Laravel5.6 + SocialiteでTwitterログインを実装する
参考にしたリンク
https://urashita.com/archives/8848
https://qiita.com/solt9029/items/a8ec1c5aef130962253c
TwitterにAPIの申請を行う
申請が通るまで2週間ぐらいかかったような気がします。早めに申請しておくのをオススメします。
アプリの説明を「これまで」ってくらいまでしたほうがいいと思います。Twiiterの何の機能を使いたいかなど書くと伝わりやすいかも?
申請が通ったら、作成するアプリの情報を設定する
「申請が通ったよ!」っていうメールが来たら、Twitterのdeveloperサイトに移動します。「Create an app」という案内があるはずなので、適宜作成します。下記のサイトを参照。
https://urashita.com/archives/8848
実装開始
socialiteの導入
artisanファイルと同じ階層で、socialiteをインストール
composerコマンドについて知りたい方はこちら
takahashiyuukinoMacBook-Pro-2% ls
app                     phpunit.xml
artisan                 public
bootstrap               readme.md
composer.json           resources
composer.lock           routes
config                  server.php
database                storage
node_modules            tests
package-lock.json       vendor
package.json            webpack.mix.js

takahashiyuukinoMacBook-Pro-2% composer require laravel/socialite

//こんな感じのやつが出てくるはず、きっと。
./composer.json has been updated
Loading composer repositories with package information
Updating dependencies (including require-dev)
Package operations: 6 installs, 0 updates, 0 removals
  - Installing guzzlehttp/promises (v1.3.1): Loading from cache
  - Installing psr/http-message (1.0.1): Loading from cache
  - Installing guzzlehttp/psr7 (1.4.2): Loading from cache
  - Installing guzzlehttp/guzzle (6.3.3): Downloading (100%)
  - Installing league/oauth1-client (1.7.0): Loading from cache
  - Installing laravel/socialite (v3.1.1): Downloading (100%)
Writing lock file
Generating optimized autoload files
> Illuminate\Foundation\ComposerScripts::postAutoloadDump
> @php artisan package:discover
Discovered Package: fideloper/proxy
Discovered Package: laravel/socialite
Discovered Package: laravel/tinker
Discovered Package: nesbot/carbon
Package manifest generated successfully.
config/app.phpにsocialiteを組み込む
composerで導入しても、ここで設定を記載しないと使えないので、要注意ですぞ。
下記の一行をconfig/app.phpに書き込む。
'providers' => [

        /*
         * Laravel Framework Service Providers...
         */
        Illuminate\Auth\AuthServiceProvider::class,
        Illuminate\Broadcasting\BroadcastServiceProvider::class,
        Illuminate\Bus\BusServiceProvider::class,
        Illuminate\Cache\CacheServiceProvider::class,
        ・・・・中略

        /*
         * Package Service Providers...
         */
        Laravel\Socialite\SocialiteServiceProvider::class,
        /*
         * Application Service Providers...
         */
        App\Providers\AppServiceProvider::class,
        App\Providers\AuthServiceProvider::class,
        // App\Providers\BroadcastServiceProvider::class,
        App\Providers\EventServiceProvider::class,
        App\Providers\RouteServiceProvider::class,

    ],
また同じファイルの「aliases」の配列に、下記を書き込む。
'aliases' => [

        'App' => Illuminate\Support\Facades\App::class,
        'Artisan' => Illuminate\Support\Facades\Artisan::class,
        'Auth' => Illuminate\Support\Facades\Auth::class,
        'Blade' => Illuminate\Support\Facades\Blade::class,
        'Broadcast' => Illuminate\Support\Facades\Broadcast::class,
        'Bus' => Illuminate\Support\Facades\Bus::class,
        'Cache' => Illuminate\Support\Facades\Cache::class,
        'Config' => Illuminate\Support\Facades\Config::class,
               ...中略
        'Redis' => Illuminate\Support\Facades\Redis::class,
        'Request' => Illuminate\Support\Facades\Request::class,
        'Response' => Illuminate\Support\Facades\Response::class,
        'Route' => Illuminate\Support\Facades\Route::class,
        'Schema' => Illuminate\Support\Facades\Schema::class,
        'Session' => Illuminate\Support\Facades\Session::class,
        'Storage' => Illuminate\Support\Facades\Storage::class,
        'URL' => Illuminate\Support\Facades\URL::class,
        'Validator' => Illuminate\Support\Facades\Validator::class,
        'View' => Illuminate\Support\Facades\View::class,
        'Socialite' => Laravel\Socialite\Facades\Socialite::class,
    ],
config/services.phpにTwitterのConsumer keyを組み込む
TwitterAPIを使用するために、service.phpでTwitterのConsumer keyを読み込む。
ただし、ここに記載するのではなく、.envに記載し、その記載内容を読み込むようにする(というかLaravelが良い感じにしてくれる)
    'mailgun' => [
        'domain' => env('MAILGUN_DOMAIN'),
        'secret' => env('MAILGUN_SECRET'),
    ],

    'ses' => [
        'key' => env('SES_KEY'),
        'secret' => env('SES_SECRET'),
        'region' => 'us-east-1',
    ],

    'sparkpost' => [
        'secret' => env('SPARKPOST_SECRET'),
    ],

    'stripe' => [
        'model' => App\User::class,
        'key' => env('STRIPE_KEY'),
        'secret' => env('STRIPE_SECRET'),
    ],

    'twitter' => [
        'client_id' => env('TWITTER_CLIENT_ID'),
        'client_secret' => env('TWITTER_CLIENT_SECRET'),
        'redirect' => env('CALLBACK_URL')
    ],
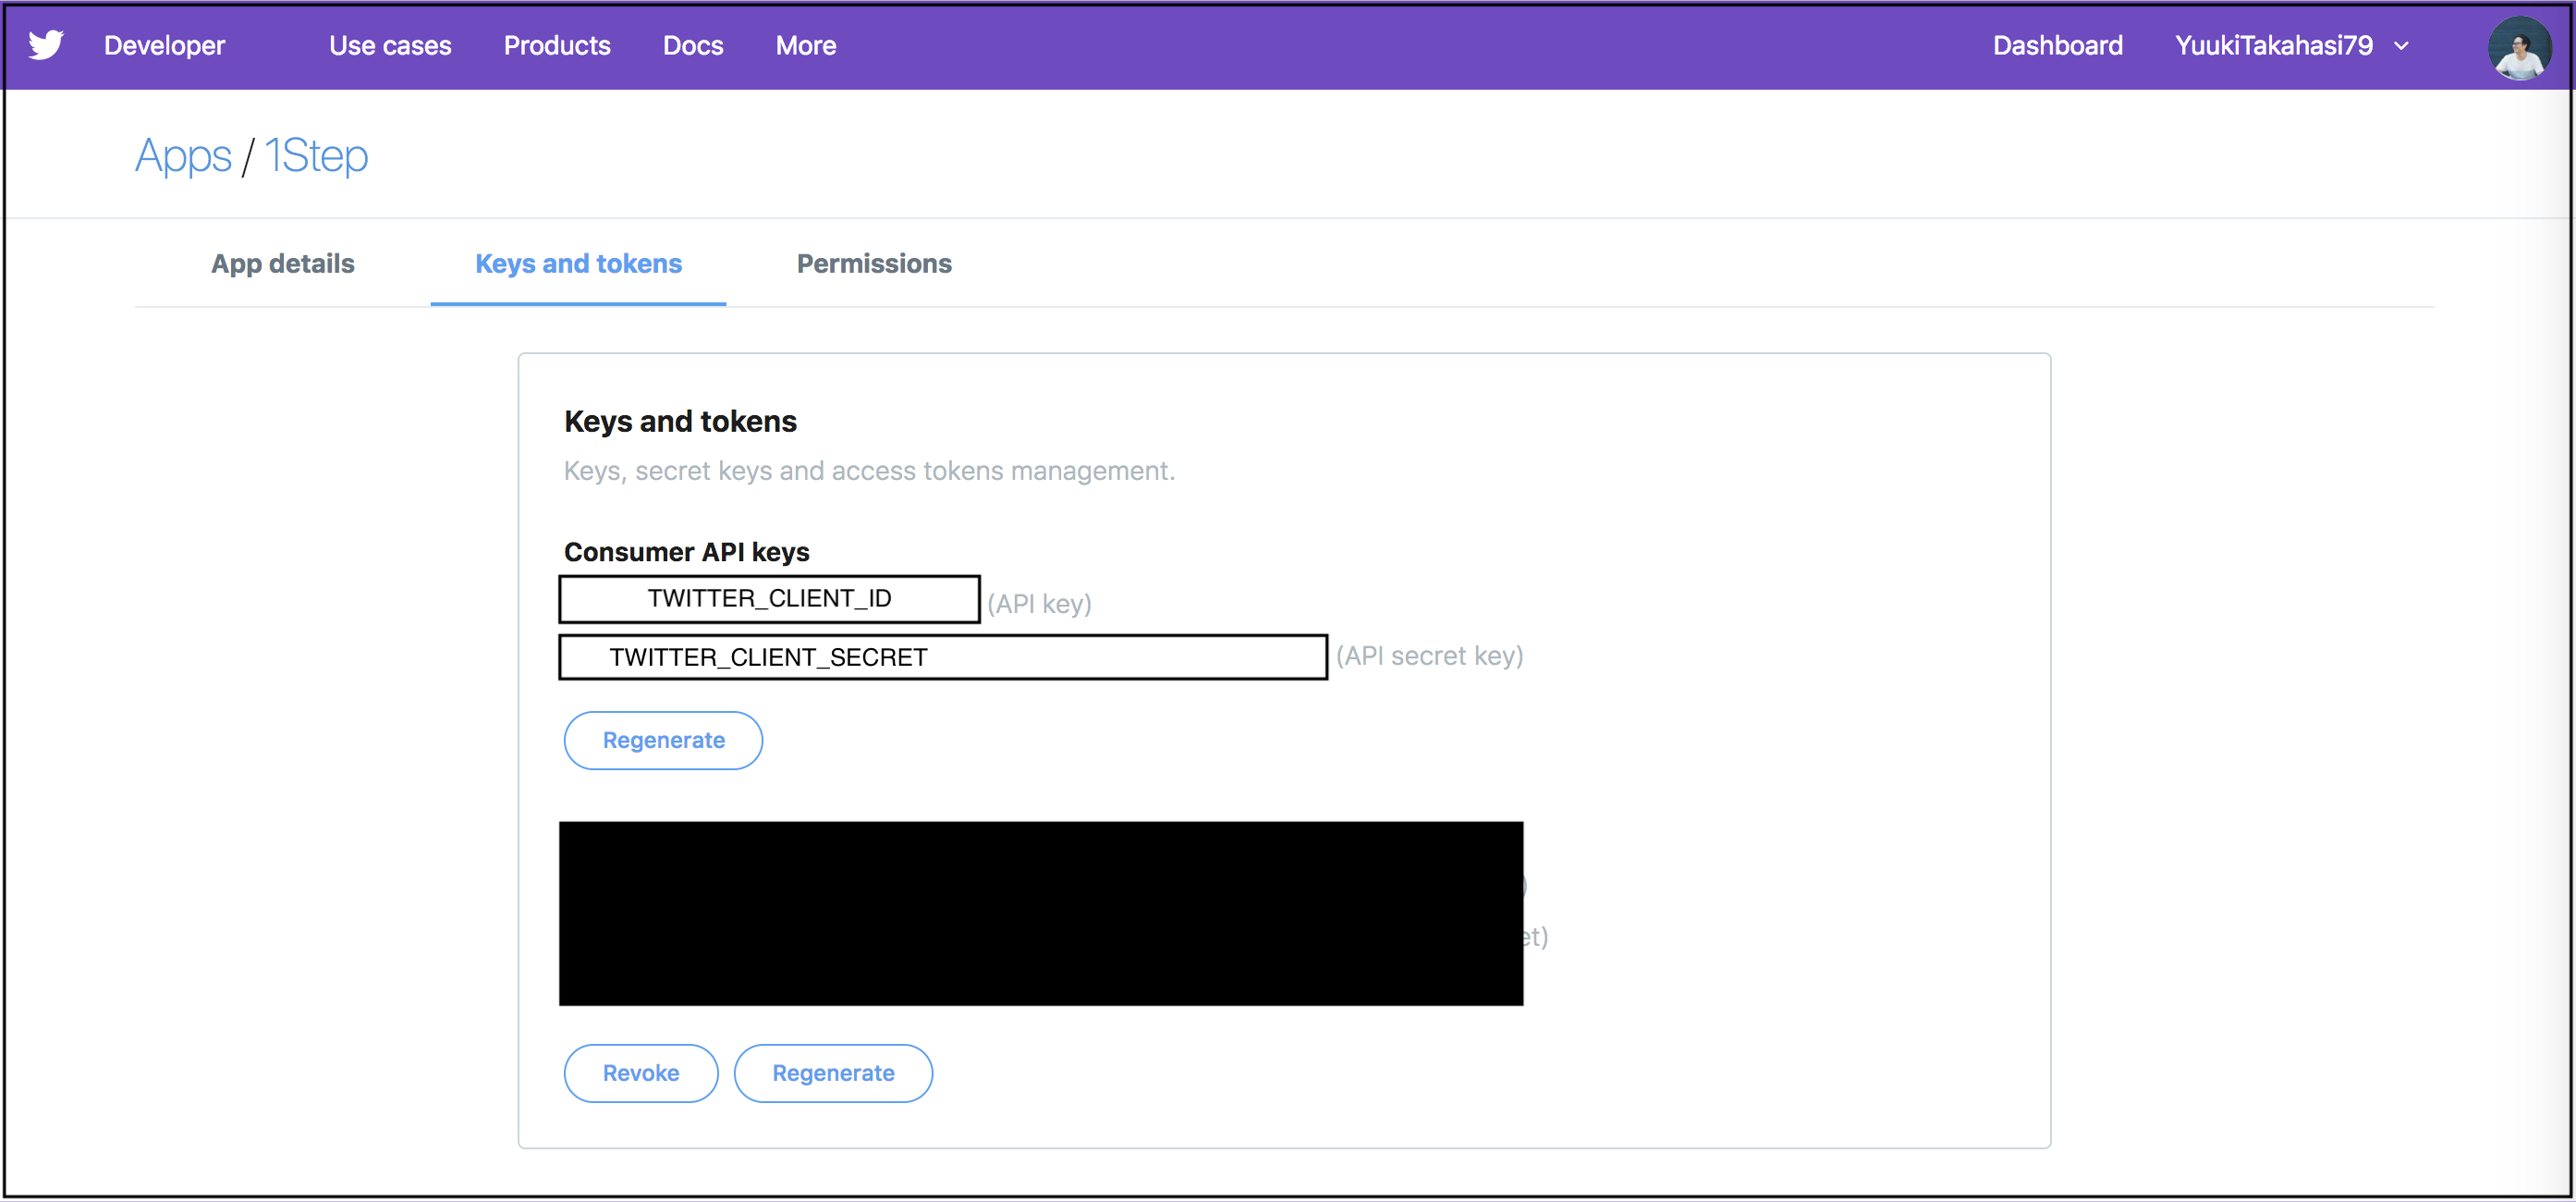
実際のConsumer keyを.envに記載する。
どこの情報を記載するかは、画像を参考にしてください!

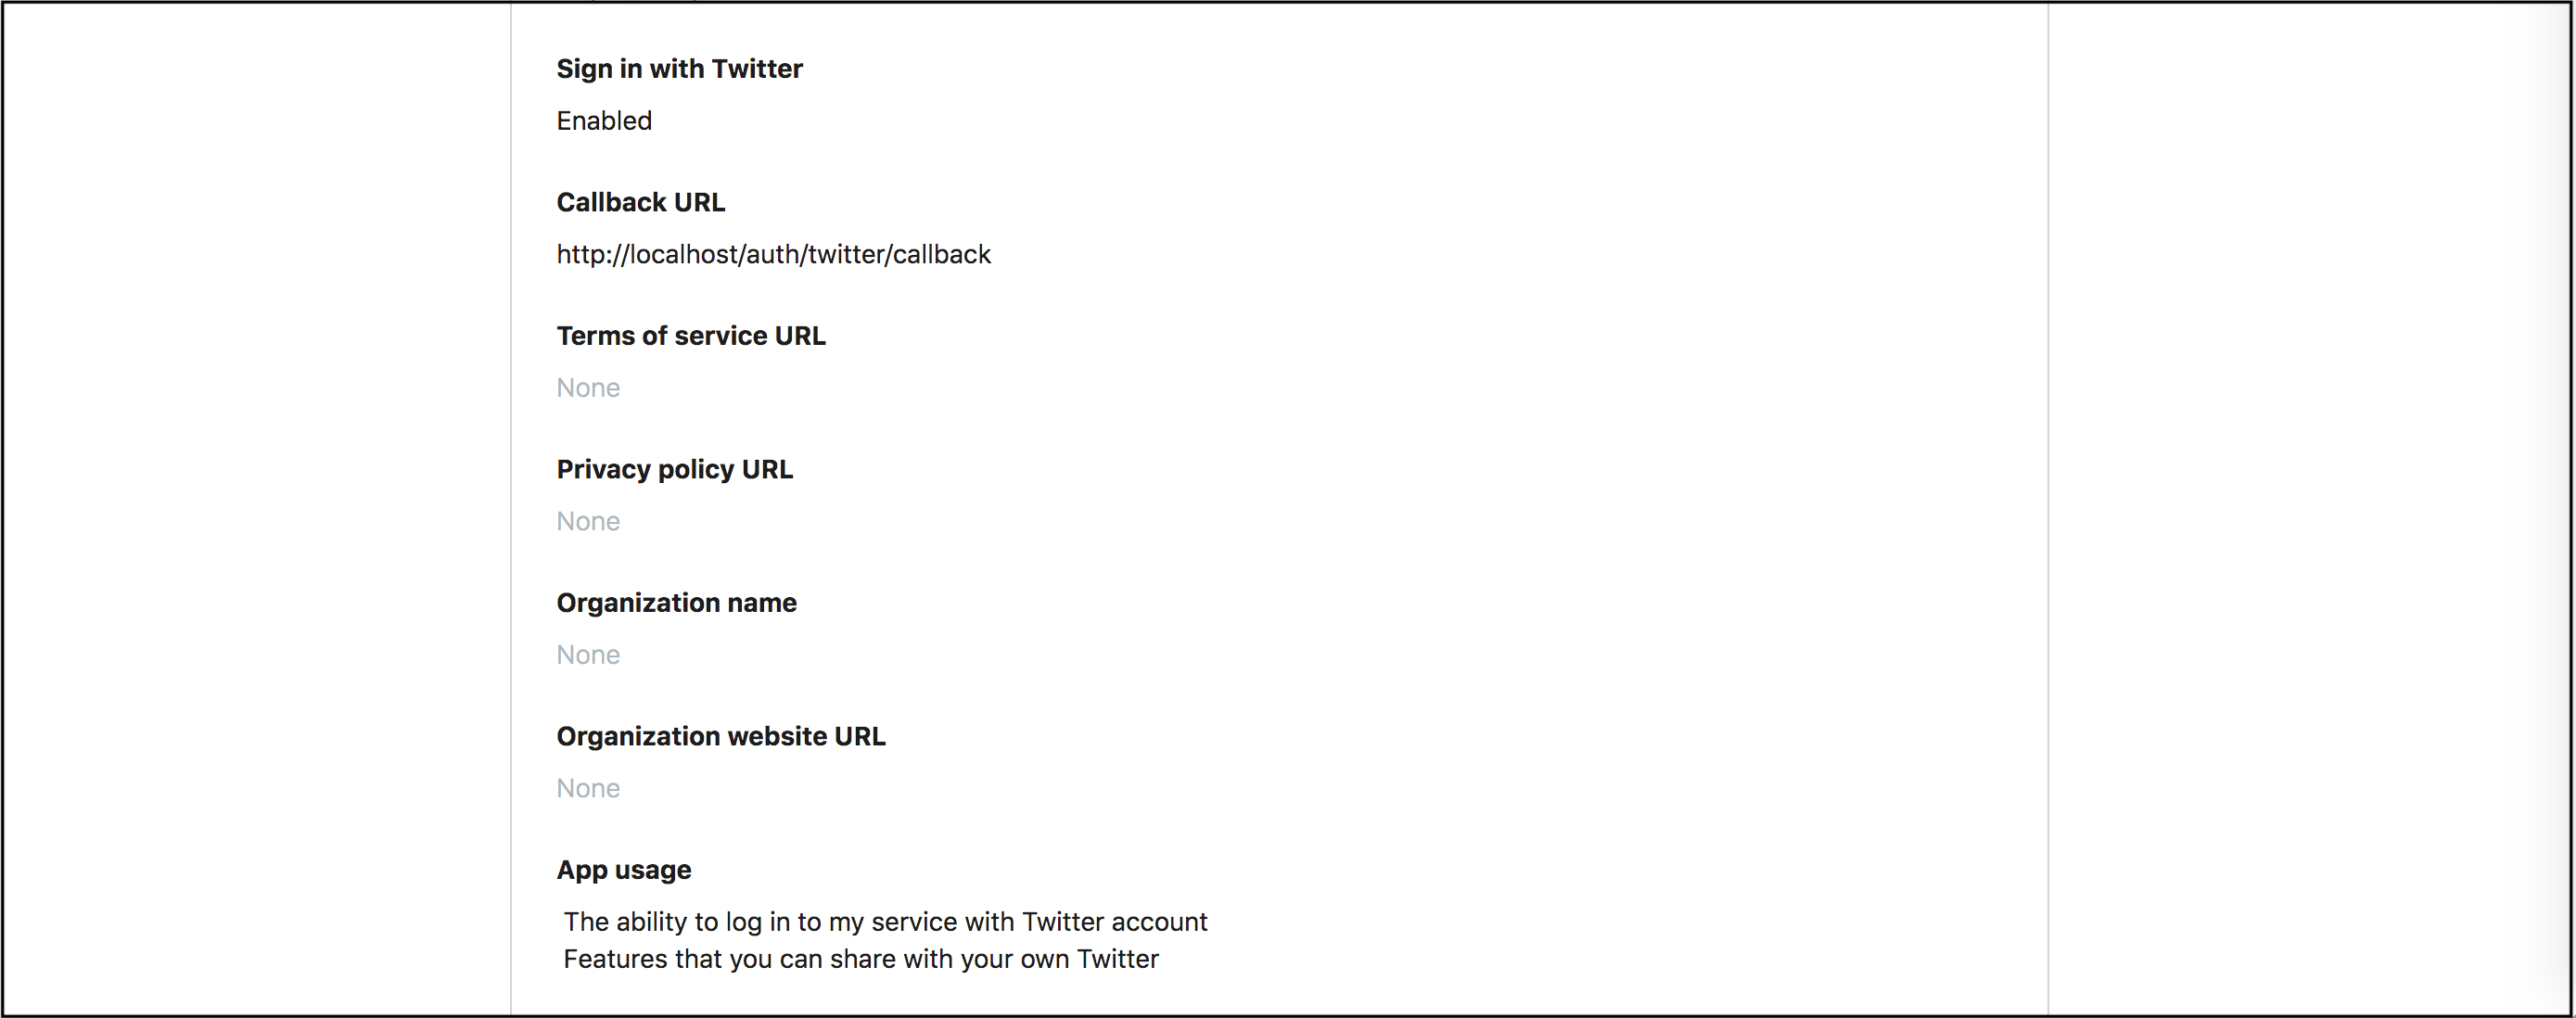
それと.envで「CALLBACK_URL」を設定したら、Twitter側でも設定が必要なので、ここでやっておきましょう。
開発の時は画像のように設定しておくと良いです!(本番環境にデプロイしたら変更が必要です!)

TWITTER_CLIENT_ID=XXXXXXXXXXXXXXXXXX
TWITTER_CLIENT_SECRET=XXXXXXXXXXXXXXXXXX
CALLBACK_URL=http://localhost/auth/twitter/callback
ルーティングを設定する
作りたいアプリによって違いが出てくると思うので、まずはTwitterログインが動くのかを確かめるを目的とします。
下記のようにルーティングを設定。
Route::get('auth/twitter', 'Auth\SocialAuthController@redirectToProvider');
Route::get('auth/twitter/callback', 'Auth\SocialAuthController@handleProviderCallback');
Route::get('auth/twitter/logout', 'Auth\SocialAuthController@logout');
認証用のコントローラーを作成する。
下記のようにコントローラーを作成する。
app.phpで設定をしておかないと、「use Socialite」が使えないはずなので、必ず設定しておいてください。
<?php
namespace App\Http\Controllers\Auth;
use App\User;
use Auth;
use Socialite;
use App\Http\Controllers\Controller;
use Illuminate\Foundation\Auth\AuthenticatesUsers;

class SocialAuthController extends Controller
{
    use AuthenticatesUsers;
    protected $redirectTo = '/home';

    /**
     * ユーザーをTwitterの認証ページにリダイレクトする
     *
     * @return Response
     */
    public function redirectToProvider()
    {
        return Socialite::driver('twitter')->redirect();
    }

    /**
     * Twitterからユーザー情報を取得する
     *
     * @return Response
     */
    public function handleProviderCallback()
    {
        try {
            $user = Socialite::driver('twitter')->user();
        } catch (Exception $e) {
            return redirect('auth/twitter');
        }

        $authUser = $this->findOrCreateUser($user);

        Auth::login($authUser, true);

        return redirect()->route('home');
    }
    private function findOrCreateUser($twitterUser)
    {
        $authUser = User::where('twitter_id', $twitterUser->id)->first();

        if ($authUser){
            return $authUser;
        }
                //この辺りは必要に応じて変更してください
        return User::create([
            'name' => $twitterUser->name,
            'handle' => $twitterUser->nickname,
            'twitter_id' => $twitterUser->id,
            'avatar' => $twitterUser->avatar_original
        ]);
    }
    public function logout()
    {
        Auth::logout();
        return redirect()->route('login');
    }
    public function __construct()
    {
        $this->middleware('guest')->except('logout');
    }
}
ちなみにUserモデルにTwitterから返って来たデータをぶち込みたい場合は、下記のように変更する必要があります。ここに気付かなくて、ハマってました。。。
<?php
namespace App;
use Illuminate\Notifications\Notifiable;
use Illuminate\Foundation\Auth\User as Authenticatable;

class User extends Authenticatable
{
    use Notifiable;

    /**
     * The attributes that are mass assignable.
     *
     * @var array
     */
    protected $fillable = [
        'name', 'email', 'password','handle','twitter_id','avatar'
    ];

    /**
     * The attributes that should be hidden for arrays.
     *
     * @var array
     */
    protected $hidden = [
        'password', 'remember_token',
    ];
}
まとめ
手順的には他の方と変わらないのですが、「Consumer key、どこから持ってくるんだよ!」と思ったので、その辺りが参考になれば幸いです。
Laravel楽しいなー