buildspec.yml
チュートリアル通りのだいたいこんなやつを使う
version: 0.2

phases:
  pre_build:
    commands:
      - echo Logging in to Amazon ECR...
      - aws --version
      - aws ecr get-login-password --region $AWS_DEFAULT_REGION | docker login --username AWS --password-stdin 012345678910.dkr.ecr.us-west-2.amazonaws.com
      - REPOSITORY_URI=012345678910.dkr.ecr.us-west-2.amazonaws.com/hello-world
      - COMMIT_HASH=$(echo $CODEBUILD_RESOLVED_SOURCE_VERSION | cut -c 1-7)
      - IMAGE_TAG=${COMMIT_HASH:=latest}
  build:
    commands:
      - echo Build started on `date`
      - echo Building the Docker image...
      - docker build -t $REPOSITORY_URI:latest .
      - docker tag $REPOSITORY_URI:latest $REPOSITORY_URI:$IMAGE_TAG
  post_build:
    commands:
      - echo Build completed on `date`
      - echo Pushing the Docker images...
      - docker push $REPOSITORY_URI:latest
      - docker push $REPOSITORY_URI:$IMAGE_TAG
      - echo Writing image definitions file...
      - printf '[{"name":"hello-world","imageUri":"%s"}]' $REPOSITORY_URI:$IMAGE_TAG > imagedefinitions.json
artifacts:
    files: imagedefinitions.json
やっている内容
- DockerfileをbuildしてECRにpushしている ( latest とコミットハッシュをリビジョンにしたものの2個 )
-
imagedefinitions.jsonをビルド内で直接作成してデプロイ用に使っている
チュートリアルの例だと生成される imagedefinitions.json は以下のようなもの
[
  {
    "name": "hello-world",
    "imageUri": "012345678910.dkr.ecr.us-west-2.amazonaws.com/hello-world:[コミットハッシュ]"
  }
]
内容は以下に詳しい
https://docs.aws.amazon.com/ja_jp/codepipeline/latest/userguide/ecs-cd-pipeline.html#cd-buildspec
要点
- AWS の CodePipeline の作成画面はかなり親切で手順に従うだけで基本的な連携は出来た。(自分の場合はGithub 2で連携させた)
- ECSのクラスタとサービスは事前に作成しておく必要がある。
-
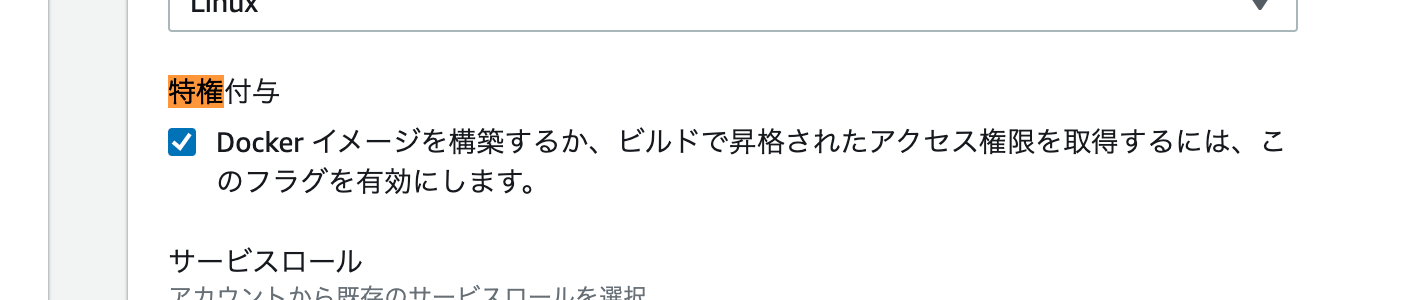
buildspec.yamlとDockerfileをGithubなどのソースレポジトリに含めておくこと。 - ビルドプロジェクトを作成する時には「特権付与」を有効にすること。そうしないと docker build などのdocker系コマンドが失敗する。 (
Docker イメージを構築するか、ビルドで昇格されたアクセス権限を取得するには、このフラグを有効にします) - この例のような
buildspec.ymlに書いてある手順は要するにコマンドの羅列に過ぎないので local でも再現できるものが多い。localでも動作確認しながら試すこと。 -
lsとかdocker pull aplpineとかいうコマンドもbuildspec.yamlに書けるのでデバッグ用に仕込んでいくのも良い。 - 実際にはチュートリアルの例を書き換えて試した。AWS ECR を使ったことがあればてきとうに
buildspec.yamlのレポジトリ名などを書き換えるのは簡単だろう。
TIPS
空のコミットをpushすると1コマンドでPipelineを回せる
git commit --allow-empty -m empty && git push
ビルド
docker build が失敗する
Cannot connect to the Docker daemon at unix:///var/run/docker.sock. Is the docker daemon running?

[Container] 2023/03/30 03:50:28 Running command docker build -t $REPOSITORY_URI:latest .
Cannot connect to the Docker daemon at unix:///var/run/docker.sock. Is the docker daemon running?

[Container] 2023/03/30 03:50:28 Command did not exit successfully docker build -t $REPOSITORY_URI:latest . exit status 1
[Container] 2023/03/30 03:50:28 Phase complete: BUILD State: FAILED
[Container] 2023/03/30 03:50:28 Phase context status code: COMMAND_EXECUTION_ERROR Message: Error while executing command: docker build -t $REPOSITORY_URI:latest .. Reason: exit status 1
Codebuildのプロジェクトに特権付与する必要がある
aws ecr get-login-password が失敗する
ビルドプロジェクトのサービスロールで EC2InstanceProfileForImageBuilderECRContainerBuilds の IAM ポリシーを許可して解決した
CodeBuild > ビルドプロジェクト > ビルドの詳細 > 環境 > サービスロール
docker rate limit 対策
buildspec.yml で docker ログインすると良いようだ
以下の例だと2回の docker login がおこなわれる
今まで知らなかったが docker login では対象サーバー単位でのログインが可能な様子
以下のひとつは docker build の時のため
もうひとつは AWS ECR への push のため
version: 0.2

phases:
  pre_build:
    commands:
      - echo Logging in to Amazon ECR...
      - aws --version
      # buildのためのログイン
      - echo "$DOCKER_HUB_PASSWORD" | docker login --username "$DOCKER_HUB_ID" --password-stdin
      - REPOSITORY_URI=xxx.dkr.ecr.ap-northeast-1.amazonaws.com/foo
      - COMMIT_HASH=$(echo $CODEBUILD_RESOLVED_SOURCE_VERSION | cut -c 1-7)
      - IMAGE_TAG=${COMMIT_HASH:=latest}
  build:
    commands:
      # 省略
  post_build:
    commands:
      # pushのためのログイン
      - $(aws ecr get-login --no-include-email --region ap-northeast-1)
      - echo Build completed on `date`
      - echo Pushing the Docker images...
      - docker push $REPOSITORY_URI:latest
      - docker push $REPOSITORY_URI:$IMAGE_TAG
      - echo Writing image definitions file...
      - printf '[{"name":"container-name","imageUri":"%s"}]' $REPOSITORY_URI:$IMAGE_TAG > imagedefinitions.json
artifacts:
    files: imagedefinitions.json
ビルドプロジェクトの環境変数に
DOCKER_HUB_ID
DOCKER_HUB_PASSWORD
のような環境変数を認証ユーザーとして実行する
CodeBuild > ビルドプロジェクト > (プロジェクト名) > 環境 を編集
dockerhubのアカウント自体は事前に作成しておくこと
ビルド時のエラー: because no identity-based policy allows the ssm:GetParameters action
サービスロールにSSMの許可ポリシーがない場合に発生
自分の場合は AmazonSSMReadOnlyAccess を設定して解決した
arn:aws:sts::842696858454:assumed-role/codebuild-ex-build-project-service-role/AWSCodeBuild-b5f8b8c5-1fc0-4794-930b-c03f3825b15f is not authorized to perform: ssm:GetParameters on resource: arn:aws:ssm:ap-northeast-1:842696858454:parameter/example@example.com because no identity-based policy allows the ssm:GetParameters action
    status code: 400, request id: e445e913-1648-47f7-ba55-1ce654f6d9a4
ビルド時のエラー: Variables Error Message: parameter does not exist:
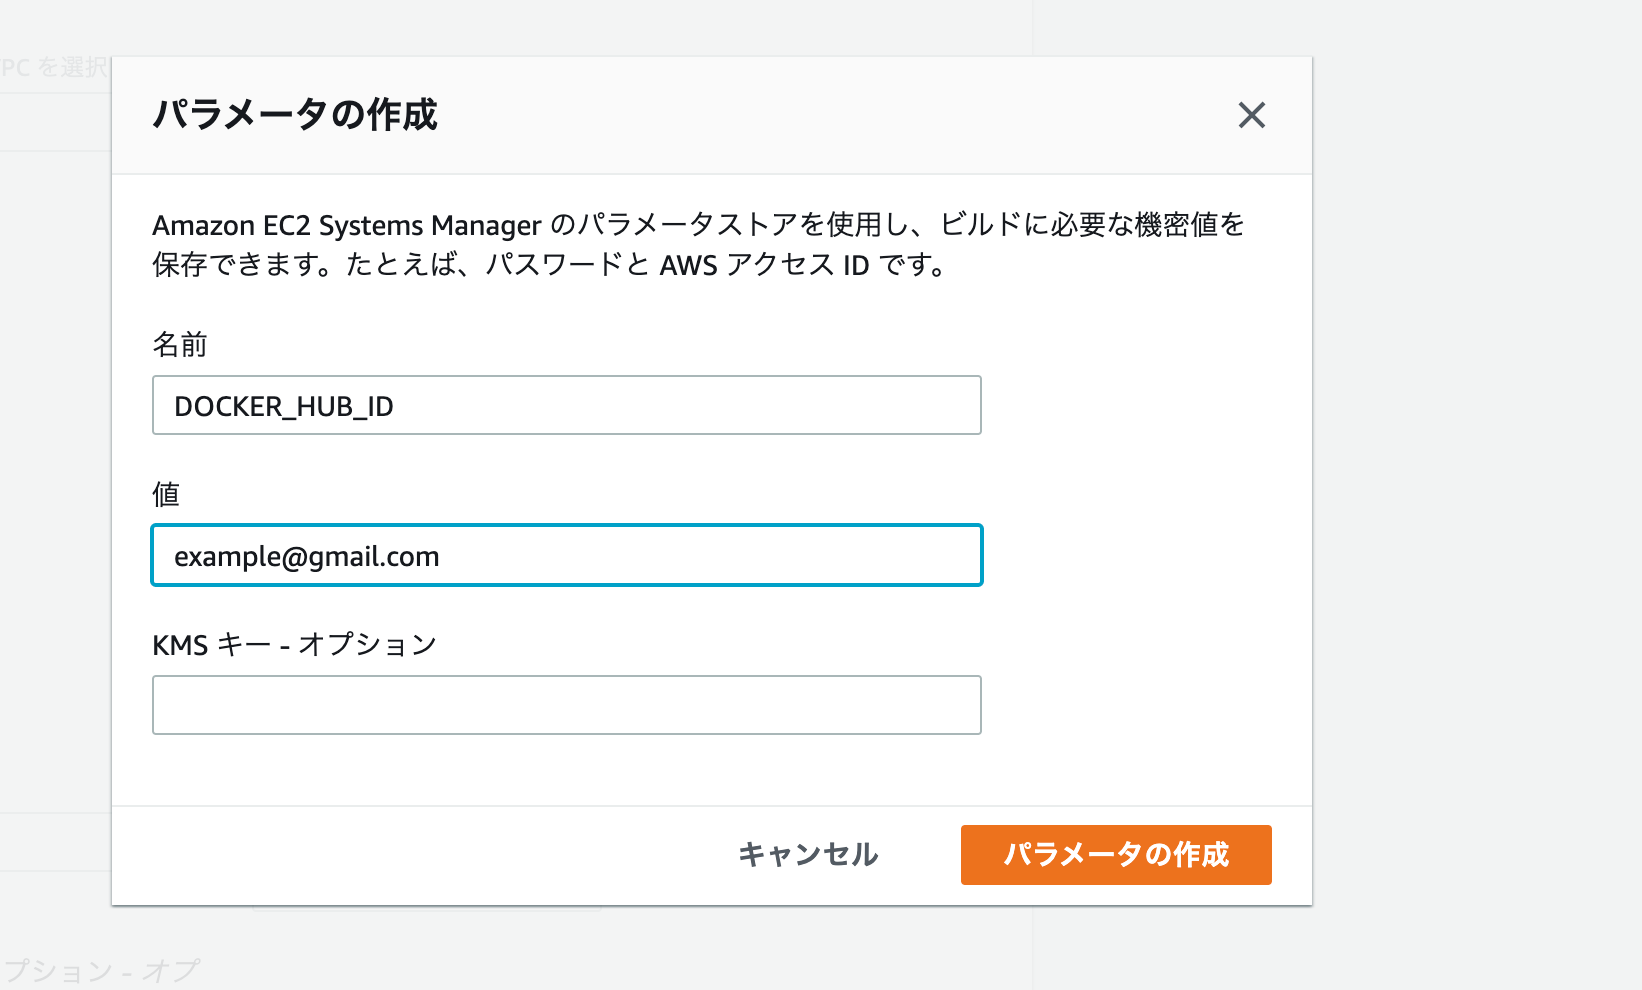
ビルドプロジェクトの環境変数でタイプを「パラメータ」にしているのに名前と値を直接入力していたのが原因だった

SSMのパラメータを使う場合は
- 「名前」がビルド内での環境変数名
- 「値」がSSMでのキー名
になるようだ。
画面内の「パラメータの作成」を使えば間違いがなかった
Phase context status code: Decrypted Variables Error Message: parameter does not exist: example@example.com
ビルドに成功した時
AWS ECSの「タスク定義」で新しいリビジョンが出来ているのが分かる
デプロイ
タスク定義のコンテナ名
The AWS ECS container ***** does not exist
imagedefinitions.json のnameにはタスク定義のコンテナ名を渡すようだ
(タスク定義そのものの名前ではなくその中のコンテナ名)
チュートリアルのyamlの例だと ECRのレポジトリ名もタスク定義のコンテナ名も hello-world なので分かりづらいが
AWS タスク定義の画面に「コンテナ」タブがあるのでそこで確認する
デプロイに成功した時
ECSでデプロイが実行されて成功するのが分かる