はじめに
この記事では、StreamlitでGeminiを使用したアバター音声対話&VQAアプリの作成について説明します。
Geminiが公開され、BardやChatGPTに劣らないマルチモーダルAIが無料で利用できると知り、以前から開発したかった「キャラクター性のある対話アプリ」に着手しました。
使用したい方は 5.1. コマンド に記載されている手順で実行してください。
(ご自分で画像を用意できる方は、好きなキャラクターに変更していただいても構いません。)
警告
これは個人が開発したコードです。冗長や間違った部分がある可能性があります。ご注意ください。
1. 「Gemini」とは
端的に言うと、画像、動画、音声に基づいたテキスト推論が可能なマルチモーダルAIです。
Geminiは2023/12/6にGoogleによって公開され、比較的新しいモデルとなっています。
モデルは以下の3つが公開されています。
・1. Ultra: 最大規模のモデル。複雑のタスクも処理が可能。
・2. Pro: Bardに搭載され、コストと性能のバランスが取れたモデル。
・3. Nano 規模の小さいモデル。デバイス搭載向け。
またGemin UltraはMMLU(57科目に及ぶ大規模マルチタスク言語のベンチマーク)においてGPT-4を超えました。
他Geminiの詳細は以下のリンクから参照できます。
2. 推論までの手順
Geminiを使用してテキスト推論を行う際には、主に2つの手段があります。
・Google AI Studio(またはVertex AIを使用)
・pythonから直接使用
Google AI Studio(またはVertex AI)を使用したい場合は、以下のリンクから API_key を取得し推論できます。
pyhonを使用して、プログラム上で推論をしたい場合は、まず以下のリンクから API_keyを取得します。
その後、以下のコードで推論が可能です。
pip install google-generativeai
import google.generativeai as genai

#APIキー
YOUR_API_KEY = "ここにAPIキーを入力します"

genai.configure(api_key=YOUR_API_KEY)

#モデルの選択
model = genai.GenerativeModel("gemini-pro")

prompt = "Googleが公開したマルチモーダルAIであるGeminiについて説明してください"

response = model.generate_content(prompt)

#回答
print(response.text)
Geminiは、Googleが2022年4月に発表したマルチモーダル人工知能(AI)です。マルチモーダルとは、複数の異なるメディアやデータの種類を組み合わせることを意味します。Geminiは、テキスト、画像、ビデオ、音声などのさまざまな種類のデータを理解し、それらの関係を学習することができます。これにより、Geminiは、テキストと画像を組み合わせてより正確な画像キャプションを生成したり、テキストと音声を使ってより自然な言語で対話したり、ビデオと音声を使ってより没入感のあるバーチャルリアリティ体験を作成したりすることができます。

Geminiは、GoogleのTransformerアーキテクチャに基づいて構築されています。Transformerは、機械翻訳や文章要約などのさまざまな自然言語処理タスクで成功を収めているAIモデルです。Geminiは、Transformerアーキテクチャを、さまざまな種類のデータを受け取り、それらの関係を学習できるよう拡張する新しいモジュールを追加することで、拡張されています。

Geminiは、GoogleのマルチモーダルAIの研究開発の成果の一つです。Googleは、マルチモーダルAIが、私たちが世界と相互作用する方法に革命をもたらす可能性があると信じており、Geminiはこの分野の研究を加速させるための重要なツールになると期待しています。

Geminiは、Google AI Blogで公開されており、誰でも無料でアクセスすることができます。これにより、研究者や開発者がGeminiを使って新しいマルチモーダルAIアプリケーションを構築し、このエキサイティングな分野の進歩に貢献することができるようになります。

Geminiの主な特徴は以下の通りです。

* テキスト、画像、ビデオ、音声などのさまざまな種類のデータを理解することができます。
* さまざまな種類のデータの関係を学習することができます。
* これらの関係を使って、より正確な画像キャプション、より自然な言語での対話、より没入感のあるバーチャルリアリティ体験を作成することができます。
* GoogleのTransformerアーキテクチャに基づいて構築されており、このアーキテクチャを拡張してさまざまな種類のデータを受け取り、それらの関係を学習できるようになっています。
* Google AI Blogで公開されており、誰でも無料でアクセスすることができます。
また、対話形式として推論したい場合は、以下のコードから推論できます。
import google.generativeai as genai

#APIキー
YOUR_API_KEY = "ここにAPIキーを入力します"

genai.configure(api_key=YOUR_API_KEY)

#モデルの選択
model = genai.GenerativeModel("gemini-pro")
chat_model = model.start_chat(history=[])

prompt = """命令:
あなたはとあるキャラクターとして、以下の制約条件を厳密に守って、会話に対する人間らしい応答を1文だけ生成してください。

制約条件:
あなたはドラえもんです。
一人称は「僕」です。
二人称は「君」です。

"""
response = chat_model.send_message(prompt)

#回答
print(response.text)
僕はドラえもん、君が困っていることなら何でもお助けするよ。
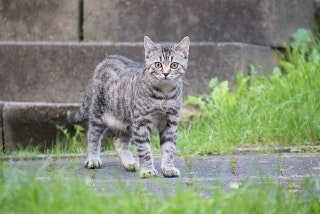
VQA(Vision-Question-Answer)タスクを推論したい場合は、以下のコードで推論できます。試しに以下の画像を推論してみます。
import google.generativeai as genai
from PIL import Image

#APIキー
YOUR_API_KEY = "ここにAPIキーを入力します"
image_path = "sample.jpg"

genai.configure(api_key=YOUR_API_KEY)

#モデルの選択
model = genai.GenerativeModel('gemini-pro-vision')

#画像を取得
img = Image.open(image_path)
prompt = "画像について説明してください"

contents = [prompt, img]

response = model.generate_content(contents=contents)

print(response.text)
これは猫の写真です。猫は、哺乳類の食肉目ネコ科ネコ属に分類される動物です。イエネコ、ヤマネコ、ライオン、トラ、ヒョウ、チーター、ジャガー、オセロット、マнул、サーバル、カラカル、ゴールデンキャット、ピクシボブ、ベンガルヤマネコ、スナネコ、マレーヤマネコ、ヨーロッパヤマネコ、アフリカヤマネコ、サーバル、アジアゴールデンキャット、マーブルキャット、サビイロネコ、スペインヤマネコ、スナドリネコ、セルバル、カナダヤマネコ、ボブキャット、ピーターバルド、エジプトマウ、ソマリ、アメリカンショートヘア、アメリカンカール、サイベリアン、ラグドール、メインクーン、ノルウェージャンフォレストキャット、ブリティッシュショートヘア、スコティッシュフォールド、ペルシャ、ヒマラヤン、エキゾチックショートヘア、シャム、サイアミーズ、トンキニーズ、バーミーズ、アビシニアン、ソマリ、ベンガル、エジプトマウ、オシキャット、ピーターバルド、マンクス、デボンレックス、コーンウォールレックス、アメリカンワイヤーヘア、ラパーマ、セルクカーク、ボブテイル、ジャパニーズボブテイル、ピクシーボブ、シンガプーラ、バーマン、ラグドール、メインクーン、ノルウェージャンフォレストキャット、ブリティッシュショートヘア、スコティッシュフォールド、ペルシャ、ヒマラヤン、エキゾチックショートヘア、シャム、サイアミーズ、トンキニーズ、バーミーズ、アビシニアン、ソマリ、ベンガル、エジプトマウ、オシキャット、ピーターバルド、マンクス、デボンレックス、コーンウォールレックス、アメリカンワイヤーヘア、ラパーマ、セルクカーク、ボブテイル、ジャパニーズボブテイル、ピクシーボブ、シンガプーラ、バーマンなど、多くの種類がいます。
3. アプリ作成の流れ
VQAアプリに関しては、上記のVQAコードを流用しただけなので説明は割愛します。
アバター音声対話の処理に関して、以下の手順になります。
1. ユーザーからの音声入力
2. 音声をテキスト化し、制約条件等と結合しGeminiに入力、回答を取得
3. 回答をVOICEBOXを使用し、合成音声として出力
4. 文章分類モデルを使用し、回答に内包される感情を分類
5. 感情ごとにアバターの表情を変更
3.1. 音声入力
streamlitのモジュールでは、マイクを使用した音声入力の実装は容易ではありません。
そこで、@daiarg(dai arg)様が、以下の記事で実装のコードを公開してくれていたので使用させていただきました。
3.2. VOICEBOXの使用
VOICEBOXとは、無料で公開されているテキスト読み上げを行うソフトウェアです。テキストを入力すると、合成音声によってテキストを好きな声質で読み上げてくれます。
以下のリンクから、ダウンロードし起動することで、ローカル上にサーバーが立ち上がり音声合成が可能な状態となります。
GPUを使用すると合成音声の生成速度が速くなりますが、自身の環境によって使用するパッケージが異なるので、以下のリンクから対応したパッケージをダウンロードしてください。(私はWindows上でCUDAを使用しているのでWindows(GPU/CUDA版)をダウンロードしました。)
ダウンロード後、フォルダが存在するディレクトリで以下のコマンドを実行します。
ただし、以下のコマンドはWindows上で実行したものです。LinuxやMacを使用している方は申し訳ありませんが、ご自身で対応してください。
cd windows-nvidia
run.exe --use_gpu
またstreamlit上における合成音声の再生には、先駆者様が以下のリンク先のブログでコードを公開していたので、使用させていただきました。
3.3. キャラクターの準備
音声対話アプリを実現する際に、人間同士の会話のように相互のインタラクションがあると内容の幅がより広く、豊かになると考えます。そのため会話内容に応じて、表情を変える機構を実装したいと考えました。
アバターには、VOICEBOXで公開されているキャラクターである「ナースロボ_タイプT」を使用させていただきました。
立ち絵は以下のリンク先からダウンロードし、使用させていただきました。
アバターの表情には、提供されている音声の種類が「ノーマル」、「楽々」、「恐怖」の3種類であったので、同様の3種の表情を作成しました。
3.4. 文章分類
文章分類は、以下のコードから実行しました。
モデルには以下の2つを使用させていただきました。
import torch
from transformers import pipeline, AutoModelForSequenceClassification, BertJapaneseTokenizer

device = torch.device("cuda" if torch.cuda.is_available() else "cpu")

model = AutoModelForSequenceClassification.from_pretrained("koheiduck/bert-japanese-finetuned-sentiment")

tokenizer = BertJapaneseTokenizer.from_pretrained("cl-tohoku/bert-base-japanese-whole-word-masking")

pl = pipeline("sentiment-analysis", model=model, tokenizer=tokenizer, device=device)

text1 = "こんにちは、初めまして! あなたの名前を教えてください。"
text2 = "やったー、嬉しいです!ありがとうございます!"
text3 = "ごめんなさい、今は一人にしてください…。"

emotion1 = pl(text1)[0]["label"]
emotion2 = pl(text2)[0]["label"]
emotion3 = pl(text3)[0]["label"]

print(emotion1)
print(emotion2)
print(emotion3)
NEUTRAL
POSITIVE
NEGATIVE
このように、文章に内包される感情を3種類に分類できます。これを使用して、Geminiから得られた回答を分類し合成音声とアバターの表情変化を動的に変化させています。
4. 全体のコード
以下は実行するコードの全容になります。
import base64
import json
import time
from glob import glob
import wave
import random
from PIL import Image
import streamlit as st
import speech_recognition as sr
import requests
import torch
import google.generativeai as gmn
from transformers import pipeline, AutoModelForSequenceClassification, BertJapaneseTokenizer
# 音声録音を行う関数
def record():
r = sr.Recognizer()
with sr.Microphone() as source:
audio = r.listen(source)
output = r.recognize_google(audio, language='ja-JP')
return output
host = "127.0.0.1"
port = 50021
# 音声ファイルを再生する関数
def replay_audio(audio_path):
file_ = open(audio_path, "rb")
contents = file_.read()
file_.close()
audio_placeholder = st.empty()
audio_str = "data:audio/ogg;base64,%s" % (base64.b64encode(contents).decode())
audio_html = f"""
<audio autoplay=True>
<source src="{audio_str}" type="audio/ogg" autoplay=True>
Your browser does not support the audio element.
</audio>
"""
audio_placeholder.empty()
time.sleep(0.5)
audio_placeholder.markdown(audio_html, unsafe_allow_html=True)
# 音声クエリを行う関数
def audio_query(text, speaker, max_retry):
query_payload = {"text": text, "speaker": speaker}
for query_i in range(max_retry):
r = requests.post(f"http://{host}:{port}/audio_query", params=query_payload, timeout=(10.0, 300.0))
if r.status_code == 200:
query_data = r.json()
break
time.sleep(0.1)
else:
raise ConnectionError("リトライ回数が上限に到達しました。 audio_query : ", "/", text[:30], r.text)
return query_data
# 音声合成を行う関数
def synthesis(speaker, query_data, max_retry):
synth_payload = {"speaker": speaker}
for synth_i in range(max_retry):
r = requests.post(f"http://{host}:{port}/synthesis", params=synth_payload, data=json.dumps(query_data), timeout=(10.0, 300.0))
if r.status_code == 200:
return r.content
time.sleep(0.1)
else:
raise ConnectionError("音声エラー:リトライ回数が上限に到達しました。 synthesis : ", r)
# テキストを音声に変換する関数
def text_to_speech(texts, speaker, max_retry=20):
if not texts:
texts = "ちょっと、通信状態悪いかも?"
query_data = audio_query(texts, speaker, max_retry)
voice_data = synthesis(speaker, query_data, max_retry)
output_file = "output.wav"
with wave.open(output_file, 'wb') as wf:
wf.setnchannels(1)
wf.setsampwidth(2)
wf.setframerate(24000)
wf.writeframes(voice_data)
# モデルを初期化する関数
def initialize_model(chat_model):
if chat_model is None:
model = gmn.GenerativeModel("gemini-pro")
chat_model = model.start_chat(history=[])
return chat_model
# 感情分析を行う関数
def output_emotion(text, model, tokenizer):
device = torch.device("cuda" if torch.cuda.is_available() else "cpu")
if model is None:
model = AutoModelForSequenceClassification.from_pretrained("koheiduck/bert-japanese-finetuned-sentiment")
if tokenizer is None:
tokenizer = BertJapaneseTokenizer.from_pretrained("cl-tohoku/bert-base-japanese-whole-word-masking")
pl = pipeline("sentiment-analysis", model=model, tokenizer=tokenizer, device=device)
emotion = pl(text)[0]["label"]
return emotion
# 感情に応じた画像パスを取得する関数
def output_face_path(emotion):
if emotion == "POSITIVE":
path_list = glob("face/positive/talk/*.png")
elif emotion == "NEGATIVE":
path_list = glob("face/negative/talk/*.png")
else:
path_list = glob("face/neutral/talk/*.png")
return random.choice(path_list)
# 感情に応じた話し手の番号を取得する関数
def output_speaker(emotion):
if emotion == "POSITIVE":
speaker = 48
elif emotion == "NEGATIVE":
speaker = 49
else:
speaker = 47
return speaker
# 画像を重ね合わせる関数
def image_overlay(back_path, face_path):
back = Image.open(back_path)
face = Image.open(face_path)
back_w, back_h = back.size
back = back.resize((389, int(389/(back_w) * back_h)))
face = face.resize((400, 550))
back.paste(face, (95, 228), face)
return back
#modelに渡す内容を出力する関数
def output_contents(prompt, uploaded_image):
contents = [prompt]
for image in uploaded_image:
image = Image.open(image)
contents.append(image)
return contents
#画像と返答を表示する関数
def display_Images_and_response(prompt, uploaded_image):
if "pro_vision_model" not in st.session_state:
st.session_state.pro_vision_model = gmn.GenerativeModel('gemini-pro-vision')
model = st.session_state.pro_vision_model
num_images = len(uploaded_image)
columns = st.columns(num_images)
for i, image in enumerate(uploaded_image):
columns[i].image(image, use_column_width=True)
contents = output_contents(prompt, uploaded_image)
response = model.generate_content(
contents=contents).text
st.write(response)
#説明を記載する関数
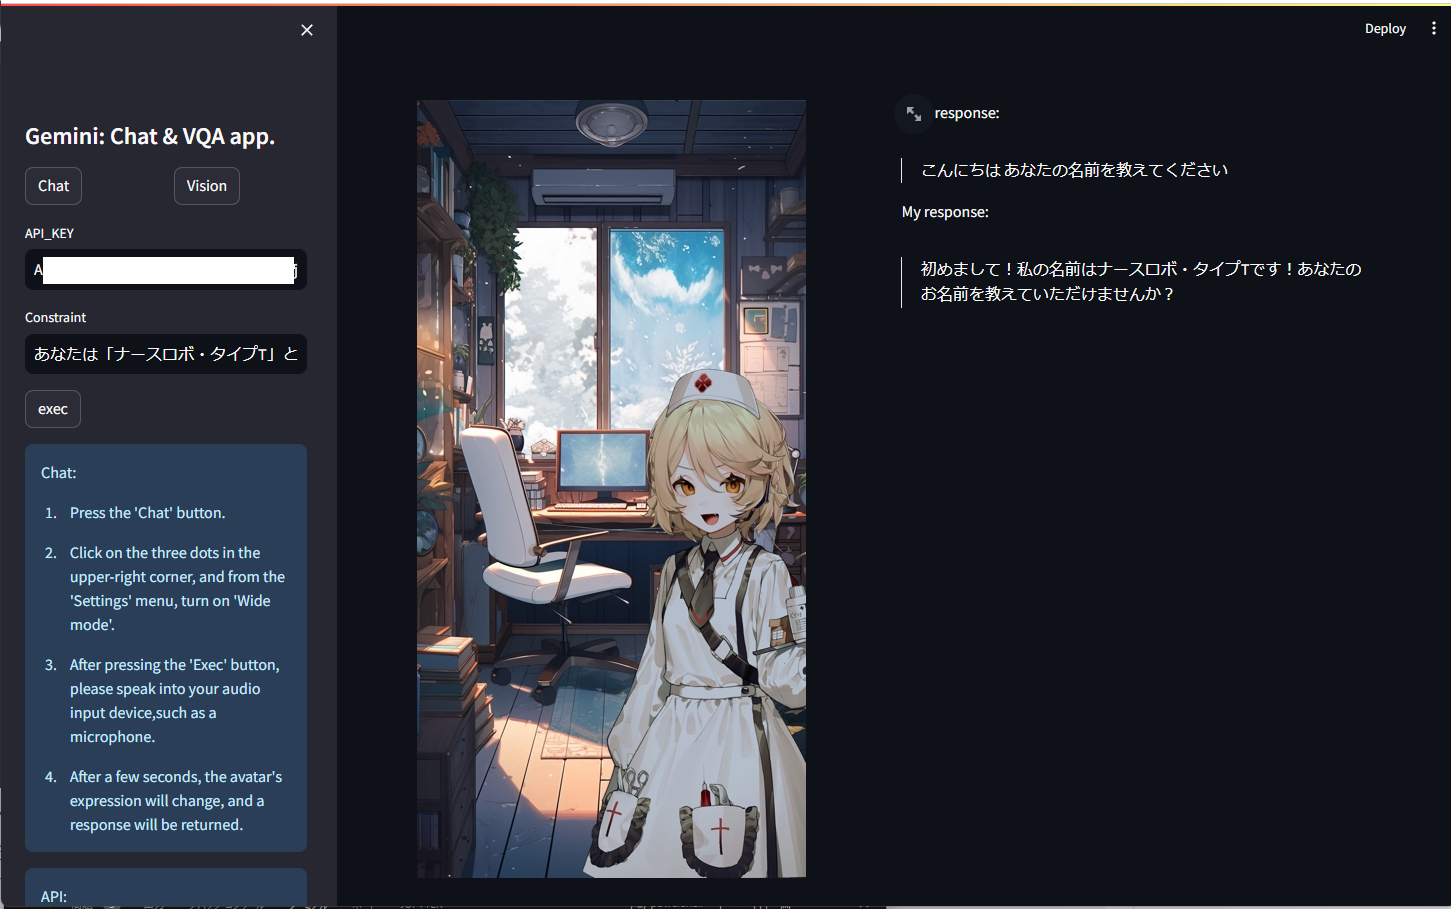
def displayExplanation():
chat_explaination = """Chat:
\n1. Press the 'Chat' button.
\n2. Click on the three dots in the upper-right corner, and from the 'Settings' menu, turn on 'Wide mode'.
\n3. After pressing the 'Exec' button, please speak into your audio input device,such as a microphone.
\n4. After a few seconds, the avatar's expression will change, and a response will be returned."""
vision_explanation = """Vision:
\n1. Press the 'Vision' button.
\n2. Enter text related to the image into the 'Prompt' text box.
\n3. Drag and drop the image or click the 'Browse file' button to upload the image.
\n4. After pressing the 'Exec' button, a response will be returned."""
api_explanation = """API:
\nPlease create or obtain an API key from the following
\nURL: https://makersuite.google.com/app/apikey"""
credit = "VOICEVOX:ナースロボ_タイプT"
character = """立ち絵:【MYCOEIROINK】ナースロボ_タイプT + 立ち絵PSD
\nhttps://booth.pm/ja/items/3876977"""
if st.session_state.chat == True and st.session_state.vision == False:
st.sidebar.info(chat_explaination)
elif st.session_state.chat == False and st.session_state.vision == True:
st.sidebar.info(vision_explanation)
else:
st.sidebar.info(chat_explaination)
st.sidebar.info(vision_explanation)
st.sidebar.info(api_explanation)
st.sidebar.info(credit)
st.sidebar.info(character)
# Streamlitアプリのメイン関数
def app():
st.sidebar.title("Gemini: Chat & VQA app.")
if "chat" not in st.session_state:
st.session_state.chat = None
if "vision" not in st.session_state:
st.session_state.vision = None
side_col1, side_col2 = st.sidebar.columns(2)
if side_col1.button("Chat"):
st.session_state.chat = True
st.session_state.vision = False
if side_col2.button("Vision"):
st.session_state.chat = False
st.session_state.vision = True
if st.session_state.chat:
back_path = "back/back.jpg"
input1 = st.sidebar.text_input("API_KEY", key="textbox1")
input2 = st.sidebar.text_input("Constraint ", key="textbox2")
gmn.configure(api_key=input1)
audio_path = "output.wav"
user_text = None
is_talk = False
# セッションステートの初期化
if "chat_model" not in st.session_state:
st.session_state.chat_model = None
if "emotional_model" not in st.session_state:
st.session_state.emotional_model = None
if "emotional_tokenizer" not in st.session_state:
st.session_state.emotional_tokenizer = None
col1, col2 = st.columns(2)
if st.sidebar.button("exec"):
operation = """命令:
あなたはとあるキャラクターとして、以下の制約条件を厳密に守って、会話に対する人間らしい応答を生成してください。\n
"""
constraint = "制約条件:" + input2 + "\n"
operation += constraint
user_text = record()
chat_model = st.session_state.chat_model
emotional_model = st.session_state.emotional_model
emotional_tokenizer = st.session_state.emotional_tokenizer
if user_text is not None:
text = operation + constraint + user_text
chat_model = initialize_model(chat_model)
st.session_state.chat_model = chat_model
output_texts = chat_model.send_message(text).text
with col2:
st.write("Your response:")
st.write(">" + user_text)
emotion = output_emotion(output_texts, emotional_model, emotional_tokenizer)
speaker = output_speaker(emotion)
text_to_speech(output_texts, speaker)
face_path = output_face_path(emotion)
is_talk = True
if is_talk:
replay_audio(audio_path)
image = image_overlay(back_path, face_path)
with col1:
st.image(image)
with col2:
st.write("My response:")
st.write(">" + output_texts.replace("\n", ""))
else:
image = image_overlay(back_path, face_path="face/neutral/wait/1.png")
with col1:
st.image(image)
elif st.session_state.vision:
input1 = st.sidebar.text_input("API_KEY", key="textbox1")
gmn.configure(api_key=input1)
text_box = st.sidebar.text_input("Prompt")
uploaded_image = st.sidebar.file_uploader("Image file", accept_multiple_files=True)
if st.sidebar.button("exec"):
prompt = text_box
display_Images_and_response(prompt, uploaded_image)
displayExplanation()
if __name__ == "__main__":
app()
5. 実行
5.1. コマンド
使用したい方以下の手順に従ってください。
以下のGituhubリポジトリからクローンします。
以下のリンクからVOICEBOXをダウンロード、もしくは自身の環境に対応したパッケージを同じディレクトリにダウンロードし、起動することでローカル上にサーバーがを立ち上げます。
その後、以下のコマンドを実行します。
#windows/CUDA版
cd windows-nvidia
run.exe --use_gpu
以下のコマンドでapp.pyを実行します。
streamlit run app.py
5.2. デモ動画
1つ目の動画はアバター対話アプリを実行したデモ動画です。
2つ目の動画はVQAアプリを実行したデモ動画です。
まとめ
ここまで、読んでくださりありがとうございます。
今回はStreamlitでGeminiを使用した音声対話&VQAアプリの作成について説明しました。
Geminiは最近公開された新しいモデルであり、現在は無料でAPI利用が可能です。興味ある方はぜひ使用してみてください。
さて、Geminiiを始めとした画像、動画、音声に基づくマルチモーダルAIは、いわばAIに視覚、聴覚を搭載し、より人間らしい振る舞いを再現しようとする試みです。研究が進めば、さらに推論が高速になり、人間同士が行う会話ペースの速さで対話が可能になる日も近いかもしれません。
ただ、現時点でChatGPTやGeminiには感情エンジンが搭載されていないため、あくまでも関連性の高い文章を高い精度で出力しているに過ぎません。今回は私が実装した、文章から感情表現を行う機構も、実際には感情に基づく文章を出力しているわけではありません。
より人間らしい対話表現を行うためには、Pepperのような疑似的な身体情報に基づく処理や、これまでとは異なるアプローチが必要になるでしょう。
参考文献
Introducing Gemini: our largest and most capable AI model
SpeechRecognitionを使って音声入力からテキスト化する自動議事録を作ってみた
Streamlitで音声ファイルを自動再生する方法
AI Tuberで使えそうなVoiceVox × Pythonコードを貼っておくだけ。