はじめに
みなさん、AI Agentフレームワーク使っていますか?
最近は様々なAI Agentが登場してきており、簡単にAgentを構築できるようになってきていますね。
AWSが公開しているStrands Agentsもその一つで、オープンソースで提供されているAI AgentのSDKです。
言語はPythonがサポートされており、すでにv1.0がGAされています。またつい先日のre:Inventにて、Typescriptのサポートがアナウンスされました。
Strands Agentsは下記のようにわずか3行でAI Agentを構築することができます。
from strands import Agent

agent = Agent()
result = agent("Strandsとはなに?")
これほど簡単に構築できるStrands Agentsですが、内部でAgentがどのように動いているのか気になりませんか?
Strands Agentsはオープンソースなので、ソースコードを読めばわかるはず。ということで、実際に設計思想がどのように実装されているのかソースコードから追ってみることにしました。
本記事ではStrands Agentのコードの解説を主に行っており、AWS上へのデプロイ方法は取り上げません。AWS上へのデプロイ方法などは大変わかりやすくまとまっているみのるんさんの記事などをご参照ください。
Strands Agentsの特徴 - モデル駆動アプローチ
Strands Agentsの特徴は、モデル駆動によってAgentが行動を選択することにあります。このアプローチを取った背景として、AWS公式のブログによると、今まで多くのエージェントフレームワークは、ステートマシンやワークフローを定義し、エラー処理コードを書く必要がありました。
しかし、こうして詳細に定義したにもかかわらず、予期せぬシナリオに遭遇するとうまく動作しないという課題があったのです。Strands Agentsはこうした問題を解決するために、LLMの推論に任せ、状況に応じて動的に行動を選択するようなアプローチを採用しています。
このアプローチを支えているのが、Agentループという仕組みです。LLMに問い合わせ、応答をみて、「ツールを使うか」、「回答するか」を推論(Reasoning)によって判断し、ツール実行後には再度LLMに問い合わせる。このループを繰り返すことによって、開発者は複雑なロジックを書かなくてもLLMが状況に応じて行動を選択してくれる設計となっています。
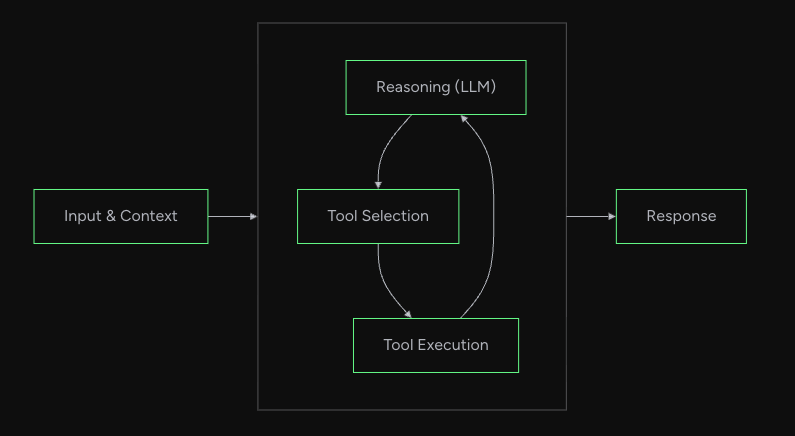
公式ドキュメント How the Loop Worksより引用
本記事ではこのAgentループの設計思想を実際のコードから追っていきたいと思います。
対象のソースコード
今回はPython版のStrands Agentsを対象とします。
- strands-agents/sdk-python
- Version: v1.19.0
本記事ではTypescript版のStrands Agents SDKの解説はいたしません。
ご興味ある方はリポジトリを参照ください。
https://github.com/strands-agents/sdk-typescript
Agentのフロー全体像
Agentの実行フローはいくつものクラスのメソッドや関数を経由します。複雑なため、まず最初にフローの全体像の図を貼っておきます。

読み進めて、現在地点がわからなくなった場合は、こちらの図に立ち返ると理解の補助になるかと思います。
Agentの初期化・呼び出し
全体像のこのあたりについてです。

Agentの初期化
今回はあくまで裏の仕組みを追っていくために、シンプルに足し算を行うエージェントを実装したときに何が起きているのかをソースコードを追いながら見ていきます。
まずはAgentの初期化を以下のように行います。
from strands import Agent
from strands.tools import tool

@tool
def add(a: int, b: int) -> int:
    return a + b

agent = Agent(tools=[add])
このとき、src/strands/agent/agent.pyで定義されたコンストラクタが呼ばれ、LLMモデル、ツール関数、コールバックなどが初期化されます。
agent()の呼び出し
次に、初期化したagent()を呼び出します。
result = agent("3と5を足して")
上記はagent.__call__("3と5を足して")と同じで、__call__メソッドを定義することでインスタンスを関数のように直接呼び出すことができます。
では__call__の中身を見てみましょう。
    # 一部抜粋
    def __call__(
        self,
        prompt: AgentInput = None,
        *,
        invocation_state: dict[str, Any] | None = None,
        structured_output_model: Type[BaseModel] | None = None,
        **kwargs: Any,
    ) -> AgentResult:
        return run_async(
            lambda: self.invoke_async(
                prompt, invocation_state=invocation_state, structured_output_model=structured_output_model, **kwargs
            )
        )
__call__の中の上記の処理では非同期関数のinvoke_asyncをrun_asyncで包んで呼び出しています。
このような実装になっている理由として、__call__は同期メソッドであり、直接非同期関数を呼び出すことができないため、アダプターとしてrun_asyncを挟み、awaitで実行しています。
run_asyncの処理詳細
run_asyncの処理は下記のとおりです。
# 一部抜粋
def run_async(async_func: Callable[[], Awaitable[T]]) -> T:
    async def execute_async() -> T:
        return await async_func()

    def execute() -> T:
        return asyncio.run(execute_async())

    with ThreadPoolExecutor() as executor:
        context = contextvars.copy_context()
        future = executor.submit(context.run, execute)
        return future.result()
上記では単にawaitで非同期関数を実行するだけではなく、ThreadPoolExecutorで別スレッドを立てることを行っています。
この理由としては、asyncio.runの公式ドキュメントにも書かれている通り同じスレッドで別のasyncioイベントループが実行中の場合には呼び出すことができないため、それを避けるためと思われます。
Agentループ処理に届くまでのステップ概要
全体像のこのあたりについてです。
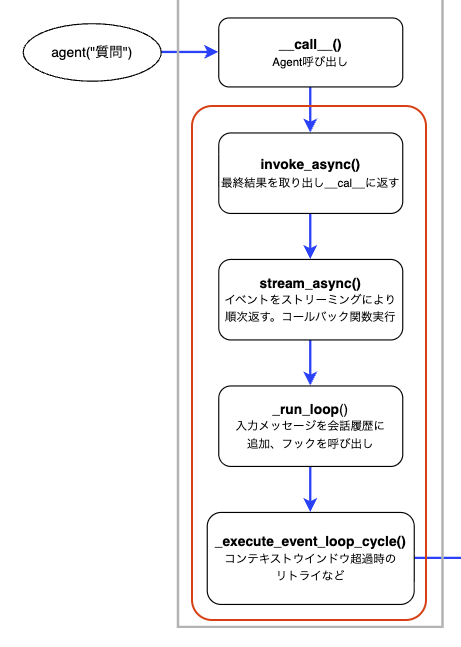
さて、invoke_asyncから先、いくつかのメソッドを経由してAgentのループ処理に到達します。
メソッドは何層もあり、説明すると細かくなりすぎてしまうので、ここでは各メソッドの概要をまとめるにとどめます。
| 呼出順序 | メソッド | ファイル | 概要 |
|---|---|---|---|
| 1 | invoke_async |
agent/agent.py |
stream_asyncを呼び出し、イベントの中から最終結果のみを返す |
| 2 | stream_async |
agent/agent.py |
イベントをストリーミングにより順次返す。コールバック関数の実行 |
| 3 | _run_loop |
agent/agent.py |
入力メッセージを会話履歴に追加、フックの呼び出しなど |
| 4 | _execute_event_loop_cycle |
agent/agent.py |
コンテキストウィンドウ超過時のリトライなど |
各メソッド・関数で実装されているストリーミング処理について
上記のメソッドを含め、イベントのやり取りはストリーミング方式になっています。
ここでいう「イベント」とは、処理の各段階で発生する通知のことです。例えば、LLMから順番に返されるトークン単位の応答や、ツール実行の完了通知、処理終了の通知などが含まれます。これらのデータがリアルタイムで各レイヤーに流されるようになっています。
これを実現しているのがyieldを使った非同期ジェネレータです。例えば、stream_asyncでは下記のように実装されています。
# 一部抜粋・簡略化
async def stream_async(self, prompt, ...):
    events = self._run_loop(messages, ...)
    async for event in events:
        yield event  # イベントを1つずつ返す
上記のように発生したイベントをasync for ... yieldによって、バケツリレーのようにつなげており、処理の途中であっても各層がイベントを受け取り、呼び出し元に返すことができます。このようにリアルタイムでイベントを即時に伝播できることによって、イベントに対してのコールバック関数処理やメッセージをリアルタイムでインターフェースに返すことなどができます。
ここまでがagent()を呼び出してからAgentループに届くまでの流れです。
Agentループ処理
この部分についてです。
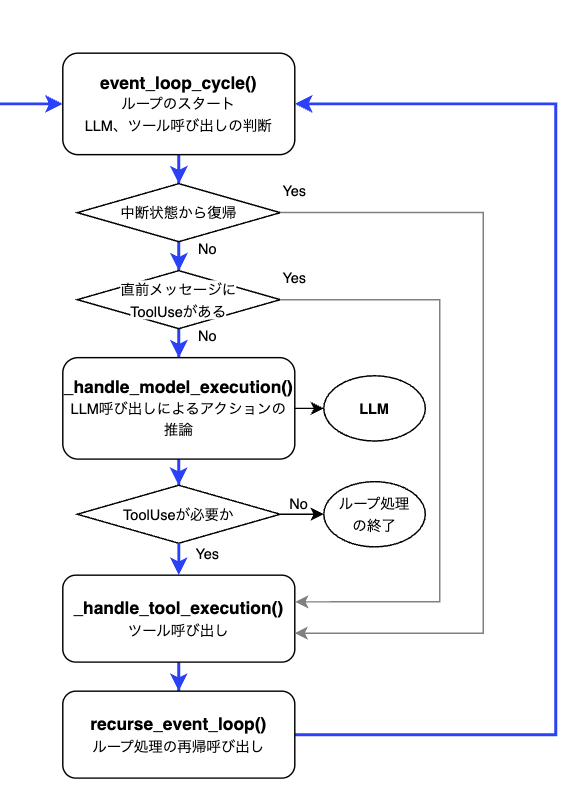
ここからがStrandsのAgentループを実現する核心部分です。_execute_event_loop_cycleはevent_loop_cycle関数を呼び出しており、この関数が、LLMに問い合わせる → 応答を見て分岐する → 必要ならツールを実行、というループ処理を実現しています。
順番に処理を見ていきましょう。
LLMを呼び出すかどうかの判断
event_loop_cycleのコードを読み進めていくと、分岐処理があります。
ここではAgentの状態に応じて、ツールコールを行うか、モデルを呼び出すかの判断を行っています。
# 一部抜粋・簡略化
async def event_loop_cycle(
    agent: "Agent",
    invocation_state: dict[str, Any],
    structured_output_context: StructuredOutputContext | None = None,
) -> AsyncGenerator[TypedEvent, None]:

# ...

if agent._interrupt_state.activated:
    stop_reason: StopReason = "tool_use"
    message = agent._interrupt_state.context["tool_use_message"]
elif _has_tool_use_in_latest_message(agent.messages):
    stop_reason = "tool_use"
    message = agent.messages[-1]
else:
    model_events = _handle_model_execution(
        agent, cycle_span, cycle_trace, invocation_state, tracer, structured_output_context
    )
    async for model_event in model_events:
        if not isinstance(model_event, ModelStopReason):
            yield model_event

    stop_reason, message, *_ = model_event["stop"]
    yield ModelMessageEvent(message=message)
最初の分岐(if agent._interrupt_state.activated:)は人の承認を待っていた中断状態から再開する場合です。次の分岐(elif _has_tool_use_in_latest_message(...):)はAgentに保存されている直前のメッセージにtoolUseが含まれている場合です。これら2つの場合はどちらもLLMは呼ばず、直接ツール実行に進みます。
上記以外の場合(else)は、_handle_model_executionでLLM呼び出しを行い、新しい応答を取得します。
LLMに問い合わせると、例えば、下記のような応答が返ってきます。
# ツール呼び出しが必要と判断した場合
{'stop': ('tool_use', {'role': 'assistant', 'content': [{'text': '3と5を足し算します。'}, {'toolUse': {'toolUseId': 'tooluse_xxxxxx', 'name': 'add', 'input': {'a': 3, 'b': 5}}}]}, {'inputTokens': 680, 'outputTokens': 79, 'totalTokens': 759}, {'latencyMs': 1299, 'timeToFirstByteMs': 969})}

# 通常応答の場合(ツール呼び出しなし)
{'stop': ('end_turn', {'role': 'assistant', 'content': [{'text': '3と5を足した結果は8です。'}]}, {'inputTokens': 772, 'outputTokens': 15, 'totalTokens': 787}, {'latencyMs': 814, 'timeToFirstByteMs': 708})}
この応答に含まれるstopの値によって次になにをするかが決まります。
(stopの値はstop_reason変数に格納され、実際の分岐処理はstop_reasonが使用されます)
stopの値 |
アクション |
|---|---|
tool_use |
ツールを実行する |
end_turn |
処理終了、結果を返す |
max_tokens |
トークン上限に達したため、例外を投げて終了する |
ツールの実行
stop(stop_reason)がtool_useの場合、ツール実行のために_handle_tool_execution関数が呼ばれます。
この関数の中でagent.tool_executor._execute()が実行されます。
# 一部抜粋・簡略化
async def _handle_tool_execution(stop_reason: StopReason, message: Message, agent: "Agent", ...
) -> AsyncGenerator[TypedEvent, None]:

# ...

tool_events = agent.tool_executor._execute(
    agent, tool_uses, tool_results, ...
)
tool_executorはAgentを初期化する際に指定することができ、デフォルトだとConcurrentToolExecutorが選択され、複数のツールを並列に実行します。
ConcurrentToolExecutor以外だと、直列でツールを実行するSequentialToolExecutorが選択できます。
ConcurrentToolExecutorの場合の_executeメソッド内で下記のようにツールが実行されます。
# 一部抜粋・簡略化
@override
async def _execute(self, agent: "Agent", tool_uses: list[ToolUse], ... ) -> AsyncGenerator[TypedEvent, None]:
    # ...
    # ツール実行タスクの作成
    tasks = [
        asyncio.create_task(self._task(agent, tool_use, ...))
        for task_id, tool_use in enumerate(tool_uses)
    ]

    # ...

async def _task(self, agent: "Agent", tool_use: ToolUse, ...) -> None:
    try:
        # ツール実行
        events = ToolExecutor._stream_with_trace(
            agent, tool_use, tool_results, cycle_trace, cycle_span, invocation_state, structured_output_context
        )
    # ...
ConcurrentToolExecutorの詳細
ツールの呼び出しはasyncio.create_taskで作成され、_taskメソッドの中で実行されます。
具体的には以下のように各ツールをタスクとして並列起動しています。例えば、2つのツールを並列実行する場合、以下のように2つのタスクが作られます。
create_task(_task(add, task_id=0))
create_task(_task(multiply, task_id=1))
作成されたタスクの処理の流れは下記のとおりです。
- ツールを実行してイベントを取得
- イベントを
task_queueに格納し、処理を一時停止 -
_executeメソッド側でイベントを取り出し、task_events[task_id].set()で再開を通知 - 全タスクが
stop_eventを送信したら終了
# 一部抜粋・簡略化
@override
async def _execute(self, agent: "Agent", tool_uses: list[ToolUse], ... ) -> AsyncGenerator[TypedEvent, None]:
    # ...
    # ツール実行タスクの作成
    tasks = [
        asyncio.create_task(self._task(agent, tool_use, ...))
        for task_id, tool_use in enumerate(tool_uses)
    ]
    task_count = len(tasks)
    while task_count:
        # 3.イベントを取り出し
        task_id, event = await task_queue.get()
        # 4. タスクが`stop_event`を送信したら終了
        if event is stop_event:
            task_count -= 1
            continue

        yield event
        # 3.タスクの再開を通知
        task_events[task_id].set()

async def _task(self, agent: "Agent", tool_use: ToolUse, ...) -> None:
    try:
        # 1. ツールを実行してイベントを取得
        events = ToolExecutor._stream_with_trace(
            agent, tool_use, tool_results, cycle_trace, cycle_span, invocation_state, structured_output_context
        )
        async for event in events:
            # 2. イベントを`task_queue`に格納し、処理を一時停止
            task_queue.put_nowait((task_id, event))
            await task_event.wait()
            task_event.clear()

    finally:
        task_queue.put_nowait((task_id, stop_event))
    # ...
ツール実行後の再帰処理
ツールを実行後の処理を見てみましょう。_handle_tool_execution上でagent.tool_executor._execute()を呼び出した後、ツールの結果をメッセージに格納し、最後にrecurse_event_loopを呼び出しています。
# 一部抜粋・簡略化
tool_result_message: Message = {
    "role": "user",
    "content": [{"toolResult": result} for result in tool_results],
}

agent.messages.append(tool_result_message)

# ...

events = recurse_event_loop(
    agent=agent, invocation_state=invocation_state, structured_output_context=structured_output_context
)
async for event in events:
    yield event
recurse_event_loop内の処理を見てみるとevent_loop_cycleを再度呼び出しています。
    events = event_loop_cycle(
        agent=agent, invocation_state=invocation_state, structured_output_context=structured_output_context
    )
    async for event in events:
        yield event
つまり、ツールの実行結果をもとにAgentループの先頭に戻っており、LLMはツールの結果を受け取ったうえで、次のアクションを決定します。
このループはLLMがstop(stop_reason)として、end_turnなどtool_use以外を返すまで繰り返されます。
今回例としてあげたようなシンプルなタスクならツールを一回呼んで結果を得たら終了ですが、複雑なタスクなら何度もツールを呼び、LLMが結果を確認して次のアクションを推論するループを回すようになっています。
さいごに
実際のコードを追ってみることでStrands Agentsの特徴であるモデル駆動アプローチがどのように設計、実装されているのかを解説してみました。こうしてコードを追ってみることはIssueが発生したときのデバッグにもつながりますし、Agentを作る際の設計の参考にもなると思いますので、時間があるときには普段使用しているAgentフレームワークなどのコードをじっくり読んでみるのはいかがでしょうか。