Genuino 101のBluetoothと連携させたサンプルスケッチのCurieBLEにあるLチカとsakura.ioを組み合わせました。
ここではGenuino 101 × sakura.io ArduinoシールドのLEDをスマホアプリでON/OFFさせ、LEDのステートをsakura.ioで送っています。
前回の投稿「sakura.ioをGenuino 101ではじめた(Lチカ~sakura.io接続テスト)」の環境が構築されていることを前提に行っていきましょう。
参考にしたページ
- Arduino/Genuino 101 CurieBLE LED
- Wire Library
- Sakura Communication Module for sakura.io Library for Arduino
- さくらの通信モジュール データシート -β版
手順
Bluetoothを使ったLチカのテンプレートを開く
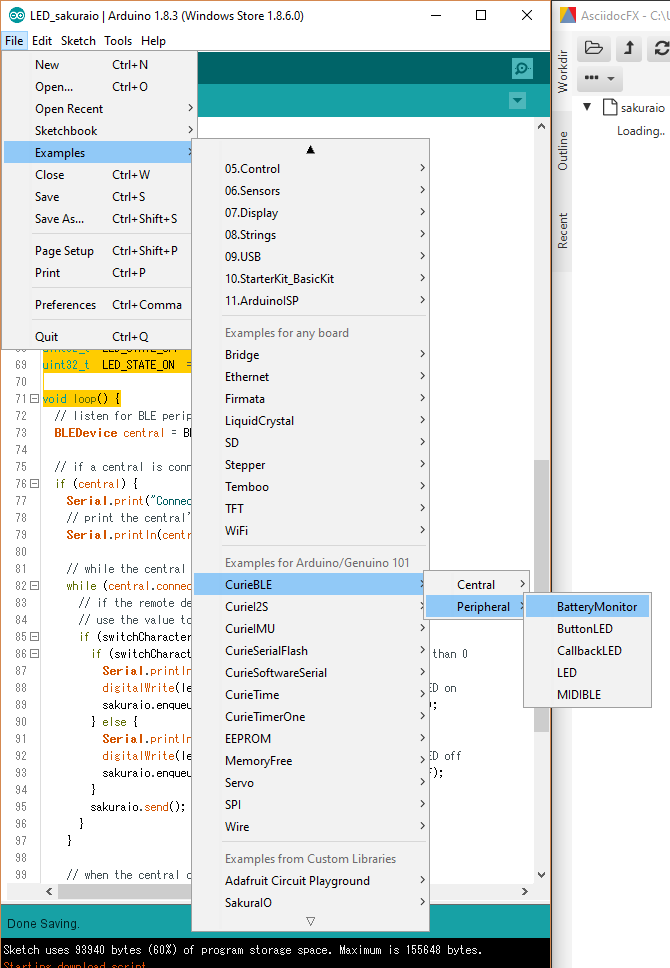
File→Examples→CurieBLE→Peripheral→LED を開く。
必要なライブラリの追加
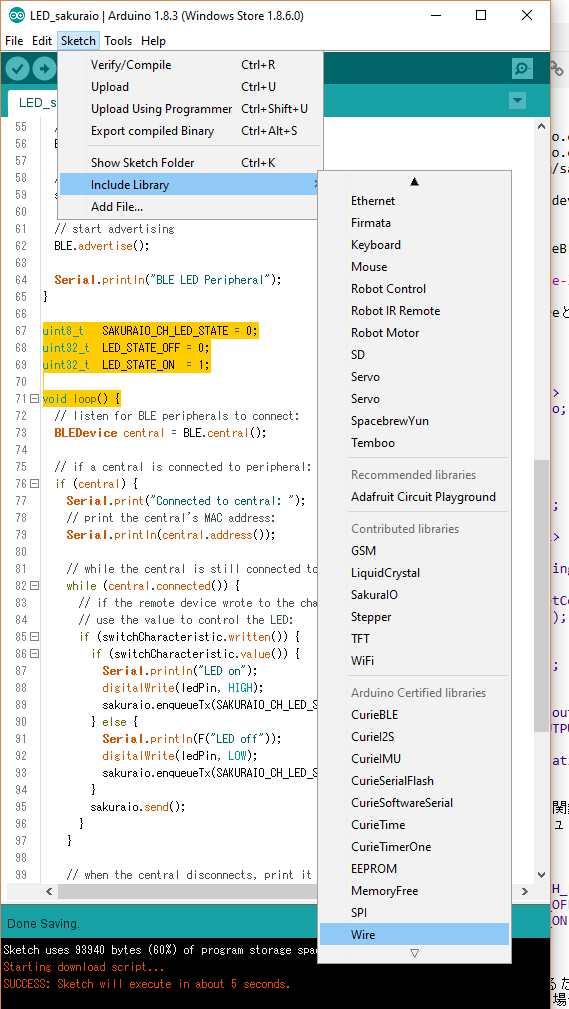
Sketch→Include Library→Wire と Sketch→Include Library→SakuraIO でライブラリ追加して、SakuraIO_I2Cをsakuraioとして読み込む。
# include <Wire.h>
# include <SakuraIO.h>
SakuraIO_I2C sakuraio;
sakura.io I2C接続と接続の待受け処理を追加
void setup() {
  Serial.begin(9600);

  Wire.begin(); //<1>

  Serial.print("Waiting to come online"); //<2>
  for(;;){
    if( (sakuraio.getConnectionStatus() & 0x80) == 0x80 ) break;
    Serial.print(".");
    delay(1000);
  }
  Serial.println("");
}

  // set LED pin to output mode
  pinMode(ledPin, OUTPUT);

  // begin initialization
  BLE.begin();
<1> Serial.begin()関数でシリアル通信を開始した後、Wire.begin()関数でI2C通信を開始
<2> さくらの通信モジュールの接続ステータスが接続になるまで待受け
LEDステート値の送信
loop()関数の手前に追加
uint8_t   SAKURAIO_CH_LED_STATE = 0; //<1>
uint32_t  LED_STATE_OFF = 0; //<2>
uint32_t  LED_STATE_ON  = 1; //<3>

void loop() {
<1> LED状態を確認するためのチャンネルとしてsakura.ioのChannel 0を定数に登録
<2> LEDの状態がOFFの場合
<3> LEDの状態がONの場合
if (switchCharacteristic.written()) {
    if (switchCharacteristic.value()) {   // any value other than 0
      Serial.println("LED on");
      digitalWrite(ledPin, HIGH);         // will turn the LED on
      sakuraio.enqueueTx(SAKURAIO_CH_LED_STATE, LED_STATE_ON); //<1>
    } else {                              // a 0 value
      Serial.println(F("LED off"));
      digitalWrite(ledPin, LOW);          // will turn the LED off
      sakuraio.enqueueTx(SAKURAIO_CH_LED_STATE, LED_STATE_OFF); //<1>
    }
    sakuraio.send(); //<2>
}
<1> LEDの状態が変化したとき、さくらの通信モジュールの送信キューにステートの値を溜める
<2> sakura.ioプラットフォームにデータを送信
プログラム完成
Arduino IDEで書き込みましょう。
/*
 * Copyright (c) 2016 Intel Corporation.  All rights reserved.
 * See the bottom of this file for the license terms.
 */

/*
 * Sketch: led.ino
 *
 * Description:
 *   This is a Peripheral sketch that works with a connected Central.
 *   It allows the Central to write a value and set/reset the led
 *   accordingly.
 */

# include <Wire.h>
# include <SakuraIO.h>
SakuraIO_I2C sakuraio;

# include <CurieBLE.h>

BLEService ledService("19B10000-E8F2-537E-4F6C-D104768A1214"); // BLE LED Service

// BLE LED Switch Characteristic - custom 128-bit UUID, read and writable by central
BLEUnsignedCharCharacteristic switchCharacteristic("19B10001-E8F2-537E-4F6C-D104768A1214", BLERead | BLEWrite);

const int ledPin = 13; // pin to use for the LED

void setup() {
  Serial.begin(9600);

  Wire.begin();

  Serial.print("Waiting to come online");
  for(;;){
    if( (sakuraio.getConnectionStatus() & 0x80) == 0x80 ) break;
    Serial.print(".");
    delay(1000);
  }
  Serial.println("");
}

  // set LED pin to output mode
  pinMode(ledPin, OUTPUT);

  // begin initialization
  BLE.begin();

  // set advertised local name and service UUID:
  BLE.setLocalName("LED");
  BLE.setAdvertisedService(ledService);

  // add the characteristic to the service
  ledService.addCharacteristic(switchCharacteristic);

  // add service
  BLE.addService(ledService);

  // set the initial value for the characeristic:
  switchCharacteristic.setValue(0);

  // start advertising
  BLE.advertise();

  Serial.println("BLE LED Peripheral");
}

uint8_t   SAKURAIO_CH_LED_STATE = 0;
uint32_t  LED_STATE_OFF = 0;
uint32_t  LED_STATE_ON  = 1;

void loop() {
  // listen for BLE peripherals to connect:
  BLEDevice central = BLE.central();

  // if a central is connected to peripheral:
  if (central) {
    Serial.print("Connected to central: ");
    // print the central's MAC address:
    Serial.println(central.address());

    // while the central is still connected to peripheral:
    while (central.connected()) {
      // if the remote device wrote to the characteristic,
      // use the value to control the LED:
      if (switchCharacteristic.written()) {
        if (switchCharacteristic.value()) {   // any value other than 0
          Serial.println("LED on");
          digitalWrite(ledPin, HIGH);         // will turn the LED on
          sakuraio.enqueueTx(SAKURAIO_CH_LED_STATE, LED_STATE_ON);
        } else {                              // a 0 value
          Serial.println(F("LED off"));
          digitalWrite(ledPin, LOW);          // will turn the LED off
          sakuraio.enqueueTx(SAKURAIO_CH_LED_STATE, LED_STATE_OFF);
        }
        sakuraio.send();
      }
    }

    // when the central disconnects, print it out:
    Serial.print(F("Disconnected from central: "));
    Serial.println(central.address());
  }
}

/*
   Copyright (c) 2016 Intel Corporation.  All rights reserved.

   This library is free software; you can redistribute it and/or
   modify it under the terms of the GNU Lesser General Public
   License as published by the Free Software Foundation; either
   version 2.1 of the License, or (at your option) any later version.

   This library is distributed in the hope that it will be useful,
   but WITHOUT ANY WARRANTY; without even the implied warranty of
   MERCHANTABILITY or FITNESS FOR A PARTICULAR PURPOSE.  See the GNU
   Lesser General Public License for more details.

   You should have received a copy of the GNU Lesser General Public
   License along with this library; if not, write to the Free Software
   Foundation, Inc., 51 Franklin Street, Fifth Floor, Boston, MA  02110-1301  USA
*/
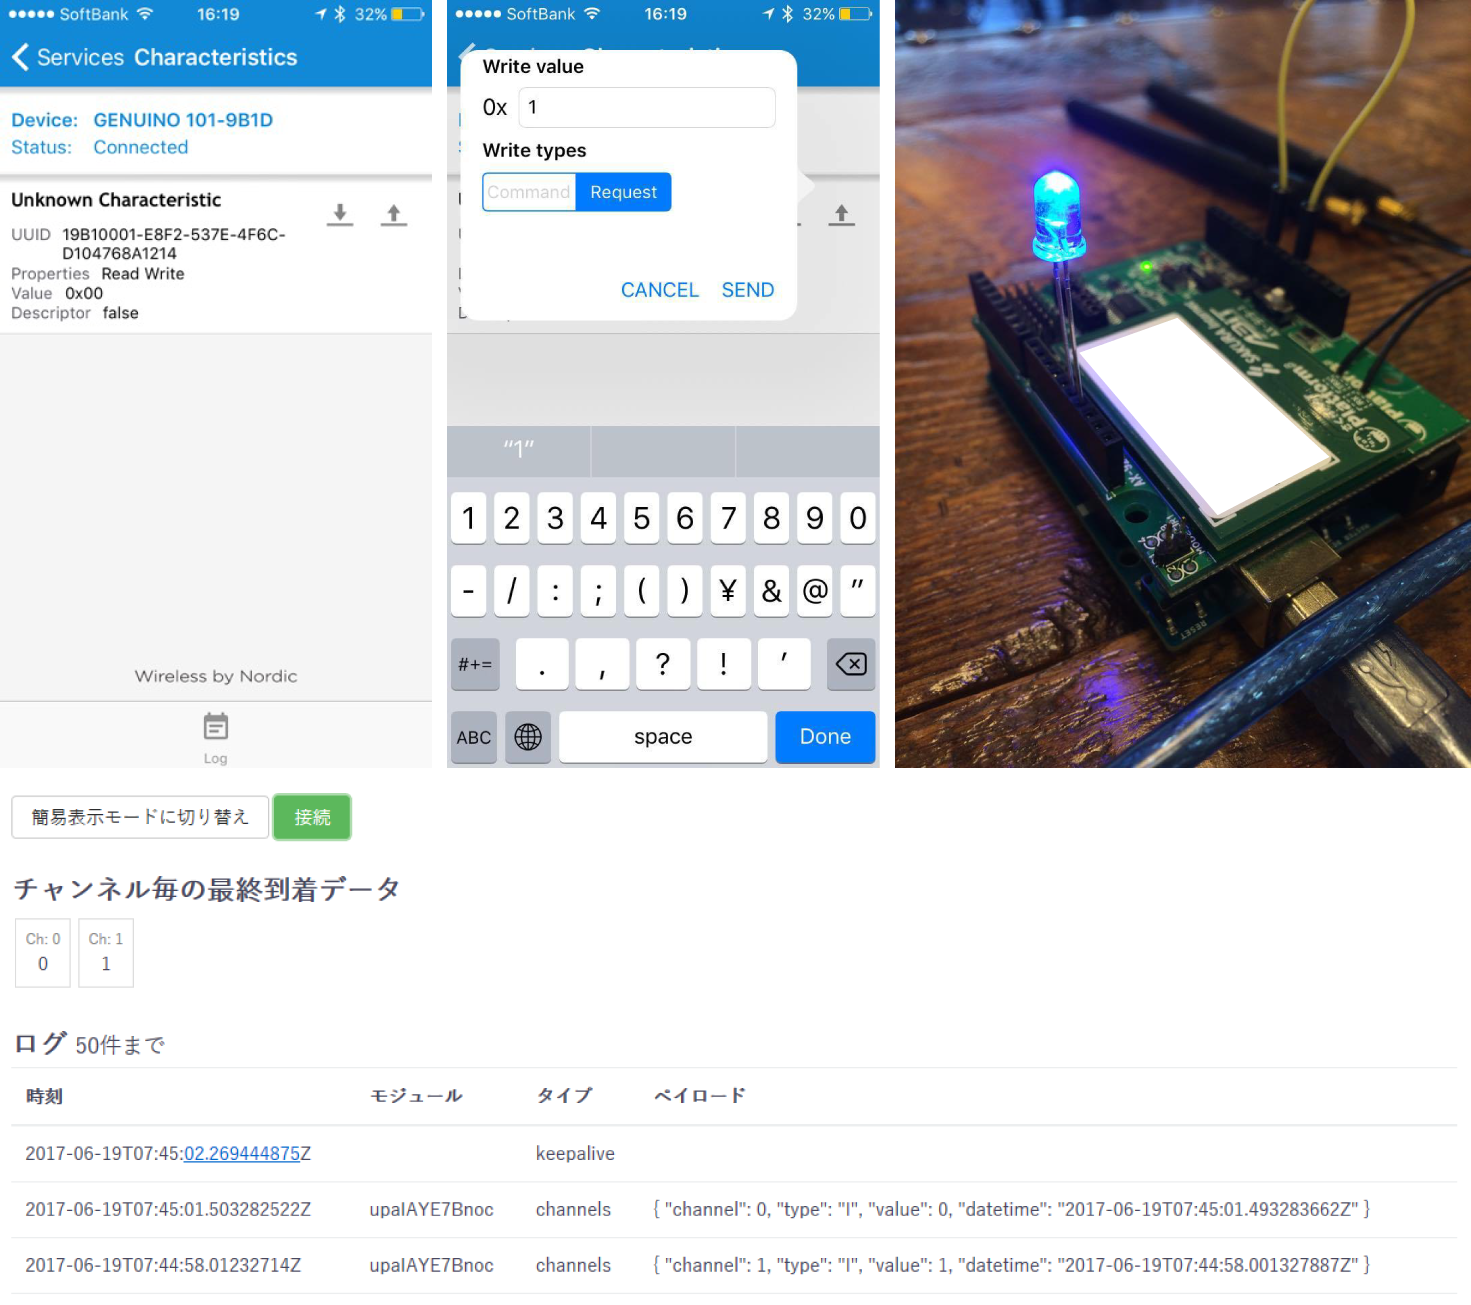
スマホと接続してLEDをON/OFF、sakura.ioプラットフォームでLEDのステートを確認
あとはArduino/Genuino 101 CurieBLE LEDを参考に、スマホアプリのnRF ConnectでLEDと表示されたデバイスに接続し、ON/OFFを送信してLEDを点灯消灯させると、sakura.ioプラットフォーム側にLEDのステートの値が送られます。


