Dockerの環境作りが出来たので忘れないうちに記事にします。
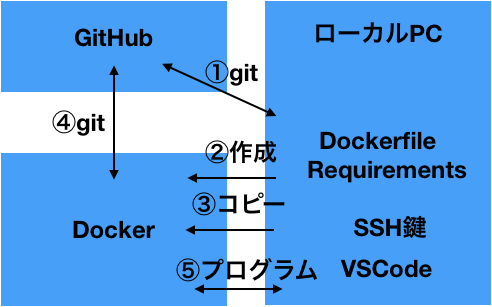
いちからDocker+Git Hub+VSCodeで環境を全部GitHubに乗せてみました。
これでいつPCがぶっ壊れても大丈夫ですね。
イメージ図
全体像はこんな感じ
ローカルとDockerでプログラムやgitのコピーも考えたのですが、面倒だったのでこうしました

環境
macOS Catalina 10.15.3
あるとよい前提知識
git/GitHub
VSCode
Dockerのインストール
公式サイトからDockerのアカウントを作ってログインし、DockerHubからダウンロードしてインストールします。
https://hub.docker.com/editions/community/docker-ce-desktop-mac
詳しくはこちらで
参考:https://qiita.com/kurkuru/items/127fa99ef5b2f0288b81
GitHubのSSH認証
SSH認証を使うので、公開鍵を登録しておきましょう。
詳しくはこちらで
参考:https://qiita.com/shizuma/items/2b2f873a0034839e47ce
Dockerfileの作成
DockerfileというものでDocker は作られます。
今回のDockerfileはこちら。ちなみに拡張子はありません。
Dockerfile
FROM ubuntu:18.04

RUN apt-get update
RUN apt-get install -y git
RUN apt-get install -y python3
RUN apt-get install -y python3-pip

COPY requirements /root/python/requirements
RUN pip3 install -r /root/python/requirements/common.txt
ベースがUbuntu
pythonなどをインストール
requirementsのフォルダをDockerにコピーして
それを参照してpip installを実行
というファイルになります。
requirementsは普通にpip installで参照する形式
GitHubに公開しているので
git clone git@github.com:XM03/docker-test.git
でもOK
このファイルを元にDockerのモト(Docker image)を作ります
Dockerを使う
ターミナルを開いて先ほどのDockerfileのあるディレクトリに行って
docker build . -t docker_test
# . で現在ディレクトリのDockerfileを参照 -tでタグ付け
でdocker image(仮想環境)をビルドします。
docker run -it docker_test bash
# -itは入力を受け付けターミナルを表示 bashはおまじない
でdockerを動かします。
SSH鍵のコピー
ファイルのコピーはローカル→Dockerが
docker cp local_dir ID:docker_dir
Docker→ローカルが
docker cp ID:docker_dir local_dir
です。
まず先ほどと別窓でターミナルを開いて
docker ps
でContainerIDを確認します
CONTAINER ID        IMAGE               COMMAND             CREATED             STATUS              PORTS                    NAMES
dc46470c4b2c        docker_test         "bash"              16 minutes ago      Up 16 minutes       0.0.0.0:5000->5000/tcp   zen_heisenberg
a49624f5e200        ubuntu              "/bin/bash"         5 hours ago         Up 5 hours                                   elastic_leakey
左にあるのがID
IDは基本的に最初の1~3文字だけ使います
IDがa49624f5e200だった場合は
docker cp ~/.ssh/. a4:/root/.ssh
と入力してSSHのKEYをローカルPCからdockerに移動します。
このように.を使うと複数選択できます。
これでDockerからGitHubにアクセス出来ます。
※DockerfileでCOPYしても同じ事がさらに簡単に出来ますが
imageに秘密鍵が残るのが嫌だったので今回は不採用としました。
あとは通常と同様にgit cloneします
もちろん他のコマンドも同様に使えます
今回はこれを使ってみます。
cd root
git clone git@github.com:XM03/docker-test.git
cd docker-test
python3 test.py
Hello World!
python ver:3.6.9 (default, Nov  7 2019, 10:44:02)
[GCC 8.3.0]
flask ver:0.12.2
無事pythonもflaskもインストールできている事が確認できるかと思います。
あとはVSCodeで編集できればミッションコンプリートですね
Bad ownerって出たら
git cloneでBad ownerって出たら
以下を打ち込めば上手く動くかと思われます。
chown root ~/.ssh/config
参考:https://stackoverflow.com/questions/51744040/docker-bad-owner-or-permissions-on-root-ssh-config
VSCode
Docker
Remote - Containers
の拡張機能をダウンロードします。
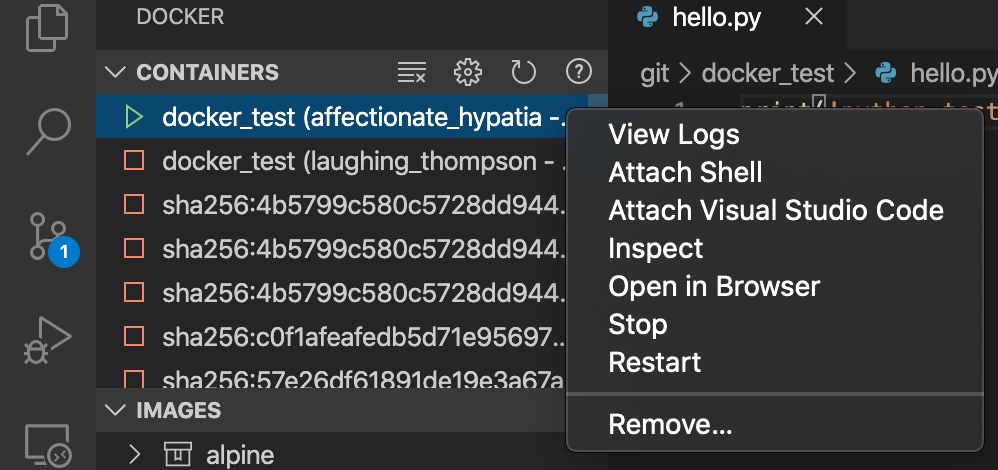
Dockerのタブで動いているDockerが表示されているのでAttach Visual Studio Codeを選ぶと
開くことができます。

あとはworkspaceに追加してあげればOKです。
rootで追加すると色々見やすくて良いです。
先ほどのファイルがあるので、それを編集すればOKです
Dockerを閉じると全てのデータは消えるので必ずpushしましょう
逆にいうと必ずpushする癖がつくはずです。
以上でミッションコンプリートとなります。
FLASKでHello World!の表示までやってみる
環境変数とgit cloneを加えてDockerfileを以下のようにします。
ちなみにDockerはキャッシュを積極的に使い、GitHubの更新が反映されないためgit cloneをここに入れるのはあまり推奨されない。
今回はほとんど更新がない奴なのでOK。
Dockerfile
FROM ubuntu:18.04

RUN apt-get update
RUN apt-get install -y git
RUN apt-get install -y python3.7
RUN apt-get install -y python-pip

COPY requirements /root/python/requirements
RUN pip install -r /root/python/requirements/common.txt

ENV FLASK_APP=hello.py
ENV FLASK_DEBUG=1

RUN git clone https://github.com/miguelgrinberg/flasky.git
プログラムはO`REILLYの教科書から参照します。
三章のaのプログラム(Hello World)を使います
docker build . -t docker_test
buildは同じ
docker run -it -p 5000:5000 docker_test bash
-p:portを5000で固定し動かします。
root@dc46470c4b2c:/# ls
bin  boot  dev  etc  flasky  home  lib  lib64  media  mnt  opt  proc  root  run  sbin  srv  sys  tmp  usr  var
root@dc46470c4b2c:/# cd flasky
root@dc46470c4b2c:/flasky# git checkout 3a #三章のaプログラム
~~
略
~~
HEAD is now at e020af8 Chapter 3: Templates (3a)
root@dc46470c4b2c:/flasky# flask run --host 0.0.0.0
 * Serving Flask app "hello"
 * Forcing debug mode on
 * Running on http://0.0.0.0:5000/ (Press CTRL+C to quit)
 * Restarting with stat
 * Debugger is active!
 * Debugger PIN: 295-074-713
ホストを0.0.0.0にしないと外部からアクセス出来ないようなので指定しています。
あとはローカルのブラウザでhttp://localhost:5000を打ち込むと
Hello World!という文字を見ることが出来ます。
他の章のプログラムにするともう少し面白いかも知れませんね。
おわりに
上記の流れで行えば動くはずです.いろいろ至らないところがあるかもしれませんが,その点はコメント等で指摘してくれると嬉しいです。
その他
Dockerの勉強はUdemyのこれがおすすめ。
英語も一緒に学べる。
https://www.udemy.com/course/learn-docker/learn/lecture/11057896
VSCodeをjupyternotebookのように使える方法
https://qiita.com/surei/items/9f25d7efa7c67d55d98f