ゴール
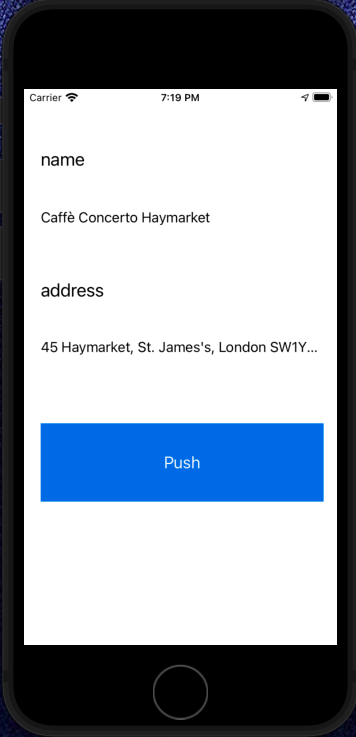
現在地を取得して表示する。
実装
場所をユーザー側から検索できるようにするには Places SDK for ios を使用する必要があるらしい。Places SDK for ios の他に Places SDK もあるのだが、粒度がわからない。とりあえずは意識しないでおこうと思う。
こちら を参考に、現在地を表示させてみる。
AppDelegadeにPlaces APIを使いますよのAPIキーを追加
    func application(_ application: UIApplication, didFinishLaunchingWithOptions
    launchOptions: [UIApplication.LaunchOptionsKey: Any]?) -> Bool {
        // Override point for customization after application launch.

        GMSServices.provideAPIKey("APIKEY")
        GMSPlacesClient.provideAPIKey("APIKEY")
        return true
    }
追加して実行すると、google maspsの方はv5.0.0使えますよとのことだったので、
New version of Google Maps SDK for iOS and Google Places SDK for iOS available: 5.0.0.0
こちら に従ってアップデートする。
アップデートが完了して実行すると、上のログが出なくなった!
次に、ViewControllerに現在地を取得するPGを実装する。
ViewControllerクラス配下にラベル表示のための変数とGMSPlacesClient型の変数を定義(swiftの変数定義)
@IBOutlet private var nameLabel: UILabel!
@IBOutlet private var addressLabel: UILabel!
private var placesClient: GMSPlacesClient!
ViewDidLoadの中で、placesClientに値を格納する。
GoogleMapsの方では行わなかったが、Placesでは、ここでAPIキーの認証を行うっぽい。
placesClient = GMSPlacesClient.shared()
ボタンを押下すると現在地を取得するメソッドを追加する。
@IBAction func getCurrentPlace(_ sender: UIButton) {
        let placeFields: GMSPlaceField = [.name, .formattedAddress]
        placesClient.findPlaceLikelihoodsFromCurrentLocation(withPlaceFields: placeFields) {
        [weak self] (placeLikelihoods, error) in
        guard let strongSelf = self else
        {
          return
        }

        guard error == nil else {
          print("Current place error: \(error?.localizedDescription ?? "")")
          return
        }

        guard let place = placeLikelihoods?.first?.place else {
            strongSelf.nameLabel.text = "No current place"
            strongSelf.addressLabel.text = ""
            return
        }

        strongSelf.nameLabel.text = place.name
        strongSelf.addressLabel.text = place.formattedAddress
    }
}
次に、storyboard側でUIを実装していこうと思うと、2年前くらいに触っていたときの仕様と変わっていたので、こちらを参考にボタン1、ラベル2を配置する。

配置して実行するが、問題が複数発生。
- マップが最前面に配置されるため、ボタンやラベルが表示されない。→マップ描画部分をコメントアウトして一時的な対応
- 以下エラーで自己位置を取得できない。
Current place error: The operation couldn’t be completed. The Places SDK could
not find the user's location. This may be because the user has not allowed the
application to access location information.
PC上のシミュレータではGPSをしようする機能に対応していない or 設定でこのアプリケーションに位置情報の取得
を許可する必要があるがある。→シミュレータを使用せず、iPhone上で動かしてみようとする。
- iPhone上で実行できない。
The operation couldn’t be completed. Unable to log in with account 'メアド'. The
login details for account 'メアド' were rejected.
No profiles for 'プロジェクト名' were found: Xcode couldn't find any iOS App
Development provisioning profiles matching 'プロジェクト名'.
バグ取り
まず、シミュレーターで実行することを考える。
Current place error: The operation couldn’t be completed. The Places SDK could
not find the user's location. This may be because the user has not allowed the
application to access location information.
こいつをどうにかしたい。
まず、PG中でfindPlaceLikelihoodsFromCurrentLocationメソッドを使うには、位置情報サービスの許可がマストらしい(先に言え)。
このあたりを参考に実装した。
let locationManager = CLLocationManager()
locationManager.requestAlwaysAuthorization()
すると以下の注意。
This app has attempted to access privacy-sensitive data without a usage description. The app's Info.plist must contain both “NSLocationAlwaysAndWhenInUseUsageDescription” and “NSLocationWhenInUseUsageDescription” keys with string values explaining to the user how the app uses this data
センシティブなデータ使うんだから説明責任があるぞ!ってことだと理解した。info.plistにNSLocationAlwaysAndWhenInUseUsageDescription NSLocationWhenInUseUsageDescriptionにShow your location on the map(使わせてください)を追加して、さて実行。
Current place error: The operation couldn’t be completed. The Places SDK could
not find the user's location. This may be because the user has not allowed the
application to access location information.
消えない。確かにアプリ実行時にこちらから位置情報を許可できていない。
こちらやこちらを参考に、info.plistにNSLocationAlwaysUsageDescription追加したり、Custom Locationを自宅で設定してみたりしたが不発
埒が明かないので、実機で動かしてみよう!
実機で実行する際に詰まっていたエラーは調べてみると一瞬で解決。
実機で実行!やっぱり同じエラー。Location Informationが許可されていませんと。
「許可しますか?」のポップアップも出てこないので、この許可周りが怪しそう。調べる。
private var placesClient: GMSPlacesClient!

func setupLocationManager(){
    locationManager = CLLocationManager()
    guard let locationManager = locationManager else { return }

    locationManager.requestAlwaysAuthorization()

    let status = locationManager.authorizationStatus
    if(status == .authorizedAlways){
        locationManager.delegate = self
        locationManager.distanceFilter = 10
        locationManager.startUpdatingLocation()
    }
}
LocationManagerを関数化して、ViewDidLoadで呼び出す。
ポップアップが出てきて、やっと動きました。
Simulator、実機ともに成功。

Simulate Locationをロンドンに設定しているため、ロンドンの住所を取得している。
追加した部分としては、以下3行。
locationManager.delegate = self
locationManager.distanceFilter = 10
locationManager.startUpdatingLocation()
それぞれの役割は以下の通り。(参考)
- delegate :
デリゲートを指定するとのことだが、デリゲートとは?状態。追記する。 - distanceFilter :
位置情報取得間隔。小さい値を設定すると、一箇所にとどまっている時にも、位置情報が通知され続けます。3-5m以上を設定すると使い勝手が良いイメージらしい。従って、なくても実行可。 - StartUpdatingLocation() :
GPSの使用を開始する。
実際に、StartUpdatingLocationを入れないと、現在地が取れない。
何はともあれ、現在地は取れるようになった。
ちなみに、本当に現在地を取得しようと思うと、できるのは実機だけです。
ちゃんちゃん。次こそは、検索した場所にピンを刺します。