前提条件
これらがインストールされていて使用可能な状態になっていること。
- Node.js
- Docker
- Git
Express.js の構築
$ npm install express-generator -g
$ express
$ npm install
Docker を使用した PostgreSQL の構築
PostgreSQL を構築するための docker-compose.yml を作業ディレクトリに追加します。
version: "3"

services:
  postgresql:
    image: postgres:12-alpine
    container_name: postgresql
    ports:
      - 5432:5432
    volumes:
      - db_data:/var/lib/postgresql/data
    environment:
      POSTGRES_USER: root
      POSTGRES_PASSWORD: hogehoge
      POSTGRES_DB: root
      POSTGRES_INITDB_ARGS: "--encoding=UTF-8 --locale=ja_JP.UTF-8"
    hostname: postgres
    restart: always
    user: root
volumes:
  db_data: {}
docker-compose.yml を追加したら docker-compose up -d コマンドを実行することで PostgreSQL が起動します。
Sequelize でテーブル作成
アプリから PostgreSQL に接続するためのパッケージと、 Sequelize ORM を使用するためのパッケージをインストールします。
$ npm install --save pg pg-hstore sequelize sequelize-cli
Sequelize CLI を使用して Sequelize ORM を初期化します。初期化が完了すると作業ディレクトリに config.json や models ディレクトリが作成されます。
$ npx sequelize-cli init
データベースへの接続設定が書かれている config/config.json を開いて development 設定を書き換えます。
  "development": {
    "username": "root",
    "password": "hogehoge",
    "database": "root",
    "host": "127.0.0.1",
    "dialect": "postgres",
    "operatorsAliases": false
  },
Sequelize CLI を使用して新しいテーブルモデルを作成します。作成が完了すると models ディレクトリに user.js ファイルが作成されます。この記事では user テーブルを作成しています。
$ npx sequelize-cli model:generate --name user --attributes firstName:string,lastName:string,email:string
Sequelize CLI を使用してデータベースにテーブルを作成します。マイグレーションコマンドを実行することによって、作成したモデルがテーブルとして追加されます。コマンド実行後にデータベースへ接続してテーブルが作成されていることを確認してみてください。
$ npx sequelize-cli db:migrate
Express.js からテーブルに接続して値を返す
routes/users.js を開いてコードをこのように置き換えます。テーブルに登録されている全てのレコードを返却しています。
var express = require("express");
var router = express.Router();
let db = require("../models");

/* GET users listing. */
router.get("/", function (req, res, next) {
  db.user.findAll({}).then((users) => {
    res.send(users);
  });
});

module.exports = router;
Seederでテストデータを追加する
SeedとはDBテーブルに初期値として用意する(テスト)データです。Seedを作っておくと、テーブルを初期化してもまた同じデータを用意することができるのでとても便利です。
$ npx sequelize-cli seed:generate --name test-users
実行後、「/seeders/********-test-users.js」というファイルが作成されるので中身を以下のようにしてください。
'use strict';

module.exports = {
  up: async (queryInterface, Sequelize) => {
    const now = new Date();
    return queryInterface.bulkInsert('users', [
      { id: 1, firstName: '太郎', lastName: '田中',  email: 'taro@example.com', createdAt: now, updatedAt: now},
      { id: 2, firstName: '次郎', lastName: '山田',  email: 'jiro@example.com', createdAt: now, updatedAt: now},
      { id: 3, firstName: '三郎', lastName: '佐藤',  email: 'saburo@example.com', createdAt: now, updatedAt: now},
    ], {});
  },

  down: async (queryInterface, Sequelize) => {
    return queryInterface.bulkDelete('users', null, {});
  }
};
以下のコマンドを実行してSeedを実行してみましょう。
$ npx sequelize-cli db:seed:all
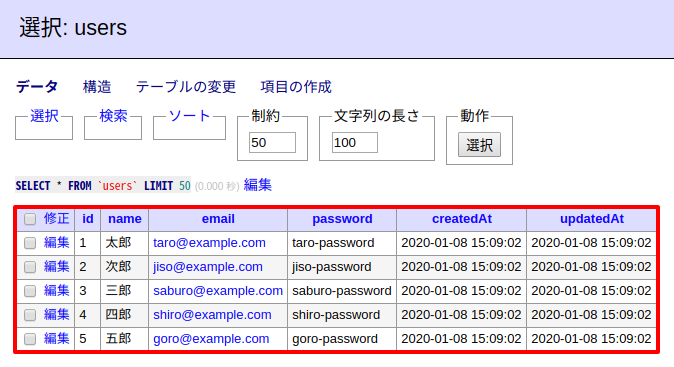
実行が終わるとテーブルはこのようになります。
npm startコマンドを実行して、ブラウザから http://localhost:3000/users にアクセスして下記のような感じになれば成功です。