この記事の内容
タイトルに記載した通り、IBM 製の Agent フレームワーク BeeAI framework を使用して、簡易的な Agent アプリを作成します。
その際に Agent の LLM として、IBM 製の LLM granite-3-3-8b-instruct を使用し、Agent が使用するツールとして、以下の記事で作成した自作の MCP サーバーを連携させます。
BeeAI framework について
BeeAI framework は IBM Research が中心となって開発している Agent 開発用フレームワークです。
詳しくは以下を参考にしてください。
github
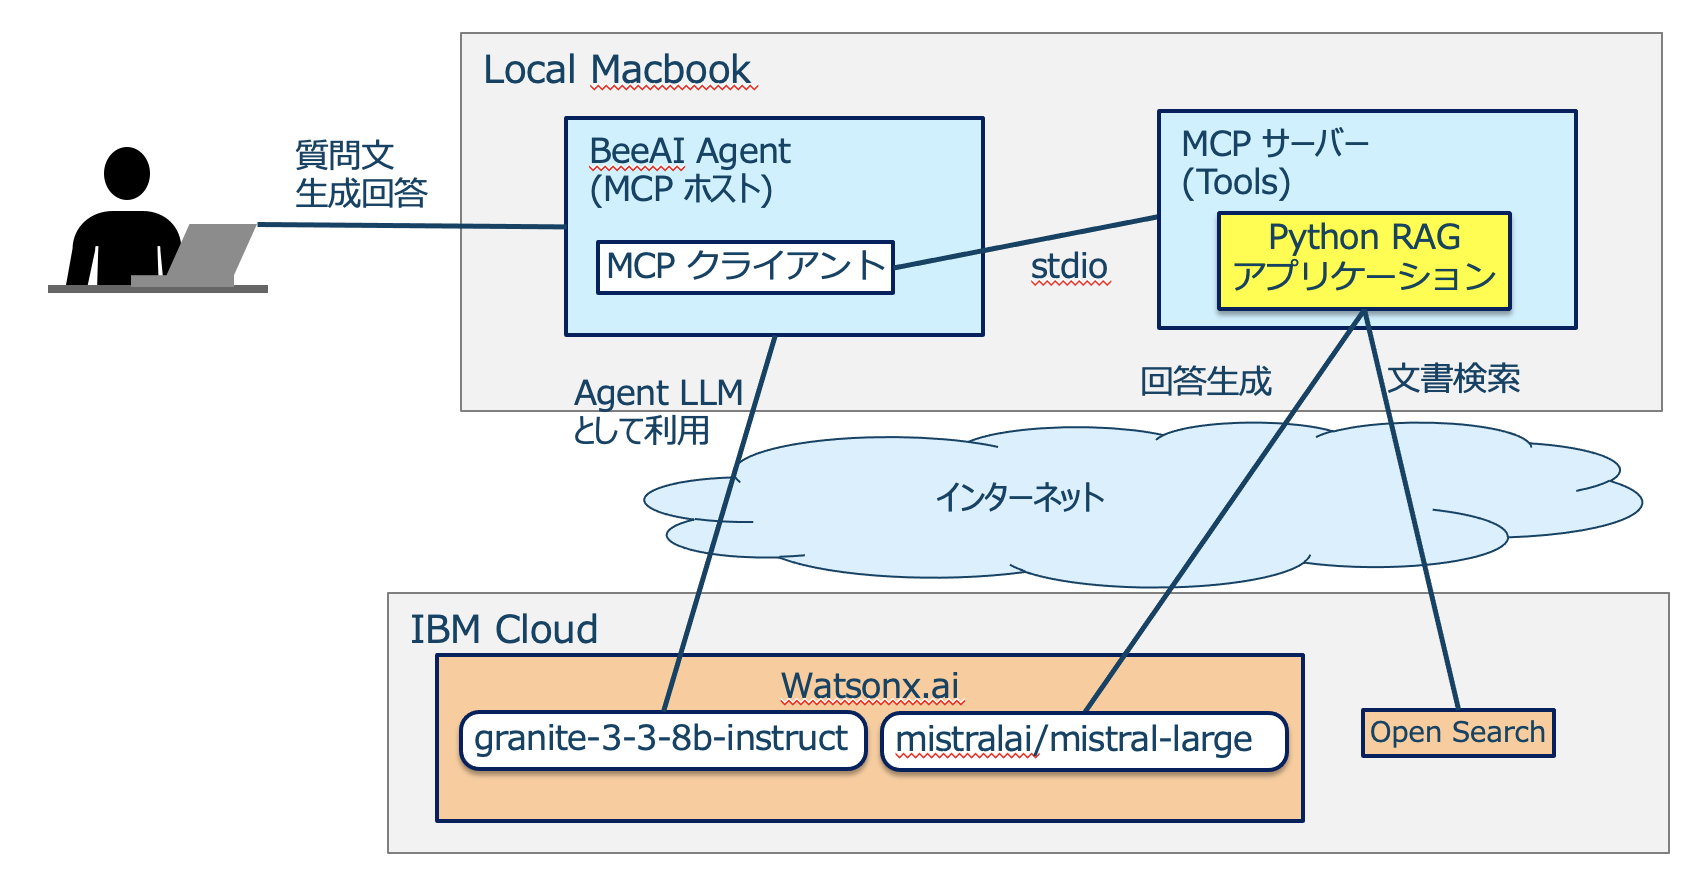
作成するアプリの構成
以下の画像のようなイメージとなります。
BeeAI framework で作成した Agent アプリがユーザーからの質問を受け、子プロセスとして起動している MCP サーバーの tools (RAG による文書検索、回答システム) を必要に応じて使用することで情報を取得し、最終的な回答をまとめてユーザーに返すといった流れになります。
BeeAI framework を用いた Agent アプリの実装部分
以下のリンクにある、BeeAI の example の中の mcp_agent.py をベースにしています。
BeeAI framework のインストール
今回は Python 版をインストールしていますが、TypeScript 版も利用可能です。
pip install beeai-framework
コードの変更
io モジュールの作成
example のコードではライブラリインポートの行で No module named 'examples.helpers' のエラーが発生しました。今後修正されるとは思いますが、今回は回避策として、io モジュールを github からコピーして io_manually.py として agent アプリ (mcp_agent.py) と同じディレクトリに配置しておきます。
import sys

from pydantic import BaseModel
from termcolor import colored

from beeai_framework.utils.models import ModelLike, to_model_optional


class ReaderOptions(BaseModel):
    fallback: str = ""
    input: str = "User 👤 : "
    allow_empty: bool = False


class ConsoleReader:
    def __init__(self, options: ModelLike[ReaderOptions] | None = None) -> None:
        options = to_model_optional(ReaderOptions, options) or ReaderOptions()
        self.fallback = options.fallback
        self.input = options.input
        self.allow_empty = options.allow_empty

    def __iter__(self) -> "ConsoleReader":
        print("Interactive session has started. To escape, input 'q' and submit.")
        return self

    def __next__(self) -> str:
        try:
            while True:
                prompt = input(colored(self.input, "cyan", attrs=["bold"])).strip()
                if not sys.stdin.isatty():
                    print(prompt)

                if prompt == "q":
                    raise StopIteration

                prompt = prompt if prompt else self.fallback

                if not prompt and not self.allow_empty:
                    print("Error: Empty prompt is not allowed. Please try again.")
                    continue

                return prompt
        except (EOFError, KeyboardInterrupt):
            print()
            exit()

    def write(self, role: str, data: str) -> None:
        print(colored(role, "red", attrs=["bold"]), data)

    def prompt(self) -> str | None:
        for prompt in self:
            return prompt
        exit()

    def ask_single_question(self, query_message: str) -> str:
        answer = input(colored(query_message, "cyan", attrs=["bold"]))
        return answer.strip()
そして、mcp_agent.py のライブラリインポートのコードは以下のようにします。
import asyncio
import logging
import os
import sys
import traceback
from typing import Any

from dotenv import load_dotenv
from mcp import ClientSession, StdioServerParameters
from mcp.client.stdio import stdio_client

from beeai_framework.agents import AgentExecutionConfig
from beeai_framework.agents.react import ReActAgent
from beeai_framework.backend import ChatModel, ChatModelParameters
from beeai_framework.emitter import Emitter, EventMeta
from beeai_framework.errors import FrameworkError
from beeai_framework.logger import Logger
from beeai_framework.memory import TokenMemory
from beeai_framework.tools import AnyTool
from beeai_framework.tools.mcp import MCPTool
from io_manually import ConsoleReader
MCP サーバーの設定
サンプルのツールが記載されているので、server_params を以下のように変更しました。
server_params = StdioServerParameters(
    command="/path/to/uv",
    args = [
        "--directory",
        "/path/to/rag_application",
        "run",
        "server_mcp.py"
    ]
)
上にも同じリンクを貼っていますが、以下の記事で MCP クライアントとして使用した Claude for Desktop の設定と同様になります。
Agent LLM を granite-3-3-8b-instruct に変更
使用する LLM ですが、example では ollama:llama3.1 となっているので以下のように変更します。
llm = ChatModel.from_name(
    "watsonx:ibm/granite-3-3-8b-instruct"
)
また、同じディレクトリに .env ファイルを作成して、以下のように認証情報などを記載します。
WATSONX_API_KEY="apikey"

WATSONX_PROJECT_ID="project_id"

WATSONX_URL="https://us-south.ml.cloud.ibm.com"
ツールの設定
example では使用するツールが slack post のツールとなっているので、今回使用する自作 MCP サーバーのツールを設定します。
rag_tools = await MCPTool.from_client(session)
tools: list[AnyTool] = list(filter(lambda tool: tool.name == "get_rag_answer", rag_tools))
(optional) ログ設定
このままだとログが非常に多くなるので、process_agent_events の関数の中を以下のように変更します。
def process_agent_events(data: Any, event: EventMeta) -> None:
    """Process agent events and log appropriately"""

    if event.name == "error":
        reader.write("Agent 🤖 : ", FrameworkError.ensure(data.error).explain())
    elif event.name == "retry":
        reader.write("Agent 🤖 : ", "retrying the action...")
    elif event.name == "update":
        reader.write(f"Agent({data.update.key}) 🤖 : ", data.update.parsed_value)
    elif event.name == "start":
        reader.write("Agent 🤖 : ", "starting new iteration")
    elif event.name == "success":
        reader.write("Agent 🤖 : ", "success")
    else:
        pass
(optional) SSE による接続対応
標準入出力ではなく SSE による通信で MCP サーバーと連携する場合、sse_client をインポートします。
from mcp.client.sse import sse_client
また、stdio_client を使用している部分を sse_client に置き換えます。
async with sse_client(url="http://0.0.0.0:8000/sse") as (read, write), ClientSession(read, write) as session:
url の末尾に /sse を入れる必要があります。
動作確認
mcp_agent.py を実行します。
python mcp_agent.py
今回は「HFSからzFSへの移行方法を教えてください。」という質問をしてみます。
注目したいログだけを抜粋していますが、以下のように、get_rag_answer の tools を使用して、質問に関する情報を取得、最終的な回答を返す、ということができていることを確認できました。
Agent(thought) 🤖 :  The user is asking for instructions on migrating from HFS to zFS in IBM Z OS. This requires specialized knowledge, so I will use the 'get_rag_answer' function to find an answer.
Agent(tool_name) 🤖 :  get_zai_tutor
Agent(tool_input) 🤖 :  {'user_input': '方法についてIBM Z OSのHFSからzFSへの移行'}
Agent(tool_output) 🤖 :  [{"annotations": null, "text": "HFSからzFSへの移行方法には以下のツールやコマンドがあります:\n\n(省略)", "type": "text"}]
Agent 🤖 :  HFSからzFSへの移行にはいくつかのツールやコマンドがあります。以下に主なものを紹介します:(省略)
まとめ
- ツールの設定自体はかなりシンプルにできるようになっていました
- SSE による接続も容易に感じました
- ただし、SSE は非推奨となり、Streamable HTTP が推奨となるため、いずれ更新が入ると思います
- Agent LLM には watsonx.ai 以外にも世の中の有名な LLM をほとんど使うことができ、その切り替えも簡単なので使い始める敷居は低く感じました
参考