今回は、ShotgunとSlackを連携させ、Shotgunに新規にAssetが作成された際に
Slackへ通知を飛ばすような仕組みの構築方法をご紹介します
ShotgunとSlack等の外部サービスとを連携するような設定は
現状、標準機能としては実装されていません
そのため、Shotgun公式で提供されている ShotgunEventDaemon というものを使用します
ShotgunEventDaemonとは
ShotgunEventDaemonは、Shotgunの操作履歴(EventLog)を常時監視することで、
Shotgunに対して何かしらの変更が行われた瞬間に処理を実行するような仕組みを
構築するためのものです
Shotgunを常に監視する必要があるため、サーバーやどこかのマシン上でShotgunEventDaemonを稼働させ続ける必要があります
開発環境
- OS: Windows 10 Pro
- Python2.7.17
- ShotgunEventDaemonがPython2.7系までしか対応していないため(2020/01/21時点)
- git 2.23.0
- テキストエディタ
- Visual Studio Code
Pythonをインストールする
Python2系は、既にサポートが終了してしまっていますが、
ShotgunEventDaemon側がまだpython3系にまだ対応していないようなので
Python2.7をインストールします
下記のページが参考になります
Python 2.7のインストール
また、Pythonの2.7系と3系の両方をインストールして共存させたい場合は、
下記の記事が参考になりました
[WindowsにPython2.7とPython3.7が共存できるようにインストールする]
(https://qiita.com/segur/items/23f276320216c3aa7cf7)
gitをインストールする
Shotgun APIをインストールする際に必要なためインストールします
下記のページが参考になります
gitのインストールと起動方法
Pythonにライブラリをインストールする
下記の3つのライブラリをインストールします
- Shotgun API
- Shotgunから情報を取得するために使用します
- pywin32
- ShotgunEventDaemonの動作に必要です
- requests
- Slackへ通知するために使用します
下記のコマンドを実行して、Shotgun APIをインストールします
pip install git+git://github.com/shotgunsoftware/python-api.git
下記のコマンドを実行して、pywin32をインストールします
pip install pywin32
下記のコマンドを実行して、requestsをインストールします
pip install requests
下記のコマンドを実行して、インストール済みのライブラリの一覧を確認します
pip list
パッケージのリストの中に先ほどインストールした3つのライブラリがあれば完了です
Package      Version
------------ -------
pywin32      227
requests     2.22.0
shotgun-api3 3.2.2
ShotgunEventDaemonをダウンロードする
コマンドプロンプトを開いて、下記のコマンドを実行します
D:\work内にShotgunEventsのパッケージがダウンロードされます
※D:\workに関しては、任意の場所で大丈夫です
cd D:\work
git clone git://github.com/shotgunsoftware/shotgunEvents.git
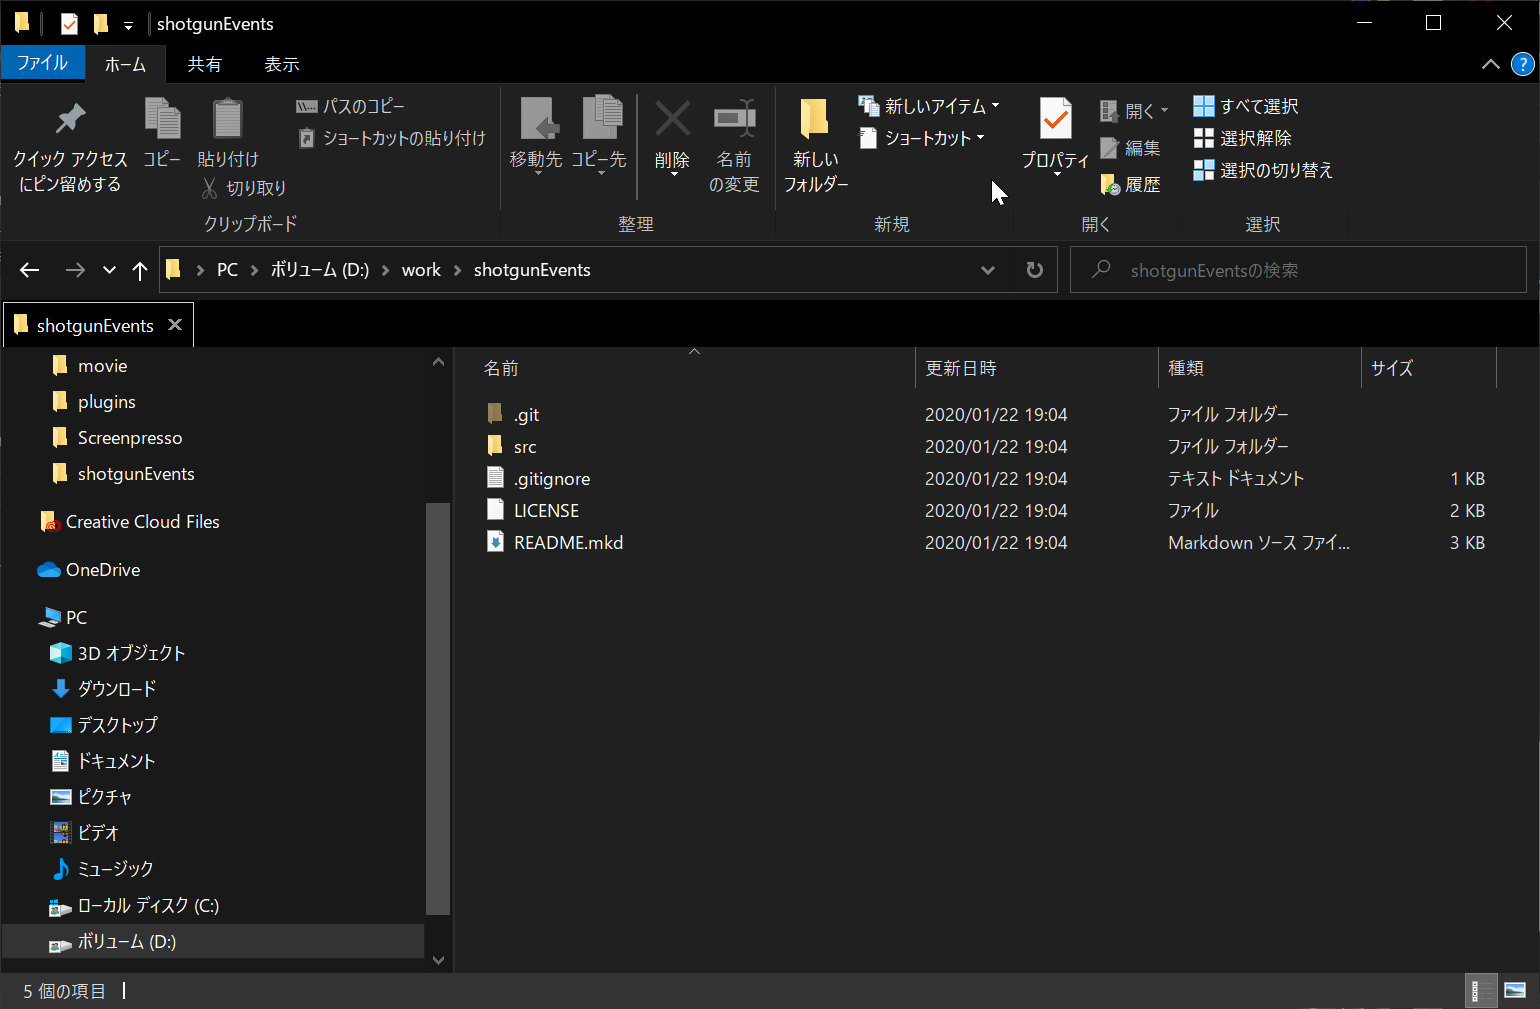 ダウンロードしたパッケージ内の shotgunEvents/src フォルダを開きます
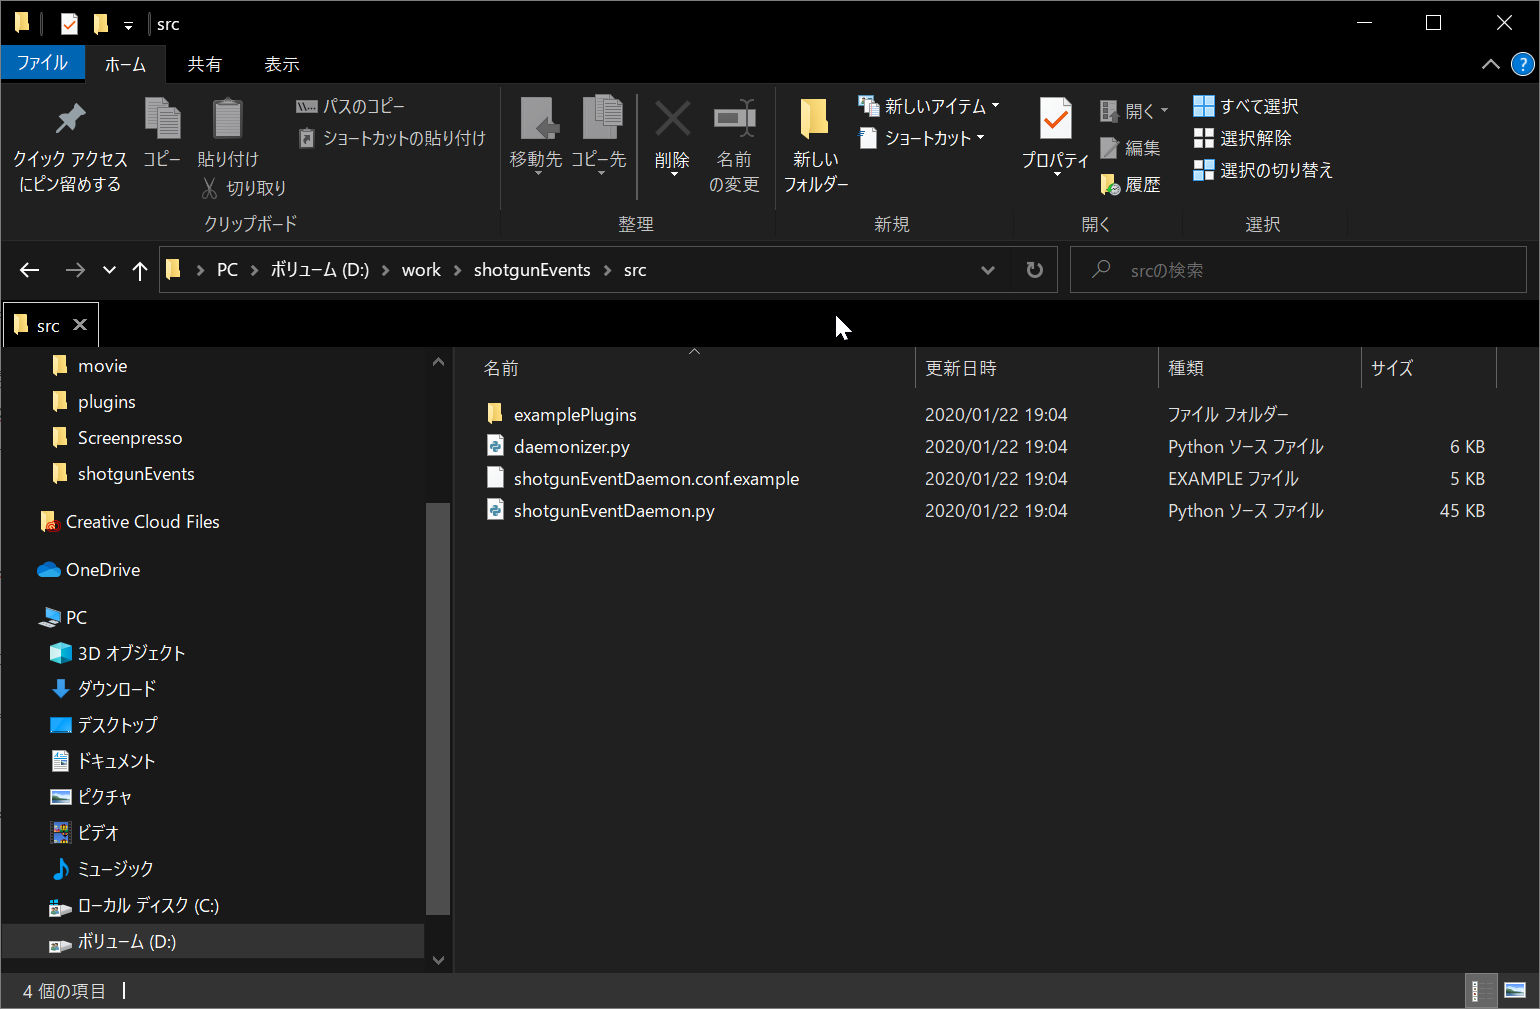
shotgunEventDaemon.py と daemonizer.py がShotgunEventDaemonのコア部分のスクリプトです
この2つのスクリプトによってShotgunの操作履歴の監視やプラグインの読み込みと実行等が行われます
shotgunEventDaemon.conf.example は、動作に必要な設定を定義するためのファイルのサンプルです。
examplePluginsの中には、処理の実行条件と実行する処理を定義するためのShotgunEventDaemonのプラグインのサンプルが入っています。
ShotgunEventDaemonの設定を行う
スクリプトユーザーを作成する
下記のページを参考にして、スクリプトユーザーを作成して下さい
※スクリプトの名前には、分かり易いように shotgunEventDaemon と指定して下さい
Shotgun APIを初めて使う方へ - 導入編 - #スクリプトユーザーの作成
設定ファイルを作成する
テキストエディタに下記の内容をコピー&ペーストし、shotgunEvents/src 内に
shotgunEventDaemon.conf という名前で保存して下さい
※下記の設定内容は、shotgunEventDaemon.conf.example の内容を一部修正したものです
[daemon]
# General daemon operational settings

# The pidFile is the location where the daemon will store its process id. If
# this file is removed while the daemon is running, it will shutdown cleanly
# after the next pass through the event processing loop.
pidFile: D:/work/shotgunEvents/src/log/shotgunEventDaemon.pid

# The eventIdFile is the location where the daemon will store the id of the last
# processed event. This will allow the daemon to pick up where it left off when
# last shutdown thus not missing any events. If you want to ignore any events
# since last daemon shutdown, remove this file before daemon startup and the
# daemon will process only new events created after startup.
eventIdFile: D:/work/shotgunEvents/src/log/shotgunEventDaemon.id

# The logging mode to operate in:
# 0 = all log message in the main log file
# 1 = one main file for the engine, one file per plugin
logMode: 1

# The path where to put log files
logPath: D:/work/shotgunEvents/src/log

# The name of the daemon log file. The setup is for 10 log files that rotate
# every night at midnight
logFile: shotgunEventDaemon

# The level of logging that should be sent to the log file. This value is only
# applicable to for the main dispatching engine and can be overriden on a per
# plugin basis. This value is passed to the logging library. Any positive
# integer value is valid but most common cases are:
# - 10 - Debug
# - 20 - Info
# - 30 - Warnings
# - 40 - Error
# - 50 - Critical
logging: 20

# Enable Timing logging
# Timing logging is a separate log file that will log timing information regarding
# event dispatching and processing run time. This is to help diagnose which plugins
# are taking the most amount of time and where any potential queue processing
# delay might be coming from. Valid values are `on` or to enable or anything else
# to disable.
# timing_log: on
timing_log: off

# If the connection to shotgun fails, number of seconds to wait until we retry.
# This allows for occasional network hiccups, server restarts, application maintenance,
# etc.
conn_retry_sleep = 60

# Number of times to retry connection before logging an error level message (which
# sends an email in the default configuration)
max_conn_retries = 5

# Number of seconds to wait before requesting new events after each batch of events
# is done processing
fetch_interval = 5

# Maimum number of events to fetch at once.
max_event_batch_size = 100


[shotgun]
# Shotgun connection options for the daemon

# The Shotgun url the event processing framework should connect to.
server: https://yoursite.shotgunstudio.com/

# The Shotgun script name the framework should connect with.
name: shotgunEventDaemon

# The Shotgun api key the framework should connect with. You'll need to replace
# this random useless key with the one corresponding to the script you've setup.
key: XXXXXXXXXXXXXXXXXXX

# The address of the proxy server used to connect to your Shotgun server
# in the format 111.222.333.444:8080. Leave this empty if you don't have
# a proxy server.
proxy_server:

# Sets the session_uuid from every event in the Shotgun instance to propagate in
# any events generated by plugins. This will allow the Shotgun UI to display
# updates that occur as a result of a plugin.
#
# Shotgun server v2.3+ required.
# Shotgun API v3.0.5+ required
use_session_uuid: True


[plugins]
# Plugin related settings

# A comma delimited list of paths where the framework should look for plugins to
# load.
paths: D:/work/shotgunEvents/src/plugins


[emails]
# Email notification settings. These are used for error reporting because we
# figured you wouldn't constantly be tailing the log and would rather have an
# active notification system.
#
# Any error above level 40 (ERROR) will be reported via email.
#
# All of these value must be provided for there to be email alerts sent out.

# The server that should be used for smtp connections. The username and password
# values can be uncommented to supply credentials for the smtp connection. The
# smtp port can also be uncommented to supply an alternate port such as 587 for
# GMail TLS SMTP. As for the useTLS parameter, it is a True/False value.
server:
# port: 587
# useTLS: True
# username: yourSMTPUsername
# password: yourSMPTPassword

# The from address that should be used in emails.
from:

# A comma delimited list of email addresses to whom these alerts should be sent.
to:

# An email subject prefix that can be used by mail clients to help sort out
# alerts sent by the Shotgun event framework.
subject: [SG]
設定内容の確認と修正
下記のパスに関する設定の D:/work の部分は、
ShotgunEventDaemonをダウンロードするの手順で
shotgunEventsパッケージをダウンロードした際の場所によって異なります
別の場所にダウンロードした場合は、その場所のパスに設定内容を修正して下さい
- 対象設定
- [daemon] セクション
- pidFile, eventIdFile, logPath
- [plugins] セクション
- pashs
- [daemon] セクション
下記の設定を、先ほどShotgunのWeb上で作成したスクリプトユーザーの情報に修正する必要があります
- 対象設定
- [shotgun] セクション
- server の値を契約しているShotgunのURLに修正
- key の値を作成したスクリプトユーザーのAPIキーに修正
- [shotgun] セクション
その他の設定項目に関しては、ShotgunEventDaemonの公式wikiの Configuration に詳しく書かれています
必要なフォルダを作成する
設定ファイル内で指定したパスの先にフォルダが無いと実行時にエラーが出るため
先にフォルダを作成しておきます
shotgunEvents/src フォルダの中に
logフォルダ と plugins フォルダを作成して下さい
現在のshotgunEvents/src フォルダの中はこのような感じになっているかと思います

Slack Botを作成する
※Slackのワークスペースが既に作成されていることを前提に進めます
Slackに通知するために必要なBotを作成します
下記のURLへアクセスして下さい
https://my.slack.com/services/new/bot
下記の画面が出た場合は、Shotgunの通知を送りたいSlackのワークスペースにサインインして下さい

Botの作成画面が表示されるのでユーザー名に shotgun_bot と入力して
ボットインテグレーションを追加する をクリックします
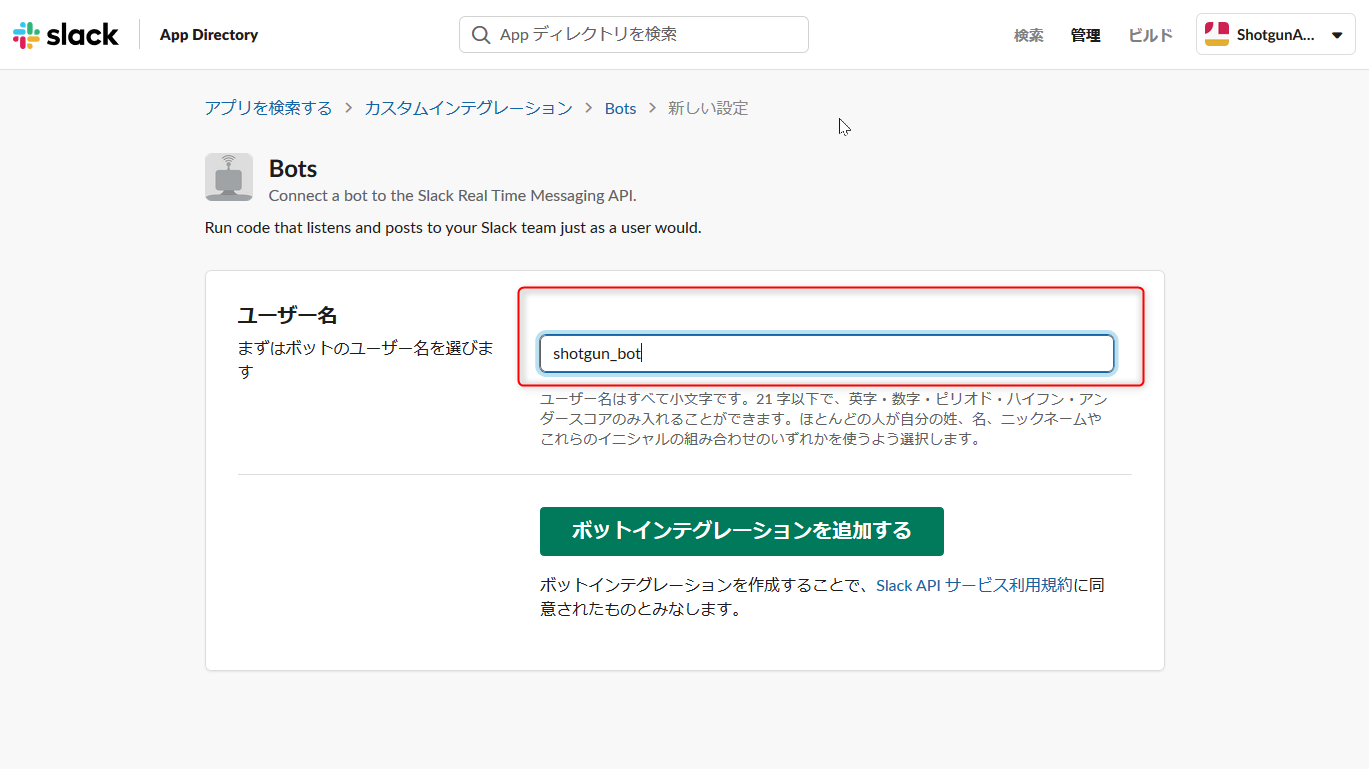
作成されるとAPIトークンが発行されます
このAPIトークンは、後でSlackに通知するための機能で必要になります
※APIトークンはBotの作成者しか確認出来ないようになっています

Slack Botを通知したいチャンネルに追加する
Slack Botは、チャンネルに追加することで、そのチャンネルに対して
APIでメッセージを投稿出来るようになっています
※Slack Botは、一つのチャンネルにしか追加出来ません
今回は、shotgun_noticeというチャンネルを作成して、
そこに通知が来るようにしたいと思います。
チャンネルに対して、Slack Botを追加する工程を動画にしました
ShotgunとSlackの連携(SlackBotをチャンネルに追加) pic.twitter.com/xVBSYgdzCK
— Tetsuya Nozawa (@lphing) January 29, 2020
Slack通知用プラグインを作成する
ShotgunにAssetが作成された際にSlackへ通知を送るような仕組みを作るにあたって、
ShotgunEventDaemonのプラグインを作成したいと思います
※ShotgunEvent/src/examplePlugins の中に色々サンプルが入っています
テキストエディタに下記のソースコードをコピー&ペーストして、
先ほど作成した shotgunEvent/src/plugins フォルダの中に new_asset_notification.py という名前で保存して下さい。
プラグイン周りの詳細については、ShotgunEventDaemonの公式wikiのPlugins に書かれています
# -*- coding:utf-8 -*-

import os
import time
import json
import logging
import requests

# ShotgunAPIの設定
SHOTGUN_SCRIPT_NAME = "shotgunEventDaemon"
SHOTGUN_SCRIPT_KEY = "ここにShotgunのスクリプトユーザーのアプリケーションキーを記述します"

# SlackBotの設定
SLACK_API_POST_MESSAGE_URL = "https://slack.com/api/chat.postMessage"
SLACK_BOT_API_TOKEN = "ここにSlackBotのAPIトークンを記述します"
SLACK_CHANNEL_NAME = "#shotgun_notice"

# 通知を行う対象のプロジェクト名を設定します
TARGET_PROJECT_NAMES = ["SHOTGUN_API_STARTUP"]


def registerCallbacks(reg):
    """
    Register all necessary or appropriate callbacks for this plugin.
    """

    # notify_new_assetを実行するための条件を指定します
    # Shotgun_Asset_Newの場合は、新しくAssetが作成された際に関数が呼ばれます
    match_events = {"Shotgun_Asset_New": ['*']}

    reg.registerCallback(
        SHOTGUN_SCRIPT_NAME,
        SHOTGUN_SCRIPT_KEY,
        notify_new_asset,
        match_events,
        None,
    )
    reg.logger.setLevel(logging.DEBUG)
    reg.logger.debug("Registered callback.")


def _create_entity_detail_url(sg, entity_type, entity_id):
    # entity_typeとentity_idを元にShotgunのDetailページのURLを作成します
    return "{0}detail/{1}/{2}".format(sg.base_url, entity_type, entity_id)


def _create_attachment(title, message):
    return {"title": title,
            "text": message,
            "footer": "post by shotgun event daemon",
            "ts": str(time.time())}


def _post_message(title, message):
    # Slack Web APIを使用してメッセージを送信します
    data = {'token': SLACK_BOTS_TOKEN,
            'channel': SLACK_CHANNEL_NAME,
            'attachments': json.dumps([_create_attachment(title, message)]),
            'as_user': True
    }
    return requests.post(SLACK_API_POST_MESSAGE_URL, data=data)


def _get_shotgun_data(sg, entity_type, entity_id, fields):
    # Shotgunから情報を取得する
    filters = [["id", "is", entity_id]]
    return sg.find_one(entity_type, filters, fields) or {}


def notify_new_asset(sg, logger, event, args):
    """
    A callback that logs its arguments.
    :param sg: Shotgun API handle.
    :param logger: Logger instance.
    :param event: A Shotgun EventLogEntry entity dictionary.
    :param args: Any additional misc arguments passed through this plugin.
    """
    event_project = event.get("project")
    if event_project is None:
        return
    if event_project.get("name") not in TARGET_PROJECT_NAMES:
        return
    entity = event.get("entity")
    if entity is None:
        return
    entity_type = entity.get("type")
    meta = event.get("meta", {})
    project_name = event_project.get("name")
    asset_name = entity.get("name")
    asset_id = meta.get("entity_id")
    asset_detail_url = _create_entity_detail_url(sg, entity_type, asset_id)

    message_format = u"{asset_link}\n{description}"
    label = u"Created Asset {asset_name}".format(asset_name=asset_name)
    asset_link = u"<"+asset_detail_url+u"|{0}>".format(label.decode("utf-8"))

    asset_data = _get_shotgun_data(sg,
                                   entity_type,
                                   asset_id,
                                   fields=["description"])

    if asset_data.get("description"):
        message = message_format.format(
            asset_link=asset_link,
            description=u"```{0}```".format(
                asset_data.get("description").decode("utf-8")))
    else:
        message = message_format.format(asset_link=asset_link,
                                        description=u"")
    title =  "{0} : Asset".format(project_name.decode("utf-8"))
    _post_message(title, message)
各自で修正する必要のある部分
ShotgunAPIの設定
変数 SHOTGUN_SCRIPT_KEY の値に スクリプトユーザーを作成する の工程で作成した スクリプトユーザーのアプリケーションキーを入力して下さい
# ShotgunAPIの設定
SHOTGUN_SCRIPT_NAME = "shotgunEventDaemon"
SHOTGUN_SCRIPT_KEY = "ここにShotgunのスクリプトユーザーのアプリケーションキーを記述します"
SlackBotの設定
変数 SLACK_BOT_API_TOKEN の値に SlackBotする の工程で発行したAPIトークンを入力して下さい
# SlackBotの設定
SLACK_API_POST_MESSAGE_URL = "https://slack.com/api/chat.postMessage"
SLACK_BOT_API_TOKEN = "ここにSlackBotのAPIトークンを記述します"
SLACK_CHANNEL_NAME = "#shotgun_notice"
通知対象プロジェクトの設定
今回は、SHOTGUN_API_STARTUP と名前が付いているのProjectを対象にしています。
もし、別の名前のProjectを通知対象にしたい場合は、このリストに追記することで対象に含まれます
# 通知を行う対象のプロジェクト名を設定します
TARGET_PROJECT_NAMES = ["SHOTGUN_API_STARTUP"]
解説
ShotgunEventDaemonはこのプラグインを読み込むと registerCallbacks 関数を実行します
この関数の中で何を条件にして何を実行するかを設定しています
今回の場合は、Assetが新規に作成された際にnotify_new_asset関数が実行されるようになっています
他の条件で実行したい場合は、ShotgunEventDaemonの公式wikiの [Technical_Overview] (https://github.com/shotgunsoftware/shotgunEvents/wiki/Technical_Overview) が参考になります
def registerCallbacks(reg):
    """
    Register all necessary or appropriate callbacks for this plugin.
    """

    # notify_new_assetを実行するための条件を指定します
    # Shotgun_Asset_Newの場合は、新しくAssetが作成された際に関数が呼ばれます
    match_events = {"Shotgun_Asset_New": ['*']}

    reg.registerCallback(
        SHOTGUN_SCRIPT_NAME,
        SHOTGUN_SCRIPT_KEY,
        notify_new_asset,
        match_events,
        None,
    )
    reg.logger.setLevel(logging.DEBUG)
    reg.logger.debug("Registered callback.")
notify_new_asset 関数は、受け取った引数から新規に作成されたAssetの情報を取り出して
Slackに投稿するためのメッセージを作成し、Slack Web APIでメッセージを送信します
def notify_new_asset(sg, logger, event, args):
    """
    A callback that logs its arguments.
    :param sg: Shotgun API handle.
    :param logger: Logger instance.
    :param event: A Shotgun EventLogEntry entity dictionary.
    :param args: Any additional misc arguments passed through this plugin.
    """
    event_project = event.get("project")
    if event_project is None:
        return
    if event_project.get("name") not in TARGET_PROJECT_NAMES:
        return
    entity = event.get("entity")
    if entity is None:
        return
    entity_type = entity.get("type")
    meta = event.get("meta", {})
    project_name = event_project.get("name")
    asset_name = entity.get("name")
    asset_id = meta.get("entity_id")
    asset_detail_url = _create_entity_detail_url(sg, entity_type, asset_id)

    message_format = u"{asset_link}\n{description}"
    label = u"Created Asset {asset_name}".format(asset_name=asset_name)
    asset_link = u"<"+asset_detail_url+u"|{0}>".format(label.decode("utf-8"))

    asset_data = _get_shotgun_data(sg,
                                   entity_type,
                                   asset_id,
                                   fields=["description"])

    if asset_data.get("description"):
        message = message_format.format(
            asset_link=asset_link,
            description=u"```{0}```".format(
                asset_data.get("description").decode("utf-8")))
    else:
        message = message_format.format(asset_link=asset_link,
                                        description=u"")
    title =  "{0} : Asset".format(project_name.decode("utf-8"))
    _post_message(title, message)
ShotgunEventDaemonの起動用batを作成する
ShotgunEventDaemonは、Shotgunのメンテナンスなどで頻繁に停止することがあるため、
手軽に起動が出来るようにbatを作成します
下記の内容をテキストエディタにコピー&ペーストして、shotgunEventDaemon.batという名前でshotgunEventsフォルダに保存して下さい
pushd %~dp0

python %CD%\src\shotgunEventDaemon.py foreground

popd
exit /b 0
shotgunEventsフォルダの中はこのような感じになっているかと思います

動作確認
動作確認の様子を動画にしました
ShotgunEventDaemonを使ったサンプル pic.twitter.com/XQOb7AXEmB
— Tetsuya Nozawa (@lphing) January 29, 2020
手順
先ほど作成した shotgunEventDaemon.bat を実行します
実行するとコマンドプロンプトが立ち上がり、下記のようなメッセージが表示されます

ShotgunEventDaemonが起動している状態で、ShotgunのAssetページを開いて、
+ アセット ボタンからアセットの作成画面を開きます
アセット名と説明を入力したら、アセットを作成をクリックします
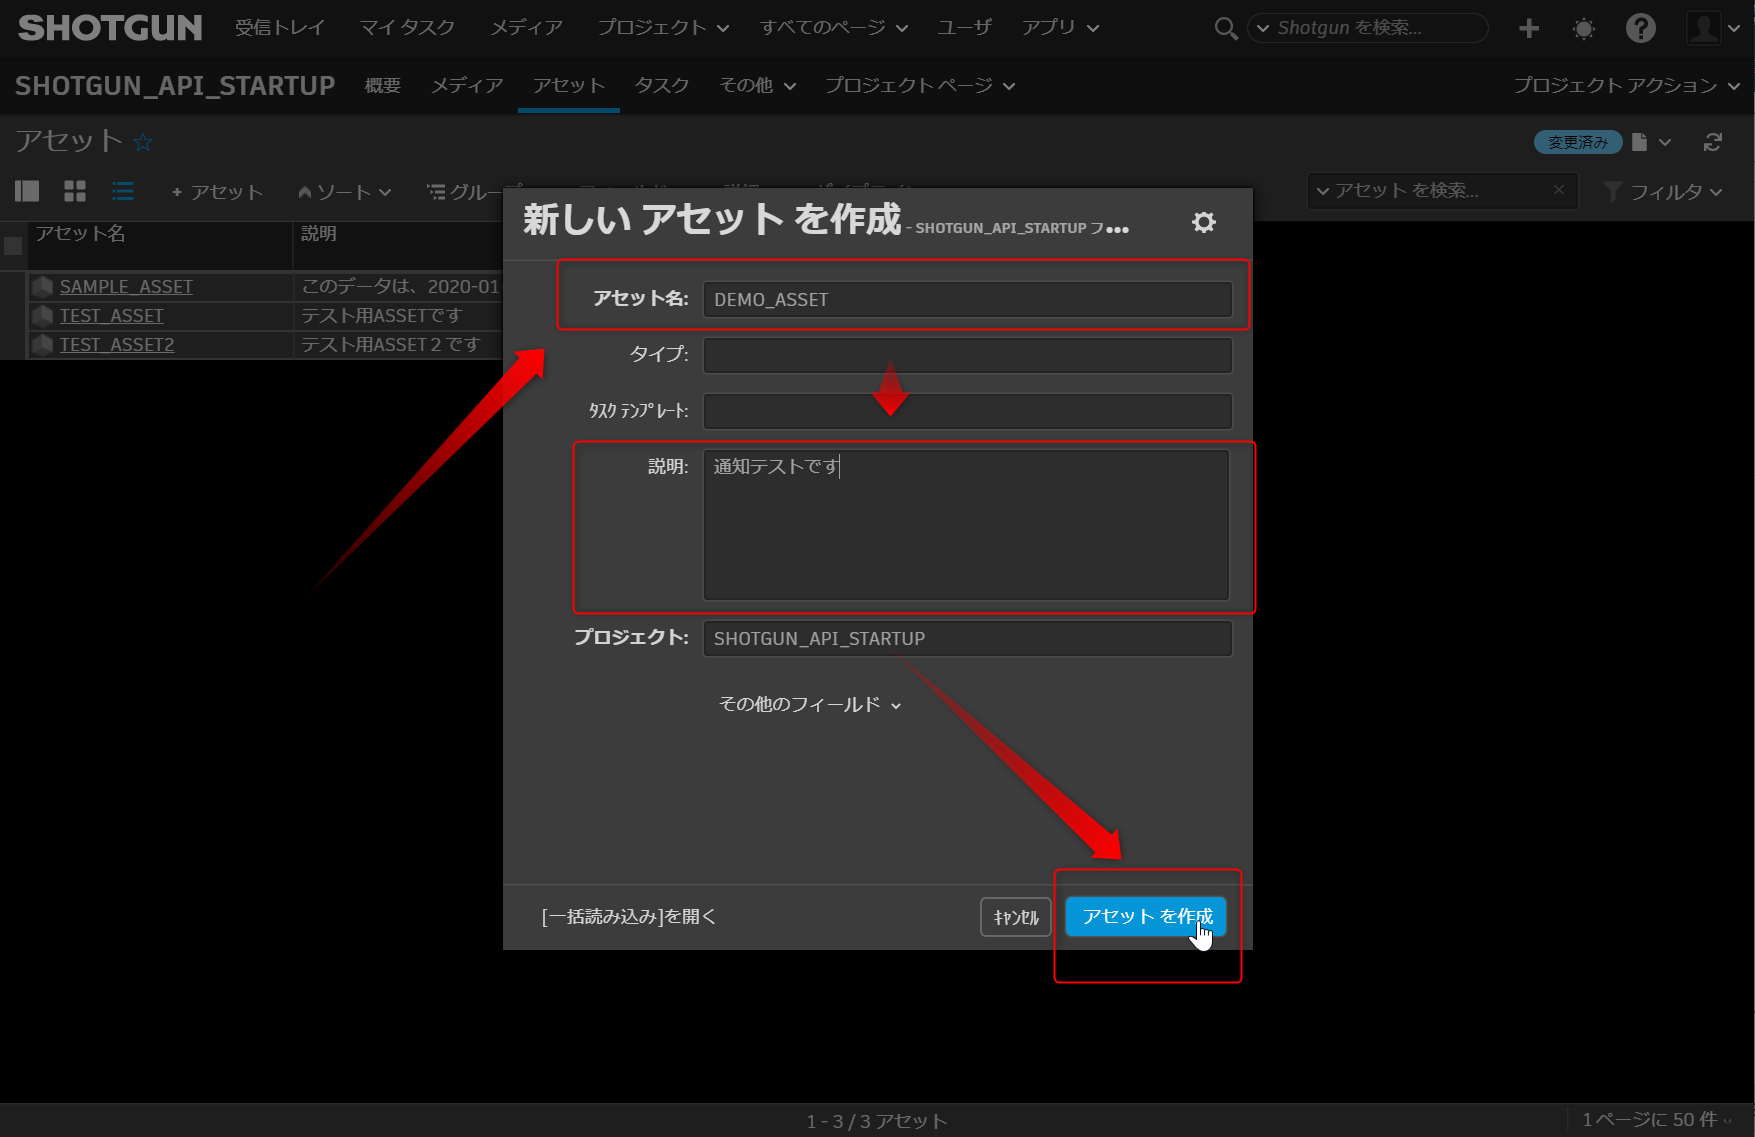
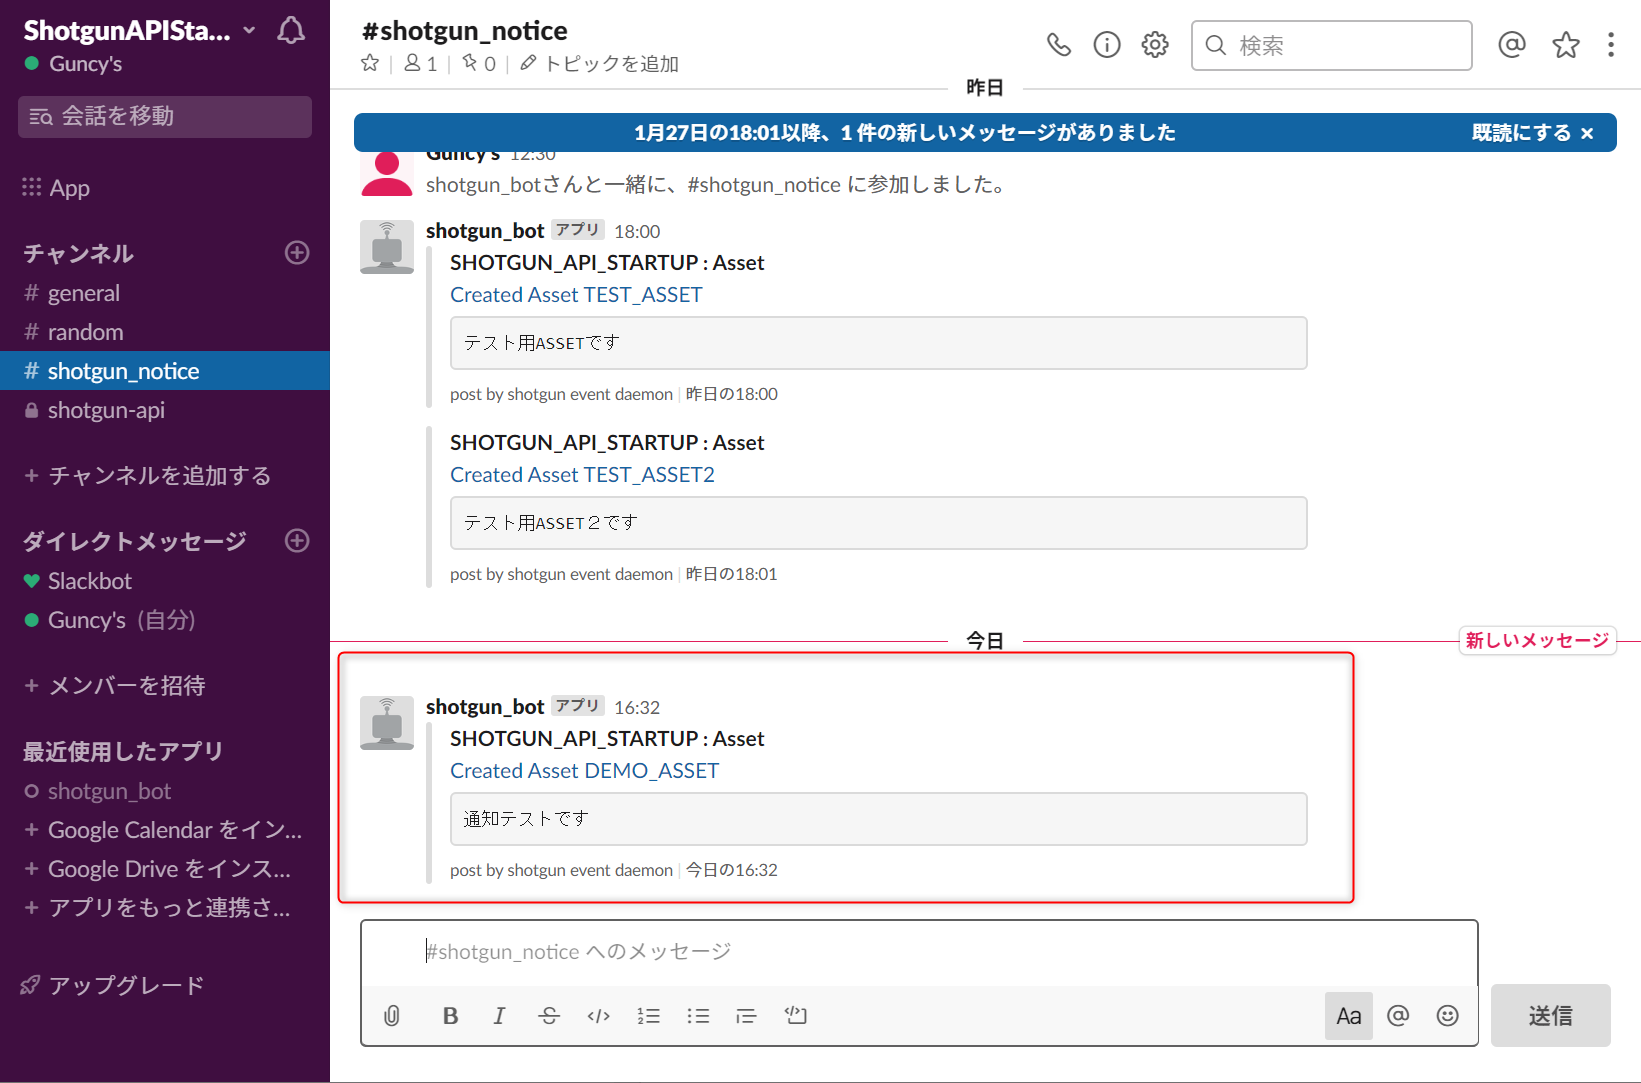
Assetが作成されたことをShotgunEventDaemonが検知して、Slack通知用プラグインが実行されるため、
Slackを開くと通知が飛んでいるかと思います
あとがき
今回は、ShotgunEventDaemonとSlack Botを使ったShotgunとSlackを連携する仕組みについてご紹介致しました。
ShotgunEventDaemonは、設定等が複雑ではありますが、使いこなせれば色々なものと連携させることが出来る強力なシステムだと思います。
ぜひご活用頂ければと思います。
