はじめに
- 2017年現在CAE業界では、Deep Learningの活用はこれからという段階
- 複雑な非線形現象にNNを用いる(NNとカップリング)
- 解析結果の予測
- DQNによる最適化
- 今回はCFDのあるタイムステップ時の解析結果を生成することを考える
- 前回の無残な記事
-
CNNで定常流れの解析結果を計算はじめ数ステップから定常解を予測できなかった件
--> 再トライ中
CFD環境
ご挨拶
import PyFoam
import PyFoam.FoamInformation

pyVer = sys.version
pfVer = PyFoam.versionString()
ofVer =  PyFoam.FoamInformation.foamVersion()

print("Python version: %s" %pyVer[:6])
print("PyFoam version: %s" %pfVer)
print("OpenFOAM version: %d.%s" %ofVer)
Python version: 3.5.3
PyFoam version: 0.6.8.1
OpenFOAM version: 4.1
Deep Leaning環境
- TensorFlow
Googleが開発しているDeep Leaningライブラリ
pip show tensorflow
Name: tensorflow
Version: 1.1.0
Summary: TensorFlow helps the tensors flow
Home-page: http://tensorflow.org/
Author: Google Inc.
Author-email: opensource@google.com
License: Apache 2.0
Location: /home/ubuntu/.pyenv/versions/anaconda3-4.3.1/envs/py35/lib/python3.5/site-packages
Requires: wheel, numpy, six, protobuf, werkzeug
TensorFlowフロントエンド環境
- keras
- Pythonで書かれたDeep Leaningライブラリ
- バックエンドでMXNet、Deeplearning4j、TensorFlow、CNTK、Theanoが動作(from Wikipedia)
pip show keras
Name: Keras
Version: 2.0.2
Summary: Deep Learning for Python
Home-page: https://github.com/fchollet/keras
Author: Francois Chollet
Author-email: francois.chollet@gmail.com
License: MIT
Location: /home/ubuntu/.pyenv/versions/anaconda3-4.3.1/envs/py35/lib/python3.5/site-packages
Requires: theano, pyyaml, six
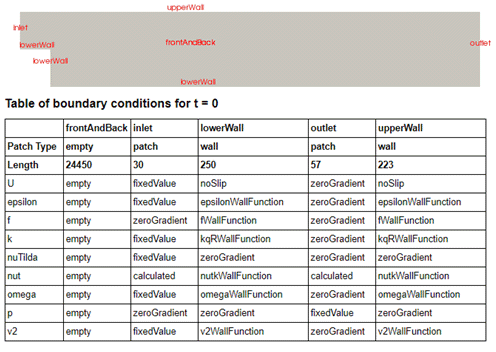
CFD対象(前回の記事と同じ)
ビッグデータの準備
- 各cellのdx,dy,ccx,ccyを計算
- t=1~10ステップ,最終ステップのp,Ux,Uy,k,epsilon,nutを取得
- 対象のcellを中心に9x9のcellに関する3,4のデータを取得。tはラベルとして使用

CVEA (Conditional Variational Autoencoder)
- 810(9x9x10)次元のベクトルから810次元の分散ベクトルと平均ベクトルを作成し、元の810次元のベクトルに戻す
- 分散・平均のベクトルから元の810次元ベクトルに戻すときにラベルを与えてあげることでラベルに対応した元ベクトルを生成できる
- コード含めこちらの記事を大いに参考にさせていただく
- こちらの記事も参考にさせていただいた
CVEAソース
必要ライブラリのインポート
import warnings
import numpy as np
from keras.layers import Input, Dense, Lambda, Dropout
from keras.layers.noise import GaussianNoise
from keras.layers.merge import concatenate as concat
from keras.models import Model
from keras import backend as K
from keras.datasets import mnist
from keras.utils import to_categorical
from keras.callbacks import EarlyStopping
from keras.optimizers import Adam
import matplotlib.pyplot as plt

warnings.filterwarnings('ignore')
%pylab inline
学習用のデータと検証用のデータを準備
X = np.load("./X2.npy")
X = X.astype(np.float32)
X = X.reshape(12225,9,9,16,10)
np.random.seed(1)
n_trains = 60000
n_ylabel = 0
n_t = 16
t = 0
c = 0
X_train = np.ones(n_trains * X[0,:,:,0,n_ylabel:].size,dtype=np.float32) * 10
X_train = X_train.reshape(n_trains,
                          X[c,:,:,t,n_ylabel:].shape[0],
                          X[c,:,:,t,n_ylabel:].shape[1],
                          X[c,:,:,t,n_ylabel:].shape[2])

Y_train = np.ones(n_trains * (1 + n_ylabel),dtype=np.float32).reshape(n_trains, (1 + n_ylabel)) * 10

CandT_train = np.ones(2*n_trains, dtype=np.float32).reshape(-1,2) * -1
for i in range(n_trains):
    t = np.random.randint(0,n_t)
    c = np.random.randint(0,12225)
    CandT_train[i,0] = c
    CandT_train[i,1] = t

    X_train[i,:,:,:] = X[c,:,:,t,n_ylabel:]
    Y_train[i,0] = t
n_test = 10000

X_test = np.ones(n_test * X[0,:,:,0,n_ylabel:].size,dtype=np.float32) * 10
X_test = X_test.reshape(n_test,
                          X[c,:,:,t,n_ylabel:].shape[0],
                          X[c,:,:,t,n_ylabel:].shape[1],
                          X[c,:,:,t,n_ylabel:].shape[2])

Y_test = np.ones(n_test * (1 + n_ylabel),dtype=np.float32).reshape(n_test, (1 + n_ylabel)) * 10


CandT_test = np.ones(2*n_test, dtype=np.float32).reshape(-1,2) * -1
for i in range(n_test):
    t = np.random.randint(0,n_t)
    c = np.random.randint(0,12225)
    CandT_test[i,0] = c
    CandT_test[i,1] = t

    X_test[i,:,:,:] = X[c,:,:,t,n_ylabel:]
    Y_test[i,0] = t
n_test2 = 100000

X_test2 = np.ones(n_test2 * X[0,:,:,0,n_ylabel:].size,dtype=np.float32) * 10
X_test2 = X_test2.reshape(n_test2,
                          X[c,:,:,t,n_ylabel:].shape[0],
                          X[c,:,:,t,n_ylabel:].shape[1],
                          X[c,:,:,t,n_ylabel:].shape[2])

Y_test2 = np.ones(n_test2 * (1 + n_ylabel),dtype=np.float32).reshape(n_test2, (1 + n_ylabel)) * 10

CandT_test2 = np.ones(2*n_test2, dtype=np.float32).reshape(-1,2) * -1
for i in range(n_test2):
    t = np.random.randint(0,n_t)
    c = np.random.randint(0,12225)
    CandT_test2[i,0] = c
    CandT_test2[i,1] = t

    X_test2[i,:,:,:] = X[c,:,:,t,n_ylabel:]
    Y_test2[i,0] = t

n_pixels = np.prod(X_train.shape[1:])
X_train = X_train.reshape((len(X_train), n_pixels)) * 0.5 +0.5
X_test = X_test.reshape((len(X_test), n_pixels)) * 0.5 +0.5
X_test2 = X_test2.reshape((len(X_test2), n_pixels)) * 0.5 +0.5

y_train = to_categorical(Y_train)
y_test = to_categorical(Y_test)
y_test2 = to_categorical(Y_test2)

print("X_train:%s" % (X_train.shape,))
print("Y_train:%s" %(Y_train.shape,))
print("X_test:%s" %(X_test.shape,))
print("Y_test:%s" %(Y_test.shape,))
print("X_test2:%s" %(X_test2.shape,))
print("Y_test2:%s" %(Y_test2.shape,))
(60000, 9, 9, 10) (60000, 1)
ハイパーパラメータ
m = 20 # batch size
n_z = 2 # latent space size
encoder_dim1 = 512 # dim of encoder hidden layer
decoder_dim = 512 # dim of decoder hidden layer
decoder_out_dim = n_pixels # dim of decoder output layer
activ = 'relu'
optim = Adam(lr=0.001)
n_x = X_train.shape[1]
n_y = y_train.shape[1]
n_epoch = 100
モデル作成
X = Input(shape=(n_x,))
label = Input(shape=(n_y,))
inputs = concat([X, label])
encoder_h = Dense(encoder_dim1, activation=activ)(inputs)
mu = Dense(n_z, activation='linear')(encoder_h)
l_sigma = Dense(n_z, activation='linear')(encoder_h)
def sample_z(args):
    mu, l_sigma = args
    eps = K.random_normal(shape=(m, n_z), mean=0., stddev=1.)
    return mu + K.exp(l_sigma / 2) * eps

# Sampling latent space
z = Lambda(sample_z, output_shape = (n_z, ))([mu, l_sigma])

z = Lambda(sample_z, output_shape = (n_z, ))([mu, l_sigma])

# merge latent space with label
zc = concat([z, label])

decoder_hidden = Dense(decoder_dim, activation=activ)
decoder_out = Dense(decoder_out_dim, activation='sigmoid')
h_p = decoder_hidden(zc)
outputs = decoder_out(h_p)

def vae_loss(y_true, y_pred):
    recon = K.sum(K.binary_crossentropy(y_true, y_pred), axis=-1)
    kl = 0.5 * K.sum(K.exp(l_sigma) + K.square(mu) - 1. - l_sigma, axis=-1)
    return recon + kl

def KL_loss(y_true, y_pred):
    return(0.5 * K.sum(K.exp(l_sigma) + K.square(mu) - 1. - l_sigma, axis=1))

def recon_loss(y_true, y_pred):
    return K.sum(K.binary_crossentropy(y_true, y_pred), axis=-1)
cvae = Model([X, label], outputs)
encoder = Model([X, label], mu)

d_in = Input(shape=(n_z+n_y,))
d_h = decoder_hidden(d_in)
d_out = decoder_out(d_h)
decoder = Model(d_in, d_out)

cvae.compile(optimizer=optim, loss=vae_loss, metrics = [KL_loss, recon_loss])

cvae.summary()
____________________________________________________________________________________________________
Layer (type)                     Output Shape          Param #     Connected to
====================================================================================================
input_1 (InputLayer)             (None, 810)           0
____________________________________________________________________________________________________
input_2 (InputLayer)             (None, 16)            0
____________________________________________________________________________________________________
concatenate_1 (Concatenate)      (None, 826)           0
____________________________________________________________________________________________________
dense_1 (Dense)                  (None, 512)           423424
____________________________________________________________________________________________________
dense_2 (Dense)                  (None, 2)             1026
____________________________________________________________________________________________________
dense_3 (Dense)                  (None, 2)             1026
____________________________________________________________________________________________________
lambda_2 (Lambda)                (None, 2)             0
____________________________________________________________________________________________________
concatenate_2 (Concatenate)      (None, 18)            0
____________________________________________________________________________________________________
dense_4 (Dense)                  (None, 512)           9728
____________________________________________________________________________________________________
dense_5 (Dense)                  (None, 810)           415530
====================================================================================================
Total params: 850,734.0
Trainable params: 850,734.0
Non-trainable params: 0.0
____________________________________________________________________________________________________
モデルをプロットする
from keras.utils import plot_model
fname = "pitzDaily_cvea.png"
plot_model(cvae, to_file='./%s'% fname , show_shapes=True)
下記のようなモデル図が出力される。

学習
GPUじゃないから遅い。。。
GPU買いたいが買えない。
from keras_tqdm import TQDMNotebookCallback
cvae_hist = cvae.fit([X_train, y_train], X_train, verbose = 0, batch_size=m, epochs=n_epoch,
                            validation_data = ([X_test, y_test], X_test),
                            callbacks = [TQDMNotebookCallback(),EarlyStopping(patience = 5)])
TQDMNotebookCallbackを用いてjupyter上でプログレスバーを表示させていたので、学習過程をstdout出力させなかった。
TQDMNotebookCallback()を使う場合も、verbose = 1にした方が良いかも
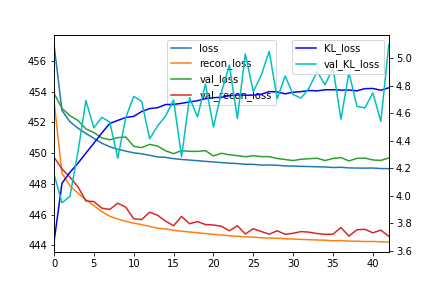
学習履歴
学習履歴をプロットする。loss関数が下がってきている。
しっかり学習できてる?
import pandas as pd
dfhist = pd.DataFrame(cvae_hist.history)

ax1 = dfhist.loss.plot(legend=True)
ax1 = dfhist.recon_loss.plot(ax=ax1,legend=True)
ax1 = dfhist.val_loss.plot(ax=ax1,legend=True)
ax1 = dfhist.val_recon_loss.plot(ax=ax1,legend=True)
ax1.legend(loc='upper center')
ax2 = ax1.twinx()
ax2 = dfhist.KL_loss.plot(ax=ax2,legend=True, c="b")
ax2 = dfhist.val_KL_loss.plot(ax = ax2,legend=True,  c="c")
ax2.legend(loc='upper right')
plt.savefig("./data2/cvae_hist_plot.png")
encoderの分布
あまりに鮮やかな画像。これは流れ場を特徴を表しているのか?
学習がうまくいっていかいのか?
X_test2をつかって相関図を描く
予測精度(相関図)

ぐは・・・
いまいちな結果に。。。
本来はここからラベルt=iの結果からi+1を予測しようと考えていたが、、、見直してから実施する
まとめ
- 黒魔術を唱えるためにも最低限のレベルが必要
- 問題設定が悪い?
- 正規分布を仮定して平均分散ベクトル化しているが隠れ層が足りない?
- ビッグデータとしてどうなの?


