はじめに
先日、「StrandsAgents」がAG-UIに対応しました!
AG-UIはAIエージェントとUI間のやりとりを標準した共通プロトコルです。
いわゆる「MCP」や「A2A」と同じような立ち位置の概念になります。
その結果、StarndsAgentsのフロントエンドとして、AG-UIに準拠した「CopilotKit」が使えるようになりました。やったー!!
本記事の内容
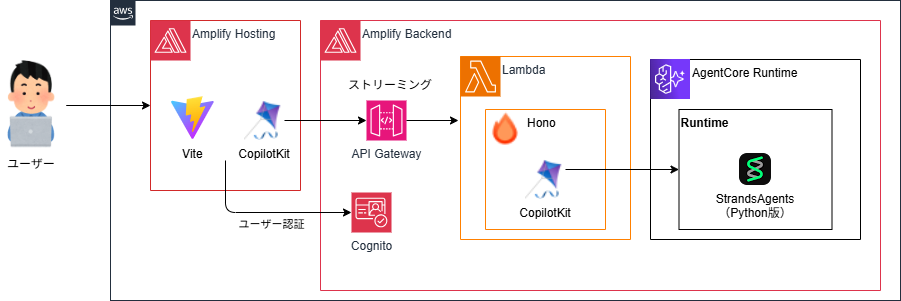
本記事では、以下のような構成でAIチャットボット作りました。
実装したコードはこちら。
推しポイント1. Amplifyの機能をフル活用で開発が楽チン
AgentCore含め全てリソースはAmplifyの管理下にあるため、AmplifyのSandbox機能で開発中もデプロイが可能です。
また、同様にAmplify HostingのCI/CDによるデプロイもnpx ampx pipeline-deployにより一発で可能です。
推しポイント2. CopilotKitによるフロントエンド実装の簡略化
StrandsAgentsのフロントエンドとしてCopilotKitが使えるようになったおかげて、フロントエンドとAIエージェントを接続する処理など以下の点がシンプルになりました。
- AIエージェント と フロントエンド間のやりとり
- フロントエンドの状態管理 (エージェントから受け取ったメッセージの管理とか)
- UI表示や表示自体の制御(チャット画面の表示とか、エラーやローディング表示とか)
推しポイント3. API Gatewayによるカスタマイズ性の向上
11月頃のアップデートでAPI Gatewayのストリーミングレスポンスが登場しました。
これにより、AIエージェントの前段にAPI Gatewayを付けることで、要件によってはWAFによるセキュリティ強化や使用量プランによる利用制限をかけることも可能です。
留意事項:本記事ではAmplifyが依存するCDKのバージョンを手動で上げてます
API Gatewayのストリーミングレスポンスは、2025/11/19に登場した機能であり、CDKはv2.230.0から対応しています。
AWS Amplifyのバージョンは、2025/12/9時点でv1.18.0であり、依存しているCDKのバージョンは、v2.216.0です。なので、手動でCDKのバージョンを上げています。
概要
StrandsAgentsの従来の課題
StrandsAgentsは、対応するフロントエンドのフレームワークが少なく、リッチなフロントエンドを構築しようとすると、自前で実装しないといけない手間がありました。
対応としては、以下が挙げられますが、TypeScriptでフロントエンドを作ろうとすると、結構大変でした...
- Straemlit(Python)でUIを実装する
- TypeScriptとか使うなら、AI SDK UIなどを使いつつ、AIエージェントとUIのやりとりを自力で実装する
例えば、TypeScriptでAIエージェントを構築する場合、「Mastra」や「AI SDK」といったフレームワークがあります。これらは「AI SDK UI」「AI SDK Elements」といったAIエージェントのフロントエンドを構築するためのライブラリが提供されています。
また「assistant-ui」というライブラリもありますが、StrandsAgentsには対応していないです。
StrandsAgentsに対応したAG-UIって何者?
AG-UI(Agent-User Interaction Protocol)は、AIエージェントとユーザーインターフェース間のやりとりを標準化したプロトコルです。
ユーザーはUIを介してAIエージェントを呼び出し、AIエージェントは応答をUIを通じてユーザーに伝えます。
例えば、呼び出す先のAIエージェントが変われば、UI側の実装も変更する必要があります。
変化が激しいAIエージェント開発とっては、とても大変なのかなと思います。
AG-UIは、このやりとりを共通規格で標準化しちゃおう!というものです。

↓詳細は公式をご参照ください
AG-UI準拠したCopilotKitでStrandsAgentsのフロントエンドが楽になった
CopilotKitは、前述したAG-UIに準拠したフレームワークです。
AIエージェントと統合することで、AIエージェントとUI間の接続を標準化し、AIエージェントのフロントエンド含めてアプリを簡単に作れちゃいます。
ざっくりアーキテクチャ
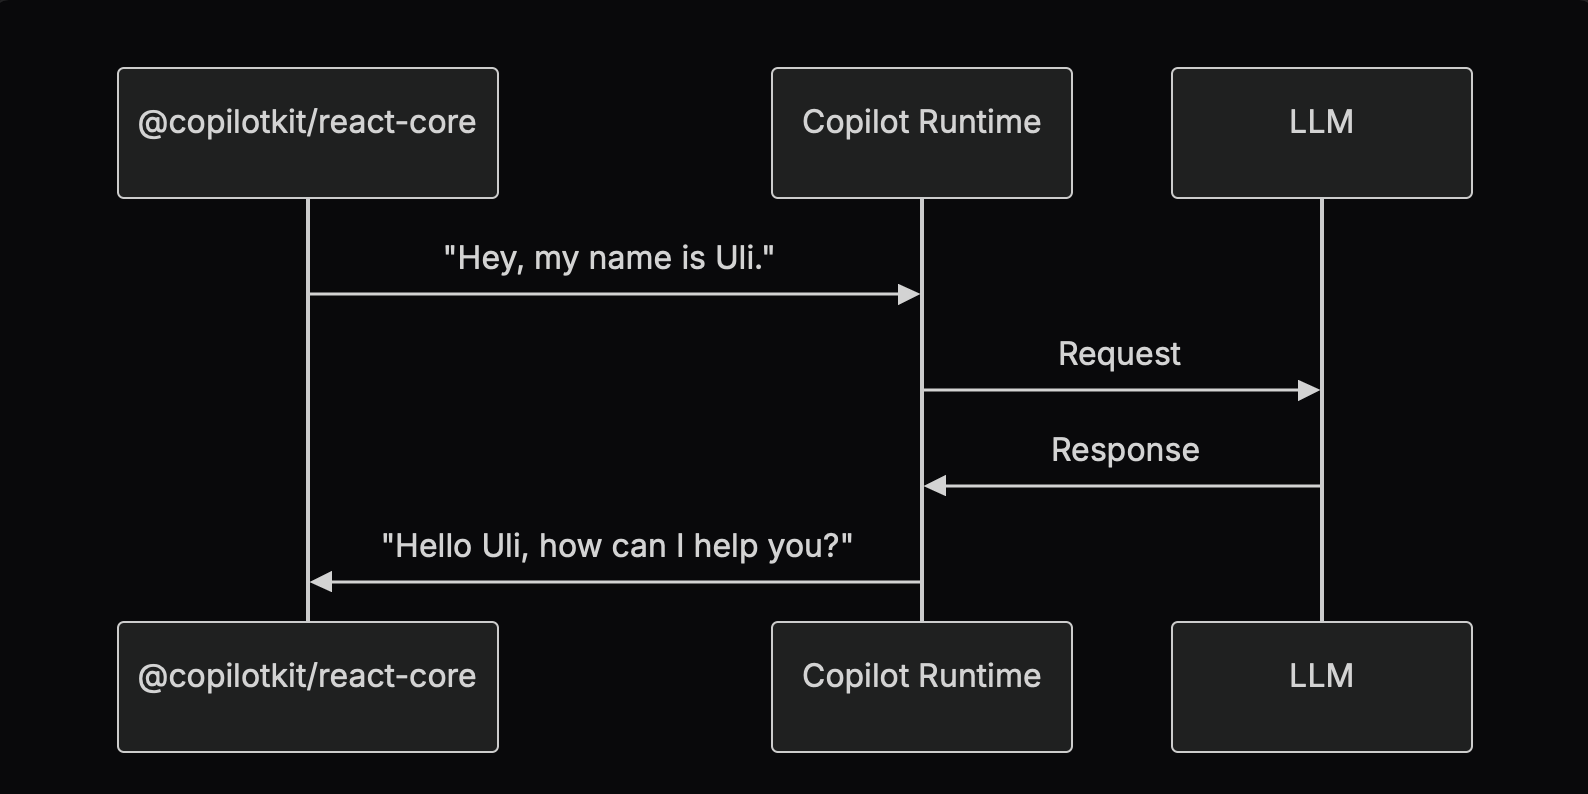
以下では、フロントエンドに@copilotkit/react-core、バックエンドにCopilot Runtime埋め込んでいます。
このCopilot Runtimeがミソでして、AIエージェント(下図のLLM)とフロントエンドの橋渡しをしてくれます。
Copilot Runtimeのサポート環境
Copilot Runtimeは、以下のサーバーで起動できます。
- Next.js (App Router / Pages Router)
- Node.js (Express / HTTP)
- Nest.js
- CopilotCloud
クイックスタートはこちら
ということで、ここから先は詳細な構築の流れになります。
1. StrandsAgents(Python版)でAIエージェントを作る
uvでPythonプロジェクトを作成します。
uv init <プロジェクト名>
cd <プロジェクト名>
Pythonの仮想環境を作成し、有効にします。
uv venv --python 3.14
source .venv/bin/activate
実装に必要なライブラリをインストールします。
uv add strands-agents ag-ui-strands fastapi uvicorn
-
strands-agentsは、AWSが提供するAIエージェントを実装するためのSDKです。 -
ag-ui-strandsは、CopilotKitとStrandsAgentsを統合し、CopilotKit準拠のレスポンスを返すための部品です。 -
fastapiは、WebAPIを開発するためのPythonフレームワークです。 -
uvicornは、Pythonアプリケーションを非同期で実行するためのWebサーバーです。
ここからは実際にStrandsAgentsでAIエージェントを実装します。
LLMは、Claude Haiku 4.5をBedrock経由で呼び出します。
model = BedrockModel(
    model_id="jp.anthropic.claude-haiku-4-5-20251001-v1:0",
    region="ap-northeast-1"
)
今回は、シンプルにツールも特に呼ばない単一のエージェントです。
agent = Agent(
    model=model,
    system_prompt="You are a helpful AI assistant.",
)
ここでag-ui-strands登場します。
StrandsAgentのagentへ先ほど実装したエージェントを設定します。これだけで、CopilotKitが認識できるようにレスポンスを返してくれます。
ストリーミング周りの実装も不要で、ag-ui-strandsがやってくれます。
agui_agent = StrandsAgent(
    agent=agent,
    name="strands_agent",
)
あとは、uvicornとFast APIでAPIサーバーを設定します。
(create_strands_app内でFast APIが使われてると思います...)
app = create_strands_app(agui_agent, "/invocations")

if __name__ == "__main__":
    import uvicorn

    uvicorn.run("main:app", host="0.0.0.0", port=8000, reload=True)
最終的に、以下のようなコードになります。
import os

from ag_ui_strands import StrandsAgent, create_strands_app
from strands import Agent
from strands.models import BedrockModel

model = BedrockModel(
    model_id="jp.anthropic.claude-haiku-4-5-20251001-v1:0",
    region="ap-northeast-1"
)

agent = Agent(
    model=model,
    system_prompt="You are a helpful AI assistant.",
)

agui_agent = StrandsAgent(
    agent=agent,
    name="strands_agent",
)

app = create_strands_app(agui_agent, "/invocations")

if __name__ == "__main__":
    import uvicorn

    uvicorn.run("main:app", host="0.0.0.0", port=8000, reload=True)
2. フロントエンドの環境を準備する
Viteのプロジェクトを作成する
Viteのプロジェクトを作成し、パッケージをインストールします。
npm create vite@latest
cd <プロジェクト名>
npm install
フロントエンド開発に必要なライブラリをインストールします。
npm install @copilotkit/react-ui @copilotkit/react-core
Amplifyを設定する
ViteのプロジェクトにAWS Amplify をインストールします。
npm create amplify@latest
Amplify開発に必要なライブラリをインストールします。
npm install @aws-amplify/ui-react @aws-cdk/aws-bedrock-agentcore-alpha
npm installを実行して、aws-cdk-libを最新バージョンへ更新します。
npm install aws-cdk-lib@latest
3. Amplifyでバックエンドを実装する
Copilot Runtimeに対応したAWS Lambdaを実装する
Lambda用のフォルダを作り、Nodeの環境を作ります。
mkdir -p amplify/functions/copilotkit
cd amplify/functions/copilotkit
npm init -y
開発に必要なライブラリをインストールします。
npm install @ag-ui/client copilotkit/runtime hono
それではLambdaのコードを書いていきます。
今回は、Honoを使ってWebサーバー化して、ストリーミング処理もやってもらいます。
const app = new Hono()
CopilotRuntimeでCopilotKitのランタイムを作成し、CopilotKitがアクセスする先のAIエージェントを設定します。
HttpAgentのパラメータとして、AgentCore RuntimeのURLとCognito認証用のアクセストークンを渡すことで、HTTPでエージェントにアクセスしてくれます。
  const runtime = new CopilotRuntime({
    agents: {
      strands_agent: new HttpAgent({
        url: fullUrl,
        headers: {
          'Content-Type': 'application/json',
          'Authorization': `Bearer ${accessToken}`,
        }
      }),
    },
  });
あとは、copilotRuntimeNodeHttpEndpointを使ってハンドラーを作って、returnするだけ。
const serviceAdapter = new ExperimentalEmptyAdapter();
  const handler = copilotRuntimeNodeHttpEndpoint({
    endpoint: '/copilotkit',
    runtime,
    serviceAdapter,
  });

  return handler.handle(c.req.raw, {});
最終的なLambdaのコードは以下になります。
import { Hono } from 'hono'
import { cors } from 'hono/cors'
import { streamHandle } from 'hono/aws-lambda'
import {
  CopilotRuntime,
  ExperimentalEmptyAdapter,
  copilotRuntimeNodeHttpEndpoint,
} from '@copilotkit/runtime';
import { HttpAgent } from "@ag-ui/client";

const serviceAdapter = new ExperimentalEmptyAdapter();

const app = new Hono()

// Add CORS middleware
app.use('/*', cors({
  origin: '*',
  allowMethods: ['POST', 'OPTIONS'],
  allowHeaders: ['content-type', 'authorization', 'accept', 'x-access-token', 'x-copilotkit-runtime-client-gql-version'],
  maxAge: 86400
}))

// 環境変数からエージェントエンドポイントIDを取得
const BEDROCK_AGENT_CORE_ENDPOINT_URL = "https://bedrock-agentcore.ap-northeast-1.amazonaws.com"
const agentEndpoint = process.env.AGENT_RUNTIME_ARN || '';
const fullUrl = `${BEDROCK_AGENT_CORE_ENDPOINT_URL}/runtimes/${encodeURIComponent(agentEndpoint)}/invocations`;
console.log("fullUrl:", fullUrl);

app.post('/copilotkit', async (c) => {
  const accessToken = c.req.header('x-access-token');
  if (!accessToken) {
    throw new Error('Missing access token');
  }

  const runtime = new CopilotRuntime({
    agents: {
      strands_agent: new HttpAgent({
        url: fullUrl,
        headers: {
          'Content-Type': 'application/json',
          'Authorization': `Bearer ${accessToken}`,
        }
      }),
    },
  });

  const handler = copilotRuntimeNodeHttpEndpoint({
    endpoint: '/copilotkit',
    runtime,
    serviceAdapter,
  });

  return handler.handle(c.req.raw, {});
})
export const handler = streamHandle(app)
あとは、このLambdaがAmplifyに読み込まれるようにdefineFunctionを定義します。
import { defineFunction } from '@aws-amplify/backend';


export const copilotkitFunction = defineFunction({
  name: 'copilotkit',
  entry: './handler.ts',
  timeoutSeconds: 180,
});
API Gateway と Lambda と AgentCore Runtimeのリソースを構築する
AgentCore Runtimeは、L2コンストラクトで構築します。
(ずっとCloudFormtionでデプロイしてきたのですが、L2を知ってしまったので、もう戻れない体になってしまいました。)
Amplifyのカスタムリソースとして定義することで、Sandbox機能の恩恵を受けられたり、Amplify Hostingのデプロイ時に一発でデプロイできます。
認証は、Amplify Auth(Amazon Cognito)によるJWT認証を設定しています。
const agentRuntimeArtifact = agentcore.AgentRuntimeArtifact.fromAsset(
  path.join(__dirname, "../../agent")
);

const agentRuntime = new agentcore.Runtime(backend.stack, 'StrandsAgentRuntime', {
  runtimeName: 'strandsAgentRuntime',
  agentRuntimeArtifact: agentRuntimeArtifact,
  authorizerConfiguration:
    agentcore.RuntimeAuthorizerConfiguration.usingCognito(
      backend.auth.resources.userPool,
      [backend.auth.resources.userPoolClient]
    )
});

agentRuntime.role.addToPrincipalPolicy(
  new iam.PolicyStatement({
    actions: [
      "bedrock:InvokeModel",
      "bedrock:InvokeModelWithResponseStream",
    ],
    resources: ["*"],
  }),
);
あとは、ストリーミングレスポンスに対応したAPI Gatew + Lambdaを実装しています。
new aws_lambda.CfnUrl(backend.stack, 'copilotkitFunctionUrl', {
  targetFunctionArn: backend.copilotkitFunction.resources.lambda.functionArn,
  authType: 'NONE',
  invokeMode: 'RESPONSE_STREAM'
});

const restApi = new apigateway.RestApi(
  backend.copilotkitFunction.stack,
  "StreamingApi",
  {
    restApiName: "Streaming API",
    deployOptions: {
      stageName: "dev",
    },
    defaultCorsPreflightOptions: {
      allowOrigins: apigateway.Cors.ALL_ORIGINS,
      allowMethods: ["POST", "OPTIONS"],
      allowHeaders: ["*"],
    },
  }
);

restApi.root.addResource("copilotkit").addMethod(
  "POST",
  new apigateway.LambdaIntegration(
    backend.copilotkitFunction.resources.lambda,
    {
      proxy: true,
      responseTransferMode: ResponseTransferMode.STREAM,
    }
  )
);
最終的なコードは以下のようになります。
import { defineBackend } from '@aws-amplify/backend';
import * as aws_lambda from 'aws-cdk-lib/aws-lambda';
import * as path from "path";
import { fileURLToPath } from "url";
import { auth } from './auth/resource';
import { copilotkitFunction } from './functions/copilotkit/resource';
import * as agentcore from "@aws-cdk/aws-bedrock-agentcore-alpha";
import * as iam from "aws-cdk-lib/aws-iam";
import * as apigateway from "aws-cdk-lib/aws-apigateway";
import { ResponseTransferMode } from "aws-cdk-lib/aws-apigateway";

const __filename = fileURLToPath(import. meta.url);
const __dirname = path.dirname(__filename);

const backend = defineBackend({
  auth,
  copilotkitFunction
});

const agentRuntimeArtifact = agentcore.AgentRuntimeArtifact.fromAsset(
  path.join(__dirname, "../../agent")
);

const agentRuntime = new agentcore.Runtime(backend.stack, 'StrandsAgentRuntime', {
  runtimeName: 'strandsAgentRuntime',
  agentRuntimeArtifact: agentRuntimeArtifact,
  authorizerConfiguration:
    agentcore.RuntimeAuthorizerConfiguration.usingCognito(
      backend.auth.resources.userPool,
      [backend.auth.resources.userPoolClient]
    )
});

agentRuntime.role.addToPrincipalPolicy(
  new iam.PolicyStatement({
    actions: [
      "bedrock:InvokeModel",
      "bedrock:InvokeModelWithResponseStream",
    ],
    resources: ["*"],
  }),
);

backend.copilotkitFunction.addEnvironment('USER_POOL_ID', backend.auth.resources.userPool.userPoolId);
backend.copilotkitFunction.addEnvironment('USER_POOL_CLIENT_ID', backend.auth.resources.userPoolClient.userPoolClientId);
backend.copilotkitFunction.addEnvironment('AGENT_RUNTIME_ARN', agentRuntime.agentRuntimeArn);

new aws_lambda.CfnUrl(backend.stack, 'copilotkitFunctionUrl', {
  targetFunctionArn: backend.copilotkitFunction.resources.lambda.functionArn,
  authType: 'NONE',
  invokeMode: 'RESPONSE_STREAM'
});

const restApi = new apigateway.RestApi(
  backend.copilotkitFunction.stack,
  "StreamingApi",
  {
    restApiName: "Streaming API",
    deployOptions: {
      stageName: "dev",
    },
    defaultCorsPreflightOptions: {
      allowOrigins: apigateway.Cors.ALL_ORIGINS,
      allowMethods: ["POST", "OPTIONS"],
      allowHeaders: ["*"],
    },
  }
);

restApi.root.addResource("copilotkit").addMethod(
  "POST",
  new apigateway.LambdaIntegration(
    backend.copilotkitFunction.resources.lambda,
    {
      proxy: true,
      responseTransferMode: ResponseTransferMode.STREAM,
    }
  )
);

backend.addOutput({
  custom: {
    copilotkitFunctionUrl: restApi.url,
    agentRuntimeArn: agentRuntime.agentRuntimeArn
  }
});
4. CopilotKitでフロントエンドを実装する
ここまででバックエンドができたので、フロントエンドを実装します。
CopilotKitコンポーネントのruntimeUrlにAmplifyで定義したAPI GatewayのURLを指定します。これでCopilotKitがAIエージェントを呼び出す際は、API Gateway経由で呼び出します。
agentの設定は、StarandsAgentsに設定した名称と同じ値にします。
    <CopilotKit
      runtimeUrl={`${custom.copilotkitFunctionUrl}copilotkit`}
      agent="strands_agent"
      headers={headers}
    >
      {children}
    </CopilotKit>
最終的には以下のようなコンポーネントを実装します。
import { useState, useEffect } from "react";
import { CopilotKit } from "@copilotkit/react-core";
import "@copilotkit/react-ui/styles.css";
import { useAuth } from "../hooks/useAuth";
import { custom } from '../../amplify_outputs.json';


export default function CopilotkitProvider({
  children,
}: {
  children: React.ReactNode;
}) {
  const { isAuthenticated, getAccessToken } = useAuth();
  const [accessToken, setAccessToken] = useState<string | null>(null);

  useEffect(() => {
    if (isAuthenticated) {
      getAccessToken().then(token => setAccessToken(token || null));
    }
  }, [isAuthenticated, getAccessToken]);

  const headers: Record<string, string> = {
    "X-Access-Token": accessToken || "",
  };

  return isAuthenticated && accessToken ? (
    <CopilotKit
      runtimeUrl={`${custom.copilotkitFunctionUrl}copilotkit`}
      agent="strands_agent"
      headers={headers}
    >
      {children}
    </CopilotKit>
  ) : null;
}
今のままでは接続の設定をしただけなので、CopilotKitでUIを構築します。
CopilotChatコンポーネントを使うことで、よくあるチャットボットの画面を構築できます。
import { CopilotChat } from "@copilotkit/react-ui";


export default function Chat() {
  return (
    <CopilotChat
      instructions={"You are assisting the user as best as you can. Answer in the best way possible given the data you have."}
      labels={{
        title: "Your Assistant",
        initial: "Hi! 👋 How can I assist you today?",
      }}
      className="copilotKitChat"
    />
  );
}
5. Amplify HostingからAWS環境へデプロイする
AgentCoreデプロイ用にDockerファイルを作成しておきます。
FROM public.ecr.aws/docker/library/python:3.13-slim

WORKDIR /app

# Install uv
RUN pip install uv

# Copy agent directory
COPY . .

# Install dependencies using uv
RUN uv pip install --system .

# Create non-root user
RUN useradd -m -u 1000 agent_user
USER agent_user

EXPOSE 8080

CMD ["python", "-m", "uvicorn", "main:app", "--host", "0.0.0.0", "--port", "8080"]
Amplify Hostingにデプロイするためのamplfy.ymlを作成します。
各種AWSリソースは、Amplify配下で定義されているので、npx ampx pipeline-deployで一発デプロイできます。
version: 1
appRoot: .
backend:
  phases:
    preBuild:
      commands:
        # Lambdaの依存ライブラリをインストール
        - cd frontend/amplify/functions/copilotkit
        - npm ci --cache .npm --prefer-offline
        - cd ../../../
    build:
      commands:
        # Amplifyのバックエンドをデプロイ
        - npm ci --cache .npm --prefer-offline
        - npx ampx pipeline-deploy --branch $AWS_BRANCH --app-id $AWS_APP_ID --debug

frontend:
  phases:
    preBuild:
      commands:
        - npm ci
    build:
      commands:
        - npm run build
        - ls
  artifacts:
    baseDirectory: frontend/dist
    files:
      - '**/*'
  cache:
    paths:
      - frontend/node_modules/**/*
      - frontend/dist/**/*
まとめ
AG-UIのStrandsAgents対応により、だいぶシンプルにAIエージェントを構築できるようなったのではないでしょうか。re:Inventのアップデートでは無いですが、個人的には何より嬉しいです。
今回はモグリの知識でAG-UIやCopilotKitを使いましたが、この辺りも面白そうなのでもう少し深掘りしてみたいと思ってます。
(覚える頃には新しいフレームワークが出てきて、覚え直しになりそうではありますが...)
今回の構成は、Amplify固有の知識を覚える必要はありますが、開発体験は良いと思うでぜひ試してみて欲しいです!!
じゃんじゃんバリバリとAIエージェントを作りましょう!!