はじめに
AWSでCloudFormationのサービスを利用すると、リソース(EC2やRDS等)をテンプレートから自動構築することができるようになり、同じインフラ構成をすぐに再現することができます。
AWS公式オンラインセミナーのスライド67枚目にあるように、テンプレートは分割して運用することがベストプラクティスのようです。今回、以下の3つのテンプレートに分割して、次の構成図をyamlで作成してみました。
構成図

Network Layer
VPC、Subnet、InternetGateway、RouteTable、VPCEndpointを作成します。
構成図でいうとここまで進みます。

VPC
DNS系については、今回外部からは検索されても問題ないのでtrueにしています。あと、ハードウェア専用インスタンスは使用しないのでテナンシーはdefaultにしています。
AWSTemplateFormatVersion: 2010-09-09
Description: Network_Layer Template

Resources:
  SampleVPC:
    Type: AWS::EC2::VPC
    Properties:
      CidrBlock: 10.0.0.0/16
      EnableDnsSupport: true
      EnableDnsHostnames: true
      InstanceTenancy: default
      Tags:
        - Key: name
          Value: SampleVPC
Subnet
PublicとPrivateそれぞれ2つずつ作成します。PublicSubnetのMapPublicIpOnLaunchをtrueに設定することでEC2のパブリックIPアドレスの自動割り当てを設定します。
  PublicSubnet1a:
    Type: AWS::EC2::Subnet
    Properties:
      VpcId: !Ref SampleVPC
      CidrBlock: 10.0.0.0/24
      MapPublicIpOnLaunch: true
      AvailabilityZone: ap-northeast-1a
      Tags:
      - Key: Name
        Value: PublicSubnet1a
  PrivateSubnet1a:
    Type: AWS::EC2::Subnet
    Properties:
      VpcId: !Ref SampleVPC
      CidrBlock: 10.0.1.0/24
      AvailabilityZone: ap-northeast-1a
      Tags:
      - Key: Name
        Value: PrivateSubnet1a
  PublicSubnet1c:
    Type: AWS::EC2::Subnet
    Properties:
      VpcId: !Ref SampleVPC
      CidrBlock: 10.0.3.0/24
      MapPublicIpOnLaunch: true
      AvailabilityZone: ap-northeast-1c
      Tags:
      - Key: Name
        Value: PublicSubnet1c
  PrivateSubnet1c:
    Type: AWS::EC2::Subnet
    Properties:
      VpcId: !Ref SampleVPC
      CidrBlock: 10.0.2.0/24
      AvailabilityZone: ap-northeast-1c
      Tags:
      - Key: Name
        Value: PrivateSubnet1c
InternetGateway
作成したVPCとInternetGatewayをAttachmentで関連付けしておきます。
  InternetGateway:
    Type: AWS::EC2::InternetGateway
    Properties:
      Tags:
        - Key: Name
          Value: InternetGateway

  # InternetGatewayとVPCの接続
  InternetGatewayAttachment:
    Type: AWS::EC2::VPCGatewayAttachment
    Properties:
      InternetGatewayId: !Ref InternetGateway
      VpcId: !Ref SampleVPC
RouteTable
InternetGateway接続用(public)とVPCEndpoint接続用(Private)のRouteTableを作成します。
  PublicRouteTable:
    Type: AWS::EC2::RouteTable
    Properties:
      VpcId: !Ref SampleVPC
      Tags:
        - Key: Name
          Value: PublicRouteTable
  PrivateRouteTable:
    Type: AWS::EC2::RouteTable
    Properties:
      VpcId: !Ref SampleVPC
      Tags:
        - Key: Name
          Value: PrivateRouteTable

  # SubnetとRoutetableの関連付け
  PublicRouteTableAssociation1a:
    Type: AWS::EC2::SubnetRouteTableAssociation
    Properties:
      RouteTableId: !Ref PublicRouteTable
      SubnetId: !Ref PublicSubnet1a
  PublicRouteTableAssociation1c:
    Type: AWS::EC2::SubnetRouteTableAssociation
    Properties:
      RouteTableId: !Ref PublicRouteTable
      SubnetId: !Ref PublicSubnet1c
  PrivateRouteTableAssociation1a:
    Type: AWS::EC2::SubnetRouteTableAssociation
    Properties:
      RouteTableId: !Ref PrivateRouteTable
      SubnetId: !Ref PrivateSubnet1a
  PrivateRouteTableAssociation1c:
    Type: AWS::EC2::SubnetRouteTableAssociation
    Properties:
      RouteTableId: !Ref PrivateRouteTable
      SubnetId: !Ref PrivateSubnet1c

  # Routeの指定
  PublicRoute:
    Type: AWS::EC2::Route
    Properties:
      DestinationCidrBlock: 0.0.0.0/0
      RouteTableId: !Ref PublicRouteTable
      GatewayId: !Ref InternetGateway
VPCEndpoint
後で作成するS3はVPC外にあります。そのため、VPCEndpointを経由してPrivateRouteTableに設置するRDSと接続できるように設定します。
  VPCEndpoint:
    Type: AWS::EC2::VPCEndpoint
    Properties:
      RouteTableIds:
        - !Ref PrivateRouteTable
      ServiceName: com.amazonaws.ap-northeast-1.s3
      VpcEndpointType: Gateway
      VpcId: !Ref SampleVPC
Outputs
今回、テンプレートを3つに分割しますので、Security_LayerやApplication_LayerへリソースIDを渡す必要があるものをOutputsで作成します。
Outputs:
  SampleVPC:
    Value: !Ref SampleVPC
    Export:
      Name: NetworkLayer-SampleVPC
  PublicSubnet1a:
    Value: !Ref PublicSubnet1a
    Export:
      Name: NetworkLayer-PublicSubnet1a
  PublicSubnet1c:
    Value: !Ref PublicSubnet1c
    Export:
      Name: NetworkLayer-PublicSubnet1c
  PrivateSubnet1a:
    Value: !Ref PrivateSubnet1a
    Export:
      Name: NetworkLayer-PrivateSubnet1a
  PrivateSubnet1c:
    Value: !Ref PrivateSubnet1c
    Export:
      Name: NetworkLayer-PrivateSubnet1c
Security Layer
セキュリティグループ、IAMユーザ、IAMポリシー、の担当分野になりますが、今回セキュリティグループのみ作成します。送信元をALBに設定するため、SourceSecurityGroupIdを設定してEC2とALBのそれぞれのセキュリティグループを関連付けておきます。
SecurityGroup
セキュリティグループはEC2、RDS、ALB用に3つ作成します。同じテンプレート内でリソースの値を参照する際は、組み込み関数Refを使用しますが、別テンプレートでエクスポートされた値を参照する場合は組み込み関数ImportValueを使用します。
構成図でいうとここまで進みます。

AWSTemplateFormatVersion: 2010-09-09
Description: Security_Layer Template

Resources:
  SecurityGroupEC2:
    Type: AWS::EC2::SecurityGroup
    Properties:
      GroupDescription: SecurityGroupEC2
      GroupName: SecurityGroupEC2
      SecurityGroupIngress:
        - IpProtocol: tcp
          FromPort: 80
          ToPort: 80
          SourceSecurityGroupId: !Ref SecurityGroupALB
        - IpProtocol: tcp
          FromPort: 22
          ToPort: 22
          CidrIp: 0.0.0.0/0
      Tags:
        - Key: Name
          Value: SecurityGroupEC2
      VpcId: !ImportValue NetworkLayer-SampleVPC
  SecurityGroupRDS:
    Type: AWS::EC2::SecurityGroup
    Properties:
      GroupDescription: SecurityGroupRDS
      GroupName: SecurityGroupRDS
      SecurityGroupIngress:
        - IpProtocol: tcp
          FromPort: 3306
          ToPort: 3306
          CidrIp: 0.0.0.0/0
      Tags:
        - Key: Name
          Value: SecurityGroupRDS
      VpcId: !ImportValue NetworkLayer-SampleVPC

  SecurityGroupALB:
    Type: AWS::EC2::SecurityGroup
    Properties:
      GroupDescription: SecurityGroupALB
      GroupName: SecurityGroupALB
      SecurityGroupIngress:
        - IpProtocol: tcp
          FromPort: 80
          ToPort: 80
          CidrIp: 0.0.0.0/0
      Tags:
        - Key: Name
          Value: SecurityGroupALB
      VpcId: !ImportValue NetworkLayer-SampleVPC
Outputs
先程同様、Outputsを作成します。
Outputs:
  SecurityGroupEC2:
    Value: !Ref SecurityGroupEC2
    Export:
      Name: SecurityLayer-SecurityGroupEC2

  SecurityGroupRDS:
    Value: !Ref SecurityGroupRDS
    Export:
      Name: SecurityLayer-SecurityGroupRDS

  SecurityGroupALB:
    Value: !Ref SecurityGroupALB
    Export:
      Name: SecurityLayer-SecurityGroupALB
Application Layer
最後に、EC2、RDS、ALB、S3を作成します。
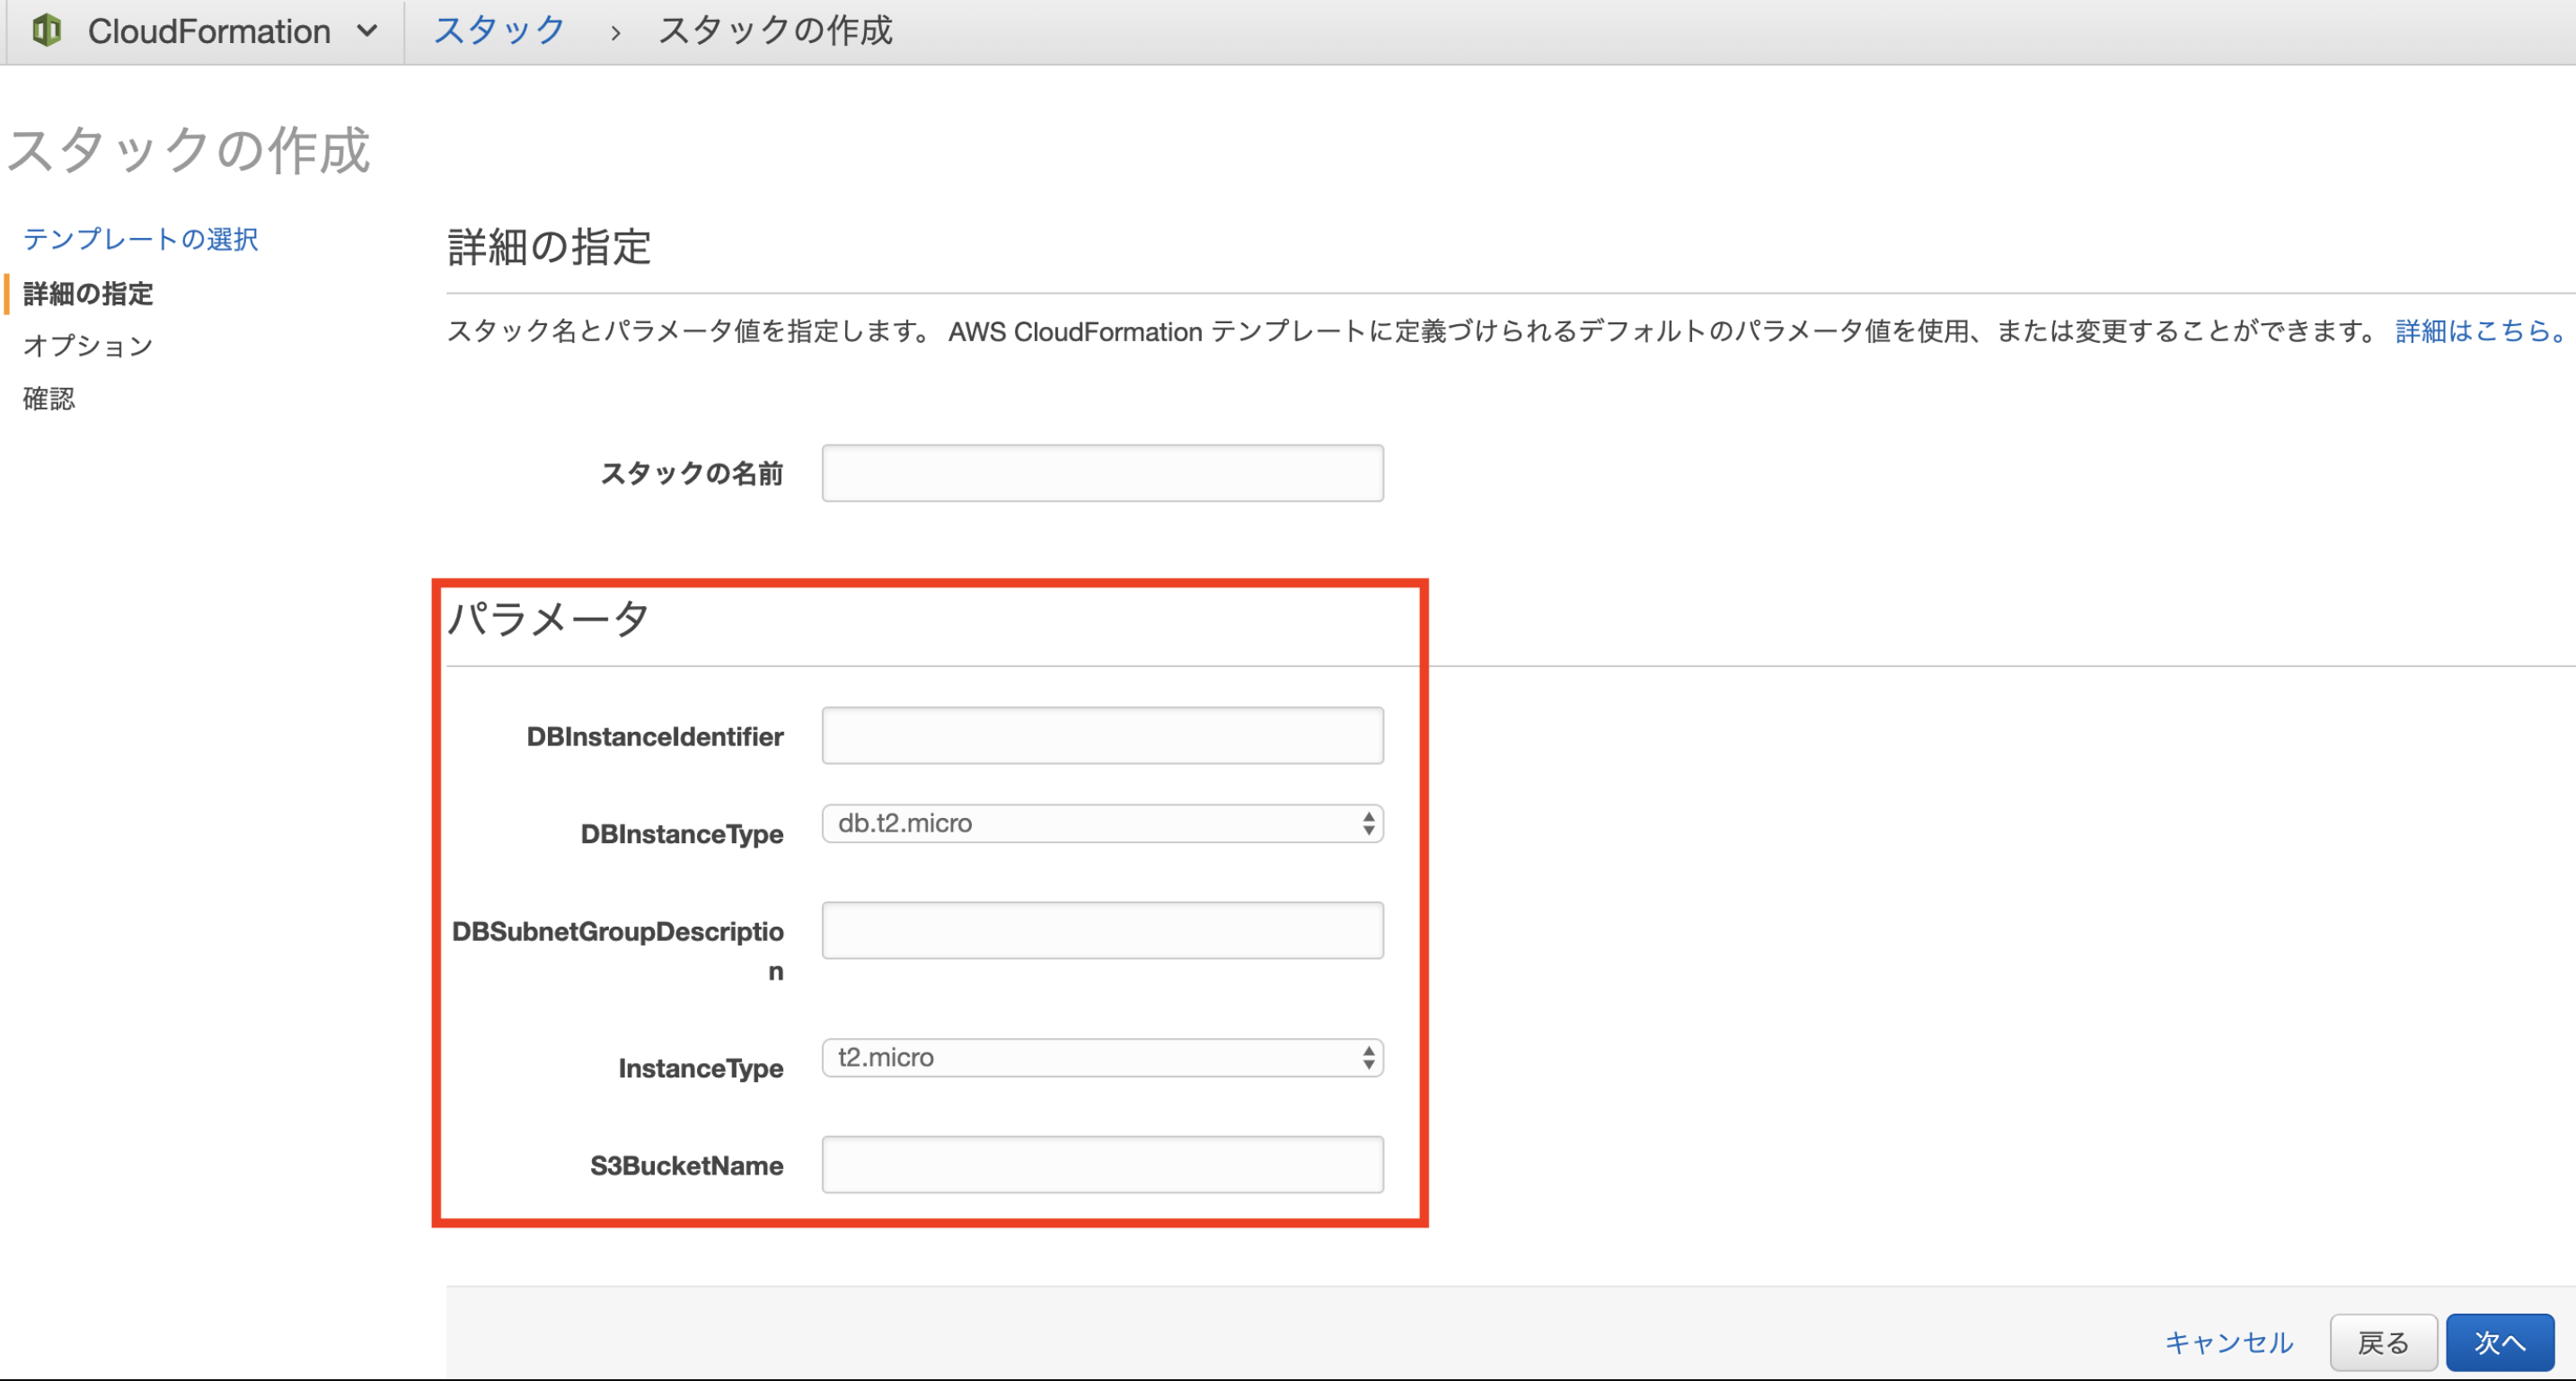
Parameters
Parametersを利用して、EC2のインスタンスタイプ等をスタック作成時に設定できるようにします。
AWSTemplateFormatVersion: 2010-09-09
Description: Application_Layer Template

Parameters:
  InstanceType:
    Type: String
    Default: t2.micro
    AllowedValues:
      - t2.micro
      - m1.small
      - m1.large
  DBInstanceIdentifier:
    Type: String
  DBInstanceType:
    Type: String
    Default: db.t2.micro
    AllowedValues:
      - db.t2.micro
      - db.t2.small
      - db.t2.medium
  DBSubnetGroupDescription:
    Type: String
  S3BucketName:
    Type: String
EC2
ALBを利用したロードバランシングの設定にしますので、EC2を2つ作成します。
  SampleEC21a:
    Type: AWS::EC2::Instance
    Properties:
      NetworkInterfaces:
        - SubnetId: !ImportValue NetworkLayer-PublicSubnet1a
          GroupSet:
            - !ImportValue SecurityLayer-SecurityGroupEC2
          DeviceIndex: 0
      InstanceType: !Ref InstanceType
      ImageId: ami-0af1df87db7b650f4
      Tags:
        - Key: Name
          Value: SampleEC21a
      KeyName: aws-test
  SampleEC21c:
    Type: AWS::EC2::Instance
    Properties:
      NetworkInterfaces:
        - SubnetId: !ImportValue NetworkLayer-PublicSubnet1c
          GroupSet:
            - !ImportValue SecurityLayer-SecurityGroupEC2
          DeviceIndex: 0
      InstanceType: !Ref InstanceType
      ImageId: ami-0af1df87db7b650f4
      Tags:
        - Key: Name
          Value: SampleEC21c
      KeyName: aws-test
RDS
今回RDSはマスターとスタンバイに分けるMulti-AZ構成にして、AZ-1aとAZ-1cに設置するようにします。
  SampleRDS:
    Type: AWS::RDS::DBInstance
    Properties:
      AllocatedStorage : 20
      DBInstanceClass: !Ref DBInstanceType
      Port: 3306
      StorageType: gp2
      BackupRetentionPeriod: 7
      MasterUsername: admin
      MasterUserPassword: MyPassword
      DBInstanceIdentifier: !Ref DBInstanceIdentifier
      DBName: SampleRDS
      Engine: mysql
      EngineVersion: 5.7.22
      DBSubnetGroupName: !Ref SampleRDSSubnetgroup
      MultiAZ: true
      VPCSecurityGroups:
        - !ImportValue SecurityLayer-SecurityGroupRDS

  SampleRDSSubnetgroup:
    Type: AWS::RDS::DBSubnetGroup
    Properties:
      DBSubnetGroupDescription: !Ref DBSubnetGroupDescription
      DBSubnetGroupName: SampleRDSSubnetgroup
      SubnetIds:
        - !ImportValue NetworkLayer-PrivateSubnet1a
        - !ImportValue NetworkLayer-PrivateSubnet1c
ALB
Schemeは今回インターネット向けのALBですのでinternet-facingに設定します。
  SampleALB:
    Type: AWS::ElasticLoadBalancingV2::LoadBalancer
    Properties:
      IpAddressType: ipv4
      Name: SampleALB
      Scheme: internet-facing
      SecurityGroups:
        - !ImportValue SecurityLayer-SecurityGroupALB
      Subnets:
        - !ImportValue NetworkLayer-PublicSubnet1a
        - !ImportValue NetworkLayer-PublicSubnet1c
      Tags:
        - Key: Name
          Value: SampleALB

  # ALBのターゲットグループの指定
  ALBTargetGroup:
    Type: AWS::ElasticLoadBalancingV2::TargetGroup
    Properties:
      Name: ALBTargetGroup
      Port: 80
      Protocol: HTTP
      Targets:
        - Id:
            Ref: SampleEC21a
          Port: 80
        - Id:
            Ref: SampleEC21c
          Port: 80
      VpcId: !ImportValue NetworkLayer-SampleVPC

  # ALBのリスナーの指定
  ALBListener:
    Type: AWS::ElasticLoadBalancingV2::Listener
    Properties:
      DefaultActions:
        - Type: forward
          TargetGroupArn:
            !Ref ALBTargetGroup
      LoadBalancerArn:
        !Ref SampleALB
      Port: 80
      Protocol: HTTP
S3
PublicAccessBlockConfigurationの設定で全てtrueにするとパブリックアクセスが全てブロックされます。
  SampleS3Bucket:
    Type: AWS::S3::Bucket
    Properties:
      BucketName: !Ref S3BucketName
      AccessControl: Private
      PublicAccessBlockConfiguration:
        BlockPublicAcls: True
        BlockPublicPolicy: True
        IgnorePublicAcls: True
        RestrictPublicBuckets: True
      VersioningConfiguration:
        Status: Enabled
以上で3つのテンプレートが作成できました。
最後に
AWSのマネジメントコンソールのCloudFormationのスタック作成を①Network_Layer ②Security_Layer ③Application_Layerの順で作成すれば完成です。作成したリソースの削除は、スタックを削除することで可能ですが、削除の順番は依存関係が影響するためApplication_Layerのスタックから削除する必要があります。
ちなみにApplication_Layerで作成したParameterも機能してくれています。
3つのスタック全てがCREATE_COMPLETEになりましたので、これで構成図で示すリソースが全て作成されました。

作成時に対応したエラー&その対処
何分初心者ですので、このコードに至るまで数々のエラーと格闘いたしました。今回のテンプレート作成時に生じたエラーを備忘録として残します。使用できる文字や配置に細かく指定があるためそのエラーが多かった印象ですが勉強になりました。
・ テンプレートの検証エラー:[/Resources] 'null' values are not allowed in templates
  => インデントのズレ修正

・ テンプレートの検証エラー: Template format error: Resource name Sample-VPC is non alphanumeric.
  => リソース名に-(ハイフン)が使用不可のため名称変更

・テンプレートの検証エラー: Template format error: Output SampleVPC is malformed. The Name field of every Export member must be specified and consist only of alphanumeric characters, colons, or hyphens.
  =>  Outputsの名称で:「コロン」が使用不可のため名称変更

・テンプレートの検証エラー: Circular dependency between resources: [VPCEndpoint, PrivateRoute1c, PrivateRoute1a]
  => 循環依存関係によるエラーで、それぞれのリソースでRouteTableIdを設定していたため生じた。 ダブらないよう片方を削除

・テンプレートの検証エラー: No updates are to be performed.
  => 変更内容がないのに更新を実行すると生じるエラーのため修正なし

・Value of property ~~~~~~~~~ must be of type List of String
  => 表記ルール違反 ユーザーガイドの表記通りの書き方に変更
     ※『改行して-(ハイフン)使用』の書き方じゃないとエラーになることが多い

・テンプレートの検証エラー: Template format error: Unresolved resource dependencies [SecurityLayer-SecurityGroupRDS] in the Resources block of the template
  => outputした変数を別テンプレートで利用するためRef関数 => importvalue関数に変更

・Property DeviceIndex cannot be empty.
  => 「DeviceIndex: 0」を追加

・Property DBSubnetGroupDescription cannot be empty.
  => DBSubnetGroupDescriptionは必須項目だったためParameterで追加

・Bucket name should not contain uppercase characters
  => S3バケット名に大文字使用不可のため名称変更

・The gateway ID '~~~~~~~~~~~~' does not exist (Service: AmazonEC2; Status Code: 400; Error Code: InvalidGatewayID.NotFound; Request ID: ~~~~~~~~~~~~)
  => Route指定でVPCEndpointを設定していたため生じたエラーのためRoute指定のコードを修正

・Encountered unsupported boolean value ture
  => タイポ「ture」を「true」に修正

・Property AllocatedStorage cannot be empty.
  => AllocatedStorageが必須項目のためDBInstanceにデフォルト値の「AllocatedStorage : 20」 を追加
参考記事
https://docs.aws.amazon.com/ja_jp/AWSCloudFormation/latest/UserGuide/template-reference.html
https://www.slideshare.net/AmazonWebServicesJapan/aws-black-belt-online-seminar-aws-cloudformation
https://dev.classmethod.jp/cloud/aws/cloudformation-beginner01/