要約
- この記事では、OKIのAIエッジコンピューター「AE2100」向けのプログラムの実装を説明します。
- OpenVINOを利用して物体検出を行う基礎的なプログラムを実装します。
はじめに
OKIのAIエッジコンピューター「AE2100」には、ディープラーニングの推論環境であるOpenVINOが搭載されています。
ここではAE2100上で動くディープラーニングの推論処理による物体検出プログラムを、OpenVINOを利用して実装します。
本記事では、物体検出プログラムの基礎的な実装について説明します。
ディープラーニングによる物体検出
物体検出は、画像の中に映り込んでいる物体を検出する問題です。
ディープラーニングによる物体検出では、下図のように学習済みモデルへ画像を入力し、推論処理を経て検出結果が出力されます。
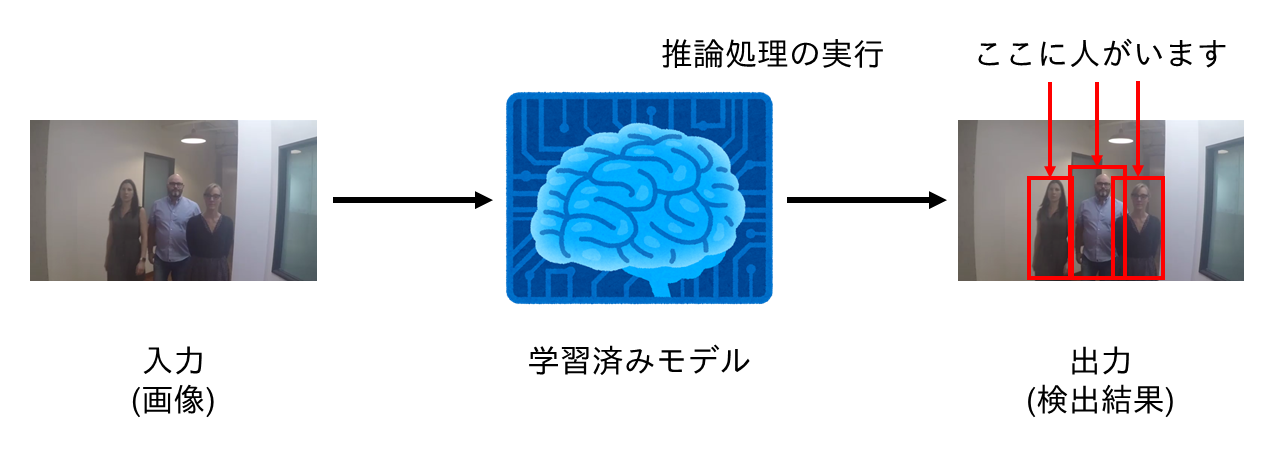
なお、物体検出を行うディープラーニングのモデルは様々ありますが、今回はSSD(Single Shot Detection)を用います。
AE2100はこのような推論処理を効率的に実行できます。
推論処理を行うプログラムを実装するには、OpenVINOを利用します。
事前準備
環境
本記事では下記の記事に倣ってOpenVINOのサンプルプログラムの動作が確認済みであり、AE2100の環境と開発環境が既に用意されていることを前提としています。
- OKI AI エッジコンピューター「AE2100」でOpenVINOのサンプルプログラムを動かしてみよう Ubuntuコンテナ版 (1)
- OKI AI エッジコンピューター「AE2100」でOpenVINOのサンプルプログラムを動かしてみよう Ubuntuコンテナ版 (2)
また、本記事ではPython 3とOpenCVを使用して物体検出プログラムを作成します。
下記の記事に倣ってAE2100のUbuntuコンテナへPython 3とOpenCVを導入してください。
以降に示すファイルを開発環境で用意し、AE2100のUbuntuコンテナへ展開して物体検出プログラムを実行します。
また、AE2100での実行結果を、VcXsrvを利用して開発環境側の画面に表示します。
ファイルの用意
開発環境側で、SSDによって物体検出を行うディープラーニングの学習済みモデル、物体検出の対象となるデータ、検出結果の表示に用いるラベルファイルを用意します。
これらのファイルを保存するディレクトリをpracticeという名前で、ホームディレクトリ直下に作成します。
# cd
# mkdir practice
ディープラーニングの学習済みモデルとして"ssd_mobilenet_v2_coco"を使用します。
下記のコマンドを順番に実行し、Open Model Zooから開発環境へssd_mobilenet_v2_cocoのモデルファイルのダウンロードを行います。
またモデルファイルのIR変換を行い、ファイルをpracticeへコピーします。
※3行目・6行目でPythonの仮想環境を起動・終了していますが「AE2100 シリーズ SDK 取扱説明書 ―DeepLearning 編―」(版数: 1.2) P.13で仮想環境を作成した場合に行ってください。
# cd /opt/intel/openvino/deployment_tools/tools/model_downloader
# source /opt/intel/openvino/bin/setupvars.sh
# source /opt/intel/openvino/deployment_tools/model_optimizer/venv/bin/activate
# python3 downloader.py --name ssd_mobilenet_v2_coco
# python3 converter.py --name ssd_mobilenet_v2_coco --precisions FP16
# deactivate
# cd
# cd practice
# cp /opt/intel/openvino/deployment_tools/tools/model_downloader/public/ssd_mobilenet_v2_coco/FP16/* ./
物体検出の対象として、Intel社が公開しているサンプル動画"face-demographics-walking.mp4"を使用します。
face-demographics-walking.mp4は、人物が画面奥側から手前に向かって歩行している様子が映っている動画です。
下記のコマンドを実行し、開発環境へface-demographics-walking.mp4をダウンロードします。
# wget https://github.com/intel-iot-devkit/sample-videos/raw/master/face-demographics-walking.mp4
検出結果の表示に用いるラベルファイルを作成します。
labels.txtという名前のファイルを作成し、下記の91行のラベルを書き込んでください。
ここをクリックしてラベルを表示
background
person
bicycle
car
motorcycle
airplane
bus
train
truck
boat
traffic_light
fire_hydrant
no_label
stop_sign
parking_meter
bench
bird
cat
dog
horse
sheep
cow
elephant
bear
zebra
giraffe
no_label
backpack
umbrella
no_label
no_label
handbag
tie
suitcase
frisbee
skis
snowboard
sports_ball
kite
baseball_bat
baseball_glove
skateboard
surfboard
tennis_racket
bottle
no_label
wine_glass
cup
fork
knife
spoon
bowl
banana
apple
sandwich
orange
broccoli
carrot
hot_dog
pizza
donut
cake
chair
couch
potted_plant
bed
no_label
dining_table
no_label
no_label
toilet
no_label
tv
laptop
mouse
remote
keyboard
cell_phone
microwave
oven
toaster
sink
refrigerator
no_label
book
clock
vase
scissors
teddy_bear
hair_drier
toothbrush
モデルファイル、動画ファイル、ラベルファイルの準備は以上となります。
物体検出プログラム
物体検出プログラムの実装を説明します。
下記をクリックしてPythonソースコードをコピーし、ディレクトリpractice直下にobject_detection.pyという名前のファイルを作成して書き込んでください。
ここをクリックしてソースコードを表示
import cv2
from openvino.inference_engine import IECore
import time

# ラベルファイルの読込
label = open('./labels.txt').readlines()

# IEコアオブジェクトを生成
ie = IECore()

# IRモデルファイルの読込
model_name = './ssd_mobilenet_v2_coco'
net = ie.read_network(model=model_name+'.xml', weights=model_name+'.bin')

# IEコアオブジェクトに読み込んだモデルを設定
exec_net = ie.load_network(network=net, device_name='HDDL')

# 入力blob・出力blobの名前を取得
input_blob_name  = list(net.inputs.keys())[0]
output_blob_name = list(net.outputs.keys())[0]
# 入力blobの形状を取得
batch, channel, height, width = net.inputs[input_blob_name].shape

def preprocess_input(img):
    # 入力画像を入力blobの形状に変換
    _img = cv2.resize(img, (width, height))
    _img = _img.transpose((2, 0, 1))
    _img = _img.reshape((1, channel, height, width))

    return _img

def show_result(result, img):
    # 推論結果を取り出す
    _result = result[output_blob_name][0][0]
    # 検出した物体ごとに結果を取り出す
    for obj in _result:
        index, label_id, score, x_min, y_min, x_max, y_max = obj
        # scoreが一定の値を超えたら検出結果を描画
        if score > 0.6:
            # フレームの高さ・幅を取得
            img_h, img_w, _ = img.shape
            # 正規化された座標からフレーム上の座標を計算
            x_min = int(x_min * img_w)
            y_min = int(y_min * img_h)
            x_max = int(x_max * img_w)
            y_max = int(y_max * img_h)
            # 検出枠の描画
            cv2.rectangle(img, (x_min, y_min), (x_max, y_max),
                (0, 255, 255), thickness=4)
            # ラベルの描画
            cv2.putText(img, label[int(label_id)][:-1], (x_min, y_min),
                cv2.FONT_HERSHEY_PLAIN, fontScale=4,
                color=(0, 255, 255), thickness=4)
    # 画面に表示
    cv2.imshow('Object Detection', img)
    cv2.waitKey(1)

# フレーム番号
frame_index = 0
# 動画を開く
video = cv2.VideoCapture('./face-demographics-walking.mp4')
# 開始時間の取得
start = time.perf_counter()

# 推論ループ
while video.isOpened():
    # 動画から1フレーム読込
    ret, img = video.read()
    # 読み込むフレームがなくなったら終了
    if not ret:
        break
    # フレームごとに前処理
    in_img = preprocess_input(img)
    # 推論
    result = exec_net.infer(inputs={input_blob_name: in_img})

    # 表示の間引き処理
    if frame_index % 4 == 0:
        # 推論結果を画面に表示
        show_result(result, img)

    frame_index += 1

elapsed_time = time.perf_counter() - start
video.release()

# 処理時間・処理速度の表示
print('Sync')
print(' Frames\t: %d' % frame_index)
print(' Elapse\t: %f [s]' % elapsed_time)
print(' Speed\t: %f [fps]' % (frame_index/elapsed_time))
以下ではソースコードについて解説します。
プログラムに必要なモジュールをインポートします。
import cv2
from openvino.inference_engine import IECore
import time
上記で作成したラベルファイルを読み込みます。
label = open('./labels.txt').readlines()
Inference Engineのコアオブジェクトを生成します。
ie = IECore()
上記で用意したIR形式の学習済みモデルを読み込みます。
model = './ssd_mobilenet_v2_coco'
net = ie.read_network(model=model+'.xml', weights=model+'.bin')
IEコアオブジェクトに読み込んだモデルを設定します。
ここではAE2100に搭載されているMyriad Xを利用するため、device_nameに'HDDL'を指定します。
exec_net = ie.load_network(network=net, device_name='HDDL')
入出力blobの名前の取得、入力blobの形状を取得します。
# 入力blob・出力blobの名前を取得
input_blob_name  = list(net.inputs.keys())[0]
output_blob_name = list(net.outputs.keys())[0]
# 入力blobの形状を取得
batch, channel, height, width = net.inputs[input_blob_name].shape
動画のフレームをモデルへ入力する前に、形状を変換する関数を定義します。
この整形処理は、動画から1フレームが読み込まれるごとに行います。
モデルへの入力となるフレームは、入力blobの形状に合わせる必要があります。
そのため、下記コードでは次のような変換を行っています。
- resize()を使用して、読み込んだフレームの大きさを入力blobの縦横の大きさに合わせる。
- transpose()を使用して、フレームの画素値の並び(縦, 横, チャネル)を、入力blobのレイアウトNCHWに合わせて(チャネル, 縦, 横)へ転置する。
- reshape()を使用して、入力blobのレイアウトNCHWに合わせて1次元目を追加する。
def preprocess_input(img):
    # 入力画像を入力blobの形状に変換
    _img = cv2.resize(img, (width, height))
    _img = _img.transpose((2, 0, 1))
    _img = _img.reshape((1, channel, height, width))

    return _img
また、推論結果を画面へ表示する関数を定義します。
モデルの出力resultには、検出された物体ごとに検出結果が格納されています。
検出結果は下表のような構成となっています。
| 変数名 | 説明 |
|---|---|
| index | バッチ中の画像のインデックス |
| label_id | 検出結果のラベル番号 |
| score | 検出結果の信頼度 |
| (x_min, y_min) | 検出枠の左端・上端を示す座標 |
| (x_max, y_max) | 検出枠の右端・下端を示す座標 |
ただし、(x_min, y_min), (x_max, y_max)は[0, 1]に正規化されているため、検出枠の描画の際には実際のフレーム画像の座標と対応させる必要があります。
そのため、x_min, x_maxに対してフレームの幅img_wを、y_min, y_maxに対してフレームの高さimg_hを乗算し、フレーム画像の座標を求めます。
また、検出結果は信頼度scoreが一定の値を超えた場合に描画します。
ここではscoreの値が閾値0.6より高ければ検出結果を表示します。
この閾値を低くすれば検出結果が描画されやすく、高くすれば検出結果が描画されにくくなります。
推論結果として、検出された物体のラベルとその物体がある場所を示す検出枠を、変換前のフレームimg上に描画します。
def show_result(result, img):
    # 推論結果を取り出す
    _result = result[output_blob_name][0][0]
    # 検出した物体ごとに結果を取り出す
    for obj in _result:
        index, label_id, score, x_min, y_min, x_max, y_max = obj
        # scoreが一定の値を超えたら検出結果を描画
        if score > 0.6:
            # フレームの高さ・幅を取得
            img_h, img_w, _ = img.shape
            # 正規化された座標からフレーム上の座標を計算
            x_min = int(x_min * img_w)
            y_min = int(y_min * img_h)
            x_max = int(x_max * img_w)
            y_max = int(y_max * img_h)
            # 検出枠の描画
            cv2.rectangle(img, (x_min, y_min), (x_max, y_max),
                (0, 255, 255), thickness=4)
            # ラベルの描画
            cv2.putText(img, label[int(label_id)][:-1], (x_min, y_min),
                cv2.FONT_HERSHEY_PLAIN, fontScale=4,
                color=(0, 255, 255), thickness=4)
    # 画面に表示
    cv2.imshow('Object Detection', img)
    cv2.waitKey(1)
推論処理のループを記述します。
動画はループの中で1フレームずつ読み込みます。
読み込んだフレームの形状を、上記で説明したpreprocess_input()で変換します。
フレームの変換後、モデルへ入力して物体検出の推論を行います。
物体検出の推論結果が取得できたら、上記で説明したshow_result()で画面に検出結果を表示します。
ただし、全フレームを表示すると処理速度が得られないため、全フレームを表示せず表示頻度を1/4まで間引いています。
また、推論ループの開始から終了までの処理時間・処理速度を測定しています。
ここでは物体検出対象のフレーム数を推論ループの実行にかかった時間で除することで処理速度(単位: fps)としています。
# フレーム番号
frame_index = 0
# 動画を開く
video = cv2.VideoCapture('./face-demographics-walking.mp4')
# 開始時間の取得
start = time.perf_counter()

# 推論ループ
while video.isOpened():
    # 動画から1フレーム読込
    ret, img = video.read()
    # 読み込むフレームがなくなったら終了
    if not ret:
        break
    # フレームごとに前処理
    in_img = preprocess_input(img)
    # 推論
    result = exec_net.infer(inputs={input_blob_name: in_img})

    # 表示の間引き処理
    if frame_index % 4 == 0:
        # 推論結果を画面に表示
        show_result(result, img)

    frame_index += 1

elapsed_time = time.perf_counter() - start
video.release()

# 処理時間・処理速度の表示
print('Sync')
print('  Frames\t: %d' % frame_index)
print('  Elapse\t: %f [s]' % elapsed_time)
print('  Speed\t: %f [fps]' % (frame_index/elapsed_time))
object_detection.pyへ書き込むソースコードの説明は以上となります。
開発環境からAE2100への展開
開発環境で作成したプログラムを、AE2100へ展開します。
practiceの中身が下記の通りとなっていることを確認してください。
# cd
# ls practice
face-demographics-walking.mp4  object_detection.py        ssd_mobilenet_v2_coco.mapping
labels.txt                     ssd_mobilenet_v2_coco.bin  ssd_mobilenet_v2_coco.xml
上記の手順に倣ってプログラムと実行に必要なファイルを開発環境のディレクトリpracticeに用意できたら、tarコマンドでpracticeをアーカイブ化します。
# cd
# tar cvf practice.tar ./practice
以上が開発環境側での手順となります。
以降はAE2100側での手順です。
TeraTermでAE2100にログインし、上記のtarファイルpractice.tarを開発環境からAE2100へ転送します。
転送が行えたら、AE2100上で下記コマンドを実行し、ホストからコンテナへpractice.tarをコピーします。
root@ae2100:~# docker cp practice.tar ubuntu-openvino:/root/
コンテナへ入り、tarファイルを展開します。
root@ae2100:~# docker exec -it ubuntu-openvino /bin/bash
# cd
# tar xvf practice.tar
# cd practice
AE2100での実行
上記の手順で用意した物体検出プログラムを、AE2100上で実行します。
環境変数の設定、検出結果の画面表示先の指定を行います。
※「OKI AI エッジコンピューター「AE2100」でOpenVINOのサンプルプログラムを動かしてみよう Ubuntuコンテナ版 (1)」に従って事前に開発環境側のXlaunchを起動しておいてください。
# source /opt/intel/openvino/bin/setupvars.sh
# export DISPLAY=192.168.100.101:0.0
実行準備が整いましたので、プログラムを実行します。
# python3 object_detection.py
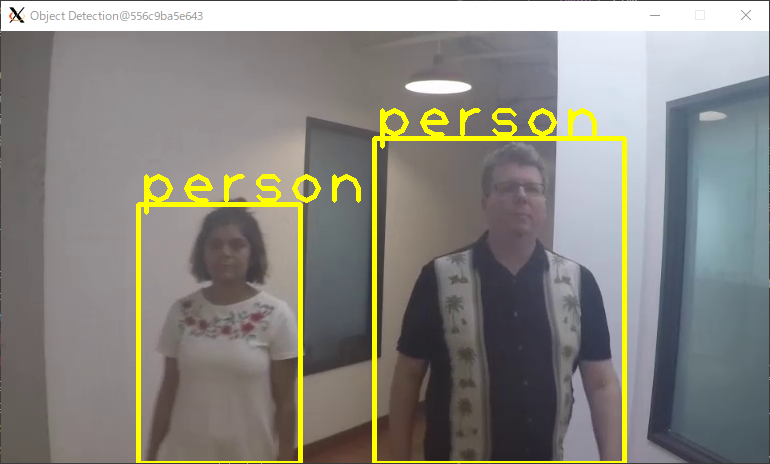
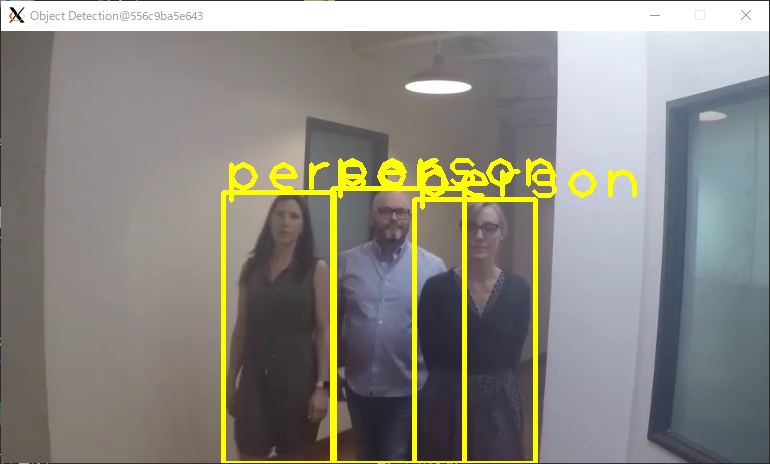
検出結果が開発環境の画面に表示されます。
動画に映っている人物が"person"と表示されており、正しく検出できました。
また、処理時間・処理速度は下記のように出力されます。
Sync
 Frames : 732
 Elapse : 64.511291 [s]
 Speed  : 11.346851 [fps]
まとめ
今回はAE2100上で物体検出を行う基礎的なプログラムを作成しました。
推論処理のスループットを向上させる方法として「非同期処理」の実装があります。
次回はこの記事で作成したプログラムをもとに非同期処理を実装し、処理速度の改善を試みます。
関連記事
- OKI AI エッジコンピューター「AE2100」でOpenVINOのサンプルプログラムを動かしてみよう Ubuntuコンテナ版 (1)
- OKI AI エッジコンピューター「AE2100」でOpenVINOのサンプルプログラムを動かしてみよう Ubuntuコンテナ版 (2)
- OKI AI エッジコンピューター「AE2100」でOpenVINOのサンプルプログラムを動かしてみよう Ubuntuコンテナ版 (3)
- OKI「AE2100」 Ubuntu + OpenVINOコンテナ向け Python環境の構築方法
参考
当記事で説明したプログラムは下記のソースコードを参考にしています。
当記事で物体検出の対象とした動画ファイル(face-demographics-walking.mp4)は、intel-iot-devkit/sample-videoリポジトリのものを使用しています。
記事中の図では動画のキャプチャを一部改変して使用しています。