これは人間が書いた記事です。
前書き
AgentCoreのAgent Runtimeには、AIエージェントだけでなくMCPサーバーもデプロイすることができます。
これまでAWSでMCPサーバーをデプロイする際は、LambdaにWeb Adapterを追加したり、ECSを使用したり、VercelのMCP AdapterをNext.jsプロジェクトに組み込んでAmplifyにデプロイしたりと、さまざまな手法を試してまいりました。
今回は、AgentCoreのAgent Runtimeにデプロイしてみたいと思います。

やりたい事
Claude Desktopにはanalysis toolがあり、それを使用すればJavaScriptのコードを実行して検証することができます。
せっかくですので、Pythonのコードも実行できるようにしたいと思います。
以前からAmazon Bedrock Agentを使用すればCodeInterpreter付きのAIエージェントを簡単に構築できましたが、AgentCoreには機能としてBuilt-in Toolsがあり、その中にCodeInterpreterが含まれております。
これを使用してMCPサーバーを作成し、Claude Desktopに実装いたします。

MCPサーバー作成
前提条件
- AWSアカウント
- uv
- Docker Desktop
1. 環境のセットアップ
作業ディレクトリで下記のコマンドを実行してください。
% uv venv
% source .venv/bin/activate
% uv init
% uv add mcp bedrock-agentcore bedrock-agentcore-starter-toolkit
同じディレクトリにmain.pyを作って、以下の内容を書いてください。
![]() リージョンが
リージョンがus-west-2じゃないとうまく動かない可能性があります。
import json
from mcp.server.fastmcp import FastMCP
from starlette.responses import JSONResponse
from bedrock_agentcore.tools.code_interpreter_client import CodeInterpreter

mcp = FastMCP(host="0.0.0.0", stateless_http=True)
code_client = CodeInterpreter('us-west-2')

@mcp.tool()
def code_interpreter(code: str) -> str:
    """Run code in a code interpreter"""
    code_client.start()
    try:
        response = code_client.invoke(
            "executeCode",
            {"language": "python", "code": code}
        )

        results: list[str] = []
        for event in response["stream"]:
            formatted = json.dumps(event["result"], indent=2)
            results.append(formatted)

        return "\n".join(results)

    finally:
        code_client.stop()

if __name__ == "__main__":
    mcp.run(transport="streamable-http")
ローカルでテストしてみます。
まずはmain.pyを実行いたします。
% python main.py
[08/09/25 12:07:28] INFO     Found credentials in environment variables.                                                      credentials.py:1217
INFO:     Started server process [26863]
INFO:     Waiting for application startup.
INFO     StreamableHTTP session manager started streamable_http_manager.py:110
INFO:     Application startup complete.
INFO:     Uvicorn running on http://0.0.0.0:8000 (Press CTRL+C to quit)
次は別のターミナルを立ち上げて、MCPクライアントを起動します。
% npx @modelcontextprotocol/inspector

Need to install the following packages:
@modelcontextprotocol/inspector@0.16.2
Ok to proceed? (y)

Starting MCP inspector...
⚙️ Proxy server listening on localhost:6277
🔑 Session token: xxxx
   Use this token to authenticate requests or set DANGEROUSLY_OMIT_AUTH=true to disable auth

🚀 MCP Inspector is up and running at:
   http://localhost:6274/?MCP_PROXY_AUTH_TOKEN=xxx

🌐 Opening browser...
しばらくすると、ブラウザからMCPクライアントが開かれるので、Transport TypeをStreamable HTTPに設定し、URLをMCPサーバーのURLに設定します。

この状態でToolsからList Toolsを押しますと、code interpreterが表示されるはずです。
もしエラーが発生してしまった場合は、![]() ConfigurationからProxy Session Tokenを、ターミナル上に表示されているSession tokenに合わせて修正してみてください。
ConfigurationからProxy Session Tokenを、ターミナル上に表示されているSession tokenに合わせて修正してみてください。
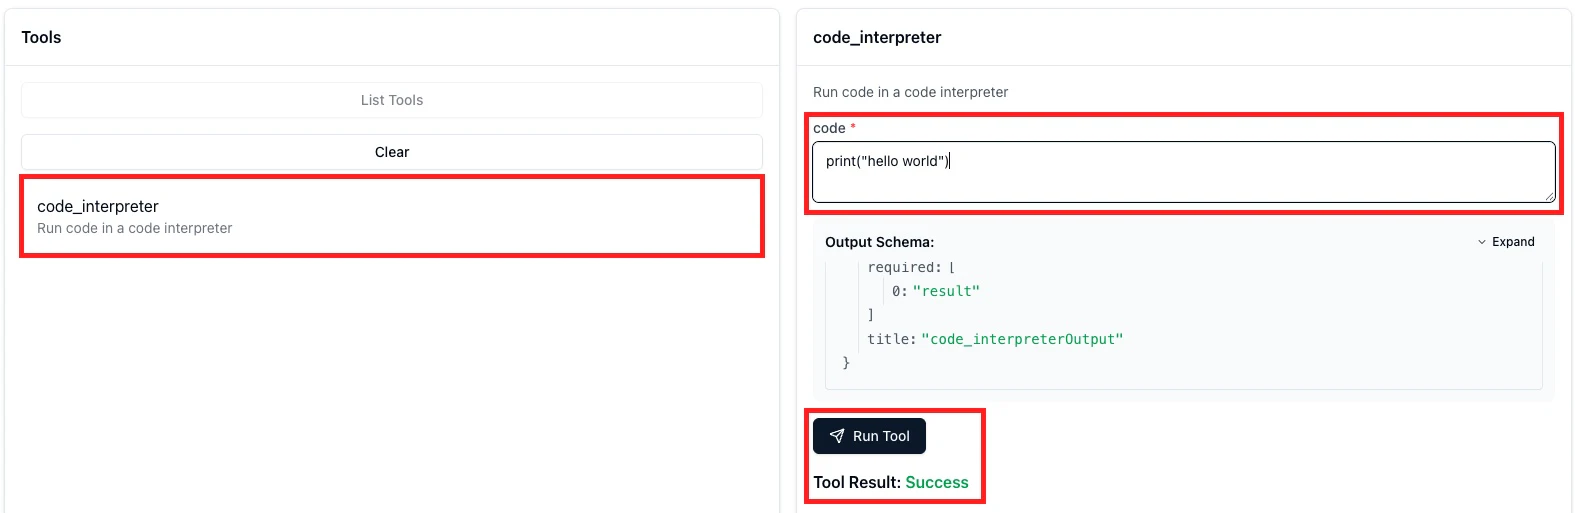
code interpreterを選択しますと、codeを入力できるinputが表示されますので、下記のcodeを入力して、
print("hello world")
Run Toolを押してください。AWSの権限設定に問題がなければ、Successが表示されるはずです。
AWSコンソールのcode interpreterのセッションでは、使用した履歴がきちんと残っていることが確認できます。

2. AWSリソース作成
最新のbedrock-agentcore-starter-toolkitであれば、AgentCore Runtime周りの権限を適切に設定してくれるため、作業が楽になりました。
今回はCognitoから認証Tokenを発行していただくため、Cognitoのリソースだけ先に作成しておきます。
作業ディレクトリに下記のシェルを作ってください、必要に応じて、TEMP_PASSWORDとPERMANENT_PASSWORDを変更してください。
#!/bin/bash

# Create User Pool and capture Pool ID directly
export POOL_ID=$(aws cognito-idp create-user-pool \
  --pool-name "MyUserPool" \
  --policies '{"PasswordPolicy":{"MinimumLength":8}}' \
  --region us-west-2 | jq -r '.UserPool.Id')

# Create App Client and capture Client ID directly
export CLIENT_ID=$(aws cognito-idp create-user-pool-client \
  --user-pool-id $POOL_ID \
  --client-name "MyClient" \
  --no-generate-secret \
  --explicit-auth-flows "ALLOW_USER_PASSWORD_AUTH" "ALLOW_REFRESH_TOKEN_AUTH" \
  --region us-west-2 | jq -r '.UserPoolClient.ClientId')

# Create User
aws cognito-idp admin-create-user \
  --user-pool-id $POOL_ID \
  --username "testuser" \
  --temporary-password "TEMP_PASSWORD" \
  --region us-west-2 \
  --message-action SUPPRESS > /dev/null

# Set Permanent Password
aws cognito-idp admin-set-user-password \
  --user-pool-id $POOL_ID \
  --username "testuser" \
  --password "PERMANENT_PASSWORD" \
  --region us-west-2 \
  --permanent > /dev/null

# Authenticate User and capture Access Token
export BEARER_TOKEN=$(aws cognito-idp initiate-auth \
  --client-id "$CLIENT_ID" \
  --auth-flow USER_PASSWORD_AUTH \
  --auth-parameters USERNAME='testuser',PASSWORD='PERMANENT_PASSWORD' \
  --region us-west-2 | jq -r '.AuthenticationResult.AccessToken')

# Output the required values
echo "Pool id: $POOL_ID"
echo "Discovery URL: https://cognito-idp.us-west-2.amazonaws.com/$POOL_ID/.well-known/openid-configuration"
echo "Client ID: $CLIENT_ID"
echo "Bearer Token: $BEARER_TOKEN"
下記にコマンドを実行して、Cognitoユーザープールを作ります。
% source setup_cognito.sh
実行完了後、マネコンからCognitoのユーザープールができたことが確認できます。

Agentcore RuntimeにMCPサーバーをデプロイします。
requirements.txtを作って、必要なライブラリを追加します。
mcp
bedrock-agentcore
COGNITO_CLIENT_IDとCOGNITO_USER_POOL_IDはマネコンから確認してください。
% agentcore configure \
  --name my_mcp_server \
  --entrypoint main.py \
  --authorizer-config "{
    \"customJWTAuthorizer\": {
      \"discoveryUrl\": \"https://cognito-idp.us-west-2.amazonaws.com/${COGNITO_USER_POOL_ID}/.well-known/openid-configuration\",
      \"allowedClients\": [\"${COGNITO_CLIENT_ID}\"]
    }
  }" \
  --protocol MCP
色々と質問されますが、すべてエンターキーを押して飛ばしていただいて構いません。
Configuring Bedrock AgentCore...
Entrypoint parsed: file=/Users/harinezumi/repos/agentcore_project/agentcore-mcp/main.py, bedrock_agentcore_name=main
Agent name: my_mcp_server_test

🔐 Execution Role
Press Enter to auto-create execution role, or provide execution role ARN/name to use existing
Execution role ARN/name (or press Enter to auto-create):
✓ Will auto-create execution role

🏗️  ECR Repository
Press Enter to auto-create ECR repository, or provide ECR Repository URI to use existing
ECR Repository URI (or press Enter to auto-create):
✓ Will auto-create ECR repository

🔍 Detected dependency file: requirements.txt
実行が完了しましたら、同じディレクトリに.bedrock_agentcore.yamlとDockerfileが生成されます。
中身を確認していただき、問題がなければ下記のコマンドでデプロイをいたしましょう。
% agentcore langch
Bedrock AgentCore Deployedのメッセージが表示されましたら、デプロイが無事に完了したということです。

Roleを任せて作成してしまいますと、ツールを呼び出すには少し権限が足りないようです。
BedrockAgentCoreFullAccessをロールにアタッチしてください。
3. MCPクライアントと接続
今回デプロイしたMCPサーバーに接続するために、2つの情報が必要です。
接続用のエンドポイント
接続するためのエンドポイントは、Agent ARNからエンコードされたものです。
たとえば、下記のようなAgent ARNがあります。
arn:aws:bedrock-agentcore:リージョンn:アカウントID:runtime/my_mcp_server-dr1wYRC2Hq
:を %3A に/ を %2Fに変換する必要があります。
変換したら、下記の形になります。
arn%3Aaws%3Abedrock-agentcore%3Aリージョンn%3AアカウントID%3Aruntime%2Fmy_mcp_server-dr1wYRC2Hq
そして、エンコードされたAgent ARNを下記のエンドポイントに入れます。
https://bedrock-agentcore.us-west-2.amazonaws.com/runtimes/{{AGENT ARN}}/invocations?qualifier=DEFAULT
この手順でよく間違えるので、うまくいかなかった場合はよく確認してください。
Cognitoから発行したトークン
Cognitoのユーザープールが作成された際にも出力されましたが、一時間で期限が切れますので、再度発行いたしましょう。
export BEARER_TOKEN=$(aws cognito-idp initiate-auth \
  --client-id "${COGNITO_CLIENT_ID}" \
  --auth-flow USER_PASSWORD_AUTH \
  --auth-parameters USERNAME=${USER_NAME},PASSWORD=${PASSWORD} \
  --region ${REGION} | jq -r '.AuthenticationResult.AccessToken')

echo "Bearer Token: ${BEARER_TOKEN}"
claude_desktop_config.jsonに追加
{
"mcpServers": {
    "python-sandbox": {
      "command": "path/to/npx",
      "args": [
        "mcp-remote",
        "{{接続用のエンドポイント}}",
        "--header",
        "Authorization: Bearer {{token}}"
      ]
    },
  }
}
Cloud Desktop再度立ち上げて、質問してみます。
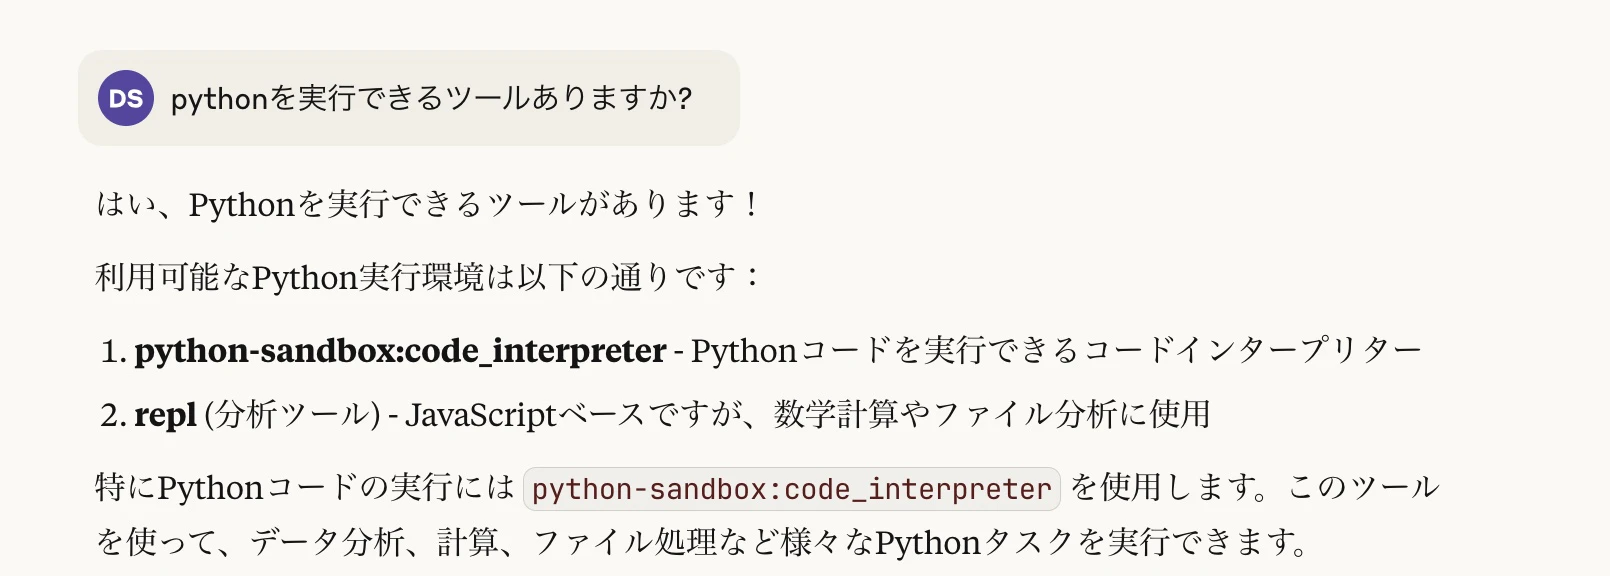
Pythonコードを実行させますと、MCPサーバーが呼び出され、Pythonのコードが実行されたことが確認できます。
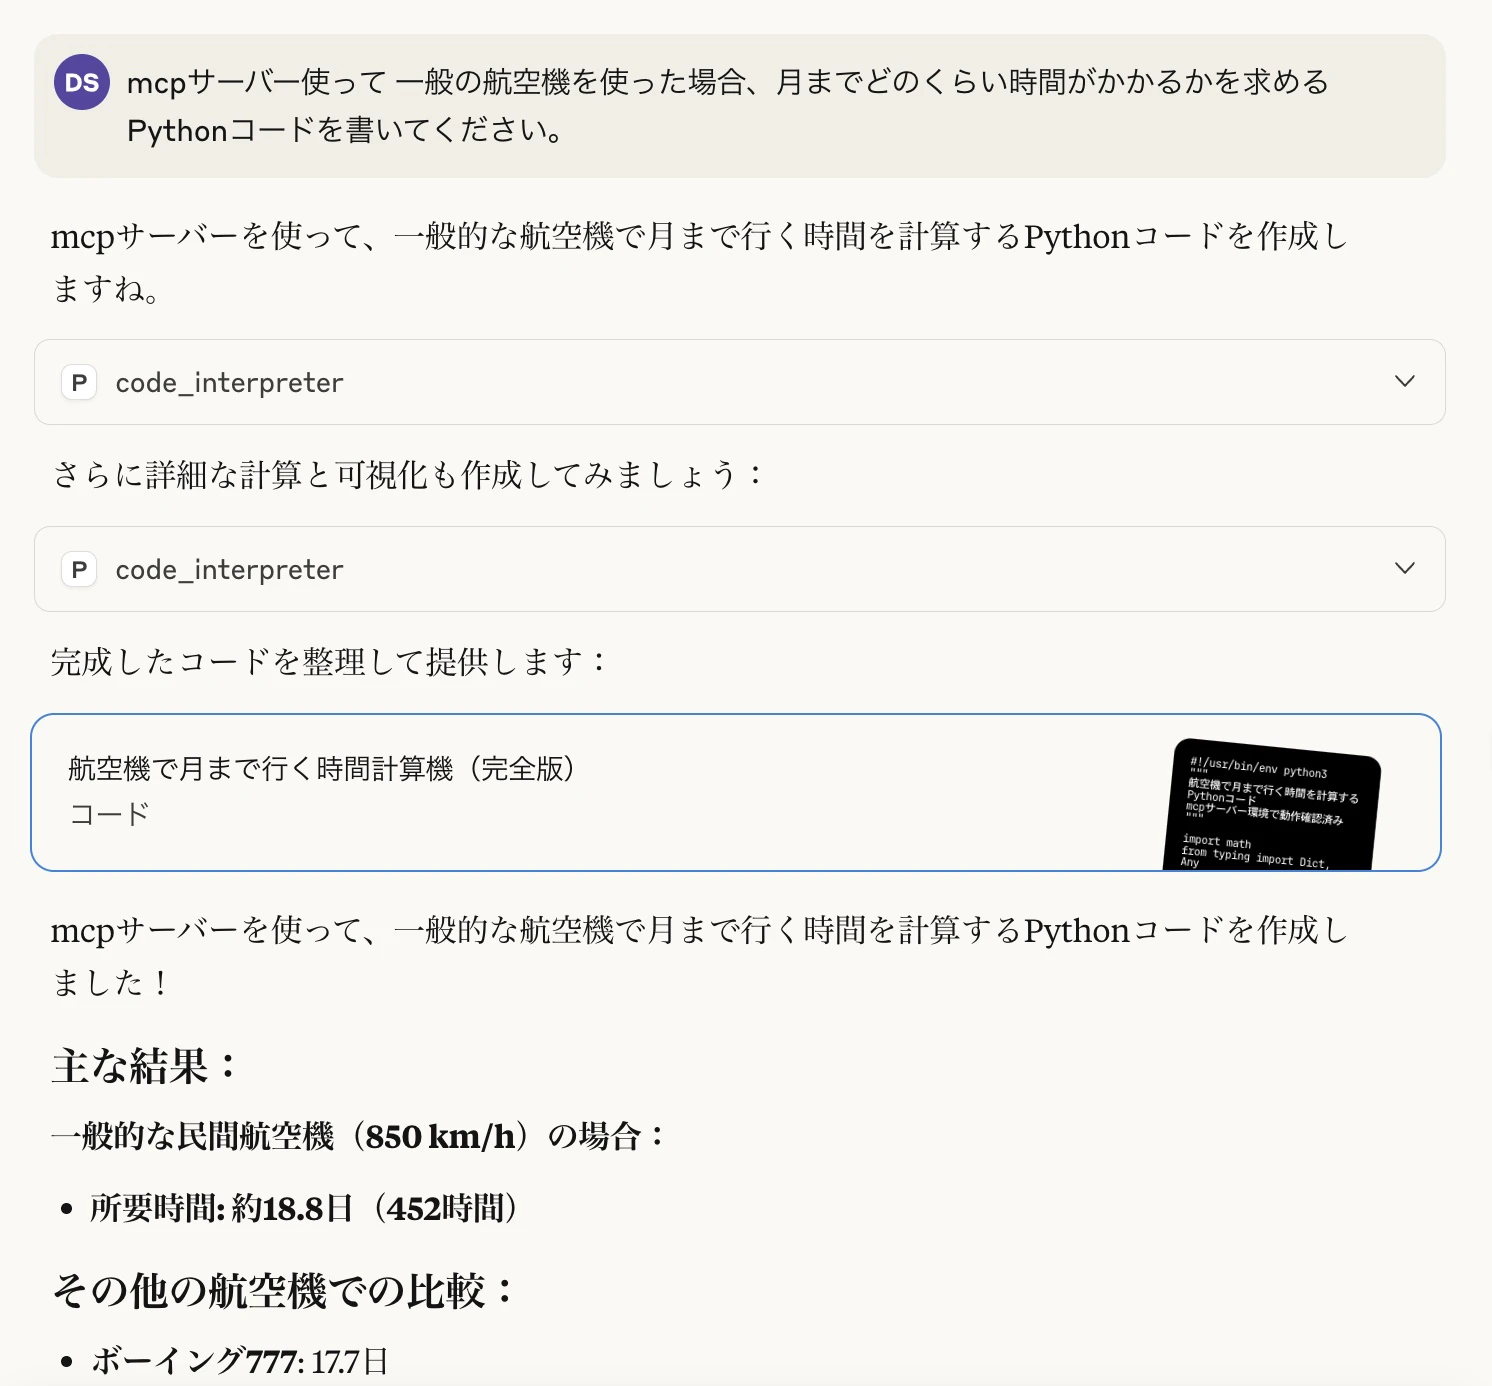
実行記録もGenAI Observabilityから確認できます。

Mastraエージェントにも使わせてみよう
import { Agent } from "@mastra/core/agent";
import { MCPClient } from "@mastra/mcp";
import { createAmazonBedrock } from "@ai-sdk/amazon-bedrock";

const bedrock = createAmazonBedrock({
  region: "us-west-2",
  accessKeyId: process.env.AWS_ACCESS_KEY_ID,
  secretAccessKey: process.env.AWS_SECRET_ACCESS_KEY,
  sessionToken: process.env.AWS_SESSION_TOKEN,
});

export const codeAgent = new Agent({
  name: "Code Agent",
  description: "python code実行するエージェント",
  instructions: 'あなたはpythonの専門家、ユーザからの質問に対して、必要に応じてpythonのコードを実行してください。',
  model: bedrock("us.amazon.nova-pro-v1:0"),
  tools: async () => {
    const mcpClient = new MCPClient({
      id: "python-tool",
      servers: {
        code: {
          url: new URL(
            "https://bedrock-agentcore.us-west-2.xxx"
          ),
          requestInit: {
            headers: {
              Authorization:
                "Bearer xxx",
            },
          },
        },
      },
    });
    return await mcpClient.getTools();
  },
});
実行できました。

おまけ: CodeInterpreterのPython環境に何がある
下記のcodeを実行して、確認しましょう。
from bedrock_agentcore.tools.code_interpreter_client import CodeInterpreter
import json

code_client = CodeInterpreter('us-west-2')
code_client.start()
try:
    response = code_client.invoke("executeCommand", {"command": "pip list"})

    for event in response["stream"]:
        print(json.dumps(event["result"], indent=2))
finally:
    code_client.stop()
実行結果は下記の通りです。
absl-py 2.1.0
aiohappyeyeballs 2.3.5
aiohttp 3.11.11
aiosignal 1.3.1
alabaster 0.7.10
annotated-types 0.7.0
anyio 4.9.0
asgiref 3.8.1
astor 0.8.1
asttokens 2.4.1
async-timeout 4.0.3
attrs 23.2.0
babel 2.17.0
backoff 2.2.1
bcrypt 4.1.3
beautifulsoup4 4.12.3
blinker 1.8.2
blis 0.7.11
bokeh 2.4.3
branca 0.7.2
cachetools 5.3.3
catalogue 2.0.10
certifi 2024.6.2
cffi 1.16.0
chardet 5.2.0
charset-normalizer 3.3.2
click 8.1.7
click-plugins 1.1.1
cloudpathlib 0.16.0
cloudpickle 3.0.0
colorama 0.4.6
comm 0.2.2
confection 0.1.5
contourpy 1.2.1
coverage 7.2.7
cryptography 40.0.2
cssselect2 0.7.0
cycler 0.12.1
cymem 2.0.8
debugpy 1.8.1
decorator 4.4.2
distro 1.9.0
Django 5.0.6
dnspython 2.6.1
docutils 0.18.1
docx2txt 0.8
duckdb 0.8.1
email_validator 2.1.1
entrypoints 0.4
et-xmlfile 1.1.0
exceptiongroup 1.3.0
execnet 2.1.1
executing 2.0.1
Faker 19.13.0
fastapi 0.111.0
ffmpeg-python 0.2.0
ffmpy 0.3.2
filelock 3.14.0
Flask 3.0.3
Flask-Cors 4.0.1
Flask-Login 0.6.3
fonttools 4.53.0
fpdf 1.7.2
frozenlist 1.4.1
fsspec 2024.5.0
future 1.0.0
greenlet 3.0.3
gTTS 2.5.1
gunicorn 22.0.0
h11 0.14.0
h2 4.1.0
hpack 4.0.0
httpcore 1.0.7
httptools 0.6.1
httpx 0.28.1
httpx-sse 0.4.0
Hypercorn 0.17.3
hyperframe 6.0.1
idna 3.7
imageio 2.34.1
imageio-ffmpeg 0.5.1
imagesize 1.4.1
imgkit 1.2.3
importlib_metadata 7.1.0
importlib_resources 6.4.0
iniconfig 0.0.0
ipykernel 6.29.5
ipython 8.25.0
itsdangerous 2.2.0
jedi 0.19.1
Jinja2 3.1.4
joblib 1.4.2
jupyter_client 8.6.0
jupyter_core 5.7.1
kiwisolver 1.4.5
langcodes 3.4.0
language_data 1.2.0
lazy_loader 0.4
loguru 0.7.2
lxml 5.2.2
marisa-trie 1.1.1
matplotlib 3.9.0
matplotlib-inline 0.1.7
matplotlib-venn 0.11.10
mcp 1.9.2
mdurl 0.1.2
mizani 0.9.3
moviepy 1.0.3
mpmath 1.3.0
multidict 6.0.5
multipart 1.2.1
murmurhash 1.0.10
mutagen 1.47.0
nest-asyncio 1.5.6
networkx 3.3
nltk 3.8.1
numexpr 2.10.0
numpy 1.26.4
openai 1.33.0
opencv-python 4.10.0.82
openpyxl 3.1.3
orjson 3.10.3
packaging 24.0
pandas 1.5.3
parso 0.8.4
patsy 0.5.6
pdf2image 1.17.0
pdfkit 1.0.0
pdfminer.six 20231228
pdfplumber 0.11.0
pdfrw 0.4
pexpect 4.9.0
pickleshare 0.7.5
pillow 10.3.0
pip 25.1.1
platformdirs 4.2.2
plotly 5.22.0
pluggy 0.13.0
preshed 3.0.9
priority 2.0.0
proglog 0.1.10
prompt_toolkit 3.0.45
propcache 0.2.1
psutil 5.9.5
psycopg2-binary 2.9.9
ptyprocess 0.7.0
pure-eval 0.2.2
py 1.11.0
pycparser 2.22
pydantic 2.10.5
pydantic_core 2.27.2
pydantic-settings 2.7.1
pydub 0.25.1
Pygments 2.18.0
pymongo 4.7.2
PyNaCl 1.5.0
pyOpenSSL 23.2.0
pyparsing 3.1.2
PyPDF2 3.0.1
pypdfium2 4.30.0
pypng 0.20220715.0
pyshp 2.3.1
pytest 6.2.5
pytest-asyncio 0.20.3
pytest-cov 4.0.0
pytest-html 1.17.0
pytest-metadata 1.7.0
pytest-xdist 2.5.0
python-dateutil 2.9.0.post0
python-docx 1.1.2
python-dotenv 1.0.1
python-multipart 0.0.9
pytz 2024.1
PyWavelets 1.6.0
pyxlsb 1.0.10
PyYAML 6.0.1
pyzbar 0.1.9
pyzmq 25.1.2
qrcode 7.4.2
rarfile 4.2
redis 5.0.4
regex 2024.5.15
reportlab 4.2.0
requests 2.32.4
retrying 1.3.4
rich 13.7.1
scikit-image 0.23.2
scikit-learn 1.5.0
scipy 1.13.1
setuptools 65.5.0
shapely 2.0.4
shellingham 1.5.4
six 1.16.0
smart-open 6.4.0
sniffio 1.3.1
snowballstemmer 2.2.0
soupsieve 2.5
spacy 3.7.4
spacy-legacy 3.0.12
spacy-loggers 1.0.5
Sphinx 7.1.2
SQLAlchemy 1.4.52
sqlparse 0.5.0
srsly 2.4.8
sse-starlette 2.3.4
stack-data 0.6.3
starlette 0.47.1
statsmodels 0.14.2
svglib 1.5.1
svgwrite 1.4.3
sympy 1.12.1
tenacity 8.3.0
textblob 0.18.0.post0
thinc 8.2.3
threadpoolctl 3.5.0
tifffile 2024.5.22
tinycss2 1.3.0
toml 0.10.2
tomli 2.1.0
torch 2.3.0
torchaudio 2.3.0
torchvision 0.18.0
tornado 6.4
tqdm 4.66.4
traitlets 5.14.3
typer 0.9.4
typing_extensions 4.12.1
tzdata 2024.1
ujson 5.10.0
urllib3 1.26.19
uvicorn 0.30.1
uvloop 0.19.0
Wand 0.6.13
wasabi 1.1.3
watchfiles 0.22.0
wcwidth 0.2.13
weasel 0.3.4
webencodings 0.5.1
Werkzeug 3.0.3
wsproto 1.2.0
xgboost 2.0.3
xlrd 2.0.1
XlsxWriter 3.2.0
xml-python 0.4.3
xyzservices 2024.4.0
yarl 1.9.4
zipp 3.21.0
ウェブ開発用のライブラリであるFlask、Djangoなどもありますが、実行した結果、CodeInterpreterのセッションがしばらく動作することになりましたが、アクセス方法がよく分からず、断念いたしました。
他のライブラリも導入してみたいと思いましたが、pip installを実行しましたら、ウェブサーバー実行時と同様に、フリーズしているような状態でした。
今度時間があったら、また研究してみたいと思います。
参考資料