はじめに
今回の記事ではIBM Cloud Kubernetes Service(IKS)のログデータをIBM Cloud Logsに送るための設定についてまとめています。すでにIBM Cloud Logsのインスタンスを作成していることを前提としていますので、必要に応じて以下の記事もご参考ください。
①【IBM Cloud】 Log AnalysisからCloud LogsへのLogs Routingサービス変更の流れ
②【IBM Cloud】 Activity TrackerからCloud LogsへのActivity Tracker Event Routing設定変更の流れ
③【IBM Cloud】 Log AnalysisからCloud Logsへのマイグレーションの流れ
④【IBM Cloud】IBM Cloud LogsダッシュボードでTCO Optimizerを構成してみた
⑤【IBM Cloud】IBM Cloud LogsのAlert機能ため、Event Notificationsと統合してみた
今回の内容にはIBM Cloudのアカウント(無料利用可能)も前提となっています。
なお、今回の検証はMacにて実施しています。
設定の流れ
IBM Cloud Kubernetes Serviceクラスターの作成
まずはCloud Logsにログを送る主体となるIBM Cloud Kubernetes Serviceのクラスターを作成します。
IBM Cloudコンソールにアクセスし、ナビゲーションメニューをクリックしてKubernetes→クラスターにアクセスします。


クラスターのインフラ設定を行います。インフラの種類にはVPCとClassicの2種類があるので、必要に応じて適宜選択します。また、その他リソースグループの設定やリージョンの設定を行います。

その後、Kubernetesのバージョン選択や、スペック(フレーバー)を選択します。そのほかAdd onなどを設定し、全ての選択が終わったら作成ボタンにてインスタンスを作成します。
以下の画像では最小スペックになっていますが、実際には2vCPU、16GBメモリーでうまくデプロイできました。

上記の通り、今回画像では最小スペックとして2vCPU、4GBメモリーにしていますが、デプロイの際メモリーが不足しているとのエラーが表示され、デプロイできない現象がありました。
複数回ワーカーノードのスペックを上げた結果、2vCPU、16GBメモリーでデプロイできましたので、必ず余裕を持ったクラスターを作成ください。
(IBM Cloud Docsに最小要件が記載なかったため、この段階でかなり苦戦しました)
Kubernetesクラスターに接続
Kubernetesクラスターを作成したらターミナルにてクラスターに接続します。クラスター接続のためにまずはIBM Cloudにログインします。
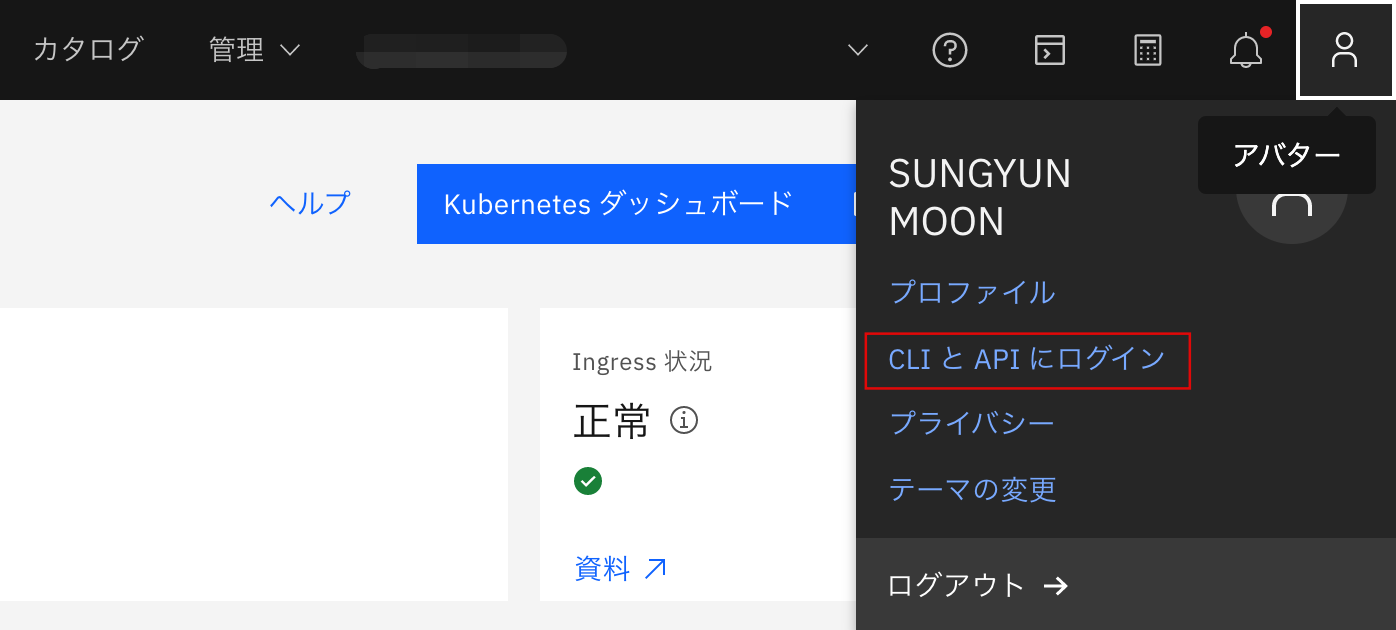
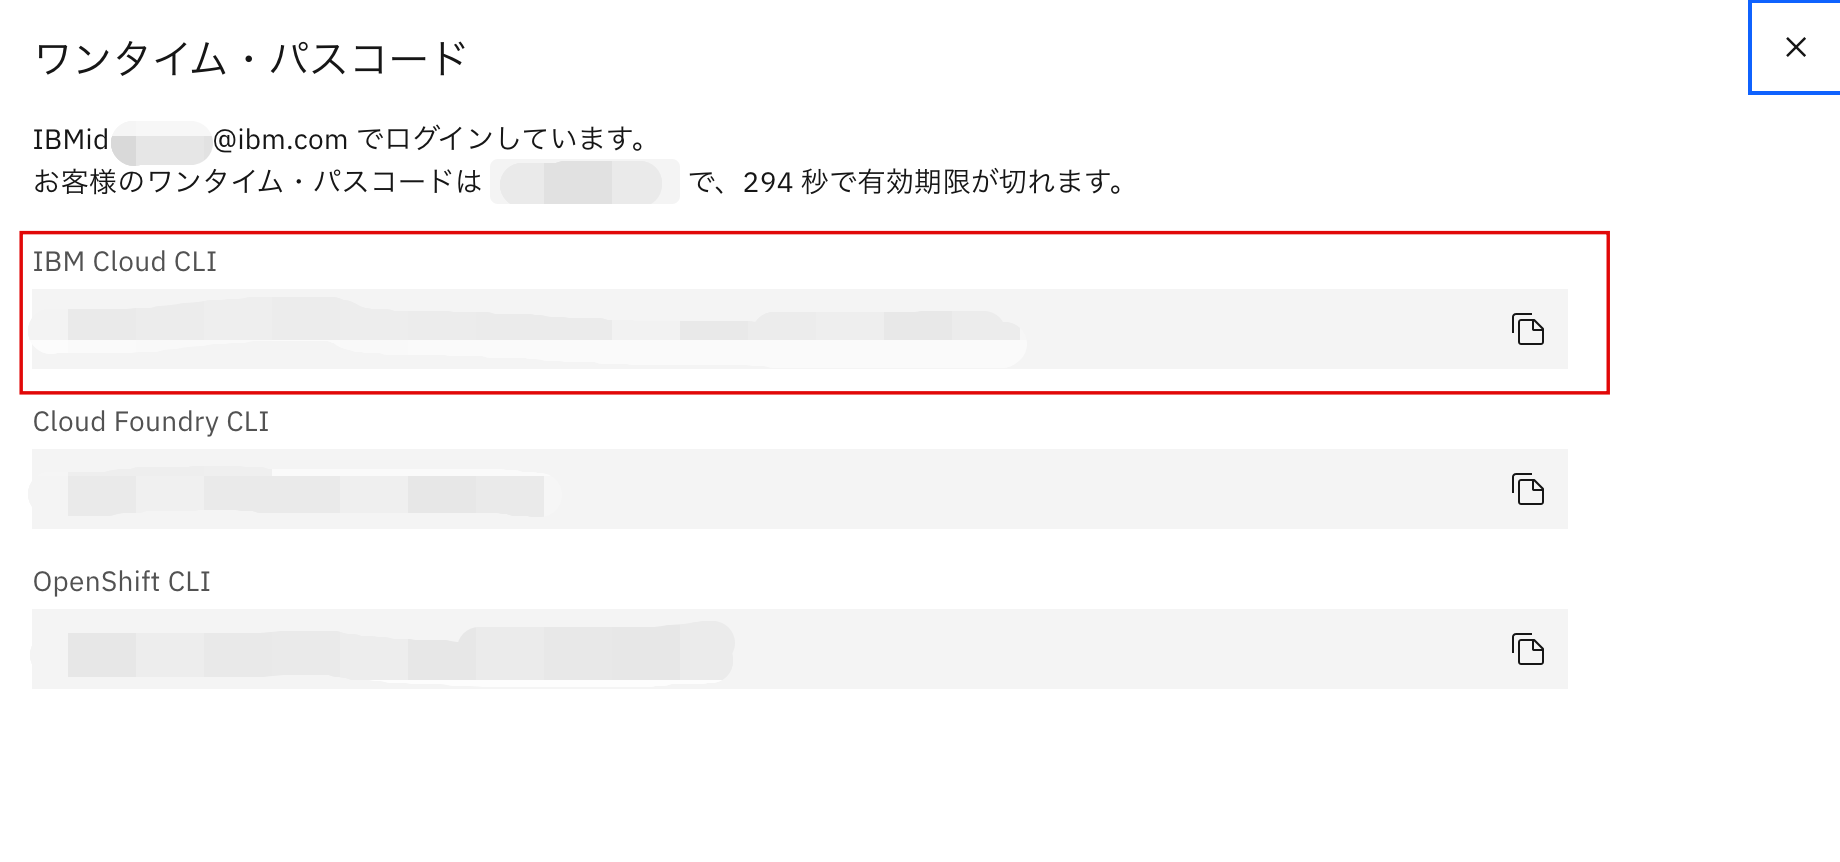
IBM Cloud右上のプロフィールアイコンをクリックし、CLIとAPIにログインをクリックしますと、以下のログインCLIが表示されます。IBM Cloud CLIをコピーしターミナルにコマンド入力することで簡単にログインできます。
また、必要に応じてリージョンを選択しますが、今回は東京(jp-tok)で実施しています。


moonsy@moon ~ % ibmcloud login -a https://cloud.ibm.com -u passcode -p xxxxxxxxxx
API エンドポイント: https://cloud.ibm.com
認証中です...
OK

ターゲットのアカウント itz-cp-jpn (xxxxxxxxxxxxxxxxxxxxxxxxxxxxxxxx) <-> xxxxxxx


リージョンを選択します (または Enter キーを押してスキップします):
1. au-syd
2. in-che
3. jp-osa
4. jp-tok
5. eu-de
6. eu-es
7. eu-gb
8. ca-tor
9. us-south
10. us-south-test
11. us-east
12. br-sao
数値を入力してください> 4
ターゲットのリージョン jp-tok


API エンドポイント:   https://cloud.ibm.com
Region:               jp-tok
ユーザー:             S.Moon@ibm.com
アカウント:           itz-cp-jpn (xxxxxxxxxxxxxxxxxxxxxxxxxxxxxxxx) <-> xxxxxxx
リソース・グループ:   リソース・グループがターゲットになっていません。'ibmcloud target -g RESOURCE_GROUP' を使用してください
IBM Cloud Kubernetes Serviceのコマンド実行のためには、IKSのCLIプラグインをインストールする必要があります。もしインストールされていない場合は、以下のコマンドを実行しCLIをインストールします。
IKS CLIを利用できるようになったら、kubectlコマンドを実行することができます。
今回私はすでにIKS CLIがインストールされていたため、以下のような結果でした。
ibmcloud plugin install ks
moonsy@moon ~ % ibmcloud plugin install ks
リポジトリー 'IBM Cloud' から 'ks' を検索しています...
プラグイン 'container-service[kubernetes-service/ks] 1.0.674' がリポジトリー 'IBM Cloud' 内で見つかりました
プラグイン 'container-service[kubernetes-service/ks] 1.0.579' は既にインストールされていました。 'container-service[kubernetes-service/ks] 1.0.674' で更新しますか? [y/N] > y
バイナリー・ファイルをダウンロードしようとしています...
 30.00 MiB / 30.00 MiB [======================================================================================================================] 100.00% 0s
31456738 バイトがダウンロードされました
バイナリーをインストールしています...
OK
プラグイン 'container-service 1.0.674' は /Users/moonsungyun/.bluemix/plugins/container-service に正常にインストールされました。 'ibmcloud plugin show container-service' を使用して詳細を表示してください。
インストールが完了し、kubectlコマンドが利用可能になりましたら、上記で作成したKubernetesクラスターに接続するために以下のコマンドに実行します。
なお、cluster_nameには以下のクラスターIDを利用することも可能です。

ibmcloud ks cluster config --cluster <cluster_name>
moonsy@moon ~ % ibmcloud ks cluster config --cluster xxxxxxxxxxxxxxxxxxx
OK
xxxxxxxxxxxxxxxxxxx の構成は正常にダウンロードされました。

csumuk4t06fvg6slhv4g のコンテキストを現在の kubeconfig ファイルに追加しました。
You can now run 'kubectl' commands against your cluster. For example, run 'kubectl get nodes'
APIキーの作成
次は、デーモンセットとして利用するロギングエージェントをインストールするために、APIキーを作成します。デーモンセットとは、Kubernetesクラスター内の各ノードで特定のPodが常に実行されるように保証する役割を果たすワークロードリソースですが、ここではロギングエージェントをデーモンセットとして利用します。
まずは以下のコマンドにてサービスIDを作成します。
なお、--descriptionの設定文は変更可能ですので、適宜変更しても問題ございません。
ibmcloud iam service-id-create kubernetes-logs-agent --description "Service ID for sending logs from IKS"
moonsy@moon ~ % ibmcloud iam service-id-create kubernetes-logs-agent --description "Service ID for sending logs from IKS"
S.Moon@ibm.com として 現行アカウント にバインドされるサービス ID kubernetes-logs-agent を作成しています...
OK
サービス ID kubernetes-logs-agent が正常に作成されました

ID           ServiceId-d9c2718e-e7df-4afa-a2ea-0d0e4239778f
名前         kubernetes-logs-agent
説明         Service ID for sending logs from IKS
CRN          crn:v1:bluemix:public:iam-identity::a/xxxxxxxxxxxxxxxxxxxxxxxxxxxxxx::serviceid:ServiceId-xxxxxx-xxxxxx-xxxxxx-a2ea-xxxxxxxxxxxxx
バージョン   1-8c23737d8a5db0dce71c767e6e4b5fff
ロック中     false
サービスIDが作成されましたら、エージェントから直接IBM Logsにログを送信するように設定します。
その際は、Trusted ProfileがIBM Cloud LogsサービスのSenderロールを持つ必要があるため、以下のコマンドを実行して、作成したサービスIDにIBM Cloud LogsのSenderロールを付与します。
ibmcloud iam service-policy-create kubernetes-logs-agent --service-name logs --roles Sender
moonsy@moon ~ % ibmcloud iam service-policy-create kubernetes-logs-agent --service-name logs --roles Sender
S.Moon@ibm.com としてサービス ID kubernetes-logs-agent の 現行アカウント にポリシーを作成しています...
OK
サービス・ポリシーは正常に作成されます


ポリシー ID:   xxxxxxxx-ae7d-xxxxxxxx-a850-xxxxxxxxxxxxxxxx
バージョン:    1-4dbdce8319aceeca6163a67919a8f2f9
役割:          Sender
リソース:
               サービス名   logs
次は以下のコマンドを実行してAPIキーを作成します。APIキーの作成の際には必要に応じてキー名(kubernetes-logs-agent-apikey)と説明(--d)をカスタマイズできますので、適宜変更してください。
また、APIキーを作成するたびに新しいIAMシークレットが生成されるようになります。APIキーには機密情報が含まれているため保管に注意してください。
ibmcloud iam service-api-key-create kubernetes-logs-agent-apikey kubernetes-logs-agent --description "API key for sending logs to the IBM Cloud Logs service"
moonsy@moon ~ % ibmcloud iam service-api-key-create kubernetes-logs-agent-apikey kubernetes-logs-agent --description "moon-API key for sending logs to the IBM Cloud Logs service"
S.Moon@ibm.com としてアカウント 27dc483dc1f14d2f821e8b3a4193ad13 にサービス ID kubernetes-logs-agent の API キー kubernetes-logs-agent-apikey を作成しています...
OK
サービス ID API キー kubernetes-logs-agent-apikey が作成されます

API キーを保存してください。 作成後に取得することはできません。

ID                   ApiKey-xxxxxxxx-xxxx-xxxx-xxxx-xxxxxxxx
名前                 kubernetes-logs-agent-apikey
説明                 moon-API key for sending logs to the IBM Cloud Logs service
ロック中             false
CRN                  crn:v1:bluemix:public:iam-identity::a/xxxxxxxxxxxxxxxxxxxxxxxxxxxxxxxx::apikey:ApiKey-xxxxxxxx-xxxx-xxxx-xxxx-xxxxxxxx
バージョン           1-97fec7b99753a5bdfb14fbb39cac7091
Disabled             false
Leaked               false
Action when leaked   disable
Session supported    false
API キー             iE_xxxxxxxxxxxxxxxxxxxxxxxxxxxxxxxxxxxx
エンドポイントの確認
APIキーを作成したら、次はIBM Cloud Logsインスタンスをマウントする際に必要とされるため取り込みエンドポイントを確認します。以下のコマンドを実行し、エンドポイントを確認します。
ibmcloud resource service-instances --service-name logs --long --output JSON | jq '[.[] | {name: .name, id: .id, region: .region_id, ingestion_endpoint: .extensions.external_ingress}]'
moonsy@moon ~ % ibmcloud resource service-instances --service-name logs --long --output JSON | jq '[.[] | {name: .name, id: .id, region: .region_id, ingestion_endpoint: .extensions.external_ingress}]'
[
  {
    "name": "Cloud Logs-common",
    "id": "crn:v1:bluemix:public:logs:eu-es:a/xxxxxxxxxxxxxxxxxxxxxxxxxxxxxxxxxxx:xxxxxxx-xxxxxxx-xxxxxxx-xxxxxxx-xxxxxxxxxxxxxx::",
    "region": "eu-es",
    "ingestion_endpoint": "xxxx-xxxx-xxxx-xxxx-xxxxxxxxxxxx.ingress.eu-es.logs.cloud.ibm.com"
  },
  {
    "name": "Logs-common-osa",
    "id": "crn:v1:bluemix:public:logs:jp-osa:a/xxxxxxxxxxxxxxxxxxxxxxxxxxxxxxxxxxx:xxxxxxx-xxxxxxx-xxxxxxx-xxxxxxx-xxxxxxxxxxxxxx::",
    "region": "jp-osa",
    "ingestion_endpoint": "xxxx-xxxx-xxxx-xxxx-xxxxxxxxxxxx.ingress.jp-osa.logs.cloud.ibm.com"
  },
  {
    "name": "Logs-investigation-tor",
    "id": "crn:v1:bluemix:public:logs:ca-tor:a/xxxxxxxxxxxxxxxxxxxxxxxxxxxxxxxxxxx:xxxxxxx-xxxxxxx-xxxxxxx-xxxxxxx-xxxxxxxxxxxxxx::",
    "region": "ca-tor",
    "ingestion_endpoint": "xxxx-xxxx-xxxx-xxxx-xxxxxxxxxxxx.ingress.ca-tor.logs.cloud.ibm.com"
  },
  {
    "name": "Logs-common-tok",
    "id": "crn:v1:bluemix:public:logs:jp-tok:a/xxxxxxxxxxxxxxxxxxxxxxxxxxxxxxxxxxx:xxxxxxx-xxxxxxx-xxxxxxx-xxxxxxx-xxxxxxxxxxxxxx::",
    "region": "jp-tok",
    "ingestion_endpoint": "xxxx-xxxx-xxxx-xxxx-xxxxxxxxxxxx.ingress.jp-tok.logs.cloud.ibm.com"
  }
]
エージェントYAMLファイルの作成
次は、エージェント・デーモンセットを構成するために使用するYAMLファイルを作成します。
本来は別途用意されていたYAMLファイルをダウンロードし、コードを修正して実行させる必要がありましたが、現在はHelmチャートを使ったデプロイが可能になりましたので、その方法を記載しています。
まず、Container Registryの利用可能な最新バージョンを確認するために、以下のコマンドを実行します。
当然ですが、最も数字が大きいものが最新版となります。今回は1.4.2が最新でした。
ibmcloud cr images --restrict ibm/observe/logger-agent-plugin
moonsy@moon ~ % ibmcloud cr images --restrict ibm/observe/logger-agent-plugin
イメージをリストしています...

リポジトリー                             タグ    ダイジェスト   名前空間   作成日          サイズ   セキュリティー状況
icr.io/ibm/observe/logger-agent-plugin   1.0.0   e37324ab54e0   ibm        1 year ago      77 MB    -
icr.io/ibm/observe/logger-agent-plugin   1.0.1   ac53710f048e   ibm        1 year ago      77 MB    -
icr.io/ibm/observe/logger-agent-plugin   1.0.2   9d7eeb343eac   ibm        1 year ago      94 MB    -
icr.io/ibm/observe/logger-agent-plugin   1.0.3   801f6a859e7a   ibm        11 months ago   94 MB    -
icr.io/ibm/observe/logger-agent-plugin   1.0.4   56a53b9a3f9b   ibm        10 months ago   98 MB    -
icr.io/ibm/observe/logger-agent-plugin   1.0.5   504d0ba2fbac   ibm        9 months ago    104 MB   -
icr.io/ibm/observe/logger-agent-plugin   1.1.0   a7b8c3e61d2a   ibm        8 months ago    104 MB   -
icr.io/ibm/observe/logger-agent-plugin   1.1.1   80b538cf5a90   ibm        7 months ago    106 MB   -
icr.io/ibm/observe/logger-agent-plugin   1.2.0   886882f03ed0   ibm        6 months ago    91 MB    -
icr.io/ibm/observe/logger-agent-plugin   1.2.2   0e4a7fbbf01c   ibm        6 months ago    97 MB    -
icr.io/ibm/observe/logger-agent-plugin   1.2.3   92163c1328aa   ibm        5 months ago    97 MB    -
icr.io/ibm/observe/logger-agent-plugin   1.2.4   ead481b07a5d   ibm        4 months ago    90 MB    -
icr.io/ibm/observe/logger-agent-plugin   1.3.0   eec0d4e506c7   ibm        3 months ago    102 MB   -
icr.io/ibm/observe/logger-agent-plugin   1.3.1   85e898de7a0a   ibm        2 months ago    95 MB    -
icr.io/ibm/observe/logger-agent-plugin   1.3.2   e28137e4efa3   ibm        2 months ago    100 MB   -
icr.io/ibm/observe/logger-agent-plugin   1.3.3   32d6baf536eb   ibm        1 month ago     100 MB   -
icr.io/ibm/observe/logger-agent-plugin   1.4.0   da3551277c49   ibm        3 weeks ago     94 MB    -
icr.io/ibm/observe/logger-agent-plugin   1.4.1   0611deda14df   ibm        3 weeks ago     94 MB    -
icr.io/ibm/observe/logger-agent-plugin   1.4.2   a0fd33299651   ibm        5 days ago      94 MB    -

OK
次は、logs-values.yaml名前のYAMLファイルを以下の内容で作成します。
metadata:
  name: "logs-agent"
image:
  version: "1.4.2"  # required

clusterName: ""     # Enter the name of your cluster. This information is used to improve the metadata and help with your filtering.

env:
  # ingestionHost is a required field. For example:
  # ingestionHost: "<logs instance>.ingress.us-east.logs.cloud.ibm.com"
  ingestionHost: "" # required

  # If you are using private CSE proxy, then use port number "3443"
  # If you are using private VPE Gateway, then use port number "443"
  # If you are using the public endpoint, then use port number "443"
  ingestionPort: "" # required

  iamMode: "IAMAPIKey or TrustedProfile"
  # trustedProfileID - trusted profile id - required for iam trusted profile mode
  trustedProfileID: "Profile-yyyyyyyy-xxxx-xxxx-yyyy-zzzzzzzzzzzz" # required if iamMode is set to TrustedProfile
今回の入力項目
- image:最新バージョンの
1.4.2 - ingestionHost:上記で確認したTOKの
ingress endpoint - iamMode:上記で発行した
IAMAPIKey- IAMAPIKeyの場合は"
IAMAPIKey"と記載するだけですが、もしTrustedProfileを利用する場合には、ProfileIDまで記載する必要があります。
- IAMAPIKeyの場合は"
デーモンセットのデプロイ
上記で作成したAPIキー、エンドポイントURL、変更済みYAMLファイルが揃いましたら、これをもってデーモンセットのデプロイを実施します。
まずは以下のコマンドを実行し、Container RegistryのCLIをインストールします。私はすでにインストールされているので、以下のような結果となります。
ibmcloud plugin install cr
moonsy@moon ~ % ibmcloud plugin install cr
リポジトリー 'IBM Cloud' から 'cr' を検索しています...
プラグイン 'container-registry[cr] 1.3.12' がリポジトリー 'IBM Cloud' 内で見つかりました
プラグイン 'container-registry[cr] 1.3.4' は既にインストールされていました。 'container-registry[cr] 1.3.12' で更新しますか? [y/N] > y
バイナリー・ファイルをダウンロードしようとしています...
 11.79 MiB / 11.79 MiB [======================================================================================================================] 100.00% 0s
12358194 バイトがダウンロードされました
バイナリーをインストールしています...
OK
プラグイン 'container-registry 1.3.12' は /Users/moonsungyun/.bluemix/plugins/container-registry に正常にインストールされました。 'ibmcloud plugin show container-registry' を使用して詳細を表示してください。
次はContainer Registryのリージョンを選択します。今回はGlobalに設定しています。
ibmcloud cr region-set global
moonsy@moon ~ % ibmcloud cr region-set global
地域は「global」に設定されました。地域は「icr.io」です。

OK
また、Helmがインストールされているか確認します。
Helmがインストールされていない場合には、手順に従って自分のPCなどの開発環境にHelmをインストールします。(2024/12/18現在、v3.13.1で作業しました。)
インストールが完了したら、コマンドにてHelmのバージョンを確認します。
helm version
version.BuildInfo{Version:"v3.13.1", GitCommit:"472c5736ab01133de504a826bd9ee12cbe4e7904", GitTreeState:"clean", GoVersion:"go1.18.10"}
最後に以下のコマンドを実行し、デーモンセットをデプロイします。値はすでに取得したものに適宜置き換えてください。
-
install-nameはHelmのインストール名(例えば'logging-agent) -
chart-versionはヘルムチャートのバージョン(今回は1.4.2) -
PATHはlogs-values.yamlファイルがあるディレクトリパス -
APIKey-valueは、上記で作成したServiceIDに関連するIAM apikey
helm install <install-name> oci://icr.io/ibm/observe/logs-agent-helm --version <chart-version> --values <PATH>/logs-values.yaml -n ibm-observe --create-namespace --set secret.iamAPIKey=<APIKey-value>
Pulled: icr.io/ibm/observe/logs-agent-helm:1.4.2
Digest: sha256:d2065465b3de3b79929817905b74d69345934a6792829d9153cea73718d09d78
NAME: logging-agent
LAST DEPLOYED: Wed Dec 18 18:42:57 2024
NAMESPACE: ibm-observe
STATUS: deployed
REVISION: 1
TEST SUITE: None
NOTES:
The agent for IBM Cloud Logs is starting up on each node in your cluster.
Logs will start to appear in your instance in a minute.

To verify the agents are started, run:
  $ kubectl -n ibm-observe get ds logs-agent

Some changes to the configuration may require the pods to be restarted:
  $ kubectl -n ibm-observe rollout restart ds/logs-agent
問題なくデプロイされた場合、ibm-observeというポッドが作成されるはずです。
インストールが完了したら、以下のコマンドにてポッドが正常に作成され稼働しているか確認します。
エラーが出ていた時にはREADY項目が0/1のままでRESTARTSが永遠と増えていました。
kubectl get pods -n ibm-observe
moonsy@moon ~ % kubectl get pods -n ibm-observe
NAME               READY   STATUS    RESTARTS   AGE
logs-agent-lvv6w   1/1     Running   0          22s
結果確認
前提のCloud Logsのダッシュボードにアクセスし、左のカテゴリーにて▶ Livetailをクリックします。その後、Startをクリックするとリアルタイムでログを確認することができます。

また、ダッシュボードからもデプロイされたエージェントを確認することができます。

最後にCloud Logsと連携されているObject Storageにもログファイルが入ってくることが確認できます。

間違いやすいポイントとその対策
検証にあたって間違いやすいと思うポイントや解決策を何点か記載します。
1. Kubernetesクラスターのスペック不足
上記の内容にも記載していますが、最初クラスターのスペックを2vCPU、4GBメモリーで作成しましたが、メモリー不足のエラーが何度も表示されました。エージェントのデプロイだったためメモリー容量があまり必要ないと思っていましたが、デフォルトで入る各種機能がメモリーを占めてしまうため、16GBメモリー以上の環境を用意する必要があります。
2. YAMLファイル作成時、Cloud LogsのIngress Endpointの記載間違い
今回の検証で使ったKubernetesクラスターは外部からアクセスができないプライベートエンドポイントクラスターでした。そのため、以下のようにIngress Endpointもprivateを使用しましたが、こちらはpublicに設定する必要があります。
例)
(⭕️)<logs instance>.ingress.jp-tok.logs.cloud.ibm.com
(❌)<logs instance>.ingress.private.jp-tok.logs.cloud.ibm.com
なお、上記のIngress Endpointをpublicにすることによって、ingestionPortもpublicの443を使用する必要があります。
(⭕️)ingestionPort: "443" # required
(❌)ingestionPort: "3443" # required
Ingress Endpointを間違えると、宛先のingressに辿り着けず、Cloud Logsにログが送れなくなります。
また、YAMLファイルのインデント間違いによってもうまく稼働しないので、ご注意ください。
3. IBM Cloud セキュリティーグループの設定
セキュリティーグループの設定の中、外部にアクセスできるルール設定ができていませんでした。
それにより、セキュリティーグループでインターネット経由のIAM認証が弾かれていたのにAPI Key(もしくはTrusted Profile)が認証できず、Podを立ち上げることができなくなりLoopBackが発生していました。
セキュリティーグループはホワイトリスト形式なので、ルール設定を行わないと外部へのアクセスは許可されない仕様です。そのため、接続先がクラスターに紐づいているセキュリティーグループのルールを変更することによって解決しています。
4. クラスターの状況の確認方法
以下のコマンドにてクラスターのStatusの確認ができます。
kubectl get pods -n ibm-observe -o wide
moonsy@moon ~ % kubectl get pods -n ibm-observe -o wide
NAME               READY   STATUS    RESTARTS   AGE   IP              NODE         NOMINATED NODE   READINESS GATES
logs-agent-xxxxx   1/1     Running   0          19h   xxx.xx.xxx.xx   xx.xx.x.xx   <none>           <none>
また、以下のコマンドにて、クラスターのログをリアルタイムで確認できます。
もしエラーが出ている場合、下端のflush backlog chunkの後ろにSucceededがつかず、エラー内容が表示されるようになります。
kubectl logs `POD_NAME` -n ibm-observe
moonsy@moon ~ % kubectl logs logs-agent-xxxxx -n ibm-observe
Defaulted container "fluent-bit" out of: fluent-bit, create-db-dir (init)
Fluent Bit v3.1.9-ibm
* Copyright (C) 2015-2024 The Fluent Bit Authors
* Fluent Bit is a CNCF sub-project under the umbrella of Fluentd
* https://fluentbit.io

______ _                  _    ______ _ _           _____  __
|  ___| |                | |   | ___ (_) |         |____ |/  |
| |_  | |_   _  ___ _ __ | |_  | |_/ /_| |_  __   __   / /`| |
|  _| | | | | |/ _ \ '_ \| __| | ___ \ | __| \ \ / /   \ \ | |
| |   | | |_| |  __/ | | | |_  | |_/ / | |_   \ V /.___/ /_| |_
\_|   |_|\__,_|\___|_| |_|\__| \____/|_|\__|   \_/ \____(_)___/

Registering the logger-icl-output-plugin with commitSHA: 5e29045cd8b22d994a4ab6e1afc292219f95a680
[2024/12/18 09:43:04] [ info] [fluent bit] version=3.1.9-ibm, commit=, pid=1
[2024/12/18 09:43:04] [ info] [storage] ver=1.5.2, type=memory+filesystem, sync=normal, checksum=off, max_chunks_up=192
[2024/12/18 09:43:04] [ info] [storage] backlog input plugin: storage_backlog.1
[2024/12/18 09:43:04] [ info] [cmetrics] version=0.9.6
[2024/12/18 09:43:04] [ info] [ctraces ] version=0.5.6
[2024/12/18 09:43:04] [ info] [input:tail:tail.0] initializing
[2024/12/18 09:43:04] [ info] [input:tail:tail.0] storage_strategy='filesystem' (memory + filesystem)
[2024/12/18 09:43:04] [ info] [input:tail:tail.0] multiline core started
[2024/12/18 09:43:04] [ info] [input:tail:tail.0] db: delete unmonitored stale inodes from the database: count=1
[2024/12/18 09:43:04] [ info] [input:storage_backlog:storage_backlog.1] initializing
[2024/12/18 09:43:04] [ info] [input:storage_backlog:storage_backlog.1] storage_strategy='memory' (memory only)
[2024/12/18 09:43:04] [ info] [input:storage_backlog:storage_backlog.1] queue memory limit: 95.4M
[2024/12/18 09:43:04] [ info] [filter:kubernetes:kubernetes.0] https=1 host=kubernetes.default.svc port=443
[2024/12/18 09:43:04] [ info] [filter:kubernetes:kubernetes.0]  token updated
[2024/12/18 09:43:04] [ info] [filter:kubernetes:kubernetes.0] local POD info OK
[2024/12/18 09:43:04] [ info] [filter:kubernetes:kubernetes.0] testing connectivity with Kubelet...
[2024/12/18 09:43:05] [ info] [filter:kubernetes:kubernetes.0] connectivity OK
{"level":"info","ts":"2024-12-18T09:43:05.01966866Z","logger":"logs-router-icl-output-plugin","caller":"internal/logger-icl-output-plugin-impl.go:95","msg":"Initializing the plugin","ID":"logs-router-icl-output-plugin"}
{"level":"info","ts":"2024-12-18T09:43:05.019752411Z","logger":"logs-router-icl-output-plugin","caller":"internal/logger-icl-output-plugin-impl.go:101","msg":"maximum payload size in bytes","#":2097152}
{"level":"info","ts":"2024-12-18T09:43:05.019854709Z","logger":"logs-router-icl-output-plugin","caller":"internal/logger-icl-output-plugin-impl.go:137","msg":"Using IAM Token Manager to authenticate.","authentication mode: ":"IAMAPIKey"}
INFO: token.go:373: [Transaction-Id: 0ddff58d-6446-4b18-9faf-51173c3fa67b] Akamai-GRN Header: 0.051fd517.1734514985.b0c2e5b8
{"level":"info","ts":"2024-12-18T09:43:05.211086399Z","logger":"logs-router-icl-output-plugin","caller":"plugin/logger-icl-output-plugin.go:102","msg":"Starting Plugin","ID":"logs-router-icl-output-plugin"}
[2024/12/18 09:43:05] [ info] [output:logger-icl-output-plugin:logger-icl-output-plugin.0] worker #1 started
[2024/12/18 09:43:05] [ info] [output:logger-icl-output-plugin:logger-icl-output-plugin.0] worker #2 started
[2024/12/18 09:43:05] [ info] [output:logger-icl-output-plugin:logger-icl-output-plugin.0] worker #0 started
[2024/12/18 09:43:05] [ info] [output:logger-icl-output-plugin:logger-icl-output-plugin.0] worker #1 started
[2024/12/18 09:43:05] [ info] [output:logger-icl-output-plugin:logger-icl-output-plugin.0] worker #3 started
.
.
(省略)
.
.
[2024/12/18 09:43:10] [ info] [engine] flush backlog chunk '1-1734514706.25704021.flb' succeeded: task_id=117, input=storage_backlog.1 > output=logger-icl-output-plugin.0 (out_id=0)
[2024/12/18 09:43:11] [ info] [engine] flush backlog chunk '1-1734514706.198421463.flb' succeeded: task_id=119, input=storage_backlog.1 > output=logger-icl-output-plugin.0 (out_id=0)
[2024/12/18 09:43:11] [ info] [engine] flush backlog chunk '1-1734514691.252188636.flb' succeeded: task_id=94, input=storage_backlog.1 > output=logger-icl-output-plugin.0 (out_id=0)
[2024/12/18 09:43:11] [ info] [engine] flush backlog chunk '1-1734514693.233196617.flb' succeeded: task_id=98, input=storage_backlog.1 > output=logger-icl-output-plugin.0 (out_id=0)
[2024/12/18 09:43:11] [ info] [engine] flush backlog chunk '1-1734514692.70858092.flb' succeeded: task_id=96, input=storage_backlog.1 > output=logger-icl-output-plugin.0 (out_id=0)
[2024/12/18 09:43:11] [ info] [engine] flush backlog chunk '1-1734514707.194399406.flb' succeeded: task_id=121, input=storage_backlog.1 > output=logger-icl-output-plugin.0 (out_id=0)
[2024/12/18 09:43:11] [ info] [engine] flush backlog chunk '1-1734514695.200123417.flb' succeeded: task_id=100, input=storage_backlog.1 > output=logger-icl-output-plugin.0 (out_id=0)
[2024/12/18 09:43:11] [ info] [engine] flush backlog chunk '1-1734514708.142653123.flb' succeeded: task_id=123, input=storage_backlog.1 > output=logger-icl-output-plugin.0 (out_id=0)
[2024/12/18 09:43:11] [ info] [engine] flush backlog chunk '1-1734514709.212355373.flb' succeeded: task_id=125, input=storage_backlog.1 > output=logger-icl-output-plugin.0 (out_id=0)
[2024/12/18 09:43:11] [ info] [engine] flush backlog chunk '1-1734514696.197685726.flb' succeeded: task_id=104, input=storage_backlog.1 > output=logger-icl-output-plugin.0 (out_id=0)

