TL;DR
- はじめに
- 温湿度センサをESPに接続する
- 温湿度をLCDに表示する
- スマホアプリから室温をチェックする
はじめに
前回の記事にてESP32の紹介と開発環境の構築を行ったので、今回はお手軽にでき、既に運用中の温湿度計の開発の手順を紹介する。
使用したものは以下の通り。
- マイコン:ESP32
- 温湿度センサ:DHT11
- LCD:Arduino IIC/I2C 1602液晶モジュール
なお、これらのセンサはOSOYOOなどのスターターキットなどに同梱されている。
5000円程度でも10数個のセンサが入っているので、初心者であれば最初はそちらで揃えることをおすすめする。
温湿度センサをESPに接続する
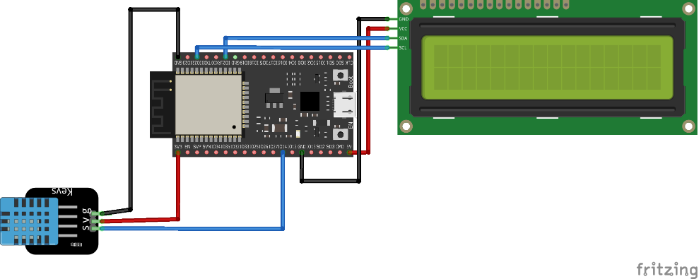
ESP32とセンサ、LCDとの接続は以下の通りに行う。

※”IO14”については、"IOxx"と記載されているピンならどこでもOK。
次に、ArduinoIDEにて以下コードを記述する。
この時、DHT11のDATAピンの接続先をコード内の”DHTPIN”と同じにすること。
(上記接続例の場合は"14"と記載する)
これで初期設定は完了。
# include <LiquidCrystal_I2C.h>
# include "DHT.h"

//here we use 14 of ESP32 to read data
# define DHTPIN 14

//our sensor is DHT11 type
# define DHTTYPE DHT11

//create an instance of DHT sensor
DHT dht(DHTPIN, DHTTYPE);
次に、通信速度や温湿度センサの情報を読み出す準備を行う。
void setup()
{
  Serial.begin(115200); // シリアルモニタ用
  Serial.println("Start!");
  //Call "begin" to start the sensor.
  dht.begin();
}
最後にメインの処理を行う。
ここでは、温湿度センサの値を既存のライブラリを用いて読み出す。コードは以下の通り。
この時、ごくまれにセンサの出力が異常(100万℃みたいな)値になることがあるため、” if (isnan(h) || isnan(t))”の記述は忘れないようにすること。
void loop()
{
  /*
   * DHT11 read temp. & humid.
  */
  //use the functions which are supplied by library.
  //Read humidity.
  int h = dht.readHumidity();
  // Read temperature as Celsius (the default)
  int t = dht.readTemperature();
  // Check if any reads failed and exit early (to try again).
  if (isnan(h) || isnan(t)) {
    Serial.println("Failed to read from DHT sensor!");
  }
  // print the result to Terminal.
  Serial.print("Humidity: ");
  Serial.print(h);
  Serial.print(" %\t");
  Serial.print("Temperature: ");
  Serial.print(t);
  Serial.println(" *C");

  delay(1000); //[msec]
}
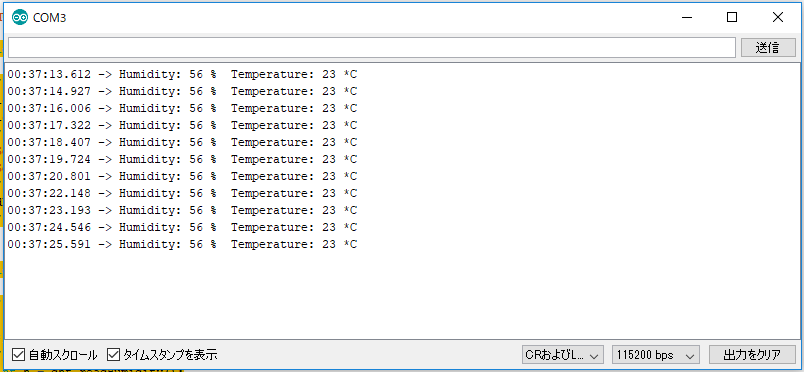
ここでArduinoIDEのCOMの設定(「ツール」タブ→「シリアルポート」)が適切であれば、ArduinoIDEの「ツール」タブから「シリアルモニタ」を選択すると以下の表示を見ることが出来る。
この時、温湿度が出力されていれば接続は問題ないが、数値が0や異常値の場合は、いずれかの操作を誤っている可能性が高い。
温湿度をLCDに表示する
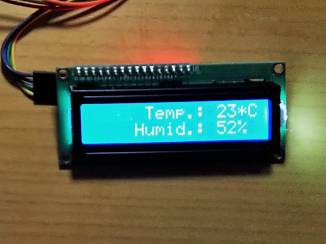
次に出力した温湿度をLCDに表示してみる。
まずはLCDの定義を行うため、以下のコードをDHTセンサを定義した箇所に追加する。
# include <LiquidCrystal_I2C.h>
LiquidCrystal_I2C lcd(0x27,16,2);  // set the LCD address to 0x27 for a 16 chars and 2 line display
次に通信速度等を定義した場所に、以下のコードを記載する。(変更点は、lcdモジュールを用いている箇所のみ)
void setup()
{
  // initialize the lcd
  lcd.init();
  lcd.backlight();

  Serial.begin(115200);
  Serial.println("Start!");
  //call begin to start sensor
  dht.begin();
  //
}
最後にメインループ内の処理だが、末尾に以下項目を追加する。LCDが横16文字に決まっているため、スペース等を活用しながら、サイズを調整する必要がある。
void loop()
{
  /*
   * DHT11 read temp. & humid.
  */
  //use the functions which are supplied by library.
  int h = dht.readHumidity();
  // Read temperature as Celsius (the default)
  int t = dht.readTemperature();
  // Check if any reads failed and exit early (to try again).
  if (isnan(h) || isnan(t)) {
    Serial.println("Failed to read from DHT sensor!");
  }
  // print the result to Terminal
  Serial.print("Humidity: ");
  Serial.print(h);
  Serial.print(" %\t");
  Serial.print("Temperature: ");
  Serial.print(t);
  Serial.println(" *C");

  // clear the screen
  lcd.clear();
  // display each character to the LCD
  lcd.print("     Temp.:");
  lcd.print(t);
  lcd.println("*C");
  lcd.setCursor(0, 1);
  lcd.print("     Humid.: ");
  lcd.print(h);
  lcd.println("%");
  // 2sec delay
  delay(1000);
}

