
はじめに
こんにちは、Watanabe jin (@Sicut_study)です。
私はReactを初心者を中心に指導してきました。
教えてきた生徒はReactで立派なサービスを開発していますが、実力はあっても仮想DOMや再レンダリングの理解が甘くバグに時間を取られるケースが多々あります。
(深く理解しなくても使えるが魅力でもあります)
Reactを開発する上で「仮想DOM」や「再レンダリング」をしっかり理解することは、バグ対応やパフォーマンス向上のためにとても重要です。
今回はReactをJavaScriptのみで0から再実装することで実装レベルで仮想DOMを理解できるチュートリアルを作成しました。
私自身もこのチュートリアルを作る中で仮想DOMを理解できました。
よりReactらしいコードをかけるようになり、やってよかったと心から思えています。
Reactを始めたばかりの人にもチュートリアルをやってもらいたいので、丁寧に解説することを意識しました。
「車輪の再発明」
エンジニアであればこの言葉を聞いたことある人は多いと思います。
車輪の再発明とは、すでに確立されている技術や解決方法を、それとは知らずに、または意図的に無視して、再び一から作り直すことを指す慣用句のこと
IT業界において「車輪の再発明」は避けたほうがいいと言われることは多いです。
しかし、Reactを深く理解する上では再実装することはよりよいコードを書けるようになるのでとてもコスパがよい取り組みだと考えます。
このチュートリアルを行うことでReact自体の仕組みを深く理解することができます。
きっとよりReactらしいコードを書けるようになれるはずです!
動画教材も用意しています
こちらの教材にはより詳しく解説した動画もセットでご用意しています。
テキスト教材でわからない細かい箇所があれば動画も活用ください。
対象者
- Reactを触ったことがある人
- 仮想DOMがよくわからない人
- 再レンダリングがわからない人
- Reactをより深く理解したい人
- 基礎力を身につけたい人
このチュートリアルはReactを触ったことある人であれば2時間程度で行うことが可能です。
本ハンズオンは以下の記事を現代風に直して解説したものになります。
DOMとはなにか?
仮想DOMの話をする前にもっと基本的なところから解説していきます。
DOMとはHTMLで書かれたWebページをプログラム(JavaScript)が理解・操作できる形で表現したモデルのことです。

DOMはノード(要素)からなるツリー構造(木構造)になっており、これをDOMツリーと呼びます。
またノードにもいくつかの種類があります。

DOMツリーではノード同士の関係を以下のように呼んでおり、「親ノード」「子ノード」「兄弟ノード」は今回の実装の中でもでてくるのでおさえておきましょう。

DOMを操作してみよう
DOMはJavaScriptで操作できるモデルなので、ブラウザに搭載されているコンソールでJavaScriptコードを実行すると操作することができます。
https://google.comを開いてください。
右クリック→「検証」または「要素を調査」をクリックしてデベロッパーツールを開きます。

デベロッパーツールが開いたら、上部の 「Console」 タブをクリックしてください。

それでは実際に現在のDOMの構造をJavaScriptを書いて理解してみましょう。
// document オブジェクトを確認
console.log(document);

// HTML要素(ルート要素)を取得
console.log(document.documentElement);

// body要素を取得
console.log(document.body);

// 特定の要素を取得する方法(inputタグ要素を取得)
console.log(document.querySelector('input')); // 検索フォームのinput取得

ツリー構造になっているのを確認することができました。
DOMを実際に取得することができたのでDOM操作で新しいh1タグをページに追加してみましょう!
// 新しいh1要素を作成(まだページには表示されない)
const newHeading = document.createElement('h1');

// 要素の内容を設定
newHeading.textContent = 'Hello World!';

// ページの最上部に追加(ここで初めて画面に表示される)
document.body.insertBefore(newHeading, document.body.firstChild);

画面に「Hello World!」を追加することができました!
実行したコードの解説をしていきます。
const newHeading = document.createElement('h1');
この行では、新しい h1 要素(見出し)をメモリ上に作成しています。
この時点ではまだ DOM ツリーに追加されていないため、画面には表示されません。
newHeading.textContent = 'Hello World!'
作成した h1 要素にテキスト内容「Hello World!」を設定しています。
document.body.insertBefore(newHeading, document.body.firstChild);
この行で実際に作成した要素を DOM に挿入しています。
insertBeforeは、最初の引数(newHeading)を、2番目の引数(document.body.firstChild、つまり body の最初の子要素)の前に挿入します。これにより、h1 要素がページの body の最初の子要素として配置され、画面に表示されます。
DOMの問題点
現代の複雑なアプリケーションでDOM操作するといくつかの問題が発生します。

- コードが複雑になりがち
- 状態管理が困難
- パフォーマンス問題が起こりやすい
Reactはこれらの問題を解決する画期的なライブラリです
最大の革新は仮想DOMという技術にあります。
Reactはまず仮想的なDOM(実際のブラウザDOMのメモリ上の軽量コピー)を作成します。
そのあと以前の仮想DOMと比較して差分があった仮想的なノードだけを、実際のDOM上のノードに対して変更を適応します。
こうすることで直接DOMを操作するよりもレンダリングのコスト(描画には色々な処理が必要)を大幅に削減できるためパフォーマンスが向上します。
ここからは実際にJavaScriptでReactを再実装ことで仮想DOMやレンダリングについて深く理解していきます。
レンダリングまでの流れ
JavaScriptでReactを再実装する前にReactがどのようにレンダリングをするのかの全体像を掴んでおくとより実装が理解しやすいので解説していきます。
もし実装している途中によくわからないと思ったときにはぜひこのチャプターに立ち戻ってください。

Reactのレンダリングプロセスは以下の流れで行います。
1. コンポーネント定義(JSX)
JSXを使ったコンポーネントを定義して、レンダリングを開始します。
// JSXを使ったコンポーネント定義
function MyComponent(props) {
  return <div className="container">Hello, {props.name}!</div>;
}

// レンダリングの開始点
ReactDOM.render(<MyComponent name="World" />, document.getElementById('root'));
2. JSXからReact要素への変換
JSXは実際には以下のような関数の呼び出しに変換されます。
// Viteが変換する
function MyComponent(props) {
  return React.createElement(
    'div',
    { className: 'container' },
    'Hello, ',
    props.name,
    '!'
  );
}

// レンダリング開始
ReactDOM.render(
  React.createElement(MyComponent, { name: 'World' }),
  document.getElementById('root')
);
私たちが書いたコードはこのような形でしたが
function MyComponent(props) {
  return <div className="container">Hello, {props.name}!</div>;
}React再実装で仕組みを
Viteが内部で変換してこのような形に変換をして実行をしています。
function MyComponent(props) {
  return React.createElement(
    'div',
    { className: 'container' },
    'Hello, ',
    props.name,
    '!'
  );
}
3. React要素の生成
createElementを呼び出すと以下のようなオブジェクト(React要素)が作成されます。
{
  type: 'div', // または関数コンポーネント
  props: {
    className: 'container',
    children: ['Hello, ', 'World', '!']
  },
  key: null,
  ref: null
}
4. レンダリングフェーズ
3で作成したReact要素を小さな単位(ノード単位)に分割して、それぞれに対してコンポーネント情報を保持するオブジェクトを作成します。
これをファイバーと呼び、ファイバーから作成されるツリー構造をファイバーツリーと呼びます。ファイバーツリーは仮想的なDOMツリーのようなものと認識してもらえば一旦大丈夫です。
ファイバーにはReactElementのタイプ(divやh1など)やparent(親要素)などノードに関する情報を持っています。
const counterFiber = {
  // 基本情報
  type: Counter, // 関数自体への参照
  props: {
    initial: 0,
    children: []
  },

  // 関数コンポーネントはDOMノードを持たない
  dom: null,

  // ツリー構造
  parent: appFiber,    // Appコンポーネントなど
  child: pFiber,       // p要素のファイバー
  sibling: null,
  alternate: null,

  // 副作用タグ
  effectTag: 'UPDATE'
}
ファイバーごとに、前回のファイバーツリーと比較をします。
変更があるならファイバーに変更があることを記録しておきます。
const counterFiber = {
  type: Counter,
  props: {
    initial: 0,
    children: []
  },
  dom: null,
  parent: appFiber,
  child: pFiber,
  sibling: null,
  alternate: null,
  effectTag: 'UPDATE' // 更新されたことを表す
}
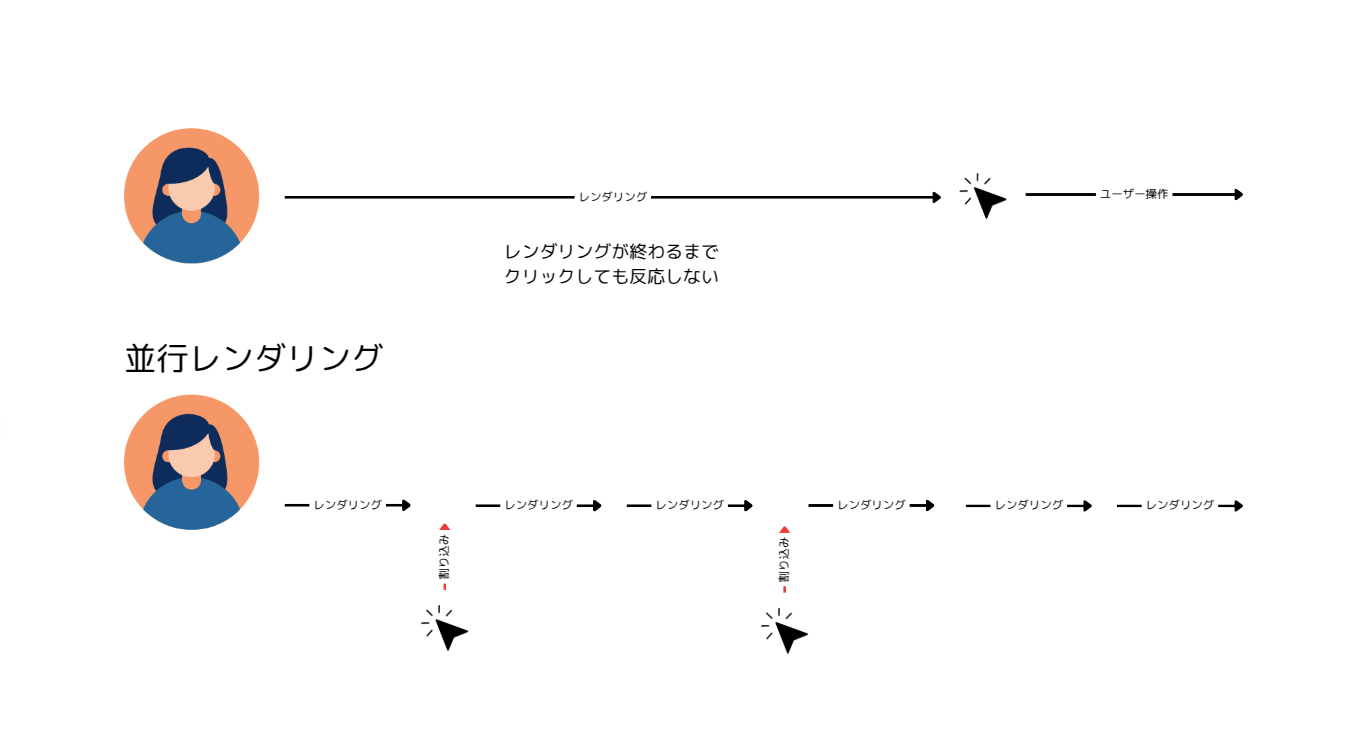
ファイバー単位の細かい単位でファイバーツリーを処理することによって、
ユーザーが画面で何かしらの操作(メニューをクリックなど)した場合に、作業を中断してユーザー操作を優先することができるようになります。
これによってレンダリング中に画面が操作できないということが防げるため、ユーザー体験向上に繋がります。
(ファイバーについての詳しい解説はのちほど行います)
5. コミットフェーズ
最後に追加、変更、削除されたノードに対して実際にDOM操作を行います。
4で作成したファイバーをみればその要素が更新されるのか/削除されるのか/更新なのかがわかるので、
それぞれのファイバーをチェックしていき、更新があるなら実際のDOMに対して操作を行います。
つまり実際に画面へ反映されることになります。
ここまでがざっくりとした流れで、今回の実装もおおよそこの流れで行っていきます。
この説明が完全にわからなくても問題はありません。なんとなく全体感を掴みながら実際にReactを実装してより理解を深めていきましょう。
またそれぞれのステップにはより細かい処理も含まれるのでこのあと解説していきます。
1. 環境構築
まずはViteを使ってJavaScriptを実行できる環境を構築しましょう
通常Reactを扱うのであればライブラリでReactをインストールする必要があるのですが、今回はJavaScriptのみでReactを作るのでJavaScriptが動く環境を用意してあげれば大丈夫です。
$ node -v

v22.4.0
$ npm create vite@latest

> npx
> create-vite

✔ Project name: … make-react
✔ Select a framework: › Vanilla
✔ Select a variant: › JavaScript
$ cd make-react
$ npm i
$ npm run dev
http://localhost:5173を開いて以下の画面が表示されれば完了です。

2. ReactをJavaScriptに置き換えてみる
ここではReactのコードを愚直にJavaScriptに置き換えてみます。
もちろん差分更新などはできない例題に依存しているコードになりますが、やっていきましょう。
先ほど作成したmake-reactディレクトリをVSCodeで開きます。
まずはmain.jsにかかれているコードをすべて消します。
通常のReactのコードを書いてみましょう(もちろんReactがインストールされていないので動きませんが)
function MyComponent() {
  return <h1 title="foo">Hello</h1>;
}

const container = document.getElementById("root");
ReactDOM.render(<MyComponent />, container);
JSXはViteやBabelなどのコンパイルツールによってcreateElementというオブジェクトを作成するコードに変換していくれます。実際に手でコードを置き換えていきましょう。
const element = React.createElement("h1", { title: "foo" }, "Hello");
const container = document.getElementById("root");
ReactDOM.render(element, container);
createElementは3つの引数を受け取る関数です。
第一引数 : Type(作成する要素のタイプを指定)
第二引数 : Props(要素に渡すプロパティ(属性)のオブジェクト)
第三引数 : children (HTMLの内側に配置される内容(テキスト、他のReact要素、または子要素の配列)を定義します)
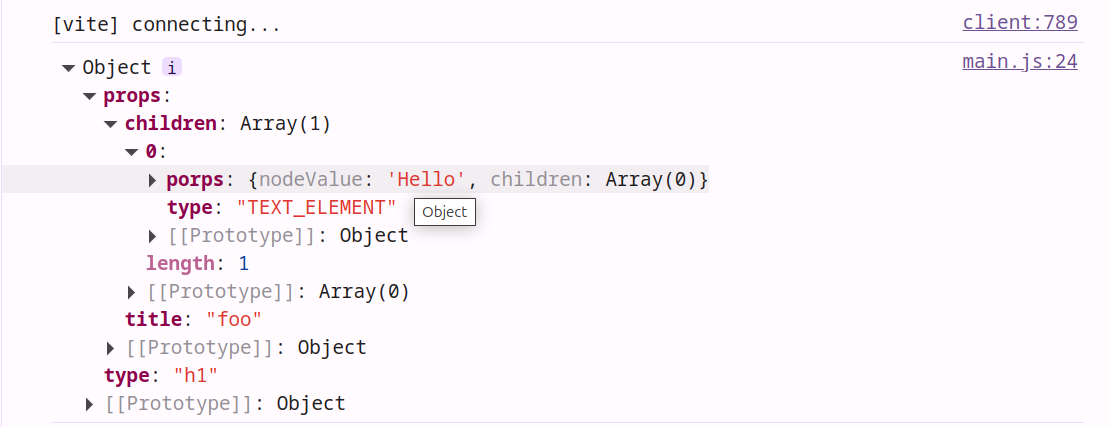
createElementをすると以下のようなオブジェクトに変換されて返却されます。
{
  type: "h1",
  props: {
    title: "foo",
    children: "Hello",
  },
}<iframe width="560" height="315" src="https://www.youtube.com/embed/nwRJVPvtYqE?si=jHeZbemhnN_FshXQ" title="YouTube video player" frameborder="0" allow="accelerometer; autoplay; clipboard-write; encrypted-media; gyroscope; picture-in-picture; web-share" referrerpolicy="strict-origin-when-cross-origin" allowfullscreen></iframe>
React.createElementをJavaScriptに置き換えるならこのように書けば同じ意味になります。
const element = {
  type: "h1",
  props: {
    title: "foo",
    children: "Hello",
  },
}

const container = document.getElementById("root")
const node = document.createElement(element.type)
ReactDOM.render(element, container)
次にReactからJavaScriptに置き換えるのはReactDom.renderです。
先程コンソールでやったようにroot要素にh1属性を追加します。
const element = {
  type: "h1",
  props: {
    title: "foo",
    children: "Hello",
  },
};

// idがrootの要素を取得
const container = document.getElementById("root");

// 新しい要素を作成(h1要素)
const node = document.createElement(element.type);
node["title"] = element.props.title;

// テキストノードを作成(Hello)
const text = document.createTextNode("");
text["nodeValue"] = element.props.children;

// テキストノードをh1要素に追加<iframe width="560" height="315" src="https://www.youtube.com/embed/nwRJVPvtYqE?si=jHeZbemhnN_FshXQ" title="YouTube video player" frameborder="0" allow="accelerometer; autoplay; clipboard-write; encrypted-media; gyroscope; picture-in-picture; web-share" referrerpolicy="strict-origin-when-cross-origin" allowfullscreen></iframe>
node.appendChild(text);

// h1要素をroot要素に追加
container.appendChild(node);
appendChildはDOMの基本メソッドで、親要素に子要素を追加します。
この行では、作成したテキストノード("Hello")をh1要素の中に配置しています。
HTMLで表すと以下のようになっています。
<h1 title="foo">Hello</h1>
Reactではroot要素に対してDOMを追加変更して画面を変更(レンダリング)しています。
なので、私たちの画面にもroot要素を用意する必要があります。
index.htmlをいかに修正してください
<!DOCTYPE html>
<html lang="en">
  <head>
    <meta charset="UTF-8" />
    <link rel="icon" type="image/svg+xml" href="/vite.svg" />
    <meta name="viewport" content="width=device-width, initial-scale=1.0" />
    <title>Vite App</title>
  </head>
  <body>
    <!-- appからrootにidを変更 -->
    <div id="root"></div>
    <script type="module" src="/src/main.js"></script>
  </body>
</html>
idをappからrootに変更しました。
<div id="root"></div>
これで実際に動くと思うのでサーバーを起動してアクセスしてみましょう。
$ npm run dev
http://localhost:5173を開いてください。

3. createElementを実装する
いまのままでは私たちが自分自身で以下のオブジェクトに変換してあげないと動かないので、ここを自動化するためにcreateElementを実装していきます。
{
  type: "h1",
  props: {
    title: "foo",
    children: "Hello",
  },
}
それでは一旦コードをcreateElementを使っていたときの形に戻してあげます。
const element = React.createElement("h1", { title: "foo" }, "Hello");
const container = document.getElementById("root");
ReactDOM.render(<MyComponent />, container);
そしてcreateElementを関数で用意して、React.createElementではなく自作関数を呼び出します。
function createElement(type, props, ...children) {
  return {
    type,
    props: {
      ...props,
      children: children.map((child) =>
        typeof child === "object" ? child : createTextElement(child)
      )
    },
  };
}

const element = createElement("h1", { title: "foo" }, "Hello");

const container = document.getElementById("root");
ReactDOM.render(element, container);
createElementの中では私たちがほしい以下の形になるようにオブジェクトを作成しています。
{
  type: "h1",
  props: {
    title: "foo",
    children: "Hello",
  },
}
propsの部分は難しいのでもう少し解説していきます。
    props: {
      ...props,
      children: children.map((child) =>
        typeof child === "object" ? child : createTextElement(child)
      )
    },
propsは第二引数の{ title: "foo" }、...childrenには第三引数のHelloがきます。
function createElement(type, props, ...children) {
(省略)
}

const element = createElement("h1", { title: "foo" }, "Hello");
...propsとすることで
{
  type: "h1",
  props: {
    title: "foo",
    children: ....
  },
}
という形にすることができます。例えばpropsが{ title: "foo", name: "hoge" }なら以下のようになります。
{
  type: "h1",
  props: {
    title: "foo",
    name: "hoge",
    children: ....
  },
}
ちなみにこのときのJSXはこのようになっているはずです。
function MyComponent() {
  return <h1 title="foo" name="hoge">Hello</h1>;
}
childrenはもっと複雑な処理をしています。
      children: children.map((child) =>
        typeof child === "object" ? child : createTextElement(child)
      )
childrenは可変長の引数を受け取ります。
function createElement(type, props, ...children) {
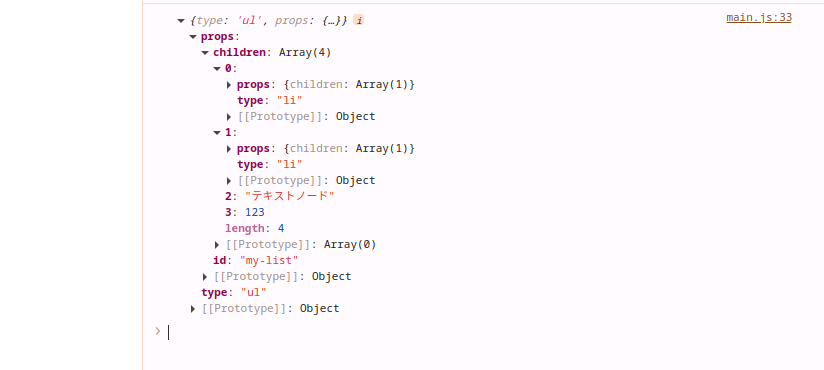
例えばこのように子要素に色々持っている場合はchildrenには複数の要素が入ります。
// JSX
function MyList() {
  return (
    <ul id="my-list">
      <li>項目1</li>
      <li>項目2</li>
      テキストノード
      {123}
    </ul>
  );
}

// コンパイルしたもの
createElement(
  "ul",
  { id: "my-list" },
  createElement("li", null, "項目1"),
  createElement("li", null, "項目2"),
  "テキストノード",
  123
);

// createElementの出力
{
    type: ul
    props: {
        id: "my-list"
        children: [
            { type: "li", props: { children: ["項目1"] } },
            { type: "li", props: { children: ["項目2"] } },
            "テキストノード",
        123
        ]
    }
}
子の要素をそれぞれチェックしてオブジェクトかどうかを判定しています。
オブジェクトならそのまま返して、それ以外ならテキスト要素に変換して返しています。
      children: children.map((child) =>
        typeof child === "object" ? child : createTextElement(child)
      )
ここでcreateTextElementという関数が必要になったので用意します。
function createElement(type, props, ...children) {
  return {
    type,
    props: {
      ...props,
      children: children.map((child) =>
        typeof child === "object" ? child : createTextElement(child)
      )
    },
  };
}

// 追加
function createTextElement(text) {
  return {
    type: "TEXT_ELEMENT",
    props: {
      nodeValue: text,
      children: [],
    },
  }
}

const element = createElement(
  "div",
  { id: "foo" },
  React.createElement("a", null, "bar"),
  React.createElement("b")
);

const container = document.getElementById("root");
ReactDOM.render(element, container);
JavaScript内では文字列や数値はオブジェクトではないため、そのままでは仮想DOM要素として扱えないため同じような形のオブジェクトにしてあげるのがcreateTextElementです。
Reactは内部的にReactTextというタイプを使用して、テキストノードを表現しますが、今回はReactを再実装しているのでTEXT_ELEMENTという独自のタイプを設定しました。
ここまでできればcreateElementを再実装できたはずなのでチェックしましょう。
このままではViteで起動ができないので
function createElement(type, props, ...children) {
  return {
    type,
    props: {
      ...props,
      children: children.map((child) =>
        typeof child === "object" ? child : createTextElement(child)
      )
    },
  };
}

function createTextElement(text) {
  return {
    type: "TEXT_ELEMENT",
    props: {
      nodeValue: text,
      children: [],
    },
  };
}

const element = createElement("h1", { title: "foo" }, "Hello");
console.log(element);

// サーバーを起動するために手で作成
const container = document.getElementById("root");
const node = document.createElement("h1");
const text = document.createTextNode("Hello World!");
node.appendChild(text);
container.appendChild(node);

// エラーになるためコメントにする
// ReactDOM.render(element, container);
いい感じにReact要素のようなオブジェクトが手に入りました。
別のパターンも試してみましょう
function createElement(type, props, ...children) {
  return {
    type,
    props: {
      ...props,
      children: children.map((child) =>
        typeof child === "object" ? child : createTextElement(child)
      ),
      children,
    },
  };
}

function createTextElement(text) {
  return {
    type: "TEXT_ELEMENT",
    props: {
      nodeValue: text,
      children: [],
    },
  };
}

// const element = createElement("h1", { title: "foo" }, "Hello");
const element = createElement(
  "ul",
  { id: "my-list" },
  createElement("li", null, "項目1"),
  createElement("li", null, "項目2"),
  "テキストノード",
  123
);
console.log(element);

// サーバーを起動するために手で作成
const container = document.getElementById("root");
const node = document.createElement("h1");
const text = document.createTextNode("Hello World!");
node.appendChild(text);
container.appendChild(node);

// エラーになるためコメントにする
// ReactDOM.render(element, container);
こちらも問題なくできています。
不要なコードは一旦消して次はReact.renderを再実装していきます。
function createElement(type, props, ...children) {
  return {
    type,
    props: {
      ...props,
      children: children.map((child) =>
        typeof child === "object" ? child : createTextElement(child)
      )
    },
  };
}

function createTextElement(text) {
  return {
    type: "TEXT_ELEMENT",
    props: {
      nodeValue: text,
      children: [],
    },
  };
}

const element = createElement("h1", { title: "foo" }, "Hello");
ReactDOM.render(element, container);
4. renderを再実装する
次にrenderを自前で用意しますが、普段ReactDom.renderを使っているように自前のオブジェクトを用意して呼び出すようにします。
function createElement(type, props, ...children) {
  return {
    type,
    props: {
      ...props,
      children: children.map((child) =>
        typeof child === "object" ? child : createTextElement(child)
      )
    },
  };
}

function createTextElement(text) {
  return {
    type: "TEXT_ELEMENT",
    props: {
      nodeValue: text,
      children: [],
    },
  };
}

// 追加
function render(element, container) {
  // あとで実装する
}

// 追加
const MyReact = {
  createElement,
  render,
}

const element = MyReact.createElement("h1", { title: "foo" }, "Hello");
MyReact.render(element, container);
オブジェクトに関数をいれることで、呼び出せるようにしました。
const MyReact = {
  createElement,
  render,
}
次にrenderを実装してきましょう。まずは先ほど作成したelementを使ってDOMに追加する操作をします。
function createElement(type, props, ...children) {
  return {
    type,
    props: {
      ...props,
      children: children.map((child) =>
        typeof child === "object" ? child : createTextElement(child)
      )
    },
  };
}

function createTextElement(text) {
  return {
    type: "TEXT_ELEMENT",
    props: {
      nodeValue: text,
      children: [],
    },
  };
}

function render(element, container) {
  const dom =
    element.type === "TEXT_ELEMENT"
      ? document.createTextNode(element.props.nodeValue)
      : document.createElement(element.type);

  element.props.children.forEach(child =>
    render(child, dom)
  )

  container.appendChild(dom)
}

const MyReact = {
  createElement,
  render,
}

const element = MyReact.createElement("h1", { title: "foo" }, "Hello");
MyReact.render(element, container);
createElementで以下のようなオブジェクトが作成できていました。
const element = {
  type: "h1",
  props: {
    title: "foo",
    children: [
      {
        type: "TEXT_ELEMENT",
        props: {
          nodeValue: "Hello",
          children: []
        }
      }
    ]
  }
}
これらをrenderに渡すことで、
  const dom =
    element.type === "TEXT_ELEMENT"
      ? document.createTextNode(element.props.nodeValue)
      : document.createElement(element.type);
elementのtypeをチェックしてテキストなら(たとえばHello)ならTextNode,
element.type が "h1" なら、h1タグのDOM要素を作ります。
  element.props.children.forEach(child =>
    render(child, dom)
  )
element の子要素(children)を1つずつ取り出して、同じ render 関数を使って、今作った dom の中に追加していきます。ここで「再帰」というテクニックを使っています。つまり、子要素がさらに子を持っていたら、どんどん深く潜っていきます。今回の場合はHelloがchildrenに当たるので、h1属性に追加されます。(TextNodeで追加されます)
container.appendChild(dom)
最後に今作った dom を container の中に追加します。
ここまででrenderができるようになりましたが、私達の例ではpropsのtitle: fooが足りません。
const element = {
  type: "h1",
  props: {
    title: "foo", // これ
    children: [
      {
        type: "TEXT_ELEMENT",
        props: {
          nodeValue: "Hello",
          children: []
        }
      }
    ]
  }
}
なのでpropsのchildren以外に関してはelementのpropsに追加しましょう
function createElement(type, props, ...children) {
  return {
    type,
    props: {
      ...props,
      children: children.map((child) =>
        typeof child === "object" ? child : createTextElement(child)
      ),
    },
  };
}

function createTextElement(text) {
  return {
    type: "TEXT_ELEMENT",
    props: {
      nodeValue: text,
      children: [],
    },
  };
}

function render(element, container) {
  const dom =
    element.type === "TEXT_ELEMENT"
      ? document.createTextNode(element.props.nodeValue)
      : document.createElement(element.type);


 // 追加
  Object.keys(element.props)
    .filter(key => key !== "children")
    .forEach(name => {
      dom[name] = element.props[name]
    })

  element.props.children.forEach(child =>
    render(child, dom)
  )

  container.appendChild(dom)
}

const MyReact = {
  createElement,
  render,
}

const element = MyReact.createElement("h1", { title: "foo" }, "Hello");
MyReact.render(element, container);
element.props(要素の属性オブジェクト)の「すべてのキー」を配列として取り出します。{ title: "foo", children: [...] } なら ["title", "children"] になります。
そしてchildrenはpropsではないので除外をします。
.filter(key => key !== "children")
残ったキーについて、1つずつ処理します。
dom[name] = element.props[name] で、実際のDOM要素(dom)に属性をセットします。
dom["title"] = element.props["title"] → dom.title = "foo"
    .forEach(name => {
      dom[name] = element.props[name]
    })
これでrenderの実装ができたので、jsxファイルを作成してReactのように実行してみましょう
touch src/main.jsx
touch vite.config.js
import MyReact from "./main.js";

const element = <h1 title="foo">Hello</h1>

const container = document.getElementById("root");
MyReact.render(element, container);
import { defineConfig } from 'vite';

export default defineConfig({
  esbuild: {
    jsxFactory: 'MyReact.createElement'
  }
});
function createElement(type, props, ...children) {
  return {
    type,
    props: {
      ...props,
      children: children.map((child) =>
        typeof child === "object" ? child : createTextElement(child)
      ),
    },
  };
}

function createTextElement(text) {
  return {
    type: "TEXT_ELEMENT",
    props: {
      nodeValue: text,
      children: [],
    },
  };
}

function render(element, container) {
  const dom =
    element.type === "TEXT_ELEMENT"
      ? document.createTextNode(element.props.nodeValue)
      : document.createElement(element.type);


  Object.keys(element.props)
    .filter(key => key !== "children")
    .forEach(name => {
      dom[name] = element.props[name]
    })

  element.props.children.forEach(child =>
    render(child, dom)
  )

  container.appendChild(dom)
}

const MyReact = {
  createElement,
  render,
}

// 修正
export default MyReact;
<!DOCTYPE html>
<html lang="en">
  <head>
    <meta charset="UTF-8" />
    <link rel="icon" type="image/svg+xml" href="/vite.svg" />
    <meta name="viewport" content="width=device-width, initial-scale=1.0" />
    <title>Vite App</title>
  </head>
  <body>
    <div id="root"></div>
    <!-- 追加 -->
    <script type="module" src="src/main.jsx"></script>
  </body>
</html>
Viteではconfigを利用してjsxファイルがあるときにMyReact.createElementでコンパイルする設定をすることができます。
export default defineConfig({
  esbuild: {
    jsxFactory: 'MyReact.createElement'
  }
});
こうすることでjsxがmain.jsのcreateElementで変換されたあとにrender関数が呼ばれて表示されます。
ページを開いたらmain.jsxを呼び出したいので、htmlにもエントリーポイントの設定をしました。
サーバーを起動すると画面が表示されれば問題ありません。

5. 並行レンダリングを再実装する
Reactっぽいものができていますが、大きな問題があります。
React 18以前は、一度レンダリングが開始されると、そのレンダリング処理が完全に終了するまで JavaScript のメインスレッドがブロックされていました。
つまりレンダリングが終わるまでユーザーは画面の操作をすることができないのです。
並行レンダリングは、レンダリング作業を小さなタスクに分割し、こまめにユーザーの操作(より優先度の高い処理)がないかチェックすることで実現されます。これにより、レンダリング中でもユーザーの入力やアニメーションなどの高優先度タスクが処理できるようになります。
それでは一旦自作のReactとは離れて、並行レンダリングの仕組みを確認します。
touch workloop-example.html
touch workloop-example.js
<!DOCTYPE html>
<html lang="ja">
<head>
    <meta charset="UTF-8">
    <meta name="viewport" content="width=device-width, initial-scale=1.0">
    <title>WorkLoop Example</title>
    <style>
        body { font-family: sans-serif; padding: 20px; }
        ul { list-style-type: none; padding-left: 0; }
        li { background-color: #f0f0f0; margin-bottom: 5px; padding: 8px; border-radius: 3px; }
        button { padding: 10px 15px; font-size: 16px; cursor: pointer; }
    </style>
</head>
<body>
    <h1>WorkLoop デモ</h1>
    <p>下のボタンを押すと、リストにアイテムが少しずつ追加されていく様子が確認できます。<br>
       ブラウザのコンソールを開いて、処理の流れも見てみましょう。</p>
    <button id="startButton">処理開始</button>
    <ul id="taskList"></ul>

    <script src="workloop-example.js"></script>
</body>
</html>
let nextUnitOfWork_example = null;
const tasks = [
  "タスク 1: 卵を買う",
  "タスク 2: 牛乳を買う",
  "タスク 3: パンを買う",
  "タスク 4: Reactの勉強をする",
  "タスク 5: workLoopの仕組みを理解する",
  "タスク 6: 散歩に行く",
  "タスク 7: 夕食を作る",
  "タスク 8: 映画を見る",
  "タスク 9: 歯を磨く",
  "タスク 10: 寝る",
];
let currentTaskIndex = 0;

const taskListElement = document.getElementById("taskList");
const startButton = document.getElementById("startButton");

function performUnitOfWork_example(unitOfWork) {
  if (!unitOfWork || unitOfWork.taskIndex >= tasks.length) {
    console.log("全てのタスクが完了しました!");
    return null;
  }

  const taskText = tasks[unitOfWork.taskIndex];
  console.log(`処理中: ${taskText} (インデックス: ${unitOfWork.taskIndex})`);

  const listItem = document.createElement("li");
  listItem.textContent = taskText;
  taskListElement.appendChild(listItem);

  return { taskIndex: unitOfWork.taskIndex + 1 };
}
function workLoop_example(deadline) {
  let shouldYield = false;
  console.log(
    `workLoop_example開始。残り時間: ${deadline.timeRemaining().toFixed(2)}ms`
  );

  while (nextUnitOfWork_example && !shouldYield) {
    nextUnitOfWork_example = performUnitOfWork_example(nextUnitOfWork_example);
    shouldYield = deadline.timeRemaining() < 1;
  }

  if (nextUnitOfWork_example) {
    console.log(
      `時間切れのため中断。残り時間: ${deadline
        .timeRemaining()
        .toFixed(2)}ms。次のアイドル時に再開します。`
    );
    requestIdleCallback(workLoop_example);
  } else {
    console.log("workLoop_example終了。全てのタスクが処理されました。");
    startButton.disabled = false;
    startButton.textContent = "処理再開 (リストはクリアされます)";
  }
}

startButton.addEventListener("click", () => {
  console.log("処理開始ボタンが押されました。");
  taskListElement.innerHTML = "";
  currentTaskIndex = 0;
  nextUnitOfWork_example = { taskIndex: currentTaskIndex };

  startButton.disabled = true;
  startButton.textContent = "処理中...";

  requestIdleCallback(workLoop_example);
});
http://localhost:5173/workloop-example.htmlを開いてコンソールを出してからボタンをクリックすると以下のログが出ます。
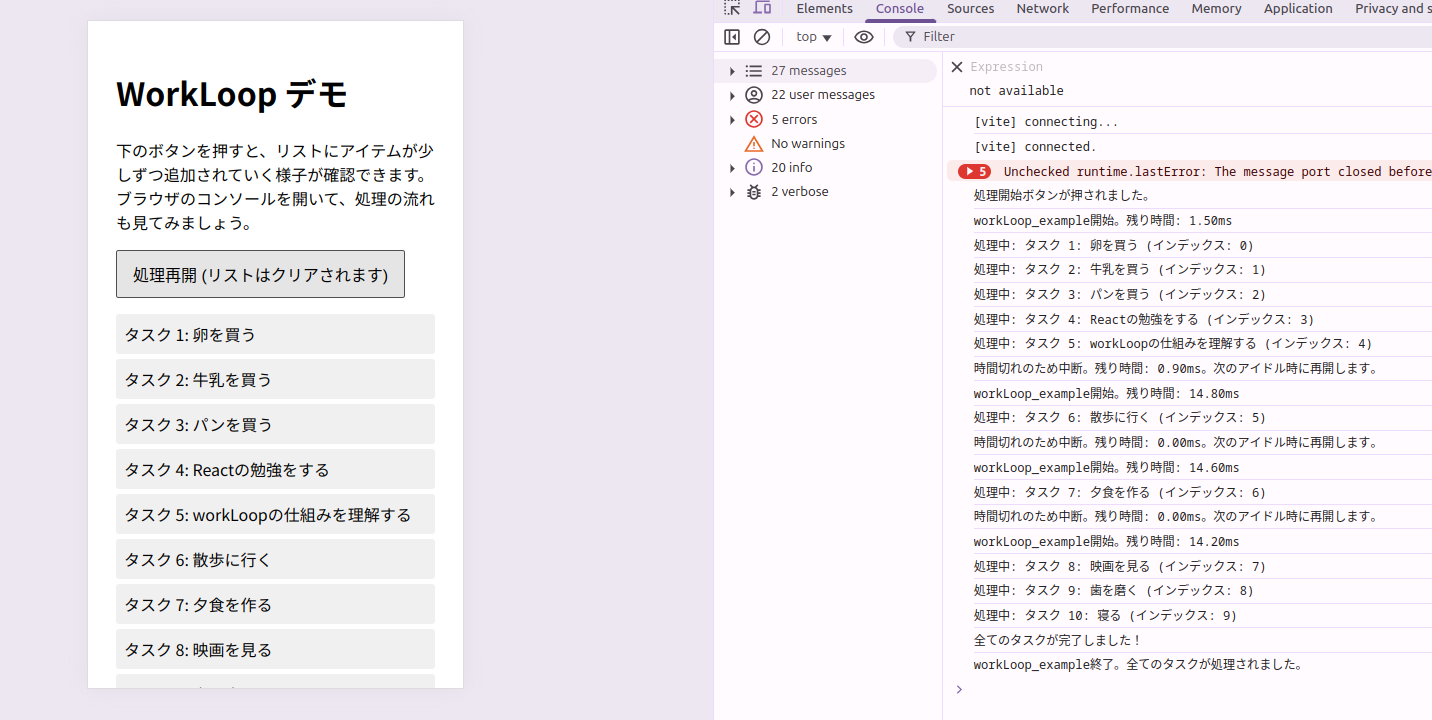
タスク実行途中で時間切れによる中断が行われています。
この中断をしたタイミングで、優先度の高い処理が割り込みされれば実行することが可能です。
詳しくコードを見ていきましょう
let nextUnitOfWork_example = null;
const tasks = [
  "タスク 1: 卵を買う",
  "タスク 2: 牛乳を買う",
  "タスク 3: パンを買う",
  "タスク 4: Reactの勉強をする",
  "タスク 5: workLoopの仕組みを理解する",
  "タスク 6: 散歩に行く",
  "タスク 7: 夕食を作る",
  "タスク 8: 映画を見る",
  "タスク 9: 歯を磨く",
  "タスク 10: 寝る",
];
let currentTaskIndex = 0;
nextUnitOfWork_exampleは次に処理をするタスクです。優先度の高いタスクがあればこの値が変わります。優先度の高いものがなければtasksのリストを1つずつ処理していきます。
currentTaskIndexはどのタスクを処理しているかのインデックスを保持しています。
startButton.addEventListener("click", () => {
  console.log("処理開始ボタンが押されました。");
  taskListElement.innerHTML = "";
  currentTaskIndex = 0;
  nextUnitOfWork_example = { taskIndex: currentTaskIndex };

  startButton.disabled = true;
  startButton.textContent = "処理中...";

  requestIdleCallback(workLoop_example);
});
スタートボタンに対してクリックしたらnextUnitOfWork_exampleにタスクのインデックスを設定して、requestIdleCallbackにworkLoop_example関数を渡しています。
requestIdleCallbackはメインスレッドが空くまで処理を待っていい感じのタイミングでworkLoop_exampleを実行してくれます。
function workLoop_example(deadline) {
  let shouldYield = false;
  console.log(
    `workLoop_example開始。残り時間: ${deadline.timeRemaining().toFixed(2)}ms`
  );
workLoop_exampleではdeadlineを引数に受け取ります。これはrequestIdleCallbackがよしなに処理に利用できる残り時間を渡してくれます。
sholdYieldは処理を中断するかを表すフラグです。trueなら処理を中断します。(最初はfalse)
そして、whileでnextUnitOfWork_example(次の処理するタスク)とshouldYieldをチェックしてから実際にタスクの実行(performUnitOfWork_example)を行います。
  while (nextUnitOfWork_example && !shouldYield) {
    nextUnitOfWork_example = performUnitOfWork_example(nextUnitOfWork_example);
    shouldYield = deadline.timeRemaining() < 1;
  }
タスクの実行が終わると次に実行したいタスクが返却されます(nextUnitOfWork_example)
そして時間がまだ余っているかをチェックしています。(1ミリ秒以内しか残っていないなら中断)
function performUnitOfWork_example(unitOfWork) {
  if (!unitOfWork || unitOfWork.taskIndex >= tasks.length) {
    console.log("全てのタスクが完了しました!");
    return null;
  }

  const taskText = tasks[unitOfWork.taskIndex];
  console.log(`処理中: ${taskText} (インデックス: ${unitOfWork.taskIndex})`);

  const listItem = document.createElement("li");
  listItem.textContent = taskText;
  taskListElement.appendChild(listItem);

  return { taskIndex: unitOfWork.taskIndex + 1 };
}
performUnitOfWorkの中では、タスクのテキストを取得してli要素を作成してlistItemのDOMに対して追加をしています。そして次のタスクのインデックスを返却しています。
もし次のタスクがないのであればreturn nullでタスクを終了させます(これでwhileが止まる)
  if (nextUnitOfWork_example) {
    console.log(
      `時間切れのため中断。残り時間: ${deadline
        .timeRemaining()
        .toFixed(2)}ms。次のアイドル時に再開します。`
    );
    requestIdleCallback(workLoop_example);
  } else {
もしnextUnitOfWork_exampleがあるのに中断されたらこの条件に入り、処理が中断されたことをコンソールに表示して、再度requestIdleCallbackを実行してメインスレッドが空いているところで処理を再開します。
  } else {
    console.log("workLoop_example終了。全てのタスクが処理されました。");
    startButton.disabled = false;
    startButton.textContent = "処理再開 (リストはクリアされます)";
  }
処理が正しくすべて終えたらコンソールにその旨を表示します。
この仕組みを使うことでレンダリングを細かくすることができれば(このあと実装予定)、細かい単位で処理をしつつ優先度が高い処理がないかをチェックすることができます。もし優先度の高い処理ができたときには何らかの方法でnextUnitOfWork_exampleに追加してあげればレンダリングの途中で処理することが可能です。
それではこの仕組みを私たちが作っているReactに追加しましょう。
処理の部分は一旦TODOとしてこのあと実装することにします。
function createElement(type, props, ...children) {
  return {
    type,
    props: {
      ...props,
      children: children.map((child) =>
        typeof child === "object" ? child : createTextElement(child)
      ),
    },
  };
}

function createTextElement(text) {
  return {
    type: "TEXT_ELEMENT",
    props: {
      nodeValue: text,
      children: [],
    },
  };
}

function render(element, container) {
  const dom =
    element.type === "TEXT_ELEMENT"
      ? document.createTextNode(element.props.nodeValue)
      : document.createElement(element.type);

  Object.keys(element.props)
    .filter((key) => key !== "children")
    .forEach((name) => {
      dom[name] = element.props[name];
    });

  element.props.children.forEach((child) => render(child, dom));

  container.appendChild(dom);
}

// 追加
let nextUnitOfWork = null;

function workLoop(deadline) {
  let shouldYield = false;
  while (nextUnitOfWork && !shouldYield) {
    nextUnitOfWork = performUnitOfWork(nextUnitOfWork);
    shouldYield = deadline.timeRemaining() < 1;
  }
  requestIdleCallback(workLoop);
}

requestIdleCallback(workLoop);

// 追加
function performUnitOfWork(nextUnitOfWork) {
  // このあと実装する
}

const MyReact = {
  createElement,
  render,
};

export default MyReact;
コードは先程試したものとほとんど同じです。
6. Fiberを再実装する
先程細かいタスクに分けて処理する仕組みを作りました。
ここではレンダリングを細かい単位で行う仕組みを実装していきます。Fiberは実行する作業の単位を表します。
この細かい作業単位(Fiber)ごとにレンダリングを行うことで優先度の高いタスクが割り込みしたとしても中断して実行することができるのです。
Fiberの作り方は以下の流れで行います。
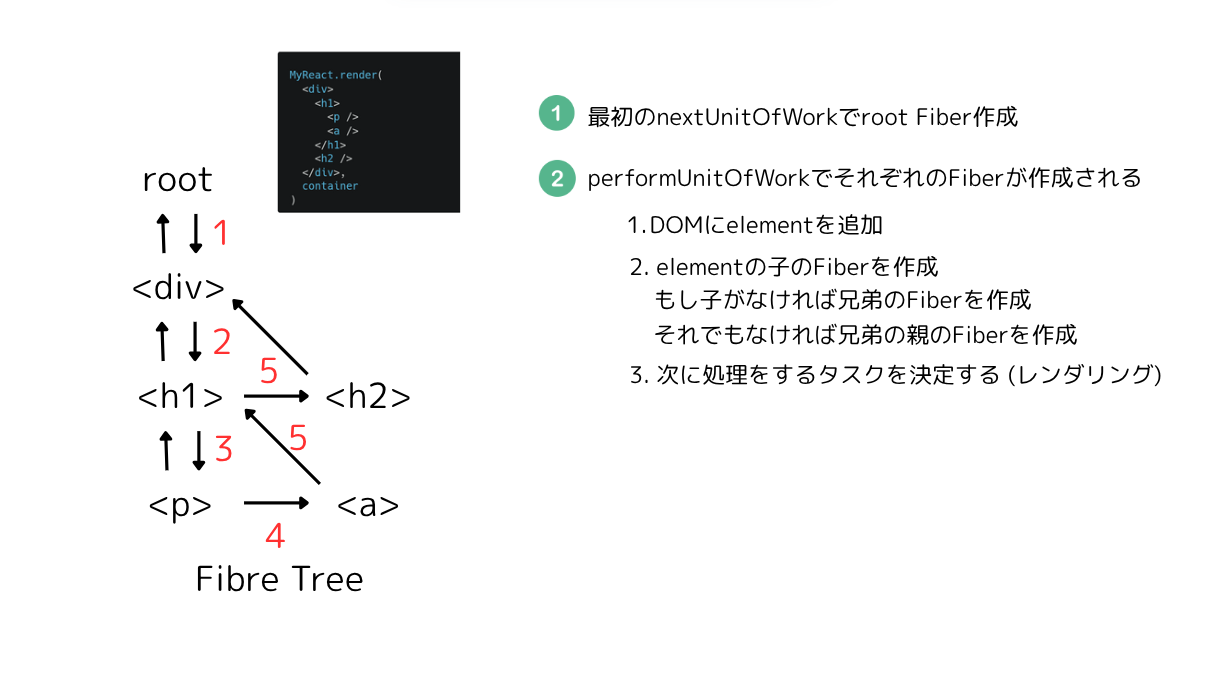
MyReact.render(
  <div>
    <h1>
      <p />
      <a />
    </h1>
    <h2 />
  </div>,
  container
)
例えばこの構造をFiberで作成するとなると
まず最初のperformUnitOfWorkでRootのFiberが作成されます。
そのあとRootの子要素であるh1のFiberを作成します。
その次にh1をDOMに追加(レンダリング)をしてから、h1の子要素pのFiberを作成します。
次にpをDOMに追加してから子要素を見つけますがありません。なので兄弟要素のaのFiberを作成します。
aをDOMに追加したあと子要素を見ますが、ありません
aの兄弟要素もすでにDOMに追加されています。そこで兄弟の親の要素(おじ)であるh1に戻ります。
h1は子要素をみますが、すでにpはDOMに追加済み
そこで兄弟要素であるh2をみるとまだFiberの作成が行われていないので作成を行いDOMに追加されます。
このようにFiberの作成では深さ優先探索を行っています。
では実際に実装をしてみましょう。
function createElement(type, props, ...children) {
  return {
    type,
    props: {
      ...props,
      children: children.map((child) =>
        typeof child === "object" ? child : createTextElement(child)
      ),
    },
  };
}

function createTextElement(text) {
  return {
    type: "TEXT_ELEMENT",
    props: {
      nodeValue: text,
      children: [],
    },
  };
}

// renderをcreateDomという関数に変更
function createDom(fiber) {
  const dom =
    fiber.type == "TEXT_ELEMENT"
      ? document.createTextNode(fiber.props.nodeValue)
      : document.createElement(fiber.type);

  const isProperty = (key) => key !== "children";
  Object.keys(fiber.props)
    .filter(isProperty)
    .forEach((name) => {
      dom[name] = fiber.props[name];
    });

  return dom;
}

// renderは別に定義
function render(element, container) {
  nextUnitOfWork = {
    dom: container,
    props: {
      children: [element],
    },
  };
}

let nextUnitOfWork = null;

function workLoop(deadline) {
  let shouldYield = false;
  while (nextUnitOfWork && !shouldYield) {
    nextUnitOfWork = performUnitOfWork(nextUnitOfWork);
    shouldYield = deadline.timeRemaining() < 1;
  }
  requestIdleCallback(workLoop);
}

requestIdleCallback(workLoop);

// Fiber作成の流れ
function performUnitOfWork(nextUnitOfWork) {
  // 1. DOMを生成する
  // 2. Fiberノードを作成する
  // 3. 次の単位作業を返す
}

const MyReact = {
  createElement,
  render,
};

export default MyReact;
renderの中では最初のFiberであるroot Fiberが設定されています。
function render(element, container) {
  nextUnitOfWork = {
    dom: container,
    props: {
      children: [element],
    },
  };
}
実際にはこのようなものができます。
nextUnitOfWork = {
  dom: 実際のDOM要素(例:<div id="root"></div>)
  props: {
    children: [
      {
        type: "h1",
        props: {
          title: "foo",
          children: [
            {
              type: "TEXT_ELEMENT",
              props: {
                nodeValue: "Hello",
                children: []
              }
            }
          ]
        }
      }
    ]
  }
このFiberを起点としてrequestIdleCallback(workLoop) で処理ができるタイミングでnextUnitOfWork をperformUnitOfWorkに渡します。
performUnitOfWork は、このルートFiberの情報に基づいて実際のDOM操作や、子Fiberの作成を行い、次に処理すべきFiberを返します。
このプロセスがFiberツリー全体に対して繰り返され、UIが構築されていきます
それでは次にFiberの作成の流れをやっていきましょう(図解の②)
function createElement(type, props, ...children) {
  return {
    type,
    props: {
      ...props,
      children: children.map((child) =>
        typeof child === "object" ? child : createTextElement(child)
      ),
    },
  };
}

function createTextElement(text) {
  return {
    type: "TEXT_ELEMENT",
    props: {
      nodeValue: text,
      children: [],
    },
  };
}

function createDom(fiber) {
  const dom =
    fiber.type == "TEXT_ELEMENT"
      ? document.createTextNode(fiber.props.nodeValue)
      : document.createElement(fiber.type);

  const isProperty = (key) => key !== "children";
  Object.keys(fiber.props)
    .filter(isProperty)
    .forEach((name) => {
      dom[name] = fiber.props[name];
    });

  return dom;
}

function render(element, container) {
  nextUnitOfWork = {
    dom: container,
    props: {
      children: [element],
    },
  };
}

let nextUnitOfWork = null;

function workLoop(deadline) {
  let shouldYield = false;
  while (nextUnitOfWork && !shouldYield) {
    nextUnitOfWork = performUnitOfWork(nextUnitOfWork);
    shouldYield = deadline.timeRemaining() < 1;
  }
  requestIdleCallback(workLoop);
}

requestIdleCallback(workLoop);

// 修正
function performUnitOfWork(fiber) {
  // 1. DOMを生成する
  if (!fiber.dom) {
    fiber.dom = createDom(fiber);
  }

  if (fiber.parent) {
    fiber.parent.dom.appendChild(fiber.dom);
  }

  // 2. Fiberノードを作成する
  const elements = fiber.props.children;
  let index = 0;
  let prevSibling = null;

  while (index < elements.length) {
    const element = elements[index];

    const newFiber = {
      type: element.type,
      props: element.props,
      parent: fiber,
      dom: null,
    };

    if (index === 0) {
      fiber.child = newFiber
    } else {
      prevSibling.sibling = newFiber
    }

    prevSibling = newFiber
    index++
  }

  // 3. 次の単位作業を返す
  if (fiber.child) {
    return fiber.child
  }
  let nextFiber = fiber
  while (nextFiber) {
    if (nextFiber.sibling) {
      return nextFiber.sibling
    }
    nextFiber = nextFiber.parent
  }
}

const MyReact = {
  createElement,
  render,
};

export default MyReact;
一気にコードが増えて混乱してしまうかも知れませんが、丁寧に解説していきます。
1. DOMを生成する
「ファイバーのDOMがなければ」つまり最初のFiber(root)であればDOMを作成します。
  if (!fiber.dom) {
    fiber.dom = createDom(fiber);
  }
「ファイバーの親が存在する」ならその親に対してファイバーのDOMを追加します。
  if (fiber.parent) {
    fiber.parent.dom.appendChild(fiber.dom);
  }
このときfiber.domはすでにDOM要素になっており、親に追加されることでレンダリングされます。
2. Fiberを作成する
ここでは作業できる小さい単位であるFiberを作成して連結リストを作成しています。
連結リストとは、データを「ノード」という単位で保存し、各ノードが「次のノード」への参照(ポインタ)を持つデータ構造です。
このように繋がりの方向を持つことができるようになります。
// 各ノードが「次」への参照を持つ
nodeA.sibling = nodeB;
nodeB.sibling = nodeC;
nodeC.sibling = null; // 最後
最初に処理に必要なものを準備しておきます。
const elements = fiber.props.children;  // 子要素の配列を取得
let index = 0;
let prevSibling = null;  // 前の兄弟要素を追跡
elementsには先程の例だとこのようなものが入っています。
[
      {
        type: "h1",
        props: {
          title: "foo",
          children: [
            {
              type: "TEXT_ELEMENT",
              props: {
                nodeValue: "Hello",
                children: []
              }
            }
          ]
     }
]
各子要素をFiberに変換します。
const newFiber = {
  type: element.type,    // 例だとh1
  props: element.props,  // 例だとHelloの要素
  parent: fiber,         // 親Fiberへの参照
  dom: null,            // DOM要素(後で作成)
};
最後に連結リストを作成します。もし子がfiberにいないなら子に追加
すでに子がいるならfiberの兄弟として追加
if (index === 0) {
  fiber.child = newFiber        // 最初の子
} else {
  prevSibling.sibling = newFiber // 兄弟として繋げる
}
先程の例だと最後にこのようになります。
root Fiber (dom: <div id="root"></div>)
├─ child → h1 Fiber (type: "h1", props: {title: "foo", children: [...]})
           └─ child → TEXT_ELEMENT Fiber (type: "TEXT_ELEMENT", props: {nodeValue: "Hello", children: []})
                      └─ sibling → null
3. 次の作業を行う
fiberに子がいるなら子を返却します。
  if (fiber.child) {
    return fiber.child
  }
子がいないなら兄弟がいないかを確認します。
もしいないなら親に戻って、兄弟がいないかを確認していきます。
  while (nextFiber) {
    if (nextFiber.sibling) {
      return nextFiber.sibling
    }
    nextFiber = nextFiber.parent
  }
もしまだ処理していないFiberがあるなら更にFiber作成の処理を行います。
なければnextUnitOfWorkがnullになって処理が終了します。
function workLoop(deadline) {
  let shouldYield = false;
  while (nextUnitOfWork && !shouldYield) {
    nextUnitOfWork = performUnitOfWork(nextUnitOfWork);
    shouldYield = deadline.timeRemaining() < 1;
  }
  requestIdleCallback(workLoop);
}
具体例をみる
以下をレンダリングする流れを見ていきます。
const element = <h1 title="foo">Hello</h1>
まずはfiberとして以下のオブジェクトがきます。
{
  dom: 実際のDOM要素(例:<div id="root"></div>)
  props: {
    children: [
      {
        type: "h1",
        props: {
          title: "foo",
          children: [
            {
              type: "TEXT_ELEMENT",
              props: {
                nodeValue: "Hello",
                children: []
              }
            }
          ]
        }
      }
    ]
  }
これはrenderフェーズで作成されたFiberです。
  if (!fiber.dom) {
    fiber.dom = createDom(fiber);
  }

  if (fiber.parent) {
    fiber.parent.dom.appendChild(fiber.dom);
  }
これはすべてスキップされます。
子要素であるh1のFiberを作成します。
// root.props.children = [h1要素] を処理
const newFiber = {
  type: "h1",
  props: {title: "foo", children: [TEXT_ELEMENT]},
  parent: root Fiber,
  dom: null
};
root.child = newFiber; // 最初の子として設定
このとき以下のような構造になっています。
root Fiber (dom: <div id="root"></div>)
├─ child → h1 Fiber (dom: null, parent: root)
           └─ 未処理
rootだけがレンダリングされています。
次にh1に対して同じ処理をしていきます。今回は親がいるのでif (fiber.parent)の中に入ります。
h1Fiber.dom = createDom(h1Fiber); // <h1 title="foo"></h1>を作成
root.dom.appendChild(h1Fiber.dom); // rootに追加
そのあと"Hello"のText Fiberが作成されます。
// h1.props.children = [TEXT_ELEMENT] を処理
const newFiber = {
  type: "TEXT_ELEMENT",
  props: {nodeValue: "Hello", children: []},
  parent: h1 Fiber,
  dom: null
};
h1Fiber.child = newFiber;
ここまででh1までがレンダリングされます。
root Fiber (dom: <div id="root"><h1 title="foo"></h1></div>)
├─ child → h1 Fiber (dom: <h1 title="foo"></h1>)
           ├─ child → TEXT_ELEMENT Fiber (dom: null, parent: h1)
           └─ sibling: null
最後にテキストもdomに追加されてすべてのレンダリングが終了します。
root Fiber (dom: <div id="root"><h1 title="foo">Hello</h1></div>)
├─ child → h1 Fiber (dom: <h1 title="foo">Hello</h1>)
           ├─ child → TEXT_ELEMENT Fiber (dom: "Hello")
           │          ├─ child: null
           │          └─ sibling: null
           └─ sibling: null
画面にHelloが表示されるはずです。
7. レンダリング&コミット
実はレンダリングにまだ問題があります。
いまのままだと優先度の高い操作が発生したときにレンダリングが中断されるため、不完全な画面が表示されてしまう可能性があります。
例えば、Helloというテキストのレンダリング前により優先度の高い処理が行われると文字が表示されないままになってしまいます。
なのでレンダリングは一気に準備ができたら行いたいと考えます。
そこで現在レンダリングを逐次している部分は削除して、いまどのFiberが作成中なのかを追跡するためのwipRootを作成します。
すべての作業が完全に終了したら最後にcommitを実行して一気にレンダリングを行います。
function createElement(type, props, ...children) {
  return {
    type,
    props: {
      ...props,
      children: children.map((child) =>
        typeof child === "object" ? child : createTextElement(child)
      ),
    },
  };
}

function createTextElement(text) {
  return {
    type: "TEXT_ELEMENT",
    props: {
      nodeValue: text,
      children: [],
    },
  };
}

function createDom(fiber) {
  const dom =
    fiber.type == "TEXT_ELEMENT"
      ? document.createTextNode(fiber.props.nodeValue)
      : document.createElement(fiber.type);

  const isProperty = (key) => key !== "children";
  Object.keys(fiber.props)
    .filter(isProperty)
    .forEach((name) => {
      dom[name] = fiber.props[name];
    });

  return dom;
}

// 追加
function commitRoot() {
  // TODO : DOM一気に追加する処理
}

function render(element, container) {
  wipRoot = {
    dom: container,
    props: {
      children: [element],
    },
  };
  nextUnitOfWork = wipRoot; // 追加
}

let nextUnitOfWork = null;
let wipRoot = null; // 追加

function workLoop(deadline) {
  let shouldYield = false;
  while (nextUnitOfWork && !shouldYield) {
    nextUnitOfWork = performUnitOfWork(nextUnitOfWork);
    shouldYield = deadline.timeRemaining() < 1;
  }
  requestIdleCallback(workLoop);

  // 作業するFiberがなくなったらレンダリングを一気にする
  if (!nextUnitOfWork && wipRoot) {
    commitRoot();
  }
}

requestIdleCallback(workLoop);


function performUnitOfWork(fiber) {

  if (!fiber.dom) {
    fiber.dom = createDom(fiber);
  }

  // DOM追加している部分を削除
  // if (fiber.parent) {
  //   fiber.parent.dom.appendChild(fiber.dom);
  // }

  const elements = fiber.props.children;
  let index = 0;
  let prevSibling = null;

  while (index < elements.length) {
    const element = elements[index];

    const newFiber = {
      type: element.type,
      props: element.props,
      parent: fiber,
      dom: null,
    };

    if (index === 0) {
      fiber.child = newFiber
    } else {
      prevSibling.sibling = newFiber
    }

    prevSibling = newFiber
    index++
  }

  if (fiber.child) {
    return fiber.child
  }
  let nextFiber = fiber
  while (nextFiber) {
    if (nextFiber.sibling) {
      return nextFiber.sibling
    }
    nextFiber = nextFiber.parent
  }
}

const MyReact = {
  createElement,
  render,
};

export default MyReact;
そしてcommitRootではroot Fiberのレンダリングを開始します。
function createElement(type, props, ...children) {
  return {
    type,
    props: {
      ...props,
      children: children.map((child) =>
        typeof child === "object" ? child : createTextElement(child)
      ),
    },
  };
}

function createTextElement(text) {
  return {
    type: "TEXT_ELEMENT",
    props: {
      nodeValue: text,
      children: [],
    },
  };
}

function createDom(fiber) {
  const dom =
    fiber.type == "TEXT_ELEMENT"
      ? document.createTextNode(fiber.props.nodeValue)
      : document.createElement(fiber.type);

  const isProperty = (key) => key !== "children";
  Object.keys(fiber.props)
    .filter(isProperty)
    .forEach((name) => {
      dom[name] = fiber.props[name];
    });

  return dom;
}

// 追加
function commitRoot() {
  commitWork(wipRoot.child);
  wipRoot = null;
}

// 追加
function commitWork(fiber) {
  if (!fiber) {
    return;
  }
  const domParent = fiber.parent.dom;
  domParent.appendChild(fiber.dom);
  commitWork(fiber.child);
  commitWork(fiber.sibling);
}

function render(element, container) {
  wipRoot = {
    dom: container,
    props: {
      children: [element],
    },
  };
  nextUnitOfWork = wipRoot;
}

let nextUnitOfWork = null;
let wipRoot = null;

function workLoop(deadline) {
  let shouldYield = false;
  while (nextUnitOfWork && !shouldYield) {
    nextUnitOfWork = performUnitOfWork(nextUnitOfWork);
    shouldYield = deadline.timeRemaining() < 1;
  }
  requestIdleCallback(workLoop);

  if (!nextUnitOfWork && wipRoot) {
    commitRoot();
  }
}

requestIdleCallback(workLoop);


function performUnitOfWork(fiber) {

  if (!fiber.dom) {
    fiber.dom = createDom(fiber);
  }

  const elements = fiber.props.children;
  let index = 0;
  let prevSibling = null;

  while (index < elements.length) {
    const element = elements[index];

    const newFiber = {
      type: element.type,
      props: element.props,
      parent: fiber,
      dom: null,
    };

    if (index === 0) {
      fiber.child = newFiber
    } else {
      prevSibling.sibling = newFiber
    }

    prevSibling = newFiber
    index++
  }

  if (fiber.child) {
    return fiber.child
  }
  let nextFiber = fiber
  while (nextFiber) {
    if (nextFiber.sibling) {
      return nextFiber.sibling
    }
    nextFiber = nextFiber.parent
  }
}

const MyReact = {
  createElement,
  render,
};

export default MyReact;
最初はroot Fiberから実行しますが、commitWorkの中では再帰的にcommitWorkを呼び出します。
すべての処理が終わったら次のレンダリングに備えてwipRootはnullにします。
function commitRoot() {
  commitWork(wipRoot.child);
  wipRoot = null;
}
commitWorkの中ではfiberがある限り、深さ優先探索しながらDOMの追加を行います。
子または兄弟がいなくなると再帰は終了していきます。
function commitWork(fiber) {
  if (!fiber) {
    return;
  }
  const domParent = fiber.parent.dom;
  domParent.appendChild(fiber.dom);
  commitWork(fiber.child);
  commitWork(fiber.sibling);
}
先程の例でいくと
root Fiber
├─ child → h1 Fiber
           └─ child → TEXT_ELEMENT Fiber
commitWork(h1 Fiber)

root.dom.appendChild(h1.dom) → <h1>をrootに追加
commitWork(TEXT_ELEMENT Fiber)を呼び出し


commitWork(TEXT_ELEMENT Fiber)

h1.dom.appendChild(textNode) → "Hello"をh1に追加
commitWork(null) → 子なしなので終了
commitWork(null) → 兄弟なしなので終了


元のcommitWork(h1 Fiber)に戻る

commitWork(null) → 兄弟なしなので終了
8. 差分検出処理
これまではDOMにノードを追加していましたが、DOMの更新や削除もあります。
Reactは差分検知を行って前のDOMと仮想DOM(Fiberツリー)の比較をして差分だけを反映することで高速にレンダリングすることが可能です。
つまりコミットをしたら最後にコミットしたFiberツリーの状態を保持しておく必要があります。これをcurrentRootという名前とします。
function createElement(type, props, ...children) {
  return {
    type,
    props: {
      ...props,
      children: children.map((child) =>
        typeof child === "object" ? child : createTextElement(child)
      ),
    },
  };
}

function createTextElement(text) {
  return {
    type: "TEXT_ELEMENT",
    props: {
      nodeValue: text,
      children: [],
    },
  };
}

function createDom(fiber) {
  const dom =
    fiber.type == "TEXT_ELEMENT"
      ? document.createTextNode(fiber.props.nodeValue)
      : document.createElement(fiber.type);

  const isProperty = (key) => key !== "children";
  Object.keys(fiber.props)
    .filter(isProperty)
    .forEach((name) => {
      dom[name] = fiber.props[name];
    });

  return dom;
}

function commitRoot() {
  commitWork(wipRoot.child);
  currentRoot = wipRoot; // 追加
  wipRoot = null;
}

function commitWork(fiber) {
  if (!fiber) {
    return;
  }
  const domParent = fiber.parent.dom;
  domParent.appendChild(fiber.dom);
  commitWork(fiber.child);
  commitWork(fiber.sibling);
}

function render(element, container) {
  wipRoot = {
    dom: container,
    props: {
      children: [element],
    },
  };
  nextUnitOfWork = wipRoot;
}

let nextUnitOfWork = null;
let currentRoot = null; // 追加
let wipRoot = null;

function workLoop(deadline) {
  let shouldYield = false;
  while (nextUnitOfWork && !shouldYield) {
    nextUnitOfWork = performUnitOfWork(nextUnitOfWork);
    shouldYield = deadline.timeRemaining() < 1;
  }
  requestIdleCallback(workLoop);

  if (!nextUnitOfWork && wipRoot) {
    commitRoot();
  }
}

requestIdleCallback(workLoop);


function performUnitOfWork(fiber) {

  if (!fiber.dom) {
    fiber.dom = createDom(fiber);
  }

  const elements = fiber.props.children;
  let index = 0;
  let prevSibling = null;

  while (index < elements.length) {
    const element = elements[index];

    const newFiber = {
      type: element.type,
      props: element.props,
      parent: fiber,
      dom: null,
    };

    if (index === 0) {
      fiber.child = newFiber
    } else {
      prevSibling.sibling = newFiber
    }

    prevSibling = newFiber
    index++
  }

  if (fiber.child) {
    return fiber.child
  }
  let nextFiber = fiber
  while (nextFiber) {
    if (nextFiber.sibling) {
      return nextFiber.sibling
    }
    nextFiber = nextFiber.parent
  }
}

const MyReact = {
  createElement,
  render,
};

export default MyReact;
次に差分検出をするためにFiberにalternateというプロパティを追加します。
alternateは前回レンダリングされたFiberの中で同じ位置に対応するFiberを保持しておくプロパティです。
例えば1回目のレンダリングがこのように行われたとします。
let currentRoot = null;

let wipRoot = {
  dom: container,
  props: { children: [<h1>Hello</h1>] },
  alternate: null  // 初回なので前回はなし
};

// 各Fiberにalternateを設定
h1Fiber = {
  type: "h1",
  props: { children: ["Hello"] },
  alternate: null  // 初回なので前回はなし
};
// コミット完了後、wipRootをcurrentRootに保存
currentRoot = wipRoot;  // 今回のツリーが「前回のツリー」になる
wipRoot = null;
そして2回目のレンダリングが行われたとすると1回目のFiberで同じ位置にあったFiberの情報が保持されます。
// 新しいレンダリング開始
let wipRoot = {
  dom: container,
  props: { children: [<h1>Hi</h1>] },
  alternate: currentRoot  // 前回のツリーへの参照
};

// 各新しいFiberにも対応する古いFiberへの参照を設定
newH1Fiber = {
  type: "h1",
  props: { children: ["Hi"] },
  alternate: currentRoot.child  // 前回のh1Fiberへの参照
};
こうすることで差分を簡単に比較することができます。
// イメージ

// 前回: <h1>Hello</h1>
// 今回: <h1>Hi</h1>

if (前回のFiberのtype == 今回のFiberのtype) {
  // 同じ要素なので、テキストだけ更新すればOK
  updateDom(fiber.dom, 前回のFiberのprops, 今回のFiberのprops);
} else {
  // 違う要素なので、削除して新しく作成
  deleteFiber(前回のFiber);
  createFiber(今回のFiber);
}
それではalternateを追加しましょう
function createElement(type, props, ...children) {
  return {
    type,
    props: {
      ...props,
      children: children.map((child) =>
        typeof child === "object" ? child : createTextElement(child)
      ),
    },
  };
}

function createTextElement(text) {
  return {
    type: "TEXT_ELEMENT",
    props: {
      nodeValue: text,
      children: [],
    },
  };
}

function createDom(fiber) {
  const dom =
    fiber.type == "TEXT_ELEMENT"
      ? document.createTextNode("")
      : document.createElement(fiber.type);

  const isProperty = (key) => key !== "children";
  Object.keys(fiber.props)
    .filter(isProperty)
    .forEach((name) => {
      dom[name] = fiber.props[name];
    });

  return dom;
}

function commitRoot() {
  commitWork(wipRoot.child);
  currentRoot = wipRoot;
  wipRoot = null;
}

function commitWork(fiber) {
  if (!fiber) {
    return;
  }
  const domParent = fiber.parent.dom;
  domParent.appendChild(fiber.dom);
  commitWork(fiber.child);
  commitWork(fiber.sibling);
}

function render(element, container) {
  wipRoot = {
    dom: container,
    props: {
      children: [element],
    },
    alternate: currentRoot, // 追加
  };
  nextUnitOfWork = wipRoot;
}

let nextUnitOfWork = null;
let currentRoot = null;
let wipRoot = null;

function workLoop(deadline) {
  let shouldYield = false;
  while (nextUnitOfWork && !shouldYield) {
    nextUnitOfWork = performUnitOfWork(nextUnitOfWork);
    shouldYield = deadline.timeRemaining() < 1;
  }
  requestIdleCallback(workLoop);

  if (!nextUnitOfWork && wipRoot) {
    commitRoot();
  }
}

requestIdleCallback(workLoop);


function performUnitOfWork(fiber) {

  if (!fiber.dom) {
    fiber.dom = createDom(fiber);
  }

  const elements = fiber.props.children;
  let index = 0;
  let prevSibling = null;

  while (index < elements.length) {
    const element = elements[index];

    const newFiber = {
      type: element.type,
      props: element.props,
      parent: fiber,
      dom: null,
    };

    if (index === 0) {
      fiber.child = newFiber
    } else {
      prevSibling.sibling = newFiber
    }

    prevSibling = newFiber
    index++
  }

  if (fiber.child) {
    return fiber.child
  }
  let nextFiber = fiber
  while (nextFiber) {
    if (nextFiber.sibling) {
      return nextFiber.sibling
    }
    nextFiber = nextFiber.parent
  }
}

const MyReact = {
  createElement,
  render,
};

export default MyReact;
performUnitOfWorkの中で差分検出の処理を書くと関数が大きくなってしまうため、差分検出は関数を分けるようにしたいので修正をかけます。
function createElement(type, props, ...children) {
return {
type,
props: {
...props,
children: children.map((child) =>
typeof child === "object" ? child : createTextElement(child)
),
},
};
}
function createTextElement(text) {
return {
type: "TEXT_ELEMENT",
props: {
nodeValue: text,
children: [],
},
};
}
function createDom(fiber) {
const dom =
fiber.type == "TEXT_ELEMENT"
? document.createTextNode("")
: document.createElement(fiber.type);
const isProperty = (key) => key !== "children";
Object.keys(fiber.props)
.filter(isProperty)
.forEach((name) => {
dom[name] = fiber.props[name];
});
return dom;
}
function commitRoot() {
commitWork(wipRoot.child);
currentRoot = wipRoot;
wipRoot = null;
}
function commitWork(fiber) {
if (!fiber) {
return;
}
const domParent = fiber.parent.dom;
domParent.appendChild(fiber.dom);
commitWork(fiber.child);
commitWork(fiber.sibling);
}
function render(element, container) {
wipRoot = {
dom: container,
props: {
children: [element],
},
alternate: currentRoot,
};
nextUnitOfWork = wipRoot;
}
let nextUnitOfWork = null;
let currentRoot = null;
let wipRoot = null;
function workLoop(deadline) {
let shouldYield = false;
while (nextUnitOfWork && !shouldYield) {
nextUnitOfWork = performUnitOfWork(nextUnitOfWork);
shouldYield = deadline.timeRemaining() < 1;
}
requestIdleCallback(workLoop);
if (!nextUnitOfWork && wipRoot) {
commitRoot();
}
}
requestIdleCallback(workLoop);
// Fiber作成部分をreconcileChildren(差分検出)に移動
function performUnitOfWork(fiber) {
if (!fiber.dom) {
fiber.dom = createDom(fiber);
}
const elements = fiber.props.children;
reconcileChildren(fiber, elements);
if (fiber.child) {
return fiber.child
}
let nextFiber = fiber
while (nextFiber) {
if (nextFiber.sibling) {
return nextFiber.sibling
}
nextFiber = nextFiber.parent
}
}
// 作成
function reconcileChildren(wipFiber, elements) {
let index = 0
let prevSibling = null
while (index < elements.length) {
const element = elements[index]
const newFiber = {
type: element.type,
props: element.props,
parent: wipFiber,
dom: null,
}
if (index === 0) {
wipFiber.child = newFiber
} else {
prevSibling.sibling = newFiber
}
prevSibling = newFiber
index++
}
}
const MyReact = {
createElement,
render,
};
export default MyReact;
次に差分検出で追加/更新/削除を前回のFiberと比較して判定を行います。
function createElement(type, props, ...children) {
  return {
    type,
    props: {
      ...props,
      children: children.map((child) =>
        typeof child === "object" ? child : createTextElement(child)
      ),
    },
  };
}

function createTextElement(text) {
  return {
    type: "TEXT_ELEMENT",
    props: {
      nodeValue: text,
      children: [],
    },
  };
}

function createDom(fiber) {
  const dom =
    fiber.type == "TEXT_ELEMENT"
      ? document.createTextNode("")
      : document.createElement(fiber.type);

  const isProperty = (key) => key !== "children";
  Object.keys(fiber.props)
    .filter(isProperty)
    .forEach((name) => {
      dom[name] = fiber.props[name];
    });

  return dom;
}

function commitRoot() {
  deletions.forEach(commitWork) // 追加
  commitWork(wipRoot.child);
  currentRoot = wipRoot;
  wipRoot = null;
}

function commitWork(fiber) {
  if (!fiber) {
    return;
  }
  const domParent = fiber.parent.dom;
  domParent.appendChild(fiber.dom);
  commitWork(fiber.child);
  commitWork(fiber.sibling);
}

function render(element, container) {
  wipRoot = {
    dom: container,
    props: {
      children: [element],
    },
    alternate: currentRoot,
  };
  deletions = []; // 追加
  nextUnitOfWork = wipRoot;
}

let nextUnitOfWork = null;
let currentRoot = null;
let wipRoot = null;
let deletions = null; // 追加

function workLoop(deadline) {
  let shouldYield = false;
  while (nextUnitOfWork && !shouldYield) {
    nextUnitOfWork = performUnitOfWork(nextUnitOfWork);
    shouldYield = deadline.timeRemaining() < 1;
  }
  requestIdleCallback(workLoop);

  if (!nextUnitOfWork && wipRoot) {
    commitRoot();
  }
}

requestIdleCallback(workLoop);


function performUnitOfWork(fiber) {

  if (!fiber.dom) {
    fiber.dom = createDom(fiber);
  }

  const elements = fiber.props.children;
  reconcileChildren(fiber, elements);

  if (fiber.child) {
    return fiber.child
  }
  let nextFiber = fiber
  while (nextFiber) {
    if (nextFiber.sibling) {
      return nextFiber.sibling
    }
    nextFiber = nextFiber.parent
  }
}

// 修正
function reconcileChildren(wipFiber, elements)  {
  let index = 0
  let oldFiber = wipFiber.alternate && wipFiber.alternate.child
  let prevSibling = null

  while (index < elements.length || oldFiber) {
    const element = elements[index]
    let newFiber = null

    const sameType = oldFiber && element && oldFiber.type === element.type

    if (sameType) {
      newFiber = {
        type: oldFiber.type,
        props: element.props,
        dom: oldFiber.dom,
        parent: wipFiber,
        alternate: oldFiber,
        effectTag: "UPDATE",
      }
    }

    if (element && !sameType) {
      newFiber = {
        type: element.type,
        props: element.props,
        dom: null,
        parent: wipFiber,
        alternate: null,
        effectTag: "PLACEMENT",
      }
    }

    if (oldFiber && !sameType) {
      oldFiber.effectTag = "DELETION"
      deletions.push(oldFiber)
    }

    if (oldFiber) {
      oldFiber = oldFiber.sibling
    }

    if (index === 0) {
      wipFiber.child = newFiber
    } else if (element) {
      prevSibling.sibling = newFiber
    }

    prevSibling = newFiber
    index++
  }
}

const MyReact = {
  createElement,
  render,
};

export default MyReact;
まずは更新するときです。更新は要素は同じ時におきます
const sameType = oldFiber && element && oldFiber.type === element.type
ここでは3つの条件をチェックしています。
- oldFiber: 前回のFiberが存在する
- element: 今回の新しい要素が存在する
- oldFiber.type === element.type: タイプが同じ
そして同じであればprops以外前回のものを利用してFiberを作成します。
if (sameType) {
  newFiber = {
    type: oldFiber.type,        // 前回と同じタイプを継承
    props: element.props,       // 新しいプロパティを採用
    dom: oldFiber.dom,         // 既存のDOM要素を再利用
    parent: wipFiber,          // 親Fiberを設定
    alternate: oldFiber,        // 前回のFiberへの参照
    effectTag: "UPDATE",        // 「更新」マークを付ける
  }
}
propsに関しては新しいプロパティを採用します。
これが変更内容を含む可能性があるからです。(なので更新マークを付けます)
前回: { children: ["Hello"] }
今回: { children: ["Hi"] }  ← こちらを採用
次に要素を新規作成する場合です。
    if (element && !sameType) {
      newFiber = {
        type: element.type,
        props: element.props,
        dom: null,
        parent: wipFiber,
        alternate: null,
        effectTag: "PLACEMENT",
      }
    }
if (element && !sameType)
要素はあり、前回と要素のタイプが違うなら追加になります。
// 前回: <h1>Hello</h1>
// 今回: <p>Hello</p>

// oldFiber.type = "h1", element.type = "p"
// sameType = false
たとえばこのようなときは新規作成が必要になります。
newFiber = {
  type: element.type,         // 新しい要素のタイプ
  props: element.props,       // 新しい要素のプロパティ
  dom: null,                 // DOMはまだ作成していない
  parent: wipFiber,          // 親Fiberを設定
  alternate: null,           // 対応する前回のFiberはない
  effectTag: "PLACEMENT",    // 「新規配置」フラグ
}
新規作成の場合は前回の対応するFiberがないのでalternateはnullになります。
effectTagはPLACEMENTとしました。
次に要素が削除される場合です。
    if (oldFiber && !sameType) {
      oldFiber.effectTag = "DELETION"
      deletions.push(oldFiber)
    }
if (oldFiber && !sameType)
前回の要素が存在して、タイプが違う場合は削除になります。(または今回の要素がない)
// 要素が完全に削除されたケース
// 前回: <div><h1>Title</h1><p>Content</p></div>
// 今回: <div><h1>Title</h1></div>

// p要素について:
// oldFiber = 前回のpFiber, element = undefined
// sameType = false → 削除が必要
// 要素のタイプが変更された
// 前回: <h1>Hello</h1>
// 今回: <p>Hello</p>

// oldFiber.type = "h1", element.type = "p"
// sameType = false → 古いh1を削除、新しいpを作成
effectTagにDELETIONをつけることでこのFiberが削除対象であることを示します。
コミットフェーズで削除処理が実行されることになります。
oldFiber.effectTag = "DELETION" // 削除フラグを設定
deletions.push(oldFiber) // 削除リストに追加
削除はリストで別に削除するFiberを管理して行います。
レンダリングの前にFiberツリーは新しく作成されますが、それらには削除されたFiberは含まれていません。
そこで削除されたFiberの差分をコミット前に判断できるようにリストで別途管理しています。
let deletions = null; // グローバルな削除リスト

function render(element, container) {
  // ...
  deletions = []; // レンダリング開始時にリセット
  // ...
}

function commitRoot() {
  deletions.forEach(commitWork); // 削除処理を先に実行
  commitWork(wipRoot.child);     // その後、追加・更新処理
  currentRoot = wipRoot;
  wipRoot = null;
  deletions = null;
}
それではeffecTagをみてcommitWorkで差分更新を行ってみましょう
function createElement(type, props, ...children) {
  return {
    type,
    props: {
      ...props,
      children: children.map((child) =>
        typeof child === "object" ? child : createTextElement(child)
      ),
    },
  };
}

function createTextElement(text) {
  return {
    type: "TEXT_ELEMENT",
    props: {
      nodeValue: text,
      children: [],
    },
  };
}

function createDom(fiber) {
  const dom =
    fiber.type == "TEXT_ELEMENT"
      ? document.createTextNode("")
      : document.createElement(fiber.type);

  const isProperty = (key) => key !== "children";
  Object.keys(fiber.props)
    .filter(isProperty)
    .forEach((name) => {
      dom[name] = fiber.props[name];
    });

  return dom;
}

// 追加
function updateDom(dom, prevProps, nextProps) {
  // あとで実装する
}

function commitRoot() {
  deletions.forEach(commitWork);
  commitWork(wipRoot.child);
  currentRoot = wipRoot;
  wipRoot = null;
}

// 修正
function commitWork(fiber) {
  if (!fiber) {
    return;
  }
  const domParent = fiber.parent.dom;
  if (fiber.effectTag === "PLACEMENT" && fiber.dom != null) {
    domParent.appendChild(fiber.dom);
  } else if (fiber.effectTag === "UPDATE" && fiber.dom != null) {
    updateDom(fiber.dom, fiber.alternate.props, fiber.props);
  } else if (fiber.effectTag === "DELETION") {
    domParent.removeChild(fiber.dom);
  }

  commitWork(fiber.child);
  commitWork(fiber.sibling);
}

function render(element, container) {
  wipRoot = {
    dom: container,
    props: {
      children: [element],
    },
    alternate: currentRoot,
  };
  deletions = [];
  nextUnitOfWork = wipRoot;
}

let nextUnitOfWork = null;
let currentRoot = null;
let wipRoot = null;
let deletions = null;

function workLoop(deadline) {
  let shouldYield = false;
  while (nextUnitOfWork && !shouldYield) {
    nextUnitOfWork = performUnitOfWork(nextUnitOfWork);
    shouldYield = deadline.timeRemaining() < 1;
  }
  requestIdleCallback(workLoop);

  if (!nextUnitOfWork && wipRoot) {
    commitRoot();
  }
}

requestIdleCallback(workLoop);

function performUnitOfWork(fiber) {
  if (!fiber.dom) {
    fiber.dom = createDom(fiber);
  }

  const elements = fiber.props.children;
  reconcileChildren(fiber, elements);

  if (fiber.child) {
    return fiber.child;
  }
  let nextFiber = fiber;
  while (nextFiber) {
    if (nextFiber.sibling) {
      return nextFiber.sibling;
    }
    nextFiber = nextFiber.parent;
  }
}

function reconcileChildren(wipFiber, elements) {
  let index = 0;
  let oldFiber = wipFiber.alternate && wipFiber.alternate.child;
  let prevSibling = null;

  while (index < elements.length || oldFiber) {
    const element = elements[index];
    let newFiber = null;

    const sameType = oldFiber && element && oldFiber.type === element.type;

    if (sameType) {
      newFiber = {
        type: oldFiber.type,
        props: element.props,
        dom: oldFiber.dom,
        parent: wipFiber,
        alternate: oldFiber,
        effectTag: "UPDATE",
      };
    }

    if (element && !sameType) {
      newFiber = {
        type: element.type,
        props: element.props,
        dom: null,
        parent: wipFiber,
        alternate: null,
        effectTag: "PLACEMENT",
      };
    }

    if (oldFiber && !sameType) {
      oldFiber.effectTag = "DELETION";
      deletions.push(oldFiber);
    }

    if (oldFiber) {
      oldFiber = oldFiber.sibling;
    }

    if (index === 0) {
      wipFiber.child = newFiber;
    } else if (element) {
      prevSibling.sibling = newFiber;
    }

    prevSibling = newFiber;
    index++;
  }
}

const MyReact = {
  createElement,
  render,
};

export default MyReact;
おもにcommitWorkでFiberのeffectTagに基づいてDOM操作を実行するようにしました
function commitWork(fiber) {
  if (!fiber) {
    return;
  }
  const domParent = fiber.parent.dom;
  if (fiber.effectTag === "PLACEMENT" && fiber.dom != null) {
    domParent.appendChild(fiber.dom);
  } else if (fiber.effectTag === "UPDATE" && fiber.dom != null) {
    updateDom(fiber.dom, fiber.alternate.props, fiber.props);
  } else if (fiber.effectTag === "DELETION") {
    domParent.removeChild(fiber.dom);
  }

  commitWork(fiber.child);
  commitWork(fiber.sibling);
}
新規追加(配置)する場合は以下の条件になります
if (fiber.effectTag === "PLACEMENT" && fiber.dom != null) {
  domParent.appendChild(fiber.dom);
}
親DOMに対して追加しているだけです。
更新の場合は
function updateDom(dom, prevProps, nextProps) {
  // あとで実装する
}

(省略)

else if (fiber.effectTag === "UPDATE" && fiber.dom != null) {
  updateDom(fiber.dom, fiber.alternate.props, fiber.props);
}
updateDOMという関数を呼び出します。(これから実装します)
削除の場合は親からDOMを取り除くだけです。
else if (fiber.effectTag === "DELETION") {
    domParent.removeChild(fiber.dom);
  }
それではここからupdateDomの実装をしていきます。
function createElement(type, props, ...children) {
  return {
    type,
    props: {
      ...props,
      children: children.map((child) =>
        typeof child === "object" ? child : createTextElement(child)
      ),
    },
  };
}

function createTextElement(text) {
  return {
    type: "TEXT_ELEMENT",
    props: {
      nodeValue: text,
      children: [],
    },
  };
}

function createDom(fiber) {
  const dom =
    fiber.type == "TEXT_ELEMENT"
      ? document.createTextNode("")
      : document.createElement(fiber.type);

  const isProperty = (key) => key !== "children";
  Object.keys(fiber.props)
    .filter(isProperty)
    .forEach((name) => {
      dom[name] = fiber.props[name];
    });

  return dom;
}

const isEvent = (key) => key.startsWith("on"); // イベントか否か
const isProperty = (key) => key !== "children" && !isEvent(key); // childrenか否か
const isNew = (prev, next) => (key) => prev[key] !== next[key]; // 以前とプロパティ値は異なるか
const isGone = (prev, next) => (key) => !(key in next); // 以前にあったプロパティがなくなったか
function updateDom(dom, prevProps, nextProps) {
  // 古いイベントリスナーを削除する or 変更されたイベントリスナーを削除する
  Object.keys(prevProps)
    .filter(isEvent)
    .filter((key) => !(key in nextProps) || isNew(prevProps, nextProps)(key))
    .forEach((name) => {
      const eventType = name.toLowerCase().substring(2);
      dom.removeEventListener(eventType, prevProps[name]);
    });

  // 古いプロパティを削除する
  Object.keys(prevProps)
    .filter(isProperty)
    .filter(isGone(prevProps, nextProps))
    .forEach((name) => {
      dom[name] = "";
    });

  // 新しいプロパティを設定する
  Object.keys(nextProps)
    .filter(isProperty)
    .filter(isNew(prevProps, nextProps))
    .forEach((name) => {
      dom[name] = nextProps[name];
    });

  // 新しいイベントリスナーを設定する
  Object.keys(nextProps)
    .filter(isEvent)
    .filter(isNew(prevProps, nextProps))
    .forEach((name) => {
      const eventType = name.toLowerCase().substring(2);
      dom.addEventListener(eventType, nextProps[name]);
    });
}

function commitRoot() {
  deletions.forEach(commitWork);
  commitWork(wipRoot.child);
  currentRoot = wipRoot;
  wipRoot = null;
}

function commitWork(fiber) {
  if (!fiber) {
    return;
  }
  const domParent = fiber.parent.dom;
  if (fiber.effectTag === "PLACEMENT" && fiber.dom != null) {
    domParent.appendChild(fiber.dom);
  } else if (fiber.effectTag === "UPDATE" && fiber.dom != null) {
    updateDom(fiber.dom, fiber.alternate.props, fiber.props);
  } else if (fiber.effectTag === "DELETION") {
    domParent.removeChild(fiber.dom);
  }

  commitWork(fiber.child);
  commitWork(fiber.sibling);
}

function render(element, container) {
  wipRoot = {
    dom: container,
    props: {
      children: [element],
    },
    alternate: currentRoot,
  };
  deletions = [];
  nextUnitOfWork = wipRoot;
}

let nextUnitOfWork = null;
let currentRoot = null;
let wipRoot = null;
let deletions = null;

function workLoop(deadline) {
  let shouldYield = false;
  while (nextUnitOfWork && !shouldYield) {
    nextUnitOfWork = performUnitOfWork(nextUnitOfWork);
    shouldYield = deadline.timeRemaining() < 1;
  }
  requestIdleCallback(workLoop);

  if (!nextUnitOfWork && wipRoot) {
    commitRoot();
  }
}

requestIdleCallback(workLoop);

function performUnitOfWork(fiber) {
  if (!fiber.dom) {
    fiber.dom = createDom(fiber);
  }

  const elements = fiber.props.children;
  reconcileChildren(fiber, elements);

  if (fiber.child) {
    return fiber.child;
  }
  let nextFiber = fiber;
  while (nextFiber) {
    if (nextFiber.sibling) {
      return nextFiber.sibling;
    }
    nextFiber = nextFiber.parent;
  }
}

function reconcileChildren(wipFiber, elements) {
  let index = 0;
  let oldFiber = wipFiber.alternate && wipFiber.alternate.child;
  let prevSibling = null;

  while (index < elements.length || oldFiber) {
    const element = elements[index];
    let newFiber = null;

    const sameType = oldFiber && element && oldFiber.type === element.type;

    if (sameType) {
      newFiber = {
        type: oldFiber.type,
        props: element.props,
        dom: oldFiber.dom,
        parent: wipFiber,
        alternate: oldFiber,
        effectTag: "UPDATE",
      };
    }

    if (element && !sameType) {
      newFiber = {
        type: element.type,
        props: element.props,
        dom: null,
        parent: wipFiber,
        alternate: null,
        effectTag: "PLACEMENT",
      };
    }

    if (oldFiber && !sameType) {
      oldFiber.effectTag = "DELETION";
      deletions.push(oldFiber);
    }

    if (index === 0) {
      wipFiber.child = newFiber;
    } else if (element) {
      prevSibling.sibling = newFiber;
    }

    prevSibling = newFiber;
    index++;
  }
}

const MyReact = {
  createElement,
  render,
};

export default MyReact;
updateDomは「要素のプロパティが更新された」「要素のイベントが更新された」ときに実行されます。
const isEvent = (key) => key.startsWith("on"); // イベントか否か
const isProperty = (key) => key !== "children" && !isEvent(key); // childrenか否か
const isNew = (prev, next) => (key) => prev[key] !== next[key]; // 以前とプロパティ値は異なるか
const isGone = (prev, next) => (key) => !(key in next); // 以前にあったプロパティがなくなったか
function updateDom(dom, prevProps, nextProps) {
  // 古いイベントリスナーを削除する or 変更されたイベントリスナーを削除する
  Object.keys(prevProps)
    .filter(isEvent)
    .filter((key) => !(key in nextProps) || isNew(prevProps, nextProps)(key))
    .forEach((name) => {
      const eventType = name.toLowerCase().substring(2);
      dom.removeEventListener(eventType, prevProps[name]);
    });

  // 古いプロパティを削除する
  Object.keys(prevProps)
    .filter(isProperty)
    .filter(isGone(prevProps, nextProps))
    .forEach((name) => {
      dom[name] = "";
    });

  // 新しいプロパティを設定する
  Object.keys(nextProps)
    .filter(isProperty)
    .filter(isNew(prevProps, nextProps))
    .forEach((name) => {
      dom[name] = nextProps[name];
    });

  // 新しいイベントリスナーを設定する
  Object.keys(nextProps)
    .filter(isEvent)
    .filter(isNew(prevProps, nextProps))
    .forEach((name) => {
      const eventType = name.toLowerCase().substring(2);
      dom.addEventListener(eventType, nextProps[name]);
    });
}
まずは高級関数(関数を返す関数)をいくつか用意します。
// 分類関数
const isEvent = (key) => key.startsWith("on"); // onClick, onChangeなど
const isProperty = (key) => key !== "children" && !isEvent(key); // className, idなど

// 比較関数
const isNew = (prev, next) => (key) => prev[key] !== next[key]; // 値が変更された
const isGone = (prev, next) => (key) => !(key in next); // プロパティが削除された
そして4つのステップを行います。
1. 古い/変更されたイベントリスナーを削除
イベントリスナーを削除しないと、古いハンドラーが残り続けてしまいます。
// 前回のボタン
<button onClick={function() { alert("古いボタン"); }}>
  Click me
</button>

// 今回のボタン
<button onClick={function() { alert("新しいボタン"); }}>
  Click me
</button>
  Object.keys(prevProps)
    .filter(isEvent)
    .filter((key) => !(key in nextProps) || isNew(prevProps, nextProps)(key))
    .forEach((name) => {
      const eventType = name.toLowerCase().substring(2);
      dom.removeEventListener(eventType, prevProps[name]);
    });
まずはイベントリスナーであるか(onで始まるプロパティか)をチェックして
  Object.keys(prevProps)
    .filter(isEvent)
今回イベントが追加された、または変更されたことをORでチェックして
.filter((key) => !(key in nextProps) || isNew(prevProps, nextProps)(key))
追加/変更されたイベントに対してonClickならclickに変更してイベントリスナーから削除しています。
    .forEach((name) => {
      const eventType = name.toLowerCase().substring(2); // onClick -> click
      dom.removeEventListener(eventType, prevProps[name]); // clickイベントを削除
    });
2. 削除されたプロパティをクリア
  Object.keys(prevProps)
    .filter(isProperty)
    .filter(isGone(prevProps, nextProps))
    .forEach((name) => {
      dom[name] = "";
    });
例えばこのような変更が起きたときにdisabledを消しています。
// 前回の入力フィールド
<input type="text" placeholder="名前を入力" disabled />

// 今回の入力フィールド(disabledを削除したい)
<input type="text" placeholder="名前を入力" />
まずは前回のプロパティをすべて取得します。
Object.keys(prevProps)
const prevProps = {
  className: "btn primary",
  title: "クリックして実行",
  disabled: true,
  onClick: handleClick,
  children: ["ボタン"]
};

// Object.keys(prevProps) の結果
["className", "title", "disabled", "onClick", "children"]
通常のプロパティのみをフィルタリングします。(childrenやonから始まるプロパティ以外)
const isEvent = (key) => key.startsWith("on"); // onClick, onChangeなど
const isProperty = (key) => key !== "children" && !isEvent(key); // className, idなど

(省略)
  Object.keys(prevProps)
    .filter(isProperty)
今回のpropsに存在しないキーのみを抽出して削除対象のpropsに空文字をいれてクリアします。
    .filter(isGone(prevProps, nextProps))
    .forEach((name) => {
      dom[name] = "";
    });
3. 新しいプロパティを設定
  Object.keys(nextProps)
    .filter(isProperty)
    .filter(isNew(prevProps, nextProps)) // 新しいものだけに絞る
    .forEach((name) => {
      dom[name] = nextProps[name];
    });
ステップ2と同じ流れで新しく追加されたプロパティだけを抽出して新しいプロパティの値を追加しています。
// 前回
<h1 className="title red" id="main-title">Hello</h1>

// 今回
<h1 className="title blue" id="main-title">Hello</h1>
このようなときはclassの変更が行われます。
4. 新しいイベントリスナーを追加
  Object.keys(nextProps)
    .filter(isEvent)
    .filter(isNew(prevProps, nextProps)) // 新しいものだけに絞る
    .forEach((name) => {
      const eventType = name.toLowerCase().substring(2);
      dom.addEventListener(eventType, nextProps[name]);
    });
ステップ1と同じ流れで新しく追加されたイベントだけを抽出して新しいプロパティの値を追加しています。
// 前回(クリックイベントなし)
<button>Click me</button>

// 今回(クリックイベント追加)
<button onClick={function() { alert("クリックされた!"); }}>
  Click me
</button>
このようなときは新しいイベントリスナーが追加されることになります
ここまでで差分検出ができるようになったので、main.jsxを更新してみましょう
import MyReact from "./main.js";

const element = <h1 title="foo">UPDATE!!</h1>;

const container = document.getElementById("root");
MyReact.render(element, container);
そしてhttp://localhost:5173をひらくと画面が更新されていることが確認できます!これにて完成です!

おわりに
いかがでしたでしょうか?
今回はJavaScriptだけでReactを再実装してみました
実装をする中で仮想DOMや再レンダリングを深く理解できたと思います。
詳しく解説した動画を投稿しているのでよかったらみてみてください!
JISOUのメンバー募集中!
プログラミングコーチングJISOUでは、新たなメンバーを募集しています。
日本一のアウトプットコミュニティでキャリアアップしませんか?
興味のある方は、ぜひホームページからお気軽にカウンセリングをお申し込みください!
▼▼▼
図解ハンズオンたくさん投稿しています!
参考にさせていただいた記事