
初めに
大学が停電し,何もできないので,PyPIに挑戦することにした.第一歩として,こちらに従う.
PyPI
まず,適当なパッケージを作り,GitHubにPublicで公開する(cf. こちら).因みに,pytestを使うと都度チェックできて便利とGPTに教えてもらった.
次に,PyPI > Account settings > API tokensから,Add API tokenで生成されたTokenを保管しておく.
その後,
(.venv_mypackage) WorkingDirectory$ python -m build
を打つと,
├── dist
│   ├── example_package_shotadeguchi-0.0.1-py3-none-any.whl
│   └── example_package_shotadeguchi-0.0.1.tar.gz
ができる.tree全体は以下.
WorkingDirectory
├── LICENSE
├── README.md
├── dist
│   ├── example_package_shotadeguchi-0.0.1-py3-none-any.whl
│   └── example_package_shotadeguchi-0.0.1.tar.gz
├── pyproject.toml
├── src
│   ├── example_package_ShotaDeguchi
│   │   ├── __init__.py
│   │   └── example.py
│   └── example_package_ShotaDeguchi.egg-info
│       ├── PKG-INFO
│       ├── SOURCES.txt
│       ├── dependency_links.txt
│       └── top_level.txt
└── tests
ls distで中身が存在することを確認し,
(.venv_mypackage) WorkingDirectory$ python -m twine check dist/*
Checking dist/example_package_shotadeguchi-0.0.1-py3-none-any.whl: PASSED
Checking dist/example_package_shotadeguchi-0.0.1.tar.gz: PASSED
でPASSEDを確認したら,
(.venv_mypackage) WorkingDirectory$ python -m twine upload dist/*
でアップロード.ここでPyPIから生成されたAdd API tokenをペースト.すると,
...
...
...
View at:
https://pypi.org/project/example-package-ShotaDeguchi/0.0.1/
と言われ,リンクを踏むとここに飛ぶ.PyPIにアップロードできたようだ.
最後に,別環境でチェックする.
WorkingDirectory$ python -m venv .venv_test_mypackage
WorkingDirectory$ source .venv_test_mypackage/bin/activate
(.venv_test_mypackage) WorkingDirectory$ pip install example-package-ShotaDeguchi==0.0.1
Collecting example-package-ShotaDeguchi==0.0.1
  Downloading example_package_shotadeguchi-0.0.1-py3-none-any.whl (3.0 kB)
Installing collected packages: example-package-ShotaDeguchi
Successfully installed example-package-ShotaDeguchi-0.0.1
(.venv_test_mypackage) WorkingDirectory$ python -c "from example_package_ShotaDeguchi import example; print(example.add_one(1))"
2
(.venv_test_mypackage) WorkingDirectory$ python -c "from example_package_ShotaDeguchi import example; print(example.add_one(2))"
3
(.venv_test_mypackage) WorkingDirectory$ python -c "from example_package_ShotaDeguchi import example; print(example.add_one(3))"
4
(.venv_test_mypackage) WorkingDirectory$
以上を以て,パッケージの開発,PyPIへのアップロード,pipを使ったインストールまでができた.ここまでで一区切り.
Sphinx
pyproject.tomlの
...
...
...
[project.urls]
Homepage = "https://github.com/pypa/sampleproject"
Issues = "https://github.com/pypa/sampleproject/issues"
を変えたい.pip install sphinxし,
(.venv_mypackage) WorkingDirectory$ sphinx-quickstart docs
を打つと,
Sphinx 8.1.3 クイックスタートユーティリティへようこそ。

以下の設定値を入力してください(Enter キーのみ押した場合、
かっこで囲まれた値をデフォルト値として受け入れます)。

...
...
...
と表示されるので,案内に従って設定.
続いて,SphinxがHTMLを作成できるか確認する.これには,
(.venv_mypackage) WorkingDirectory$ sphinx-build -M html docs/source docs/build
を実行する.
Sphinx v8.1.3 を実行中
...
...
...
HTMLページはdocs/build/htmlにあります。
と返答されれば,docs/build/htmlが作成される.その後,
(.venv_mypackage) WorkingDirectory$ python -m http.server 8000 --directory docs/build/html
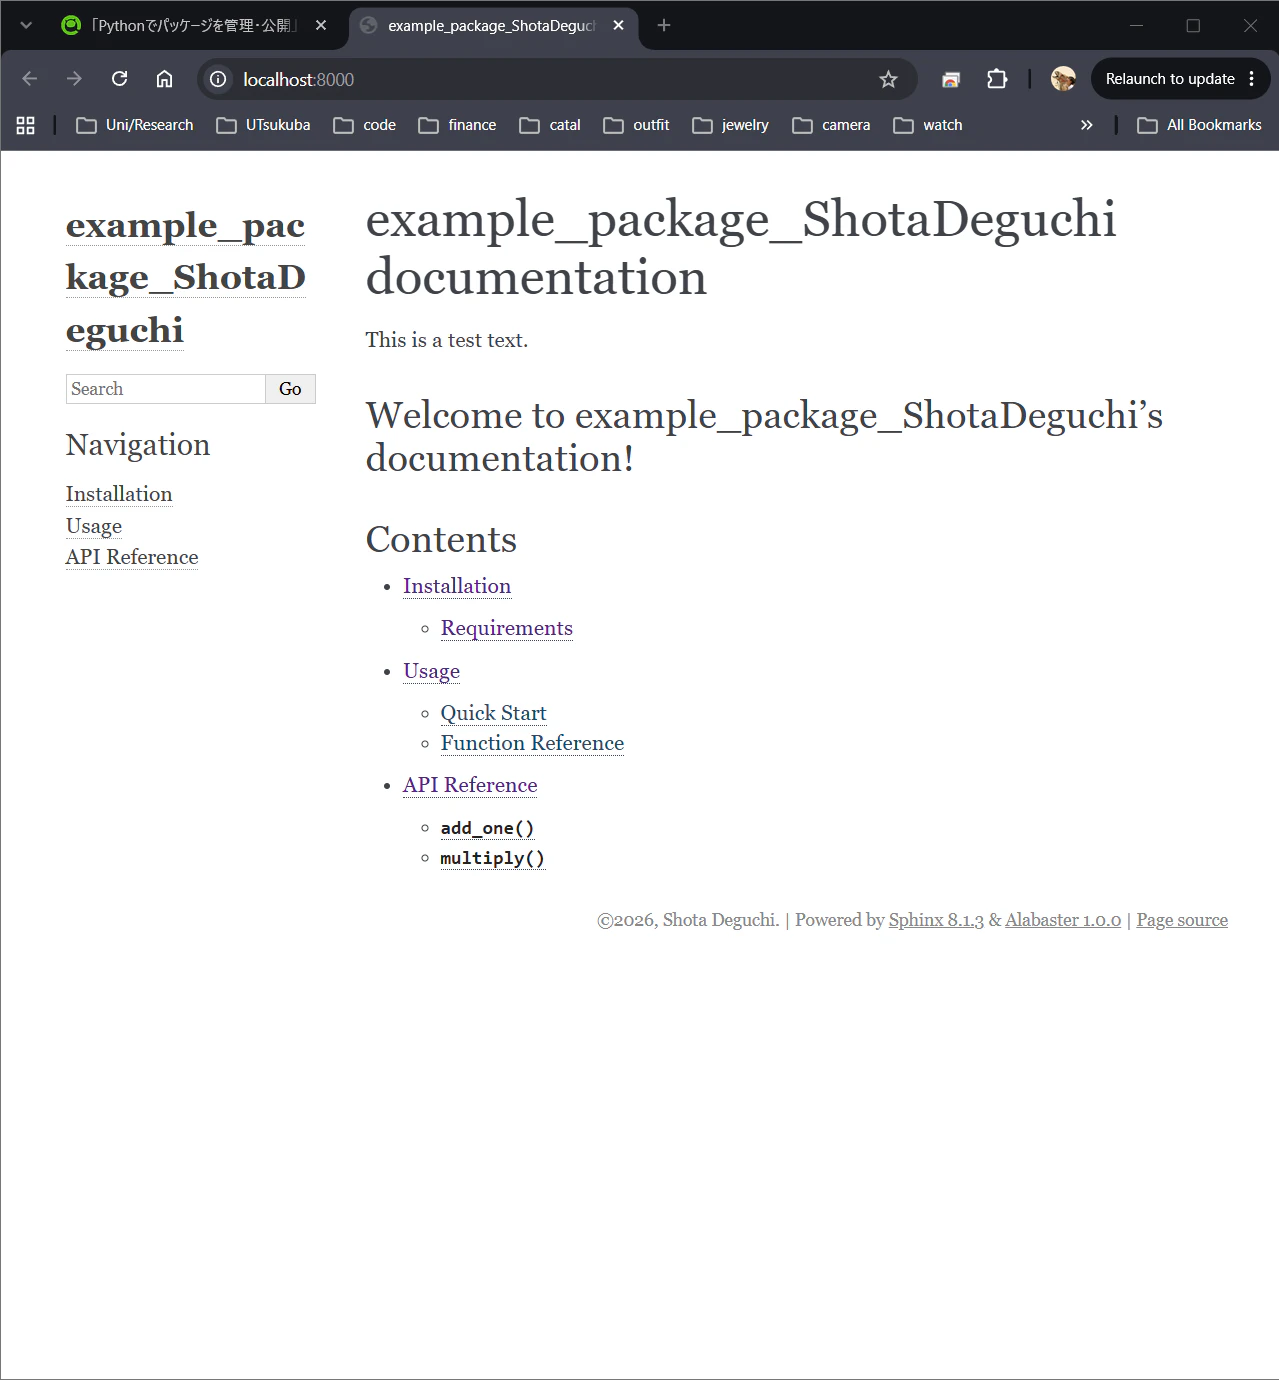
を叩き,ブラウザで," http://localhost:8000/ "に飛べば,以下が確認できる.

表示されているのは,docs/source/index.rstの内容であり,自動生成されたものをそのままにしている.
続いて,documentationを(慣れのあるmarkdownで)整備してゆくため,
(.venv_mypackage) WorkingDirectory$ pip install --upgrade myst-parser
し,docs/source/conf.pyを以下のように編集する.
# Configuration file for the Sphinx documentation builder.
#
# For the full list of built-in configuration values, see the documentation:
# https://www.sphinx-doc.org/en/master/usage/configuration.html


# -- Path setup --------------------------------------------------------------

import sys
from pathlib import Path

ROOT_DIR = Path(__file__).resolve().parents[2]
SRC_DIR = ROOT_DIR / "src"

sys.path.insert(0, str(SRC_DIR))


# -- Project information -----------------------------------------------------
# https://www.sphinx-doc.org/en/master/usage/configuration.html#project-information

project = 'example_package_ShotaDeguchi'
copyright = '2026, Shota Deguchi'
author = 'Shota Deguchi'
release = '0.0.1'


# -- General configuration ---------------------------------------------------
# https://www.sphinx-doc.org/en/master/usage/configuration.html#general-configuration

extensions = [
    "sphinx.ext.autodoc",
    "myst_parser",   # support markdown files
]

templates_path = ['_templates']
exclude_patterns = []


# -- Options for HTML output -------------------------------------------------
# https://www.sphinx-doc.org/en/master/usage/configuration.html#options-for-html-output

html_theme = 'alabaster'
html_static_path = ['_static']
さらに,慣れのあるmarkdownを利用するため,
(.venv_mypackage) WorkingDirectory$ mv docs/source/index.rst docs/source/index.md
し,sourceディレクトリ内に
(.venv_mypackage) WorkingDirectory$ touch docs/source/installation.md
(.venv_mypackage) WorkingDirectory$ touch docs/source/usage.md
(.venv_mypackage) WorkingDirectory$ touch docs/source/api.md
を作成する.これらの内部に各種必要な情報をmarkdown形式で記入し,
(.venv_mypackage) WorkingDirectory$ python -m sphinx -b html -E -a docs/source docs/build/html
(.venv_mypackage) WorkingDirectory$ python -m http.server 8000 --directory docs/build/html
で再度ビルドし,httpを確認すると,以下.

Web公開
以上でローカルでの確認は終わり,Web上で一般公開に進む.通常通り,add, commit, pushする.
(.venv_mypackage) WorkingDirectory$ git add .
(.venv_mypackage) WorkingDirectory$ git commit -m "add sphinx documentation"
(.venv_mypackage) WorkingDirectory$ git push
続いて,GitHubリポジトリの,Settings > Pages > Build and deployment > Sourceで,GitHub Actionsを選択する.

次いで,.github/workflows/docs.ymlを作成し,
(.venv_mypackage) WorkingDirectory$ mkdir -p .github/workflows
(.venv_mypackage) WorkingDirectory$ touch .github/workflows/docs.yml
内部に以下を書き込む(Sphinxの説明と違うのが気になったが,理解が追い付かなかったので,一旦GPTの言う通りにした).
name: Build and deploy Sphinx documentation

on:
  push:
    branches:
      - main
  workflow_dispatch:

permissions:
  contents: read
  pages: write
  id-token: write

concurrency:
  group: pages
  cancel-in-progress: true

jobs:
  deploy:
    environment:
      name: github-pages
      url: ${{ steps.deployment.outputs.page_url }}
    runs-on: ubuntu-latest

    steps:
      - name: Check out repository
        uses: actions/checkout@v4

      - name: Set up Python
        uses: actions/setup-python@v5
        with:
          python-version: "3.12"

      - name: Install documentation dependencies
        run: python -m pip install sphinx myst-parser

      - name: Build documentation
        run: sphinx-build -b html docs/source docs/build/html

      - name: Upload Pages artifact
        uses: actions/upload-pages-artifact@v3
        with:
          path: docs/build/html

      - name: Deploy to GitHub Pages
        id: deployment
        uses: actions/deploy-pages@v4
その後,作成したYAMLをpushする.
(.venv_mypackage) WorkingDirectory$ git add .github/
(.venv_mypackage) WorkingDirectory$ git commit -m "add GitHub Pages deployment workflow (./github/workflows/docs.yml)"
(.venv_mypackage) WorkingDirectory$ git push origin main
すると,GitHubリポジトリのActionsにworkflowというものが追加されていて,

先程のcommitメッセージの項目に緑色のチェックが付いているので,このworkflowは正常に実行された,という意味らしい(workflowが何を指すか理解し切れていない).
次いで,Settings > Pagesを見ると,「Your site is live at ...」となっており,

これを踏むと,以下が公開されている.

情報更新
公開したバージョンでは,/src/example_package_ShotaDeguchi/example.pyに
def add_one(number):
    """
    Adds one to the given number.

    Parameters
    ----------
    number : int or float
        The number to which one will be added.

    Returns
    -------
    int or float
        The result of adding one to the input number.
    """
    return number + 1
しか実装していない.機能を追加してみる.
def add_one(number):
    """
    Adds one to the given number.

    Parameters
    ----------
    number : int or float
        The number to which one will be added.

    Returns
    -------
    int or float
        The result of adding one to the input number.
    """
    return number + 1


def multiply(number1, number2):
    """
    Multiplies two numbers.

    Parameters
    ----------
    number1 : int or float
        The first number to multiply.
    number2 : int or float
        The second number to multiply.

    Returns
    -------
    int or float
        The product.
    """
    return number1 * number2
関数multiplyを追加した.動作確認をする.
(.venv_mypackage) WorkingDirectory$ python -c "from src.example_package_ShotaDeguchi.example import add_one; print(add_one(7))"
8
(.venv_mypackage) WorkingDirectory$ python -c "from src.example_package_ShotaDeguchi.example import multiply; print(multiply(3, 4))"
12
(.venv_mypackage) WorkingDirectory$ python -c "from src.example_package_ShotaDeguchi.example import multiply; print(multiply(3, 5))"
15
再度ビルドし,ローカルで確認.
(.venv_mypackage) WorkingDirectory$ sphinx-build -M html docs/source docs/build
(.venv_mypackage) WorkingDirectory$ python -m http.server 8000 --directory docs/build/html
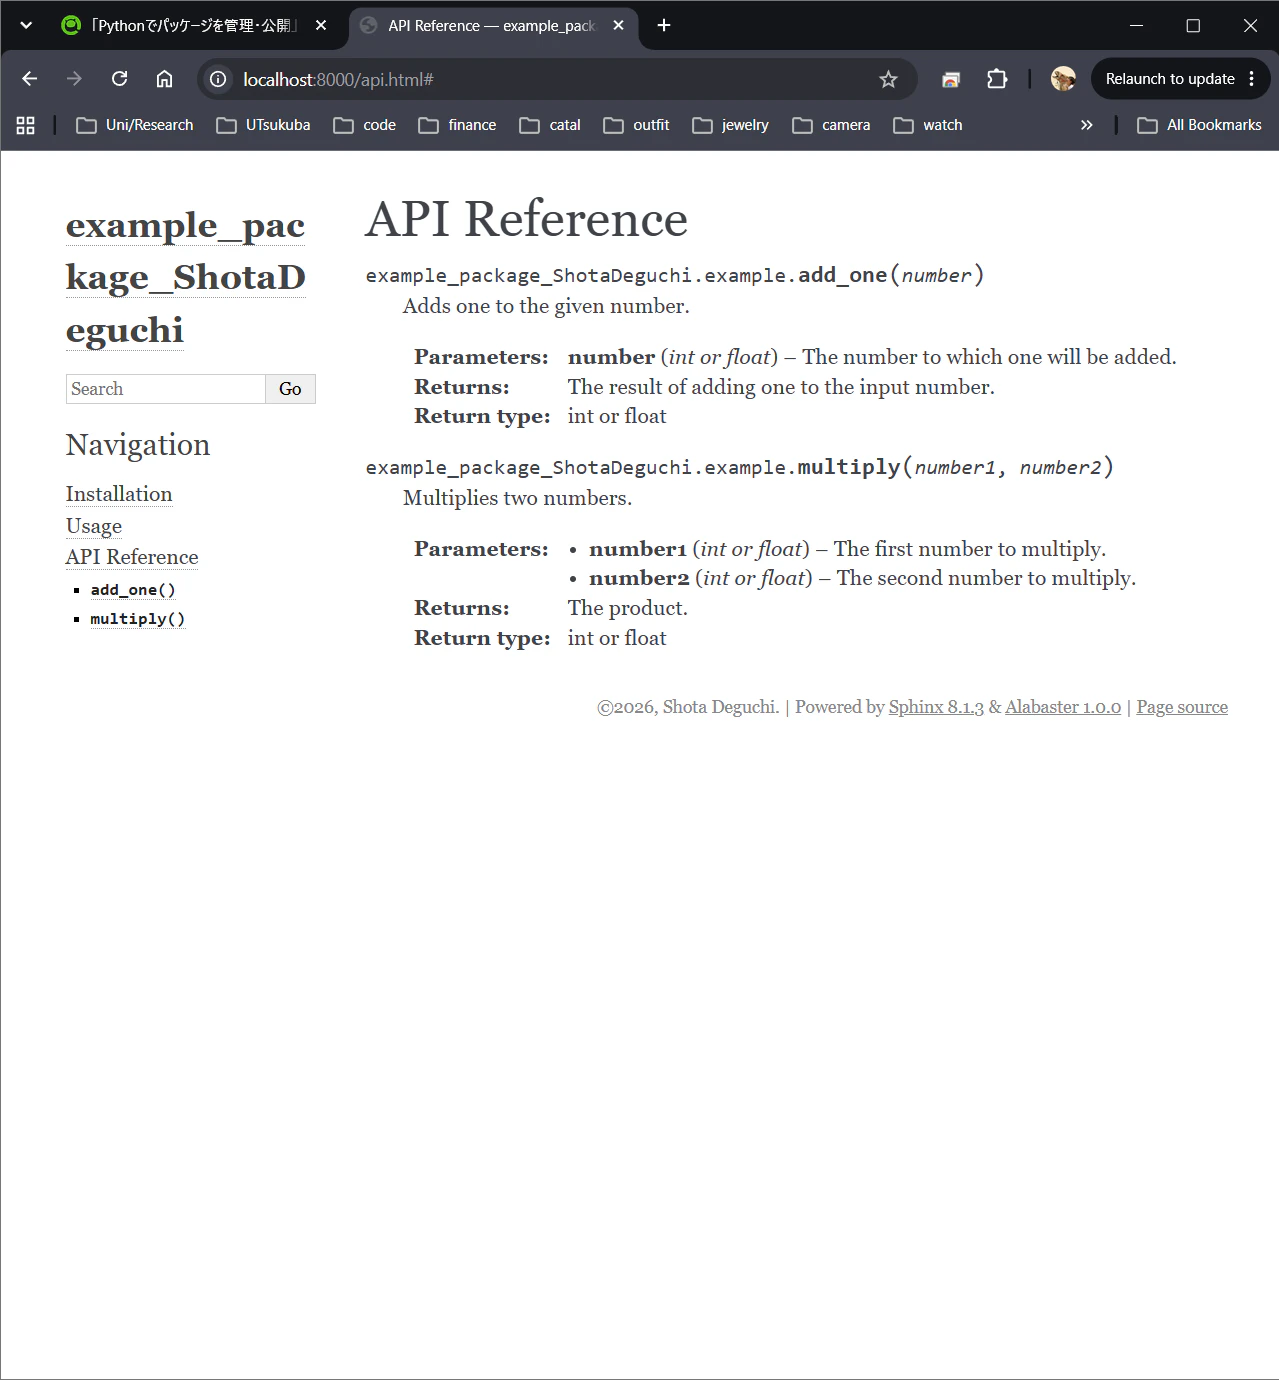
すると,以下の通り,新たな関数のdocumentationが追記されている(docstringに書いた通り).
ただし,Web公開はされていないから(同じタイミングでGitHub Pagesを確認すると以下),

add, commit, pushまで終えてから再度確認すると,以下.

PyPIの更新
再確認を,と思い,scratchpadでテストしたが,multiply()が無い.

ローカルで関数の動作をテストし,Documentationも追加したが,pypiに上げているバージョンと,ローカルにあるパッケージのバージョンに乖離があるため,と予想.したがって,これをpypiに上げ直す必要がある,と考えた.
手順1:バージョン番号の変更
まず,pyproject.tomlに記載しているバージョンを変更する.
[build-system]
requires = ["setuptools"]
build-backend = "setuptools.build_meta"

[project]
name = "example_package_ShotaDeguchi"
version = "0.0.2"   # "0.0.1" -> "0.0.2"
authors = [
    { name = "Shota Deguchi", email = "shotadeguchio2o5@gmail.com" },
]
description = "A small example package"
readme = "README.md"
requires-python = ">=3.10"
classifiers = [
    "Programming Language :: Python :: 3",
    "Operating System :: OS Independent",
]
license = "MIT"
license-files = ["LICEN[CS]E*"]

[project.urls]
Homepage = "https://github.com/pypa/sampleproject"
Issues = "https://github.com/pypa/sampleproject/issues"
合わせて,conf.pyに記載のバージョンも上げておく(pyproject.tomlに記載のバージョンがpypiで公開されるバージョン番号,conf.pyに記載のバージョン番号がSphinxで作成したDocumentationで公開されるバージョン番号).
# Configuration file for the Sphinx documentation builder.
#
# For the full list of built-in configuration values, see the documentation:
# https://www.sphinx-doc.org/en/master/usage/configuration.html


# -- Path setup --------------------------------------------------------------

import sys
from pathlib import Path

ROOT_DIR = Path(__file__).resolve().parents[2]
SRC_DIR = ROOT_DIR / "src"

sys.path.insert(0, str(SRC_DIR))


# -- Project information -----------------------------------------------------
# https://www.sphinx-doc.org/en/master/usage/configuration.html#project-information

project = 'example_package_ShotaDeguchi'
copyright = '2026, Shota Deguchi'
author = 'Shota Deguchi'
release = '0.0.2'   # '0.0.1' -> '0.0.2'


# -- General configuration ---------------------------------------------------
# https://www.sphinx-doc.org/en/master/usage/configuration.html#general-configuration

extensions = [
    "sphinx.ext.autodoc",
    "sphinx.ext.napoleon",  # support Google and NumPy style docstrings
    "myst_parser",   # support markdown files
]

source_suffix = {
    ".rst": "restructuredtext",
    ".md": "markdown",
}

templates_path = ['_templates']
exclude_patterns = []


# -- Options for HTML output -------------------------------------------------
# https://www.sphinx-doc.org/en/master/usage/configuration.html#options-for-html-output

html_theme = 'alabaster'
html_static_path = ['_static']
手順2:新たなバージョンとしてdistを作成
ビルドし直して,新たなdistributionを作り直す.
(.venv_mypackage) WorkingDirectory$ python -m build
* Creating isolated environment: venv+pip...
* Installing packages in isolated environment:
...
...
...
Successfully built example_package_shotadeguchi-0.0.2.tar.gz and example_package_shotadeguchi-0.0.2-py3-none-any.whl
(.venv_mypackage) WorkingDirectory$ ls dist/
example_package_shotadeguchi-0.0.1-py3-none-any.whl  example_package_shotadeguchi-0.0.2-py3-none-any.whl
example_package_shotadeguchi-0.0.1.tar.gz            example_package_shotadeguchi-0.0.2.tar.gz
バージョン0.0.2のdistributionができている(このときの番号は,tomlの中身を参照しているらしい).
手順3:新たなバージョンをPyPIへ
手順2で作成したバージョン0.0.2のdistributionをPyPIへ上げる.ここでは,新たなバージョン0.0.2のみ上げることに注意する(当該のAPI Tokenが要求される,保管しておかなければならないが,どのような保管方法が良いだろう?).
(.venv_mypackage) WorkingDirectory$ python -m twine check dist/*-0.0.2*
Checking dist/example_package_shotadeguchi-0.0.2-py3-none-any.whl: PASSED
Checking dist/example_package_shotadeguchi-0.0.2.tar.gz: PASSED
(.venv_mypackage) WorkingDirectory$ python -m twine upload dist/*-0.0.2*
...
...
...
Enter your API token:
Uploading example_package_shotadeguchi-0.0.2-py3-none-any.whl
100% ━━━━━━━━━━━━━━━━━━━━━━━━━━━━━━━━━━━━━━━━ 5.8/5.8 kB • 00:00 • ?
Uploading example_package_shotadeguchi-0.0.2.tar.gz
100% ━━━━━━━━━━━━━━━━━━━━━━━━━━━━━━━━━━━━━━━━ 5.2/5.2 kB • 00:00 • ?

View at:
https://pypi.org/project/example-package-ShotaDeguchi/0.0.2/
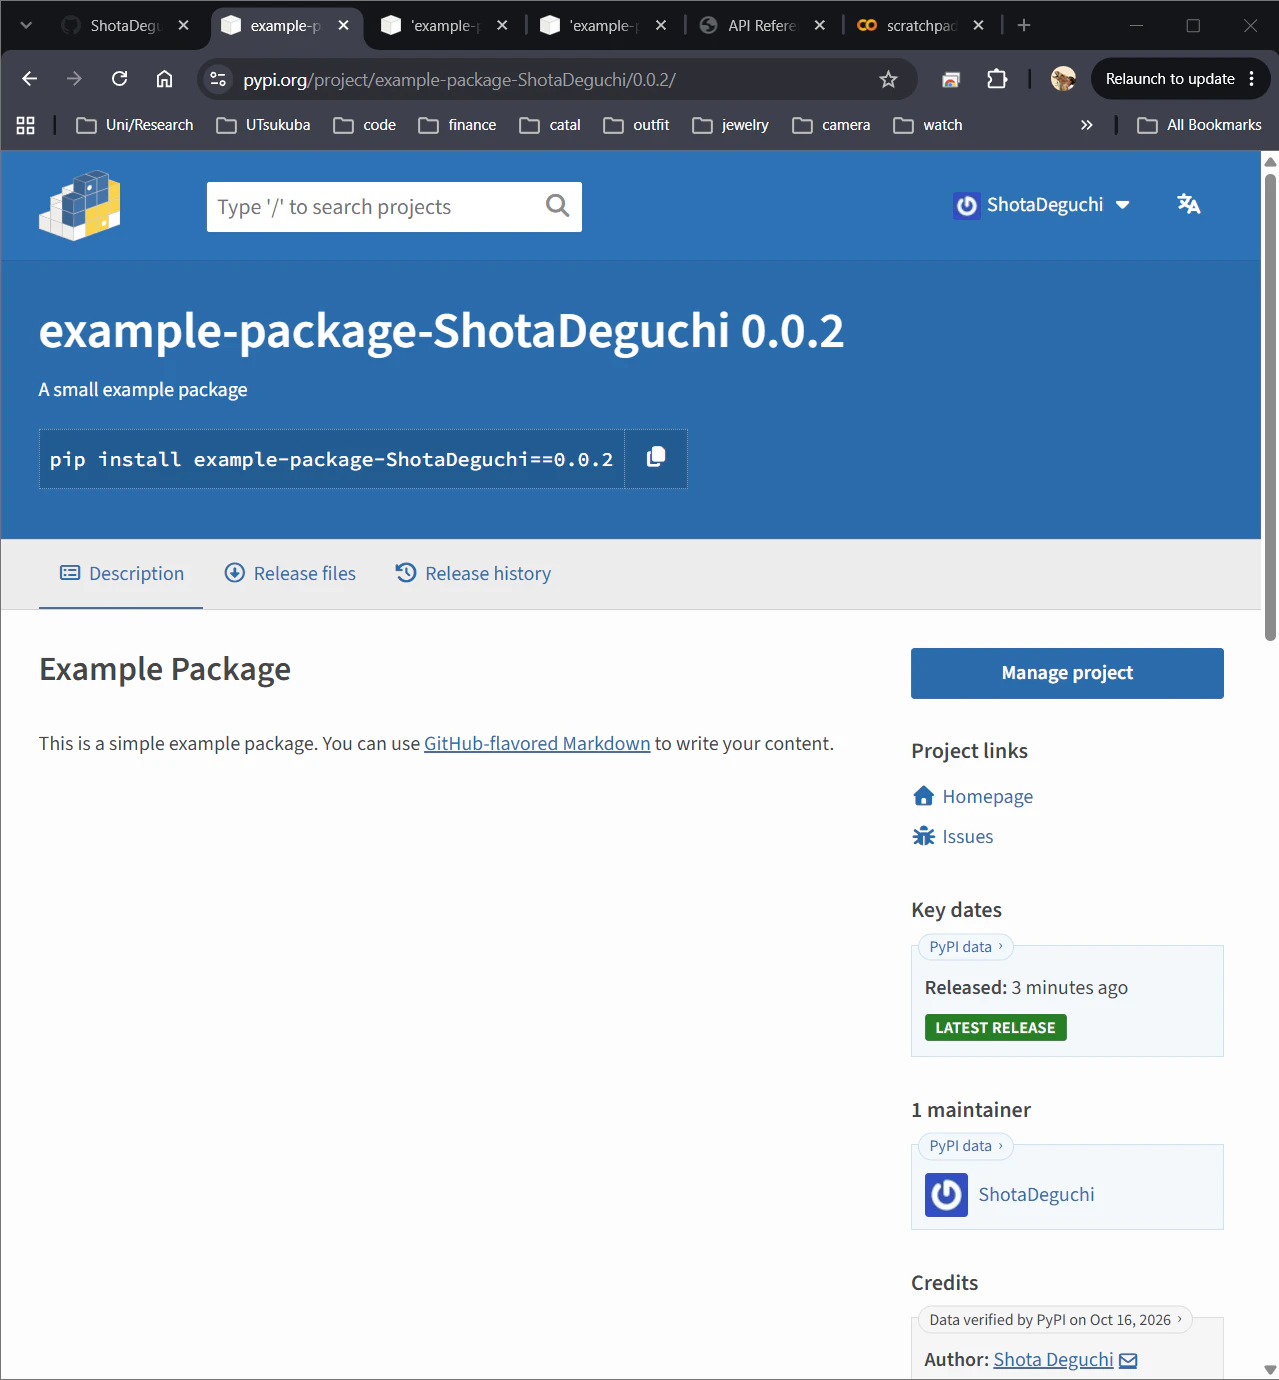
すると,0.0.2がアップロードされている.

手順4:scratchpadで動作確認
scratchpadのランタイムを再起動し,pip installし直すところから再度実行.

素晴らしい.
終わりに
こちらができた(馬鹿らしいが,READMEを変更したものをversion 0.0.3とし,その後pyproject.tomlの情報を適切なものに張り替えてversion 0.0.4とした).
GitHubにcommit・pushすることでソースコードとDocumentationは更新できるが,PyPIはそれと切り分けられたところにあるため,別途ビルド・アップロードをしなければならない,ということを理解した.
何事も経験.