こんにちは。サイボウズ公認 kintoneエバンジェリスト アスノート株式会社の松田です。
Qiitaデビュー一発目は、kintoneをもっと便利にサポートしてくれる、ブックマークレットのアイデアを紹介したいと思います。
※この記事のコンテンツは随時追加・修正をしていきます。記事をストックしていただけると、更新・追加時に通知を受けることができます。
悩めるkintone管理者のための便利ツール、ぜひご活用ください。
ブックマークレットとは
ブラウザーのブックマーク機能を活用して、ブラウザー上でJavaScriptプログラムを動作させるためのプログラムです。
ブラウザー上で利用するkintoneにおいてもブックマークレットが活用できることに気づいて、その活用の可能性を検証してみました。
その中から、広く活用できそうなものをいくつか紹介します。
- アプリ一覧
- アプリ検索
- 印刷レイアウト変更
- 印刷幅変更
- レコード内容コピー
- フィールド一覧の表示
- ステータスの一括更新(2021/03/18追加)
- 一覧の設定リスト出力(2022/02/23追加)
- プロセス管理の設定表示(2022/03/14追加)
- ユーザー情報検索表示(2022/04/11追加)
- アクセス権の設定表示(2023/12/18追加)
- 通知の設定表示(2023/12/19追加)
- レコードコメント一括ダウンロード(2024/09/23追加)
利用方法と参考情報:
- kintoneを便利にしてくれる「ブックマークレット」を使ってみませんか? - note
- 参考:ブックマークレットの登録方法 - Qiita
- 登録用となっているソースコードを全文コピーし、ブックマークのURL欄に張り付けて使用ください。
- よく使用するブックマークレットは、ブックマークバーに表示しておくと便利です。
- コードの内容に書いてあるJavaScriptコードをコピーして、コンソールで実行することもできます。
この場合はコードの頭の「javascript:」は削除してから実行してください。
既存のkintoneブックマークレット記事
kintoneでブックマークレットを活用するメリット
通常のJavaScriptカスタマイズやプラグインは、利用するアプリ固有の機能追加に向いています。
今回提供しているような管理のための機能は、kintone全体で使用したり、個別のアプリでも常に使用するものではありません。プラグインを設定していなくても、使いたいときにブラウザからすぐ利用できるというブックマークレットによる機能追加のメリットは、このようなところにあります。
利用者自身のブラウザーで動くブックマークレットは、アプリ固有ではなく、もっと汎用的に活用できる機能をサポートするのに向いていると思います。
ブックマークレットの処理内で、kintoneのJavaScript APIやREST APIを使うものは、kintoneスタンダードコースでのみ動作します。
APIを使わない画面上のカスタマイズであれば、通常カスタマイズを行うことができない、kintoneライトコースでも使うことができます。
ちょっとデメリット
アプリカスタマイズであれば管理者が作成して利用者に使ってもらうことができますが、ブックマークレットは個別の利用者が自身のブラウザーに設定する必要があります。利用者のスキルやリテラシーによっては、ここがネックになるかもしれません。
効率的でメンテナンスが容易なブックマークレット配布方法をご存知の方は、ぜひノウハウを共有お願いします。
動作確認環境
- PC: Chrome(Mac/Win), Firefox(Win), Safari(Mac), Edge(Win)
※Internet Explorer 11では正常に動作しません。 - スマートフォン: Chrome(iOS), Safari(iOS)
注意書き
- 画面レイアウトを変更しているプログラムはkintoneのDOM要素を使用しています。将来のアップデート等で正常に作動しなくなる可能性があります。とはいえ、kintone内のカスタマイズではないため、kintoneの操作性やデータに影響を与える心配はありません。
- 悪意のあるプログラムが仕込まれたブックマークレットをkintone画面で動作させた場合、kintone内のデータを操作したり、外部に送信したりすることが技術上可能になります。ブックマークレットやカスタマイズを使用する時は処理内容を確認して信頼できるものを適用するようにしましょう。
- JavaScriptやCSSについてはまだまだ勉強中なので、もっといい書き方や間違いなどがあれば、コメントいただけると嬉しいです!
①アプリ一覧
【kintoneスタンダードコース】
利用するアプリの数が増えてくると、kintoneの中でアプリを探し出すのが結構たいへんになりませんか?
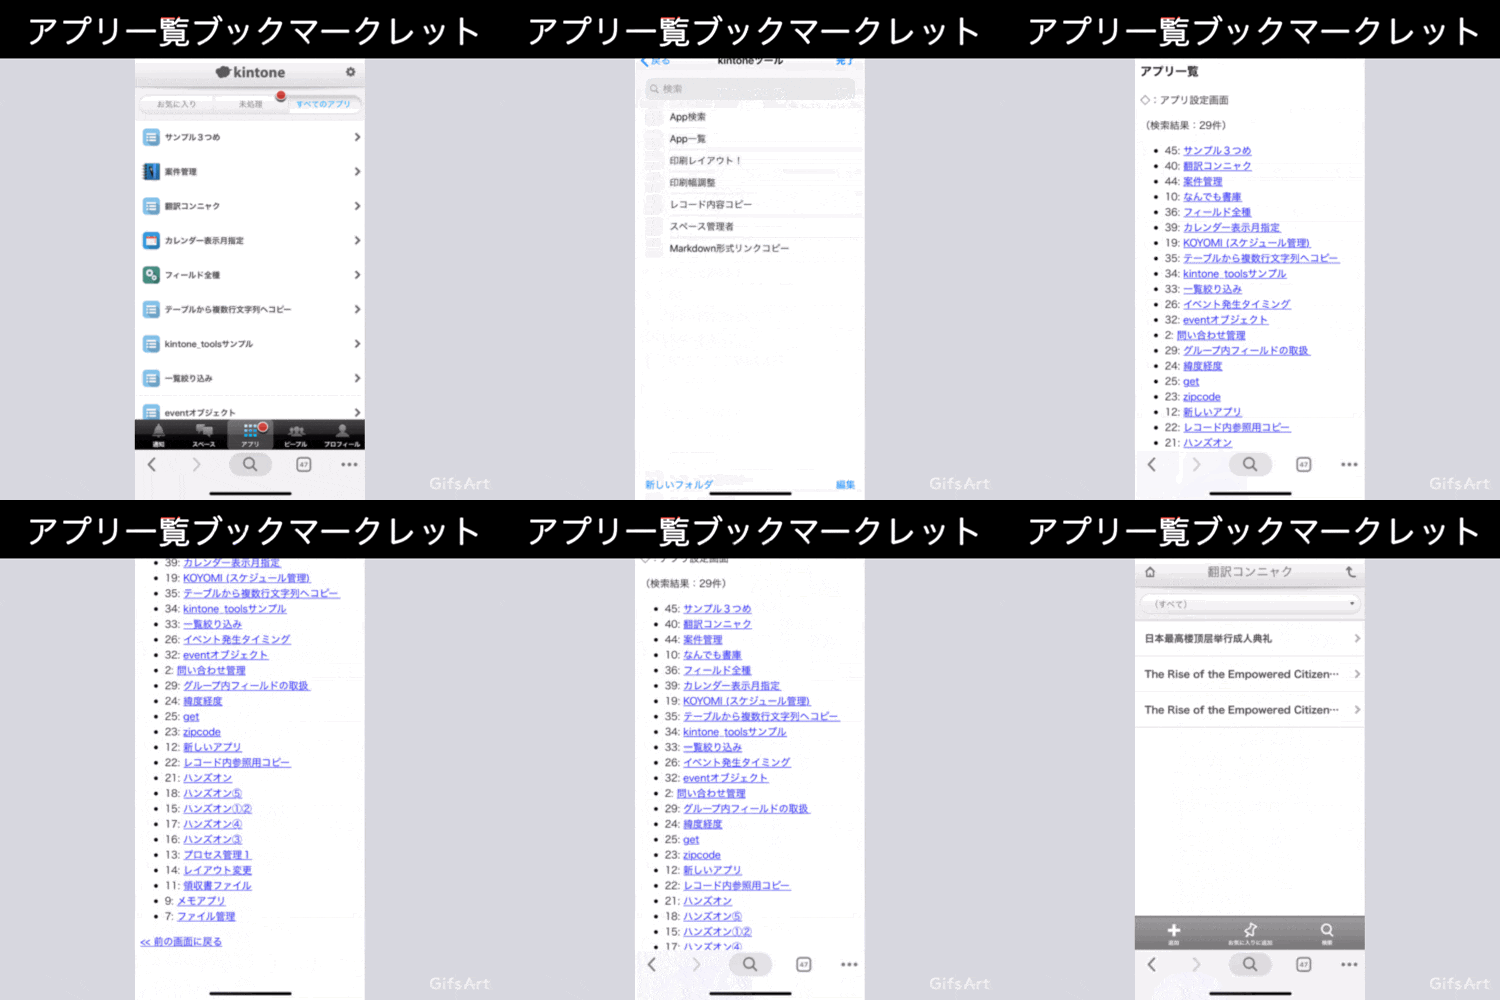
このブックマークレットは、そのユーザーにアクセス権のあるアプリが一発で一覧表示され、そこからアプリ画面へ直接リンクで移動できるというものです。
スマートフォンのブラウザー上のモバイルビューでも使えますので、現状(2019年1月)アプリを探す機能がないモバイルシーンにおいては非常に重宝しています。
- 利用するアプリが最大数十個程度のユーザー向けです。
- 表示順はアプリ設定の更新日時の新しいもの順となります。
※(2023/05/13アップデート):JavaScriptコードをES6対応に修正。同時に画面表示で使っていた'document.open'をやめて'innerHTML'を使う処理に修正。結果表示をリスト形式からテーブル形式に変更。
機能・利用イメージ
ブックマークレット(登録用)
※このコードをブックマークのURL欄に貼り付けてください。
javascript:(async()=>{if(!location.href.includes("cybozu.com/k")){window.alert("kintoneの画面から操作してください");return;}const n=`${location.origin}/k/`;const e=async(t=0,o=[])=>{try{const n=await kintone.api(kintone.api.url("/k/v1/apps",!0),"GET",{offset:t});o.push(...n.apps);return 100===n.apps.length?e(t+100,o):o;}catch(t){console.error(t);}};const t=await e();t.sort((t,n)=>new Date(n.modifiedAt)-new Date(t.modifiedAt));const o=`<body style="font-family: sans-serif;"><h3>アプリ一覧</h3><p>◇:アプリ設定画面</p>${0===t.length?"検索結果がゼロ件でした":""}<p>(検索結果:${t.length}件)</p><table><tr><th>App ID</th><th>App Name</th><th>Settings</th><th>Space ID</th></tr>${t.map(t=>`<tr><td>${t.appId}</td><td><a href="${n}${t.appId}/">${t.name}</a></td><td><a href="${location.origin}/k/admin/app/flow?app=${t.appId}">□</a></td><td>${null!==t.spaceId?`<a href="${location.origin}/k/#/space/${t.spaceId}" target="_blank">${t.spaceId}</a>`:"portal"}</td></tr>`).join("")}</table><p><a href="."> << 前の画面に戻る<a></p></body>`;document.body.innerHTML=o;})();
コードの内容
javascript: (async () => {
    // kintoneの画面でのみ動作させる
    if (!location.href.includes('cybozu.com/k')) {
        window.alert("kintoneの画面から操作してください");
        return;
    }
    const domain = `${location.origin}/k/`;

    const fetchApps = async (offset = 0, apps = []) => {
        try {
            const response = await kintone.api(kintone.api.url('/k/v1/apps', true), 'GET', { offset });
            apps.push(...response.apps);
            return response.apps.length === 100 ? fetchApps(offset + 100, apps) : apps;
        } catch (error) {
            console.error(error);
        }
    };

    const apps = await fetchApps();
    apps.sort((a, b) => new Date(b.modifiedAt) - new Date(a.modifiedAt));

    const result = `
        <body style="font-family: sans-serif;">
            <h3>アプリ一覧</h3>
            <p>◇:アプリ設定画面</p>
            ${apps.length === 0 ? '検索結果がゼロ件でした' : ''}
            <p>(検索結果:${apps.length}件)</p>
            <table>
                <tr>
                    <th>App ID</th>
                    <th>App Name</th>
                    <th>Settings</th>
                    <th>Space ID</th>
                </tr>
                ${apps.map(app => `
                    <tr>
                        <td>${app.appId}</td>
                        <td><a href="${domain}${app.appId}/">${app.name}</a></td>
                        <td><a href="${location.origin}/k/admin/app/flow?app=${app.appId}">□</a></td>
                        <td>${app.spaceId !== null ? `<a href="${location.origin}/k/#/space/${app.spaceId}" target="_blank">${app.spaceId}</a>` : 'portal'}</td>
                    </tr>
                `).join('')}
            </table>
            <p><a href="."> << 前の画面に戻る<a></p>
        </body>
    `;

    document.body.innerHTML = result;
})();
②アプリ検索
【kintoneスタンダードコース】
アプリ一覧ブックマークレットに検索機能を追加しました。
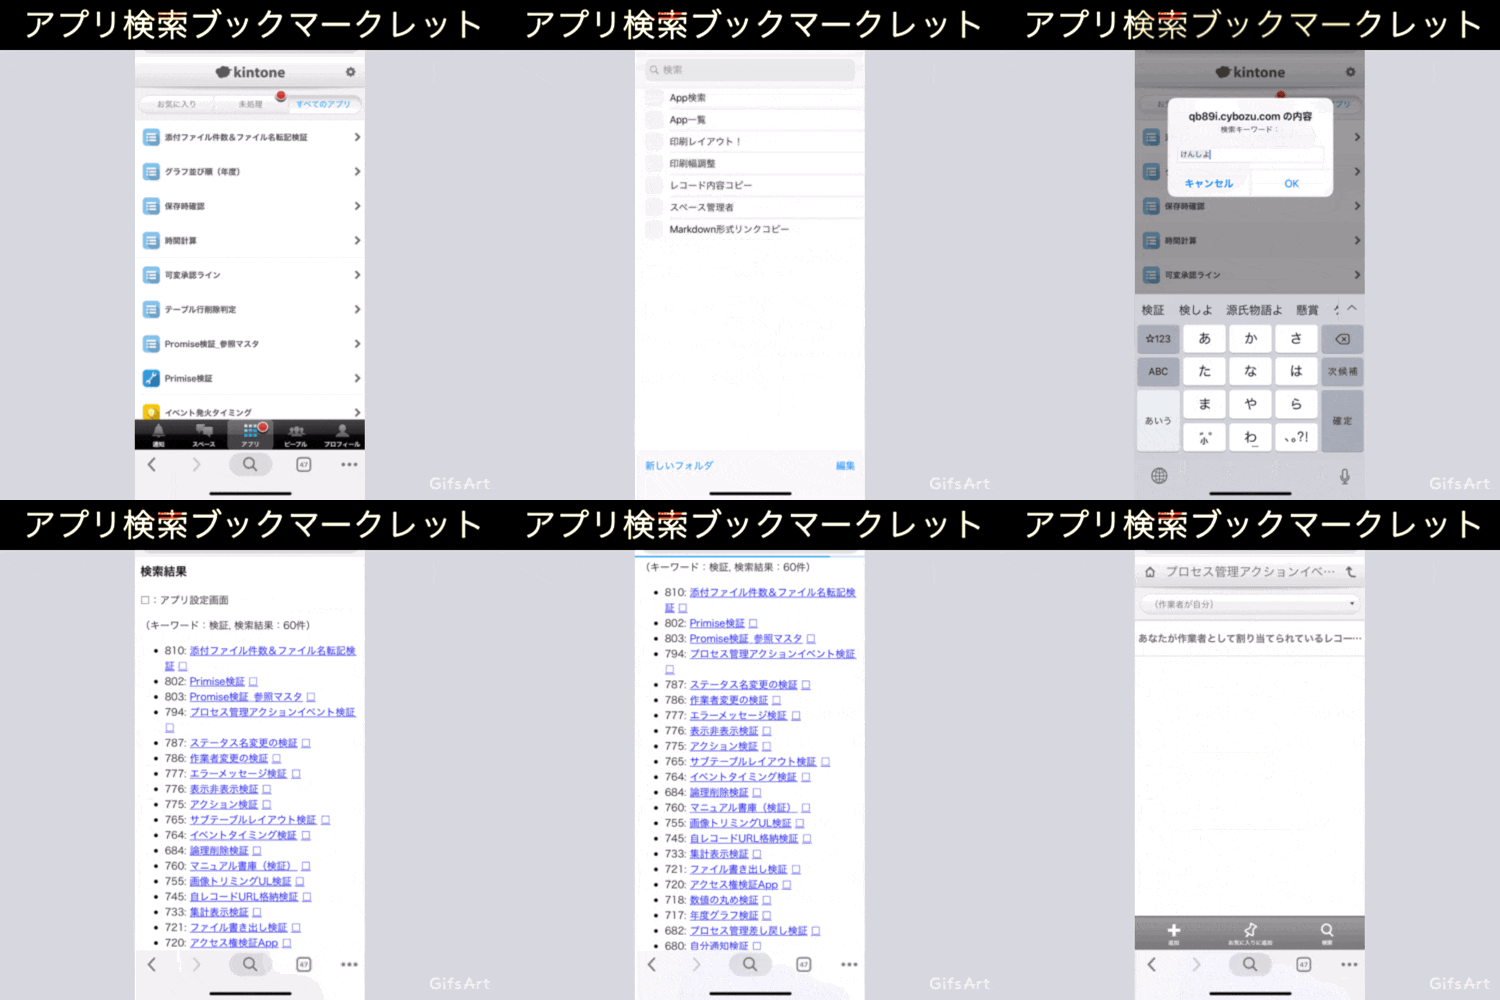
キーワードを1つ設定して、アプリ名で検索し、一覧表示します。
利用するアプリの数が非常に多いユーザーや、kintoneの管理者の方向きの機能で、大量のアプリの中からキーワードで絞り込んで目的のアプリを見つけることができます。
また、管理者向けに、各アプリの設定画面への直リンク(□)も表示するようにしています。
表示順はアプリ設定の更新日時の新しいもの順となります。
キーワードを入れずにOKを押すと、アクセス権のあるアプリが全件表示されます(最大100件)。
※(2021/8/20アップデート):検索結果リストに所属しているスペースのIDおよびスペースへのリンクを表示するようにしました。スペース外アプリの場合は[Portal]表示。
※(2023/05/13アップデート):JavaScriptコードをES6対応に修正。同時に画面表示で使っていた'document.open'をやめて'innerHTML'を使う処理に修正。また、アプリ数が100を超える場合も全件取得する処理に変更。キーワード入力ダイアログに何も入力せずにOK(エンター)すると、アプリリスト全件表示。表示形式をリスト形式からテーブル形式に変更。
機能・利用イメージ
ブックマークレット(登録用)
※このコードをブックマークのURL欄に貼り付けてください。
javascript:(async()=>{if(!location.href.includes("cybozu.com/k")){alert("kintoneの画面から操作してください");return}let t=prompt("検索キーワード:"),a=0,e=[],p=async()=>{let i=await kintone.api(kintone.api.url("/k/v1/apps",!0),"GET",{name:t,offset:a,limit:100});i.apps.length>0&&(e=[...e,...i.apps],a+=100,await p())};await p(),e.sort((t,a)=>t.modifiedAt<a.modifiedAt?1:t.modifiedAt>a.modifiedAt?-1:0);let i=`${location.origin}/k/`,d=e.map(t=>`<tr><td>${t.appId}</td><td><a href="${i}${t.appId}/">${t.name}</a></td><td><a href="${location.origin}/k/admin/app/flow?app=${t.appId}">設定</a></td><td>${null!==t.spaceId?`<a href="${location.origin}/k/#/space/${t.spaceId}" target="_blank">${t.spaceId}</a>`:"portal"}</td></tr>`).join(""),r=`<body style="font-family: sans-serif; background-color: white;"><h3>検索結果</h3><p>□:アプリ設定画面</p>${0===e.length?"検索結果がゼロ件でした":`<p>(キーワード:${t}, 検索結果:${e.length}件)</p>`}<table><tr><th>App ID</th><th>App Name</th><th>Settings</th><th>Space ID</th></tr>${d}</table><p><a href="."> << 前の画面に戻る<a></p></body>`;if(0===e.length){alert("検索結果がゼロ件でした");return}document.body.innerHTML=r})().catch(t=>console.error(t));
コードの内容
javascript: (async () => {
    if (!location.href.includes('cybozu.com/k')) {
        alert("kintoneの画面から操作してください");
        return;
    }

    const keyword = prompt("検索キーワード:");
    let offset = 0;
    const limit = 100;
    let apps = [];

    const getApps = async () => {
        const resp = await kintone.api(kintone.api.url('/k/v1/apps', true), 'GET', {
            "name": keyword,
            "offset": offset,
            "limit": limit
        });
        if (resp.apps.length > 0) {
            apps = [...apps, ...resp.apps];
            offset += limit;
            await getApps();
        }
    }

    await getApps();

    apps.sort((a, b) => a.modifiedAt < b.modifiedAt ? 1 : a.modifiedAt > b.modifiedAt ? -1 : 0);

    const domain = `${location.origin}/k/`;
    const appList = apps.map(app => `
        <tr>
            <td>${app.appId}</td>
            <td><a href="${domain}${app.appId}/">${app.name}</a></td>
            <td><a href="${location.origin}/k/admin/app/flow?app=${app.appId}">設定</a></td>
            <td>${app.spaceId !== null ?
                `<a href="${location.origin}/k/#/space/${app.spaceId}" target="_blank">${app.spaceId}</a>`
                : 'portal'}</td>
        </tr>
    `).join('');

    const result = `
        <body style="font-family: sans-serif; background-color: white;">
            <h3>検索結果</h3>
            <p>□:アプリ設定画面</p>
            ${apps.length === 0 ?
                '検索結果がゼロ件でした'
                : `<p>(キーワード:${keyword}, 検索結果:${apps.length}件)</p>`}
            <table>
                <tr>
                    <th>App ID</th>
                    <th>App Name</th>
                    <th>Settings</th>
                    <th>Space ID</th>
                </tr>
                ${appList}
            </table>
            <p><a href="."> << 前の画面に戻る<a></p>
        </body>
    `;

    if (apps.length === 0) {
        alert("検索結果がゼロ件でした");
        return;
    }

    document.body.innerHTML = result;
})().catch((error) => console.error(error));
③印刷レイアウト変更
【kintoneライトコース/スタンダードコース】
kintone標準のレコード印刷画面、ちょっとイケてないです。そもそも印刷などしないためにクラウドを使うんだ!と言ってしまえばそれまでです。しかし実際の活用シーンにおいては、紙に印刷したり、またはレコードの内容をPDFに出力するニーズもまだまだあるのが現実です。
このブックマークレットはkintoneの印刷用画面のレイアウトや装飾を変更します。APIは利用していないため、通常のカスタマイズや連携サービスを使うことができない、kintoneライトコースでも利用できます。
※(2023/05/13アップデート):JavaScriptコードをES6対応に修正。
機能・利用イメージ
ブックマークレット(登録用)
※このコードをブックマークのURL欄に貼り付けてください。
javascript:(()=>{if(!location.href.includes('cybozu.com/k')){alert("kintoneの画面から操作してください");return;}const s=prompt("文字のサイズ(pt):","14");const f=1.1;const st=`@media print{.body-record-print .subtable-label-gaia,.body-record-print .show-subtable-gaia th:first-child{-webkit-print-color-adjust:exact}}#record-gaia,div.control-value-gaia{font-size:${s}px}.body-record-print .showlayout-gaia .row-gaia .control-value-gaia,.body-record-print .control-group-gaia{border-style:none;background-color:#f5f5f5}.control-label-text-gaia{border-left:4px solid #777;font-size:${s*f}px;font-weight:bold;padding-left:5px}.control-label-gaia{color:#777}.body-record-print .subtable-label-gaia,.body-record-print .show-subtable-gaia th:first-child{border-width:1px;background-color:#e0e0e0!important;font-size:${s}px;text-align:center}`;const n=document.createElement('link');n.rel='stylesheet';n.href='data:text/css,'+escape(st);document.getElementsByTagName("head")[0].appendChild(n);})();
コードの内容
javascript: (() => {
    if (!location.href.includes('cybozu.com/k')) {
        alert("kintoneの画面から操作してください");
        return;
    }
    const size = prompt("文字のサイズ(pt):", "14");
    const f=1.1;
    const styles = `@media print {
        .body-record-print .subtable-label-gaia,.body-record-print .show-subtable-gaia th:first-child {
            -webkit-print-color-adjust: exact;
        }
    }
    #record-gaia,div.control-value-gaia {
        font-size: ${size}px;
    }
    .body-record-print .showlayout-gaia .row-gaia .control-value-gaia,.body-record-print .control-group-gaia {
        border-style: none;
        background-color: #f5f5f5;
    }
    .control-label-text-gaia {
        border-left: 4px solid #777;
        font-size: ${size * f}px;
        font-weight:bold;
        padding-left: 5px;
    }
    .control-label-gaia {
        color:#777;
    }
    .body-record-print .subtable-label-gaia,.body-record-print .show-subtable-gaia th:first-child {
        border-width: 1px;
        background-color: #e0e0e0 !important;
        font-size: ${size}px;
        text-align: center;
    }`;
    const newSS = document.createElement('link');
    newSS.rel = 'stylesheet';
    newSS.href = 'data:text/css,' + escape(styles);
    document.getElementsByTagName("head")[0].appendChild(newSS);
})();
④印刷幅調整
【kintoneライトコース/スタンダードコース】
kintoneのレコードを印刷するときに悲しいのが、アプリフォームのレイアウトによっては、印刷時に右端が切れてしまうこと。
全体を縮小するといいんですが、そうすると今度は文字が小さくなってしまう。
このブックマークレットは、印刷レイアウト画面の幅を強制的に調整します。③のレイアウト変更と一緒に使ってもいいし、標準の印刷用画面でも単独で利用できます。
標準の印刷用画面でも使えますし、上記の印刷レイアウト変更ブックマークレットと合わせて用いてもOKです。
kintoneライトコースでも利用できます
※(2023/05/13アップデート):JavaScriptコードをES6対応に修正。
利用方法
- ブックマークレットを起動し、レイアウト幅をピクセルで設定します。
- Chromeの場合は、1034px ぐらいでちょうどおさまります(私の環境での数値なので微調整してください)
- そのままOKを押すと1034px, 手動で入力する場合は数値を入力します。
ブックマークレット(登録用)
※このコードをブックマークのURL欄に貼り付けてください。
javascript:(function () { const w1 = document.getElementsByClassName("layout-gaia")[0].style.width; const w2 = window.prompt("幅を指定してください(現状:"+w1+"px => )", 1034); document.getElementsByClassName("layout-gaia")[0].style.width=w2+"px"; })();
コードの内容
javascript: (function () {
  const w1 = document.getElementsByClassName("layout-gaia")[0].style.width;
  const w2 = window.prompt("幅を指定してください(現状:" + w1 + "px => )", 1034);
  document.getElementsByClassName("layout-gaia")[0].style.width = w2 + "px";
})();
⑤レコード内容をコピー
【kintoneライトコース/スタンダードコース】
kintoneのレコードを印刷ではなく、文字で取り出して使いたい場合がたまにあります。
このブックマークレットは、レコード詳細画面で、表示されているレコードデータをまるっとクリップボードにコピーします。その後はメール等の本文に貼り付けて加工したり、メモ帳などに貼り付けたり、いろいろできます。
現状、PCビューでのみ作動します。kintoneライトコースでも利用できます
※(2023/05/13アップデート):JavaScriptコードをES6対応に修正。
ブックマークレット(登録用)
※このコードをブックマークのURL欄に貼り付けてください。
javascript:(()=>{if(!location.href.includes('cybozu.com/k')){alert("kintoneの画面から操作してください");return}const c=document.getElementsByClassName("layout-gaia")[0].innerText;const f=t=>{const e=document.createElement("textarea");e.textContent=t;const b=document.getElementsByTagName("body")[0];b.appendChild(e);e.select();const r=document.execCommand('copy');b.removeChild(e);return r};f(c);alert("クリップボードにコピーしました!")})();
コードの内容
クリップボードコピー関数は以下のサイトを参考にしました。
JavaScript でテキストをクリップボードへコピーする方法
javascript: (() => {
    if (!location.href.includes('cybozu.com/k')) {
        alert("kintoneの画面から操作してください");
        return;
    }
    const contents = document.getElementsByClassName("layout-gaia")[0].innerText;

    copyTextToClipboard(contents);
    alert("クリップボードにコピーしました!");

    const copyTextToClipboard = (textVal) => {
        const copyFrom = document.createElement("textarea");
        copyFrom.textContent = textVal;
        const bodyElm = document.getElementsByTagName("body")[0];
        bodyElm.appendChild(copyFrom);
        copyFrom.select();
        const retVal = document.execCommand('copy');
        bodyElm.removeChild(copyFrom);
        return retVal;
    }
})();
⑥フィールド一覧を表示
【kintoneスタンダードコース】
kintoneのカスタマイズを行ったり、自動計算の計算式を作ったりするとき、アプリの各フィールドのフィールドコードが必要になります。
このブックマークレットは、今開いているアプリのフィールド一覧を画面表示するというものです。
※2021/2/19 出力項目に「重複禁止」「必須設定」を追加しました。
※(2023/05/13アップデート):JavaScriptコードをES6対応に修正。同時に画面表示で使っていた'document.open'をやめて'innerHTML'を使うDOM処理に修正。
※(2024/02/15アップデート):ソート機能追加(フィールド名、フィールドコード、フィールド種別)
ブックマークレット(登録用)
※このコードをブックマークのURL欄に貼り付けてください。
javascript:(()=>{if(!location.href.includes("cybozu.com/k")){window.alert("kintoneの画面から操作してください");return}kintone.api(kintone.api.url("/k/v1/form",!0),"GET",{app:kintone.app.getId()},t=>{let e=t.properties,n="<h3>フィールド一覧</h3>";if(0===e.length){window.alert("フィールドがありません");return}n+='<table id="fieldsTable" rules="rows">',n+='<thead><tr><th>SUBTABLE</th><th>フィールド名 <button id="sortBtn1">▲▼</button></th><th>フィールドコード <button id="sortBtn2">▲▼</button></th><th>フィールドタイプ <button id="sortBtn3">▲▼</button></th><th>重複禁止</th><th>必須</th></tr></thead><tbody>',e.forEach(t=>{"SUBTABLE"===t.type?t.fields.forEach(e=>{n+=`<tr><td>${t.code}</td><td>${e.label}</td><td>${e.code}</td><td>${e.type}</td><td>${e.unique?"はい":"いいえ"}</td><td>${e.required?"はい":"いいえ"}</td></tr>`}):n+=`<tr><td></td><td>${t.label}</td><td>${t.code}</td><td>${t.type}</td><td>${t.unique?"はい":"いいえ"}</td><td>${t.required?"はい":"いいえ"}</td></tr>`}),n+='</tbody></table><p><a href="javascript:location.reload();">前の画面に戻る</a></p><br>';let o=document.getElementsByTagName("body")[0],r=document.createElement("script");r.innerHTML=`
            var sortDirections = {1: 'asc', 2: 'asc', 3: 'asc'};
            function updateSortButton(column) {
                var btn = document.getElementById('sortBtn' + column);
                btn.textContent = sortDirections[column] === 'asc' ? '▲' : '▼';
            }
            function sortTable(column) {
                var table, rows, switching, i, x, y, shouldSwitch, dir = sortDirections[column];
                table = document.getElementById("fieldsTable");
                switching = true;
                while (switching) {
                    switching = false;
                    rows = table.rows;
                    for (i = 1; i < (rows.length - 1); i++) {
                        shouldSwitch = false;
                        x = rows[i].getElementsByTagName("TD")[column];
                        y = rows[i + 1].getElementsByTagName("TD")[column];
                        if (dir === 'asc' ? x.innerHTML.toLowerCase() > y.innerHTML.toLowerCase() : x.innerHTML.toLowerCase() < y.innerHTML.toLowerCase()) {
                            shouldSwitch = true;
                            break;
                        }
                    }
                    if (shouldSwitch) {
                        rows[i].parentNode.insertBefore(rows[i + 1], rows[i]);
                        switching = true;
                    }
                }
                sortDirections[column] = dir === 'asc' ? 'desc' : 'asc';
                updateSortButton(column);
            }
            function addEventListeners() {
                document.getElementById('sortBtn1').addEventListener('click', function() { sortTable(1); });
                document.getElementById('sortBtn2').addEventListener('click', function() { sortTable(2); });
                document.getElementById('sortBtn3').addEventListener('click', function() { sortTable(3); });
                updateSortButton(1);
                updateSortButton(2);
                updateSortButton(3);
            }
            addEventListeners();
        `,o.innerHTML=n,o.appendChild(r)},t=>{console.log(t)})})();
コードの内容
javascript: (() => {
    if (!location.href.includes('cybozu.com/k')) {
        window.alert("kintoneの画面から操作してください");
        return;
    }

    kintone.api(kintone.api.url('/k/v1/form', true), 'GET', { "app": kintone.app.getId() }, (resp) => {
        const fields = resp.properties;
        let result = '<h3>フィールド一覧</h3>';
        if (fields.length === 0) {
            window.alert("フィールドがありません");
            return;
        }
        result += '<table id="fieldsTable" rules="rows">';
        result += '<thead><tr><th>SUBTABLE</th><th>フィールド名 <button id="sortBtn1">▲▼</button></th><th>フィールドコード <button id="sortBtn2">▲▼</button></th><th>フィールドタイプ <button id="sortBtn3">▲▼</button></th><th>重複禁止</th><th>必須</th></tr></thead><tbody>';

        fields.forEach((field) => {
            if (field.type === 'SUBTABLE') {
                field.fields.forEach((row) => {
                    result += `<tr><td>${field.code}</td><td>${row.label}</td><td>${row.code}</td><td>${row.type}</td><td>${row.unique ? 'はい' : 'いいえ'}</td><td>${row.required ? 'はい' : 'いいえ'}</td></tr>`;
                });
            } else {
                result += `<tr><td></td><td>${field.label}</td><td>${field.code}</td><td>${field.type}</td><td>${field.unique ? 'はい' : 'いいえ'}</td><td>${field.required ? 'はい' : 'いいえ'}</td></tr>`;
            }
        });
        result += '</tbody></table><p><a href="javascript:location.reload();">前の画面に戻る</a></p><br>';

        const body = document.getElementsByTagName('body')[0];
        const script = document.createElement('script');
        script.innerHTML = `
            var sortDirections = {1: 'asc', 2: 'asc', 3: 'asc'};
            function updateSortButton(column) {
                var btn = document.getElementById('sortBtn' + column);
                btn.textContent = sortDirections[column] === 'asc' ? '▲' : '▼';
            }
            function sortTable(column) {
                var table, rows, switching, i, x, y, shouldSwitch, dir = sortDirections[column];
                table = document.getElementById("fieldsTable");
                switching = true;
                while (switching) {
                    switching = false;
                    rows = table.rows;
                    for (i = 1; i < (rows.length - 1); i++) {
                        shouldSwitch = false;
                        x = rows[i].getElementsByTagName("TD")[column];
                        y = rows[i + 1].getElementsByTagName("TD")[column];
                        if (dir === 'asc' ? x.innerHTML.toLowerCase() > y.innerHTML.toLowerCase() : x.innerHTML.toLowerCase() < y.innerHTML.toLowerCase()) {
                            shouldSwitch = true;
                            break;
                        }
                    }
                    if (shouldSwitch) {
                        rows[i].parentNode.insertBefore(rows[i + 1], rows[i]);
                        switching = true;
                    }
                }
                sortDirections[column] = dir === 'asc' ? 'desc' : 'asc';
                updateSortButton(column);
            }
            function addEventListeners() {
                document.getElementById('sortBtn1').addEventListener('click', function() { sortTable(1); });
                document.getElementById('sortBtn2').addEventListener('click', function() { sortTable(2); });
                document.getElementById('sortBtn3').addEventListener('click', function() { sortTable(3); });
                updateSortButton(1);
                updateSortButton(2);
                updateSortButton(3);
            }
            addEventListeners();
        `;
        body.innerHTML = result;
        body.appendChild(script);
    }, (error) => {
        console.log(error);
    });
})();
⑦ステータスの一括更新
【kintoneスタンダードコース】
「kintoneのアプリを新しく作ってデータを引越ししたいんですが」
私「あーできますよ。CSVに出力してですね・・・」
「おおーいいですね。じゃぁステータスも前と同じ状態にしておいてください」
私「・・・え!?あの・・・」
みなさんも経験ありませんか?アプリのフォーム内のデータであればCSVやコマンドラインツールを使って引越しできますが、引越しできないものもあります(レコード履歴、ステータス、ステータス履歴など)。
プロセス管理を設定したアプリを作って、そこに別システムから過去データを取り込むときも同じですね。
こういうときによくやる手段として、通称「神の手プロセス」を一時的に設定して、未処理→完了のようなバイパスプロセスを作り、レコードを開いてプロセス管理のアクションボタンをポチポチ押していく。
数件~20件ぐらいのレコード数であれば、手作業でもいいんですが、レコードが多いと死ねます(笑)
そこで一覧画面から絞り込んだレコードを対象として、指定ステータスから指定アクションを一括で実行することができるブックマークレットを作成しました。
操作方法
- アプリ一覧画面でブックマークレット実行
2. このとき一覧の絞り込み条件が設定されている場合は絞り込まれたレコードに対して更新処理が行われます
3. ステータス以外で更新対象レコードを絞り込んでから処理を実行する、という使い方ができます - 更新対象ステータスを入力
- 実行するアクション名(プロセス管理のボタン名)を入力
- 確認ダイアログが表示され、OKを押すと一括更新処理実行。キャンセルを押すと処理中断
- 処理には時間がかかりますが、画面の更新等は行わないでください
- 処理完了後にもダイアログが表示されます
制限事項等
- 一度に更新できるレコード数は100件です。対象レコードが多い場合は、一括更新処理を何度か繰り返すことで対処可能です。腕に覚えのある人は大量レコード対応してみてください。
- 使用したAPI
※(2023/05/13アップデート):JavaScriptコードをES6対応に修正。コールバックをasync/awaitに変更。
ブックマークレット(登録用)
※このコードをブックマークのURL欄に貼り付けてください。
javascript:(async()=>{const t=window.prompt("更新対象ステータス:"),n=window.prompt("実行アクション名(ボタン名)"),e={fromStatus:t,doAction:n},a=kintone.api.url("/k/v1/records",!0),o=kintone.api.url("/k/v1/records/status",!0),r=(c=kintone.app.getQueryCondition())?c+" and ":"",s={app:kintone.app.getId(),fields:["$id"],query:`${r}ステータス = "${e.fromStatus}" limit 100`};try{const c=await kintone.api(a,"GET",s),i=c.records.map((t=>t.$id.value)),u={app:kintone.app.getId(),records:i.map((t=>({id:t,action:e.doAction})))};if(!window.confirm(`${i.length}件のレコードのステータス更新をします。\n対象ステータス:${e.fromStatus}\n実行アクション:${e.doAction}`))throw new Error("処理中断しました");console.log(u);const d=await kintone.api(o,"PUT",u);console.log(d),alert("ステータスの一括更新が完了しました"),window.location.reload()}catch(t){console.log(t),alert("処理中断しました")}})();
コードの内容
javascript:(async () => {
    const fromStatus = window.prompt('更新対象ステータス:');
    const doAction = window.prompt('実行アクション名(ボタン名)');
    const condition = {
        fromStatus,
        doAction
    };
    const getUrl = kintone.api.url('/k/v1/records', true);
    const putUrl = kintone.api.url('/k/v1/records/status', true);
    let currentQuery = kintone.app.getQueryCondition();
    if (currentQuery != '') {
        currentQuery += ' and ';
    }
    const getBody = {
        app: kintone.app.getId(),
        fields: ['$id'],
        query: `${currentQuery}ステータス = "${condition.fromStatus}" limit 100`
    };
    try {
        const resp = await kintone.api(getUrl, 'GET', getBody);
        const ids = resp.records.map(record => record.$id.value);
        const putBody = {
            "app": kintone.app.getId(),
            "records": ids.map(id => ({
                id,
                "action": condition.doAction
            }))
        };
        console.log(putBody);
        const message = `${ids.length}件のレコードのステータス更新をします。
        対象ステータス:${condition.fromStatus}
        実行アクション:${condition.doAction}`;
        const result = window.confirm(message);
        if (!result) {
            throw new Error('処理中断しました');
        }
        const putResp = await kintone.api(putUrl, 'PUT', putBody);
        console.log(putResp);
        alert('ステータスの一括更新が完了しました');
        window.location.reload();
    } catch (error) {
        console.log(error);
        alert('処理中断しました');
    }
})();
⑧一覧の設定リスト出力
【kintoneスタンダードコース】
長くkintoneのアプリを使っていると、一覧の設定数が増えてくることがよくあります。
特に、ユーザーにアプリ管理権限を渡して、自由に一覧設定をできるようにしていると、増殖傾向になります。
そして多くの場合、一覧の名前の付け方も微妙な感じで、同じような名前が氾濫することもあったりしますね。
そこで、kintone SIGNPOSTの「6-42 定期的な棚卸し」にも書いてあるように、一覧の棚卸しをやろう!ということになります。
しかし、ここで30数個の一覧が登録されたアプリを眺めてハッと気づくのです。
「どの一覧がどんな設定内容になっているのかが把握できない!」
そんな迷える kintone管理者のためのブックマークレットを作成しました。
操作方法
- アプリ画面(一覧画面、詳細画面どちらでもOK)でブックマークレット実行。
- 一覧の設定内容のリストが表示されます。
- 「ダウンロード」ボタンをクリックすると、CSVファイルをダウンロードすることができます。
- 文字コードがUnicodeになっているため、Excelで普通に開くと文字化けします。スプレッドシートやエディタで開くか、Excelの外部データの読み込み機能を使って、文字コードを変更して読み込んでください。
- 画面のリロードまたは、「アプリ画面に戻る」をクリックすると kintoneに戻ります。
- REST APIによる一覧設定の更新を行いたい場合は、コンソールに一覧設定のオブジェクトが出力されていますので、これをコピーして編集し、更新することで可能となります。参考:一覧の設定の変更(Cybozu developer network)
制限事項等
- kintoneのREST APIの仕様により、同じ名称の一覧が複数個登録されている場合には、データ取得がエラーとなります。メッセージに従って一覧名を修正してから再度試してください。
- 使用したAPI
※(2023/05/13アップデート):JavaScriptコードをES6対応に修正。同時に画面表示で使っていた'document.open'をやめて'innerHTML'を使うDOM処理に修正。
ブックマークレット(登録用)
※このコードをブックマークのURL欄に貼り付けてください。
javascript:(async()=>{const t=kintone.api.url('/k/v1/app/views.json',!0),n={'app':kintone.app.getId(),'lang':'user'};try{const e=await kintone.api(t,'GET',n),i=Object.values(e.views);if(i.sort((t,n)=>t.index-n.index),0===i.length)return void window.alert("検索結果がゼロ件でした");const a=r(i),o=i.map((t,n)=>`<tr style="${n%2==0?'background-color: #f0f0f0;':''}"><td>${t.index}</td><td>${t.id}</td><td>${t.name}</td><td>${t.filterCond}</td><td>${'LIST'===t.type?t.fields.join(', '):''}</td></tr>`).join(''),s=`<body style="font-family: sans-serif;"><h3>一覧設定リスト(アプリID: ${kintone.app.getId()})</h3><p>(一覧件数:${i.length}件) <button id="b" class="dlcsv" type="button"> ↓ download CSV file</button></br></p><table border="1" style="border-collapse: collapse; width: 100%;"><tr style="background-color: #444444; color: white;"><th style="padding: 15px;">Index</th><th style="padding: 15px;">id</th><th style="padding: 15px;">一覧名</th><th style="padding: 15px;">絞込条件</th><th style="padding: 15px;">フィールド構成</th></tr>${o}</table><br><a href="."> << アプリ画面に戻る<a><br></body>`;document.body.innerHTML=s,document.getElementById('b').addEventListener('click',()=>{const t=new Blob([a],{type:"text/csv"}),n=document.createElement('a');n.href=URL.createObjectURL(t),n.download=`appViews_${kintone.app.getId()}.csv`,n.click()});function r(t){let n='Index,一覧名称,絞込条件,フィールド構成\n';return t.forEach(t=>{'LIST'===t.type&&(n+=`${t.index},${t.name},${t.filterCond},${t.fields.join(',')}\n`)}),n}}catch(t){'GAIA_DU01'===t.code&&window.alert(t.message),console.log(t)}})();
コードの内容
(async () => {
    const url = kintone.api.url('/k/v1/app/views.json', true);
    const body = {
        'app': kintone.app.getId(),
        'lang': 'user'
    };
    try {
        const resp = await kintone.api(url, 'GET', body);
        const lists = Object.values(resp.views);

        lists.sort((a, b) => a.index - b.index);

        if (lists.length === 0) {
            window.alert("検索結果がゼロ件でした");
            return;
        }

        const data = generateCsvFile(lists);
        const listItems = lists.map((list, index) => `
            <tr style="${index % 2 === 0 ? 'background-color: #f0f0f0;' : ''}">
                <td>${list.index}</td>
                <td>${list.id}</td>
                <td>${list.name}</td>
                <td>${list.filterCond}</td>
                <td>${list.type === 'LIST' ? list.fields.join(', ') : ''}</td>
            </tr>
        `).join('');

        const result = `
            <body style="font-family: sans-serif;">
                <h3>一覧設定リスト(アプリID: ${kintone.app.getId()})</h3>
                <p>(一覧件数:${lists.length}件) <button id="btn" class="dlcsv" type="button"> ↓ download CSV file</button></br></p>
                <table border="1" style="border-collapse: collapse; width: 100%;">
                    <tr style="background-color: #444444; color: white;">
                        <th style="padding: 15px;">Index</th>
                        <th style="padding: 15px;">id</th>
                        <th style="padding: 15px;">一覧名</th>
                        <th style="padding: 15px;">絞込条件</th>
                        <th style="padding: 15px;">フィールド構成</th>
                    </tr>
                    ${listItems}
                </table>
                <br><a href="."> << アプリ画面に戻る<a><br>
            </body>
        `;

        document.body.innerHTML = result;

        document.getElementById('btn').addEventListener('click', () => {
            const blob = new Blob([data], { type: "text/csv" });
            const link = document.createElement('a');
            link.href = URL.createObjectURL(blob);
            link.download = `appViews_${kintone.app.getId()}.csv`;
            link.click();
        });

        function generateCsvFile(views) {
            let result = 'Index,一覧名称,絞込条件,フィールド構成\n';
            views.forEach(list => {
                if (list.type === 'LIST') {
                    result += `${list.index},${list.name},${list.filterCond},${list.fields.join(',')}\n`;
                }
            });
            return result;
        }
    } catch (error) {
        if (error.code === 'GAIA_DU01') {
            window.alert(error.message);
        }
        console.log(error);
    }
})();
⑨プロセス管理の設定表示
【kintoneスタンダードコース】
kintoneをワークフロー的な使い方をするときに活用するのが、プロセス管理です。
既存業務をkintone化するときのステップとしては概ね次のように考えます。
- kintone化をしたい業務の現状の業務を棚卸しし、業務フローとして見える化する
- 現状業務の無駄なところ、改善できるところを見直し、kintone化に適した業務フローを作る
- kintoneのプロセス管理の設定を行い、テストを経て運用開始
ところが、ステップ2の「現状業務の見直し」が不十分なことが非常に多いです。
これには理由もあると思います。机上で考えただけの業務プロセスだけでは見えてこないこともあります。やはり実際に運用をして、かつデータを見ないと把握できない無駄もあります。
「kintoneアプリは使い始めたときが、業務改善のスタート」とかねてからお話していますが、ここでプロセス管理設定の見直しが必要になります。kintone SIGNPOSTの「6-42 定期的な棚卸し」にもあるように、使ってみた結果をフィードバックして、業務を改善していくことは、非常にkintoneっぽいと思います。
先日、あるお客さんのアプリでこのケースがあり、さっそくプロセス管理設定画面を開きました。
しかし、そこには
- ステータス:14個
- 全アクション数:77個(条件分岐含む)
という、膨大な設定がありました。
当初設定したのは自分だったので、仕方ないのですが、これを見直すためには、現状設定を見える化する必要があります。
スクリーンショットを頑張って撮りましたが、これだけではkintoneの設定画面に慣れていない業務メンバーの理解が進みません。
そんな迷える業務改善職のためのブックマークレットを作成しました。
機能および出力結果は下の図を参照してください。
プロセス管理設定を、テキストおよびテーブルデータとして画面出力します。
これをベースに検討資料を作成し、業務プロセスの見直し、アプリのプロセス管理の設定見直しに使うことを想定しています。
77アクションの設定は? いや、長すぎて載せられませんでしたw
操作方法
- アプリ画面(一覧画面、詳細画面どちらでもOK)でブックマークレット実行。
- プロセス管理の設定内容のリストが表示されます。
- 画面のリロードまたは、「アプリ画面に戻る」をクリックすると kintoneに戻ります。
- 表示されたデータを全選択(Ctrl+A)し、コピー&ペーストでExcelやGoogleドキュメント等に貼り付けて、検討資料として利用することができます。(これがやりたかった)
制限事項等
- プロセス管理が有効化されていないアプリではメッセージが表示されます。
- 使用したAPI
※(2025/03/25アップデート):プロセス管理の開発中の新機能「作業者以外でも実行できるアクション」が設定されている場合の表示に対応(右端に「実行可能なユーザー」列を追加)。
ブックマークレット(登録用)
※このコードをブックマークのURL欄に貼り付けてください。
javascript:!function(){"use strict";let t=kintone.app.getId(),e=kintone.api.url("/k/v1/app/status.json",!0);kintone.api(e,"GET",{app:t,lang:"user"},function(e){if(!1==e.enable){window.alert("プロセス管理が設定されていません!");return}let n={};Object.entries(e.states).forEach(function(t){n[t[0]]=t[1].assignee.entities.map(function(t){return t.entity.type+":"+t.entity.code}).join("</br>")});let r=e.actions;r.forEach(function(t){t.assignee=n[t.from]});let a=Object.entries(e.states);a.forEach(function(t){t[1].assignee=n[t[0]]});let i=a.map(function(t){return{name:t[1].name,index:t[1].index,assignee:t[1].assignee}});i.sort(function t(e,n){let r=e.index,a=n.index;return r-a}),location.origin;let s="<title>プロセス管理設定</title>";s+='<body style="font-family: sans-serif;"><h3>プロセス管理設定(アプリID:'+t+")</h3>",s+='<p><a href="'+location.origin+"/k/admin/app/status?app="+t+'" target="_blank">プロセス管理設定画面</a></p>',s+='<h4>ステータス</h4><table border="1" style="border-collapse: collapse">',s+="<tr><th>Index</th><th>ステータス名</th><th>作業者</th></tr>",i.forEach(function(t){s+="<tr>",s+="<td>"+t.index+"</td>",s+="<td>"+t.name+"</td>",s+="<td>"+t.assignee+"</td>",s+="</tr>"}),s+="</table></br>",s+='<h4>プロセス設定</h4><table border="1" style="border-collapse: collapse">',s+="<p>アクション数:"+r.length+"</p>",s+="<tr><th>実行前ステータス</th><th>作業者</th><th>アクション実行条件</th><th>アクション名</th><th>実行後ステータス</th><th>実行可能ユーザー</th></tr>",r.forEach(function(t){if(s+="<tr>",s+="<td>"+t.from+"</td>",s+="<td>"+t.assignee+"</td>",s+="<td>"+t.filterCond+"</td>",s+="<td>"+t.name+"</td>",s+="<td>"+t.to+"</td>",t.executableUser){let e=t.executableUser.entities.map(function(t){return t.entity.type+":"+t.entity.code}).join("</br>");s+="<td>"+e+"</td>"}else s+="<td>-</td>";s+="</tr>"}),s+='</table></br><a href="."> << 前の画面に戻る<a></p></br></body>',console.log(i),console.log(r),document.open(),document.write(s)},function(t){console.log(t.message)})}();
コードの内容
/**
 *  プロセス管理の設定を抽出する処理
 *      2022/03/14 Shotaro Matsuda
 *      Updated 2025/03/16 Shotaro Matsuda
 */

(function () {
    'use strict';
    const appId = kintone.app.getId();
    const url = kintone.api.url('/k/v1/app/status.json', true);
    const body = {
        'app': appId,
        'lang': 'user'
    };

    kintone.api(url, 'GET', body, function (resp) {
        // プロセス管理の設定チェック
        if (resp.enable == false) {
            window.alert('プロセス管理が設定されていません!');
            return;
        }

        // 作業者オブジェクト抽出処理
        const assignees = {};
        Object.entries(resp.states).forEach(function (status) {
            assignees[status[0]] = status[1].assignee.entities.map(function (entities) {
                return entities.entity.type + ":" + entities.entity.code
            }).join('</br>')
        });

        // プロセス設定一覧の抽出&作業者挿入
        const actions = resp.actions;
        actions.forEach(function (action) {
            action.assignee = assignees[action.from];
        });

        // ステータス抽出処理
        const statesObj = Object.entries(resp.states);
        // ステータスの作業者紐付け
        statesObj.forEach(function (status) {
            status[1].assignee = assignees[status[0]];
        })

        const states = statesObj.map(function (state) {
            return { name: state[1].name, index: state[1].index, assignee: state[1].assignee };
        });

        // indexによる並び替え処理
        states.sort(function compareFunc(a, b) {
            const dt1 = a.index;
            const dt2 = b.index;
            return dt1 - dt2;
        });

        // 結果出力処理
        const domain = location.origin + '/k/';
        let result = '<title>プロセス管理設定</title>';
        result += '<body style="font-family: sans-serif;"><h3>プロセス管理設定(アプリID:' + appId + ')</h3>';
        result += '<p><a href="' + location.origin + '/k/admin/app/status?app=' + appId + '" target="_blank">プロセス管理設定画面</a></p>';
        result += '<h4>ステータス</h4><table border="1" style="border-collapse: collapse">';
        result += '<tr><th>Index</th><th>ステータス名</th><th>作業者</th></tr>';
        states.forEach(function (status) {
            result += '<tr>'
            result += '<td>' + status.index + '</td>';
            result += '<td>' + status.name + '</td>';
            result += '<td>' + status.assignee + '</td>';
            result += '</tr>';
        });
        result += '</table></br>';

        result += '<h4>プロセス設定</h4><table border="1" style="border-collapse: collapse">';
        result += '<p>アクション数:' + actions.length + '</p>';
        result += '<tr><th>実行前ステータス</th><th>作業者</th><th>アクション実行条件</th><th>アクション名</th><th>実行後ステータス</th><th>実行可能ユーザー</th></tr>';
        actions.forEach(function (action) {
            result += '<tr>'
            result += '<td>' + action.from + '</td>';
            result += '<td>' + action.assignee + '</td>';
            result += '<td>' + action.filterCond + '</td>';
            result += '<td>' + action.name + '</td>';
            result += '<td>' + action.to + '</td>';
            // 新しい列に実行可能ユーザーを追加
            if (action.executableUser) {
                const executableUsers = action.executableUser.entities.map(function (entity) {
                    return entity.entity.type + ":" + entity.entity.code;
                }).join('</br>');
                result += '<td>' + executableUsers + '</td>';
            } else {
                result += '<td>-</td>';
            }
            result += '</tr>';
        });
        result += '</table></br><a href="."> << 前の画面に戻る<a></p></br></body>';

        // 出力
        console.log(states);    // ステータス
        console.log(actions);   // プロセス設定
        document.open();
        document.write(result);

    }, function (error) {
        console.log(error.message);
    });
})();
⑩ユーザー情報検索表示
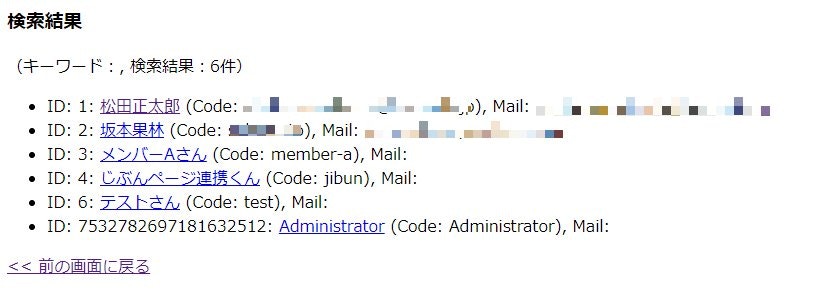
cybozu.comに登録されたユーザー情報を簡易的に検索・参照する機能を持つブックマークレットです。
通常、ユーザー情報(名前、ログイン名、メールアドレス、ユーザーID)を参照するためには、cybozu.com共通管理画面から、参照したいユーザーを探して管理画面を探すという操作が必要です。しかもcybozu.com共通管理画面にアクセスできるのは、cybozu.com共通管理者の権限が必要となります。
cybozu.com共通管理者の権限はシステム設定を行う権限と同等のため、kintoneを管理する立場の一部の人にしか付与しないことが通常です。
このため、通常のユーザーが(アプリ管理者であっても)他のユーザーの情報を参照したい場合は、個別にピープルから参照するしか方法がないという状況です。
そこで、ユーザー情報を簡単に検索・表示できる機能をブックマークレットで作成してみました。
cybozu.comのサービス利用中の画面であれば、どこからでもブックマークレットを選択することで利用することができます。
また、ユーザーを条件とした一覧絞り込みのURLを生成する際には、ユーザーID(ログイン名ではない)を必要としますが、これは管理画面、ピープルにおいても参照することはできません。(ユーザー管理画面のURLから確認は可能)
このブックマークレットによるユーザー情報表示には、ユーザーIDも表示しますので、URL芸を使う時にも強い味方となります。
操作方法
- cybozu.comのいずれかの画面でブックマークレット実行。
- 検索キーワードを入れるダイアログが表示されます。
- 表示名(姓名、よみがな)、ログイン名、メールアドレスの一部をキーワードとして検索絞り込み表示が可能です。
- 何もキーワードを入れずにOKをクリックまたはエンターキーを押すと、検索結果が表示されます。
- 画面のリロードまたは、「アプリ画面に戻る」をクリックすると kintoneに戻ります。
- 表示名のリンクを開くと、cybozu.comのユーザー管理画面が開きます(cybozu.com共通管理者権限が必要)。
制限事項等
- cybozu.com全ユーザーが利用可能です。
- ユーザー管理画面へのリンクを開くには、cybozu.com共通管理者権限が必要です。
- kintone等のcybozu.comの画面で、ログインした状態で利用してください。
- 使用したAPI
※(2023/05/13アップデート):JavaScriptコードをES6対応に修正。同時に画面表示で使っていた'document.open'をやめて'innerHTML'を使うDOM処理に修正。また、検索対象として姓・名が漏れていたため追加修正。
ブックマークレット(登録用)
※このコードをブックマークのURL欄に貼り付けてください。
javascript:(async()=>{if(!location.href.includes('cybozu.com')){alert("cybozu.comの画面から操作してください");return;}const k=prompt("検索キーワード:"),a=kintone.api.url('/v1/users',true),b=[],c=async()=>{for(let d=0;;d+=100){const e=await kintone.api(a,'GET',{offset:d,size:100});if(e.users.length===0)break;b.push(...e.users);}};await c();const f=b.filter(g=>g.name.includes(k)||g.surName.includes(k)||g.givenName.includes(k)||g.code.includes(k)||g.givenNameReading.includes(k)||g.surNameReading.includes(k)||g.email.includes(k)),h=f.map(i=>`<li>ID: ${i.id}: <a href="${location.origin}/admin/directory/editUser?id=${i.id}">${i.name}</a> (Code: ${i.code}), Mail: ${i.email}</li>`).join('');document.body.innerHTML=`<body style="font-family: sans-serif;"><h3>検索結果</h3>${f.length===0?'<p>検索結果がゼロ件でした</p>':`<p>(キーワード:${k}, 検索結果:${f.length}件)</p>`}<ul>${h}</ul><p><a href="."> << 前の画面に戻る<a></p></body>`;})().catch(j=>console.error(j));
コードの内容
※コンソールから実行することもできます。
(async () => {
    // cybozu.com画面でのみ作動させる
    if (!location.href.includes('cybozu.com')) {
        window.alert("cybozu.comの画面から操作してください");
        return;
    }

    // 検索キーワード取得
    const keyword = window.prompt("検索キーワード:");

    // cubozu.comユーザー情報一括取得処理
    let results = [];
    let offset = 0;
    const size = 100;
    const url = kintone.api.url('/v1/users', true);

    const getUser = async () => {
        try {
            while (true) {
                const param = { offset, size };
                const resp = await kintone.api(url, 'GET', param);
                if (resp.users.length === 0) {
                    break;
                }
                results = results.concat(resp.users);
                offset += size;
            }
        } catch (error) {
            console.error(error);
        }
    };

    await getUser();

    // キーワード絞り込み処理
    const users = results.filter(user =>
        user.name.includes(keyword)
        || user.surName.includes(keyword)
        || user.givenName.includes(keyword)
        || user.code.includes(keyword)
        || user.givenNameReading.includes(keyword)
        || user.surNameReading.includes(keyword)
        || user.email.includes(keyword)
    );

    // ユーザー情報一覧作成
    const domain = location.origin + '/admin/directory/editUser?id=';
    const userList = users.map(user =>
        `<li>ID: ${user.id}: <a href="${domain}${user.id}">${user.name}</a> (Code: ${user.code}), Mail: ${user.email}</li>`
    ).join('');

    const result = `
        <body style="font-family: sans-serif;">
            <h3>検索結果</h3>
            ${users.length === 0 ? '<p>検索結果がゼロ件でした</p>' : `<p>(キーワード:${keyword}, 検索結果:${users.length}件)</p>`}
            <ul>
                ${userList}
            </ul>
            <p><a href="."> << 前の画面に戻る<a></p>
        </body>
    `;

    document.body.innerHTML = result;

})().catch(error => console.error(error));
⑪アクセス権の設定表示
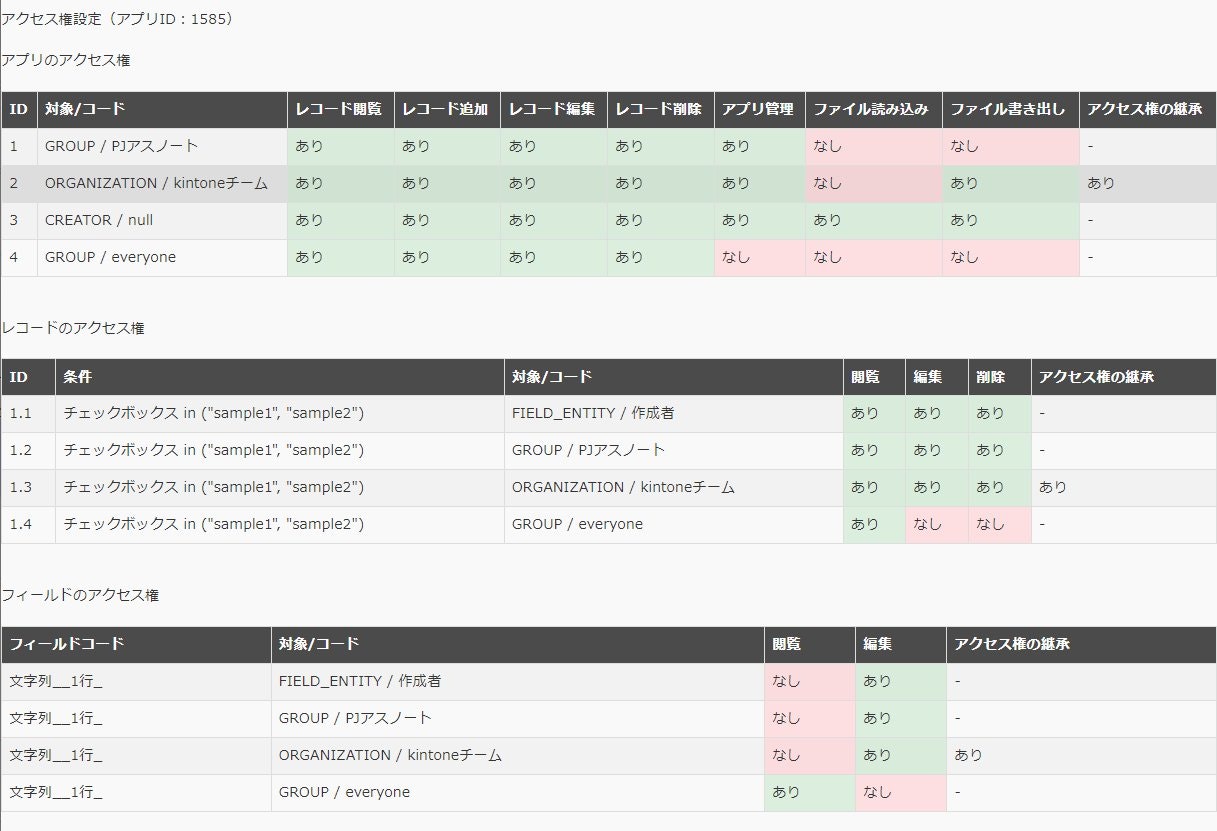
アプリに設定されたアクセス権の設定内容を一覧で表示するブックマークレットです。
kintoneのアクセス権には、アプリのアクセス権、レコードのアクセス権、フィールドのアクセス権の3種の設定があります。
実際にアクセス権を設定する際は、この3つのアクセス権を組み合わせることで、目的のアクセス制御を実現します。アプリを使い始めると、業務の実態や変化に合わせて、アクセス権を変更したり追加する必要があることがあり、長く使っているアプリでは、この3つのアクセス権が複雑に絡み合ってしまい、現状を簡単に把握するのが難しくなることがあります。
そこで、現在設定されている3つのアクセス権設定を一度に参照するためのツールを作成してみました。
操作方法
- アプリ画面(一覧画面、詳細画面どちらでもOK)でブックマークレット実行。
- アクセス権の設定内容のリストが表示されます。
- 画面のリロードまたは、「アプリ画面に戻る」をクリックすると kintoneに戻ります。
- 表示されたデータを全選択(Ctrl+A)し、コピー&ペーストでExcelやGoogleドキュメント等に貼り付けて、検討資料として利用することができます。
制限事項等
- アプリの管理権限が必要です。
- kintoneにログインした状態で利用してください。
- 使用したAPI
※(2023/12/18コンテンツ追加):本ブックマークレットを追加しました。
※(2023/12/21修正):各設定画面へのリンクを追加しました(タイトル部)
※(2024/03/05修正):不具合修正(各アクセス権設定画面へのリンク生成を修正しました)
ブックマークレット(登録用)
※このコードをブックマークのURL欄に貼り付けてください。
javascript:!(async()=>{"use strict";try{let t=kintone.app.getId(),e=location.hostname,a=await kintone.api(kintone.api.url("/k/v1/app/acl",!0),"GET",{app:t}),d=await kintone.api(kintone.api.url("/k/v1/record/acl",!0),"GET",{app:t}),r=await kintone.api(kintone.api.url("/k/v1/field/acl",!0),"GET",{app:t}),l=`<title>アクセス権設定</title>
            <body style="font-family: sans-serif; background-color: #f9f9f9; padding: 20px;">
            <h3 style="color: #333;">アクセス権設定(アプリID:${t})</h3>
            <style>
                body { background-color: #f9f9f9; }
                table { width: 100%; border-collapse: collapse; }
                th, td { border: 1px solid #ddd; padding: 8px; text-align: left; }
                th { background-color: #4B4B4B; color: white; }
                tr:nth-child(even){background-color: #f2f2f2;}
                tr:hover {background-color: #ddd;}
                .yes { background-color: rgba(200, 230, 201, 0.6); }
                .no { background-color: rgba(255, 205, 210, 0.6); }
                .none { background-color: #f0f0f0; }
            </style>`;l+=c(t,a.rights,e),l+=h(t,d.rights,e),l+=i(t,r.rights,e),l+='<a href="."> << 前の画面に戻る</a></p></br></body>',document.body.innerHTML=l}catch(o){console.error("エラーが発生しました: ",o),window.alert("エラーが発生しました: "+o.message)}function c(t,e,a){let d=`<h4><a href="https://${a}/k/admin/app/acl/app?app=${t}" target="_blank">アプリのアクセス権</a></h4><table><tr><th>ID</th><th>対象/コード</th><th>レコード閲覧</th><th>レコード追加</th><th>レコード編集</th><th>レコード削除</th><th>アプリ管理</th><th>ファイル読み込み</th><th>ファイル書き出し</th><th>アクセス権の継承</th></tr>`;return e.forEach((t,e)=>{d+=`<tr>
                <td>${e+1}</td>
                <td>${t.entity.type} / ${t.entity.code}</td>
                <td class="${t.recordViewable?"yes":"no"}">${t.recordViewable?"あり":"なし"}</td>
                <td class="${t.recordAddable?"yes":"no"}">${t.recordAddable?"あり":"なし"}</td>
                <td class="${t.recordEditable?"yes":"no"}">${t.recordEditable?"あり":"なし"}</td>
                <td class="${t.recordDeletable?"yes":"no"}">${t.recordDeletable?"あり":"なし"}</td>
                <td class="${t.appEditable?"yes":"no"}">${t.appEditable?"あり":"なし"}</td>
                <td class="${t.recordImportable?"yes":"no"}">${t.recordImportable?"あり":"なし"}</td>
                <td class="${t.recordExportable?"yes":"no"}">${t.recordExportable?"あり":"なし"}</td>
                <td>${s(t.entity.type,t.includeSubs)}</td>
            </tr>`}),d+="</table></br>"}function h(t,e,a){let d=`<h4><a href="https://${a}/k/admin/app/acl/record?app=${t}" target="_blank">レコードのアクセス権</a></h4><table><tr><th>ID</th><th>条件</th><th>対象/コード</th><th>閲覧</th><th>編集</th><th>削除</th><th>アクセス権の継承</th></tr>`;return e.forEach((t,e)=>{t.entities.forEach((a,r)=>{d+=`<tr>
                    <td>${e+1}.${r+1}</td>
                    <td>${t.filterCond||"なし"}</td>
                    <td>${a.entity.type} / ${a.entity.code}</td>
                    <td class="${a.viewable?"yes":"no"}">${a.viewable?"あり":"なし"}</td>
                    <td class="${a.editable?"yes":"no"}">${a.editable?"あり":"なし"}</td>
                    <td class="${a.deletable?"yes":"no"}">${a.deletable?"あり":"なし"}</td>
                    <td>${s(a.entity.type,a.includeSubs)}</td>
                </tr>`})}),d+="</table></br>"}function i(t,e,a){let d=`<h4><a href="https://${a}/k/admin/app/acl/field?app=${t}" target="_blank">フィールドのアクセス権</a></h4><table><tr><th>フィールドコード</th><th>対象/コード</th><th>閲覧</th><th>編集</th><th>アクセス権の継承</th></tr>`;return e.forEach(t=>{t.entities.forEach(e=>{d+=`<tr>
                    <td>${t.code}</td>
                    <td>${e.entity.type} / ${e.entity.code}</td>
                    <td class="${"READ"===e.accessibility?"yes":"no"}">${"READ"===e.accessibility?"あり":"なし"}</td>
                    <td class="${"WRITE"===e.accessibility?"yes":"no"}">${"WRITE"===e.accessibility?"あり":"なし"}</td>
                    <td>${s(e.entity.type,e.includeSubs)}</td>
                </tr>`})}),d+="</table></br>"}function s(t,e){return"ORGANIZATION"===t?e?"あり":"なし":"-"}})();
コードの内容
※コンソールから実行することもできます。
(async () => {
    'use strict';
    try {
        const appId = kintone.app.getId();
        const subdomain = location.hostname; // 現在のサブドメインを取得

        // 各アクセス権の取得
        const appResponse = await kintone.api(kintone.api.url('/k/v1/app/acl', true), 'GET', { "app": appId });
        const recordResponse = await kintone.api(kintone.api.url('/k/v1/record/acl', true), 'GET', { "app": appId });
        const fieldResponse = await kintone.api(kintone.api.url('/k/v1/field/acl', true), 'GET', { "app": appId });

        // 結果を格納するためのHTMLコンテンツを構築
        let content = `<title>アクセス権設定</title>
            <body style="font-family: sans-serif; background-color: #f9f9f9; padding: 20px;">
            <h3 style="color: #333;">アクセス権設定(アプリID:${appId})</h3>
            <style>
                body { background-color: #f9f9f9; }
                table { width: 100%; border-collapse: collapse; }
                th, td { border: 1px solid #ddd; padding: 8px; text-align: left; }
                th { background-color: #4B4B4B; color: white; }
                tr:nth-child(even){background-color: #f2f2f2;}
                tr:hover {background-color: #ddd;}
                .yes { background-color: rgba(200, 230, 201, 0.6); }
                .no { background-color: rgba(255, 205, 210, 0.6); }
                .none { background-color: #f0f0f0; }
            </style>`;

        // アプリのアクセス権のHTMLテーブルを構築
        content += buildAppAclTable(appId, appResponse.rights, subdomain);

        // レコードのアクセス権のHTMLテーブルを構築
        content += buildRecordAclTable(appId, recordResponse.rights, subdomain);

        // フィールドのアクセス権のHTMLテーブルを構築
        content += buildFieldAclTable(appId, fieldResponse.rights, subdomain);

        content += '<a href="."> << 前の画面に戻る</a></p></br></body>';

        // 結果を画面に表示
        document.body.innerHTML = content;
    } catch (error) {
        console.error("エラーが発生しました: ", error);
        window.alert('エラーが発生しました: ' + error.message);
    }

    function buildAppAclTable(appId, rights, subdomain) {
        let table = `<h4><a href="https://${subdomain}/k/admin/app/acl/app?app=${appId}" target="_blank">アプリのアクセス権</a></h4><table><tr><th>ID</th><th>対象/コード</th><th>レコード閲覧</th><th>レコード追加</th><th>レコード編集</th><th>レコード削除</th><th>アプリ管理</th><th>ファイル読み込み</th><th>ファイル書き出し</th><th>アクセス権の継承</th></tr>`;
        rights.forEach((right, index) => {
            table += `<tr>
                <td>${index + 1}</td>
                <td>${right.entity.type} / ${right.entity.code}</td>
                <td class="${right.recordViewable ? 'yes' : 'no'}">${right.recordViewable ? 'あり' : 'なし'}</td>
                <td class="${right.recordAddable ? 'yes' : 'no'}">${right.recordAddable ? 'あり' : 'なし'}</td>
                <td class="${right.recordEditable ? 'yes' : 'no'}">${right.recordEditable ? 'あり' : 'なし'}</td>
                <td class="${right.recordDeletable ? 'yes' : 'no'}">${right.recordDeletable ? 'あり' : 'なし'}</td>
                <td class="${right.appEditable ? 'yes' : 'no'}">${right.appEditable ? 'あり' : 'なし'}</td>
                <td class="${right.recordImportable ? 'yes' : 'no'}">${right.recordImportable ? 'あり' : 'なし'}</td>
                <td class="${right.recordExportable ? 'yes' : 'no'}">${right.recordExportable ? 'あり' : 'なし'}</td>
                <td>${displayInheritance(right.entity.type, right.includeSubs)}</td>
            </tr>`;
        });
        table += `</table></br>`;
        return table;
    }

    function buildRecordAclTable(appId, rights, subdomain) {
        let table = `<h4><a href="https://${subdomain}/k/admin/app/acl/record?app=${appId}" target="_blank">レコードのアクセス権</a></h4><table><tr><th>ID</th><th>条件</th><th>対象/コード</th><th>閲覧</th><th>編集</th><th>削除</th><th>アクセス権の継承</th></tr>`;
        rights.forEach((right, index) => {
            right.entities.forEach((entity, entityIndex) => {
                table += `<tr>
                    <td>${index + 1}.${entityIndex + 1}</td>
                    <td>${right.filterCond || 'なし'}</td>
                    <td>${entity.entity.type} / ${entity.entity.code}</td>
                    <td class="${entity.viewable ? 'yes' : 'no'}">${entity.viewable ? 'あり' : 'なし'}</td>
                    <td class="${entity.editable ? 'yes' : 'no'}">${entity.editable ? 'あり' : 'なし'}</td>
                    <td class="${entity.deletable ? 'yes' : 'no'}">${entity.deletable ? 'あり' : 'なし'}</td>
                    <td>${displayInheritance(entity.entity.type, entity.includeSubs)}</td>
                </tr>`;
            });
        });
        table += `</table></br>`;
        return table;
    }

    function buildFieldAclTable(appId, fields, subdomain) {
        let table = `<h4><a href="https://${subdomain}/k/admin/app/acl/field?app=${appId}" target="_blank">フィールドのアクセス権</a></h4><table><tr><th>フィールドコード</th><th>対象/コード</th><th>閲覧</th><th>編集</th><th>アクセス権の継承</th></tr>`;
        fields.forEach(field => {
            field.entities.forEach(entity => {
                table += `<tr>
                    <td>${field.code}</td>
                    <td>${entity.entity.type} / ${entity.entity.code}</td>
                    <td class="${entity.accessibility === 'READ' ? 'yes' : 'no'}">${entity.accessibility === 'READ' ? 'あり' : 'なし'}</td>
                    <td class="${entity.accessibility === 'WRITE' ? 'yes' : 'no'}">${entity.accessibility === 'WRITE' ? 'あり' : 'なし'}</td>
                    <td>${displayInheritance(entity.entity.type, entity.includeSubs)}</td>
                </tr>`;
            });
        });
        table += `</table></br>`;
        return table;
    }

    function displayInheritance(entityType, includeSubs) {
        if (entityType === 'ORGANIZATION') {
            return includeSubs ? 'あり' : 'なし';
        }
        return '-';
    }
})();
⑫通知の設定表示
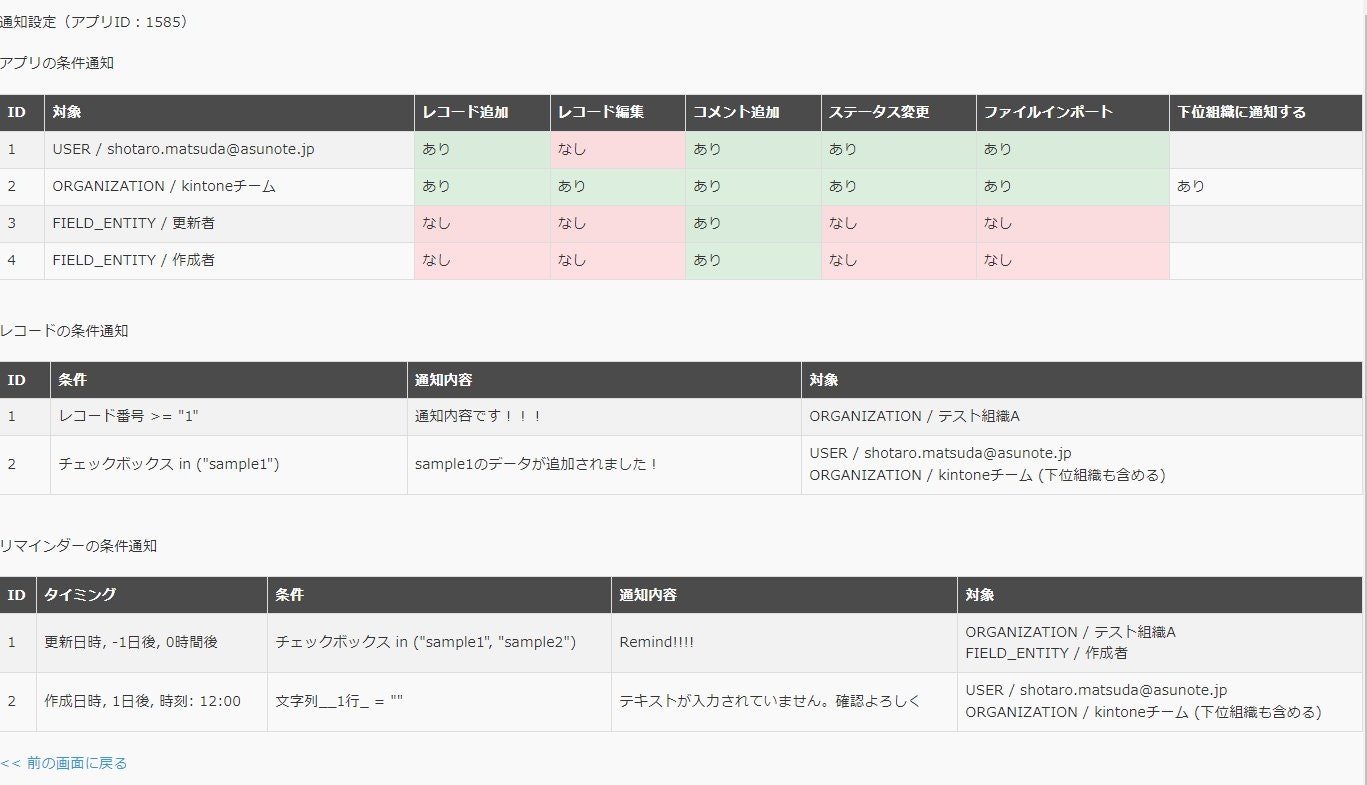
アプリに設定された通知の設定内容を一覧で表示するブックマークレットです。
kintoneの通知には、アプリの条件通知、レコードの条件通知、リマインダーの条件通知の3種の設定があります。
アクセス権でも同様ですが、業務の実態や変化に合わせて、通知設定を追加・修正する必要があることがあり、長く使っているアプリでは、この3つの通知設定が複雑に絡み合ってしまい、現状を簡単に把握するのが難しくなることがあります。
通知の発信はなるべく必要最小限にし、本当にアクションが必要なケースに絞った設定とするべきだと考えます。特にメール通知を設定している場合は、同じような通知メールが大量に来てしまうと、だんだんとメールを読まなくなり、重要な通知を見逃してしまうことも考えられます。
そこで、現在設定されている3つの通知設定を一度に参照するためのツールを作成してみました。
操作方法
- アプリ画面(一覧画面、詳細画面どちらでもOK)でブックマークレット実行。
- 通知の設定内容のリストが表示されます。
- 画面のリロードまたは、「アプリ画面に戻る」をクリックすると kintoneに戻ります。
- 表示されたデータを全選択(Ctrl+A)し、コピー&ペーストでExcelやGoogleドキュメント等に貼り付けて、検討資料として利用することができます。
制限事項等
- アプリの管理権限が必要です。
- kintoneにログインした状態で利用してください。
- 使用したAPI
※(2023/12/19コンテンツ追加):本ブックマークレットを追加しました。
※(2023/12/21修正):各設定画面へのリンクを追加しました(タイトル部)
ブックマークレット(登録用)
※このコードをブックマークのURL欄に貼り付けてください。
javascript:!(async()=>{"use strict";try{let t=kintone.app.getId(),e=await kintone.api(kintone.api.url("/k/v1/app/notifications/general.json",!0),"GET",{app:t}),r=await kintone.api(kintone.api.url("/k/v1/app/notifications/perRecord.json",!0),"GET",{app:t}),a=await kintone.api(kintone.api.url("/k/v1/app/notifications/reminder.json",!0),"GET",{app:t}),d=`<title>通知設定</title>
            <body style="font-family: sans-serif; background-color: #f9f9f9; padding: 20px;">
            <h3 style="color: #333;">通知設定(アプリID:${t})</h3>
            <style>
                body { background-color: #f9f9f9; }
                table { width: 100%; border-collapse: collapse; }
                th, td { border: 1px solid #ddd; padding: 8px; text-align: left; }
                th { background-color: #4B4B4B; color: white; }
                tr:nth-child(even){background-color: #f2f2f2;}
                tr:hover {background-color: #ddd;}
                .yes { background-color: rgba(200, 230, 201, 0.6); }
                .no { background-color: rgba(255, 205, 210, 0.6); }
            </style>`;d+=n(t,"アプリの条件通知",e.notifications),d+=i(t,"レコードの条件通知",r.notifications),d+=c(t,"リマインダーの条件通知",a.notifications),d+='<a href="."> << 前の画面に戻る<a></p></br></body>',document.body.innerHTML=d}catch(o){console.error("エラーが発生しました: ",o),window.alert("エラーが発生しました: "+o.message)}function n(t,e,r){let a=`<h4><a href="https://asunotedev.cybozu.com/k/admin/app/notification?app=${t}&trigger=app" target="_blank">${e}</a></h4><table><tr>
            <th>ID</th><th>対象</th>
            <th>レコード追加</th>
            <th>レコード編集</th>
            <th>コメント追加</th>
            <th>ステータス変更</th>
            <th>ファイルインポート</th>
            <th>下位組織に通知する</th>
            </tr>`;return r.forEach((t,e)=>{a+=`<tr>
                <td>${e+1}</td>
                <td>${t.entity.type} / ${t.entity.code}</td>
                <td class="${t.recordAdded?"yes":"no"}">${t.recordAdded?"あり":"なし"}</td>
                <td class="${t.recordEdited?"yes":"no"}">${t.recordEdited?"あり":"なし"}</td>
                <td class="${t.commentAdded?"yes":"no"}">${t.commentAdded?"あり":"なし"}</td>
                <td class="${t.statusChanged?"yes":"no"}">${t.statusChanged?"あり":"なし"}</td>
                <td class="${t.fileImported?"yes":"no"}">${t.fileImported?"あり":"なし"}</td>
                <td>${"ORGANIZATION"===t.entity.type?t.includeSubs?"あり":"なし":""}</td>
            </tr>`}),a+="</table></br>"}function i(t,e,r){let a=`<h4><a href="https://asunotedev.cybozu.com/k/admin/app/notification?app=${t}&trigger=record" target="_blank">${e}</a></h4><table><tr>
            <th>ID</th><th>条件</th><th>通知内容</th><th>対象</th>
            </tr>`;return r.forEach((t,e)=>{let r=t.targets?t.targets.map(t=>t.entity.type+" / "+t.entity.code+h(t.includeSubs)).join("<br>"):"";a+=`<tr>
                <td>${e+1}</td>
                <td>${t.filterCond||"なし"}</td>
                <td>${t.title}</td>
                <td>${r}</td>
            </tr>`}),a+="</table></br>"}function c(t,e,r){let a=`<h4><a href="https://asunotedev.cybozu.com/k/admin/app/notification?app=${t}&trigger=reminder" target="_blank">${e}</a></h4><table><tr>
            <th>ID</th><th>タイミング</th><th>条件</th><th>通知内容</th><th>対象</th>
            </tr>`;return r.forEach((t,e)=>{let r=s(t.timing),d=t.targets?t.targets.map(t=>t.entity.type+" / "+t.entity.code+h(t.includeSubs)).join("<br>"):"";a+=`<tr>
                <td>${e+1}</td>
                <td>${r}</td>
                <td>${t.filterCond||"なし"}</td>
                <td>${t.title}</td>
                <td>${d}</td>
            </tr>`}),a+="</table></br>"}function h(t){return t?" (下位組織も含める)":""}function s(t){let e=t.code;return t.daysLater&&(e+=`, ${t.daysLater}日後`),t.hoursLater&&(e+=`, ${t.hoursLater}時間後`),t.time&&(e+=`, 時刻: ${t.time}`),e}})();
コードの内容
※コンソールから実行することもできます。
(async () => {
    'use strict';
    try {
        const appId = kintone.app.getId();

        // アプリの条件通知の取得
        const generalNotificationSettings = await kintone.api(kintone.api.url('/k/v1/app/notifications/general.json', true), 'GET', { "app": appId });

        // レコードの条件通知の取得
        const perRecordNotificationSettings = await kintone.api(kintone.api.url('/k/v1/app/notifications/perRecord.json', true), 'GET', { "app": appId });

        // リマインダーの条件通知の取得
        const reminderNotificationSettings = await kintone.api(kintone.api.url('/k/v1/app/notifications/reminder.json', true), 'GET', { "app": appId });

        // 結果を格納するためのHTMLコンテンツを構築
        let content = `<title>通知設定</title>
            <body style="font-family: sans-serif; background-color: #f9f9f9; padding: 20px;">
            <h3 style="color: #333;">通知設定(アプリID:${appId})</h3>
            <style>
                body { background-color: #f9f9f9; }
                table { width: 100%; border-collapse: collapse; }
                th, td { border: 1px solid #ddd; padding: 8px; text-align: left; }
                th { background-color: #4B4B4B; color: white; }
                tr:nth-child(even){background-color: #f2f2f2;}
                tr:hover {background-color: #ddd;}
                .yes { background-color: rgba(200, 230, 201, 0.6); }
                .no { background-color: rgba(255, 205, 210, 0.6); }
            </style>`;

        // アプリの条件通知のHTMLテーブルを構築
        content += buildGeneralNotificationTable(appId, 'アプリの条件通知', generalNotificationSettings.notifications);

        // レコードの条件通知のHTMLテーブルを構築
        content += buildPerRecordNotificationTable(appId, 'レコードの条件通知', perRecordNotificationSettings.notifications);

        // リマインダーの条件通知のHTMLテーブルを構築
        content += buildReminderNotificationTable(appId, 'リマインダーの条件通知', reminderNotificationSettings.notifications);

        content += '<a href="."> << 前の画面に戻る<a></p></br></body>';

        // 結果を画面に表示
        document.body.innerHTML = content;
    } catch (error) {
        console.error("エラーが発生しました: ", error);
        window.alert('エラーが発生しました: ' + error.message);
    }

    // アプリの条件通知のテーブルを構築する関数
    function buildGeneralNotificationTable(appId, title, notifications) {
        let table = `<h4><a href="https://asunotedev.cybozu.com/k/admin/app/notification?app=${appId}&trigger=app" target="_blank">${title}</a></h4><table><tr>
            <th>ID</th><th>対象</th>
            <th>レコード追加</th>
            <th>レコード編集</th>
            <th>コメント追加</th>
            <th>ステータス変更</th>
            <th>ファイルインポート</th>
            <th>下位組織に通知する</th>
            </tr>`;
        notifications.forEach((notification, index) => {
            table += `<tr>
                <td>${index + 1}</td>
                <td>${notification.entity.type} / ${notification.entity.code}</td>
                <td class="${notification.recordAdded ? 'yes' : 'no'}">${notification.recordAdded ? 'あり' : 'なし'}</td>
                <td class="${notification.recordEdited ? 'yes' : 'no'}">${notification.recordEdited ? 'あり' : 'なし'}</td>
                <td class="${notification.commentAdded ? 'yes' : 'no'}">${notification.commentAdded ? 'あり' : 'なし'}</td>
                <td class="${notification.statusChanged ? 'yes' : 'no'}">${notification.statusChanged ? 'あり' : 'なし'}</td>
                <td class="${notification.fileImported ? 'yes' : 'no'}">${notification.fileImported ? 'あり' : 'なし'}</td>
                <td>${notification.entity.type === 'ORGANIZATION' ? (notification.includeSubs ? 'あり' : 'なし') : ''}</td>
            </tr>`;
        });
        table += `</table></br>`;
        return table;
    }

    // レコードの条件通知のテーブルを構築する関数
    function buildPerRecordNotificationTable(appId, title, notifications) {
        let table = `<h4><a href="https://asunotedev.cybozu.com/k/admin/app/notification?app=${appId}&trigger=record" target="_blank">${title}</a></h4><table><tr>
            <th>ID</th><th>条件</th><th>通知内容</th><th>対象</th>
            </tr>`;
        notifications.forEach((notification, index) => {
            const targets = notification.targets ? notification.targets.map(target => target.entity.type + ' / ' + target.entity.code + formatSubs(target.includeSubs)).join('<br>') : "";
            table += `<tr>
                <td>${index + 1}</td>
                <td>${notification.filterCond || 'なし'}</td>
                <td>${notification.title}</td>
                <td>${targets}</td>
            </tr>`;
        });
        table += `</table></br>`;
        return table;
    }

    // リマインダーの条件通知のテーブルを構築する関数
    function buildReminderNotificationTable(appId, title, notifications) {
        let table = `<h4><a href="https://asunotedev.cybozu.com/k/admin/app/notification?app=${appId}&trigger=reminder" target="_blank">${title}</a></h4><table><tr>
            <th>ID</th><th>タイミング</th><th>条件</th><th>通知内容</th><th>対象</th>
            </tr>`;
        notifications.forEach((notification, index) => {
            const timing = formatTiming(notification.timing);
            const targets = notification.targets ? notification.targets.map(target => target.entity.type + ' / ' + target.entity.code + formatSubs(target.includeSubs)).join('<br>') : "";
            table += `<tr>
                <td>${index + 1}</td>
                <td>${timing}</td>
                <td>${notification.filterCond || 'なし'}</td>
                <td>${notification.title}</td>
                <td>${targets}</td>
            </tr>`;
        });
        table += `</table></br>`;
        return table;
    }

    // 下位組織も含める設定をフォーマットする関数
    function formatSubs(includeSubs) {
        return includeSubs ? ' (下位組織も含める)' : '';
    }

    // リマインダーのタイミングをフォーマットする関数
    function formatTiming(timing) {
        let timingStr = timing.code;
        if (timing.daysLater) {
            timingStr += `, ${timing.daysLater}日後`;
        }
        if (timing.hoursLater) {
            timingStr += `, ${timing.hoursLater}時間後`;
        }
        if (timing.time) {
            timingStr += `, 時刻: ${timing.time}`;
        }
        return timingStr;
    }

    // 以下、他の通知設定のテーブル構築関数...
})();
⑬レコードコメント一括ダウンロード
アプリのレコードコメントの内容をまとめてCSV形式でダウンロードするブックマークレットです。
kintoneアプリのバックアップや引っ越しをする際、レコードのデータを取得する方法はいろいろ提供されています。CSV形式でダウンロードしたり、コマンドラインツールを使って取得することができます。
一方、レコードのコメントの内容も、かなり重要な情報が含まれており、レコードデータと合わせて出力したくなることがあります。
developer networkに掲載された記事を参考に、アプリカスタマイズではなく、ブックマークレット形式でコメントをまとめてダウンロードする機能を作成しました。
参考:レコードのコメント情報をCSVでダウンロードする方法(Cybozu developer network)
操作方法
- アプリ画面(一覧画面、詳細画面どちらでもOK)でブックマークレット実行。
- レコードコメントをCSV形式で一括ダウンロードされます。
- コンソールを開いておくと、途中経過や結果、コメント件数等がログ出力されます。
- 出力したデータは、そのまま保存したり、引っ越し先の環境で別のアプリにコメントデータとして保存し、関連レコード一覧等で参照することができるようにすることも可能です。
制限事項等
- アプリおよびレコードの参照権限が必要です。
- kintoneにログインした状態で利用してください。
- 使用したAPI
※(2024/09/23コンテンツ追加):本ブックマークレットを追加しました。
※(2024/10/10修正):大量レコード、大量コメント時の安定性向上。抽出状況をコンソールログに出力するようにしました。
ブックマークレット(登録用)
※このコードをブックマークのURL欄に貼り付けてください。
javascript:(()=>{let e=e=>("string"!=typeof e&&(e=null!=e?String(e):""),'"'+e.replace(/"/g,'""')+'"'),t=e=>{console.log("CSVファイルのダウンロードを開始します");let t=e.map(e=>e.join(",")).join("\r\n"),n=new Uint8Array([239,187,191]),o=new Blob([n,t],{type:"text/csv"}),r=(window.URL||window.webkitURL).createObjectURL(o),s=kintone.app.getId(),c=s+"_comments.csv",l=document.createElement("a");l.id="cscDownLoad";let m=new MouseEvent("click",{view:window,bubbles:!0,cancelable:!0});l.download=c,l.href=r,l.dispatchEvent(m),console.log("CSVファイルのダウンロードが完了しました")},n=(e,t,o,r)=>{let s=t||0,c=o||100,l=r||[],m={app:e,query:"order by $id asc limit "+c+" offset "+s};return console.log(`レコードを取得中... offset: ${s}`),kintone.api(kintone.api.url("/k/v1/records",!0),"GET",m).then(t=>(l=l.concat(t.records),console.log(`${t.records.length}件のレコードを取得しました`),t.records.length===c)?n(e,s+c,c,l):l)},o=(t,n,r,s,c)=>{let l=r||0,m=n||[],p=s||0,a=c||0,i=kintone.app.getId(),d=t[l].$id.value,h={app:i,record:d,offset:p};return kintone.api(kintone.api.url("/k/v1/record/comments",!0),"GET",h).then(n=>{a+=n.comments.length;for(let r=0;r<n.comments.length;r++){let s=[],c=[],h=[];void 0===n.comments[r].mentions[0]&&(n.comments[r].mentions.code=null);for(let u=0;u<n.comments[r].mentions.length;u++)c.push(n.comments[r].mentions[u].code),h.push(n.comments[r].mentions[u].type);s.push(e(i)),s.push(e(d)),s.push(e(n.comments[r].id)),s.push(e(n.comments[r].text)),s.push(e(n.comments[r].createdAt)),s.push(e(n.comments[r].creator.code)),s.push(e(n.comments[r].creator.name)),s.push(e(c.join(","))),s.push(e(h.join(","))),m.push(s)}return(a==0&&console.log(`${a}件のコメントを取得しました`),n.older)?o(t,m,l,p+10,a):(l+=1,t.length!==l)?o(t,m,l,0,a):(console.log(`コメント取得が完了しました。総取得コメント数: ${a}件`),m)})},r=e=>{console.log("コメントのCSVデータを作成中..."),o(e).then(e=>{let n=[],o=['アプリID','レコードID','コメントID','コメント内容','投稿日時','投稿者ログイン名','投稿者表示名','メンション宛先', 'メンションタイプ'];if(0===e.length){alert("コメントが登録されていません");return}n.push(o);for(let r=0;r<e.length;r++)n.push(e[r]);t(n)})};n(kintone.app.getId()).then(e=>{if(0===e.length){alert("レコードが登録されていません");return}console.log(`${e.length}件のレコードを取得しました`),r(e)})})();
コードの内容
※コンソールから実行することもできます。
(() => {
  // エスケープ
  const escapeStr = (value) => {
    if (typeof value !== 'string') {
      value = value !== null && value !== undefined ? String(value) : ''; // 文字列でない場合は文字列に変換
    }
    return '"' + value.replace(/"/g, '""') + '"';
  };

  // CSVファイルをダウンロード
  const downloadCSV = (csv) => {
    console.log("CSVファイルのダウンロードを開始します");
    const csvbuf = csv.map((e) => {
      return e.join(',');
    }).join('\r\n');
    const bom = new Uint8Array([0xEF, 0xBB, 0xBF]);
    const blob = new Blob([bom, csvbuf], { type: 'text/csv' });
    const url = (window.URL || window.webkitURL).createObjectURL(blob);

    // ファイル名:アプリ番号_comments.csv
    const appId = kintone.app.getId();
    const fileName = appId + '_comments.csv';

    const link = document.createElement('a');
    link.id = 'cscDownLoad';
    const e = new MouseEvent('click', { view: window, bubbles: true, cancelable: true });
    link.download = fileName;
    link.href = url;
    link.dispatchEvent(e);
    console.log("CSVファイルのダウンロードが完了しました");
  };

  // レコード一覧を取得する
  const fetchRecords = (appId, opt_offset, opt_limit, opt_records) => {
    const offset = opt_offset || 0;
    const limit = opt_limit || 100;
    let allRecords = opt_records || [];
    const params = { app: appId, query: 'order by $id asc limit ' + limit + ' offset ' + offset };
    console.log(`レコードを取得中... offset: ${offset}`);
    return kintone.api(kintone.api.url('/k/v1/records', true), 'GET', params).then((resp) => {
      allRecords = allRecords.concat(resp.records);
      console.log(`${resp.records.length}件のレコードを取得しました`);
      if (resp.records.length === limit) {
        return fetchRecords(appId, offset + limit, limit, allRecords);
      }
      return allRecords;
    });
  };

  // レコード一覧からコメント情報を取得する
  const getCommentCsv = (records, opt_comments, opt_i, opt_offset, commentCount) => {
    let i = opt_i || 0; // レコードのカウント
    const comments = opt_comments || [];
    const offset = opt_offset || 0;
    let totalComments = commentCount || 0;

    const appId = kintone.app.getId(); // アプリID
    const recordId = records[i].$id.value; // レコードID

    const params = {
      app: appId,
      record: recordId,
      offset: offset
    };

    // 一覧画面からコメント取得
    return kintone.api(kintone.api.url('/k/v1/record/comments', true), 'GET', params).then((resp) => {
      totalComments += resp.comments.length;

      // CSVデータの作成
      for (let j = 0; j < resp.comments.length; j++) {
        const row = [];
        const mentions_code = [];
        const mentions_type = [];

        if (resp.comments[j].mentions[0] === undefined) {
          resp.comments[j].mentions.code = null;
        }
        for (let k = 0; k < resp.comments[j].mentions.length; k++) {
          mentions_code.push(resp.comments[j].mentions[k].code);
          mentions_type.push(resp.comments[j].mentions[k].type);
        }
        row.push(escapeStr(appId)); // アプリID
        row.push(escapeStr(recordId)); // レコードID
        row.push(escapeStr(resp.comments[j].id)); // コメントID
        row.push(escapeStr(resp.comments[j].text)); // コメント内容
        row.push(escapeStr(resp.comments[j].createdAt)); // 投稿日時
        row.push(escapeStr(resp.comments[j].creator.code)); // 投稿者ログイン名
        row.push(escapeStr(resp.comments[j].creator.name)); // 投稿者表示名
        row.push(escapeStr(mentions_code.join(','))); // メンション宛先
        row.push(escapeStr(mentions_type.join(','))); // メンションタイプ
        comments.push(row);
      }

      // 10件ごとに進捗をログに出力
      if (totalComments % 10 === 0) {
        console.log(`${totalComments}件のコメントを取得しました`);
      }

      // コメントを全て参照したか判定
      if (resp.older) {
        return getCommentCsv(records, comments, i, offset + 10, totalComments);
      }

      i += 1;
      // レコードを全て参照したか判定
      if (records.length !== i) {
        return getCommentCsv(records, comments, i, 0, totalComments);
      }
      console.log(`コメント取得が完了しました。総取得コメント数: ${totalComments}件`);
      return comments;
    });
  };

  // コメント一覧のCSVファイルを作成
  const createCSVData = (records) => {
    console.log("コメントのCSVデータを作成中...");
    getCommentCsv(records).then((comments) => {
      const comments_csv = [];
      // CSVファイルの列名
      const column_row = ['アプリID', 'レコードID', 'コメントID', 'コメント内容',
        '投稿日時', '投稿者ログイン名', '投稿者表示名',
        'メンション宛先', 'メンションタイプ'];
      if (comments.length === 0) {
        alert('コメントが登録されていません');
        return;
      }
      comments_csv.push(column_row);
      for (let i = 0; i < comments.length; i++) {
        comments_csv.push(comments[i]);
      }
      // BOM付でダウンロード
      downloadCSV(comments_csv);
    });
  };

  fetchRecords(kintone.app.getId()).then((records) => {
    if (records.length === 0) {
      alert('レコードが登録されていません');
      return;
    }
    console.log(`${records.length}件のレコードを取得しました`);
    // CSVデータを作成
    createCSVData(records);
  });
})();

