はじめに
Tinder風の「スワイプUI」は、マッチングアプリだけでなく、
レコメンド・レビュー・学習アプリなど幅広く応用できます。
本記事では FlutterでTinder風スワイプUIを実装する方法 を解説します。
さらに Firebase と組み合わせて、マッチングアプリを構築する方法まで触れていきます。
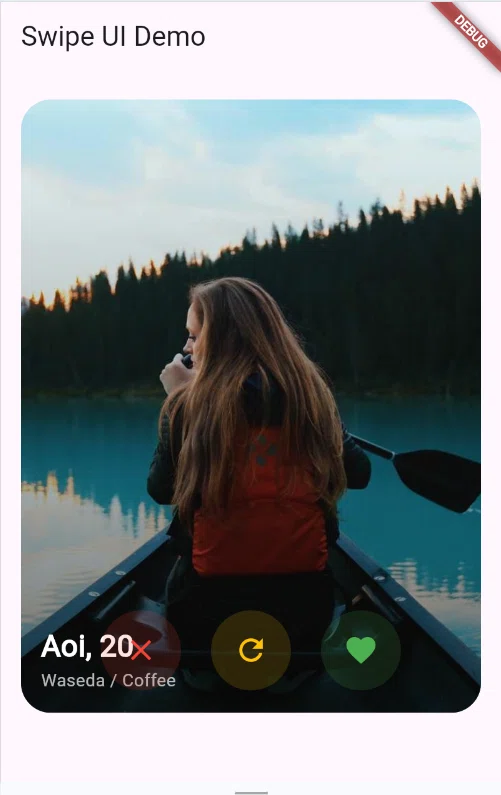
完成イメージ
1. 開発環境
-
Flutter 3.x
-
Firebase(Firestore)
-
Android/iOS対応
2. スワイプUIの実装
class CardModel {
  final String id;
  final String title;
  final String imageUrl;
  final String subtitle;

  const CardModel({
    required this.id,
    required this.title,
    required this.imageUrl,
    this.subtitle = "",
  });
}
final demoCards = <CardModel>[
  CardModel(id: 'u1', title: 'Aoi, 20', imageUrl: 'https://picsum.photos/id/1011/800/1200', subtitle: 'Waseda / Coffee'),
  CardModel(id: 'u2', title: 'Ken, 22', imageUrl: 'https://picsum.photos/id/1015/800/1200', subtitle: 'Keio / Surf'),
  CardModel(id: 'u3', title: 'Mina, 19', imageUrl: 'https://picsum.photos/id/1016/800/1200', subtitle: 'UTokyo / Piano'),
];
SwipeDeck を作り、先頭カードを Draggable で操作。
dart
import 'dart:math' as math;
import 'package:flutter/material.dart';

enum SwipeResult { like, pass, none }

typedef OnSwipe = void Function(String cardId, SwipeResult result);

typedef RewindProvider = void Function();

class SwipeDeck extends StatefulWidget {
  final List<CardModel> cards;
  final OnSwipe onSwipe;
  final double swipeThreshold; // px
  final RewindProvider? onRewind;

  const SwipeDeck({
    super.key,
    required this.cards,
    required this.onSwipe,
    this.swipeThreshold = 120,
    this.onRewind,
  });

  @override
  State<SwipeDeck> createState() => _SwipeDeckState();
}

class _SwipeDeckState extends State<SwipeDeck> with TickerProviderStateMixin {
  late final List<CardModel> _stack;
  Offset _dragOffset = Offset.zero;
  CardModel? _lastPopped;

  @override
  void initState() {
    super.initState();
    _stack = List.of(widget.cards);
  }

  void _handleDrag(DragUpdateDetails d) {
    setState(() => _dragOffset += d.delta);
  }

  void _handleEnd(DraggableDetails d) {
    final dx = _dragOffset.dx;
    final absX = dx.abs();
    SwipeResult result = SwipeResult.none;
    if (absX > widget.swipeThreshold) {
      result = dx > 0 ? SwipeResult.like : SwipeResult.pass;
      _popTop(result);
    } else {
      setState(() => _dragOffset = Offset.zero);
    }
  }

  void _popTop(SwipeResult result) {
    if (_stack.isEmpty) return;
    setState(() {
      _lastPopped = _stack.removeAt(0);
      _dragOffset = Offset.zero;
    });
    widget.onSwipe(_lastPopped!.id, result);
  }

  void _rewind() {
    if (_lastPopped == null) return;
    setState(() {
      _stack.insert(0, _lastPopped!);
      _lastPopped = null;
    });
    widget.onRewind?.call();
  }

  @override
  Widget build(BuildContext context) {
    if (_stack.isEmpty) {
      return _buildEmpty();
    }
    return Stack(
      alignment: Alignment.center,
      children: [
        // 次のカード(少し縮小 & 下に)
        if (_stack.length >= 2)
          _buildBackCard(_stack[1], 12),
        // 先頭カード
        _buildTopCard(_stack.first),
        // 下部操作ボタン
        Positioned(
          bottom: 24,
          child: Row(
            mainAxisAlignment: MainAxisAlignment.center,
            children: [
              _actionBtn(Icons.close, Colors.red, () => _popTop(SwipeResult.pass)),
              const SizedBox(width: 24),
              _actionBtn(Icons.refresh, Colors.amber, _rewind),
              const SizedBox(width: 24),
              _actionBtn(Icons.favorite, Colors.green, () => _popTop(SwipeResult.like)),
            ],
          ),
        )
      ],
    );
  }

  Widget _actionBtn(IconData icon, Color color, VoidCallback onTap) {
    return Material(
      color: color.withOpacity(.15),
      shape: const CircleBorder(),
      child: InkWell(
        customBorder: const CircleBorder(),
        onTap: onTap,
        child: Padding(
          padding: const EdgeInsets.all(18),
          child: Icon(icon, color: color, size: 28),
        ),
      ),
    );
  }

  Widget _buildTopCard(CardModel m) {
    final angle = (_dragOffset.dx / 16) * math.pi / 180; // 軽い傾き
    final likeOpacity = (_dragOffset.dx / 100).clamp(0.0, 1.0);
    final passOpacity = (-_dragOffset.dx / 100).clamp(0.0, 1.0);

    return GestureDetector(
      onPanUpdate: _handleDrag,
      onPanEnd: (_) => _handleEnd(DraggableDetails(
        velocity: Velocity.zero,
        offset: _dragOffset,
      )),
      child: Transform.translate(
        offset: _dragOffset,
        child: Transform.rotate(
          angle: angle,
          child: _CardView(
            model: m,
            likeOpacity: likeOpacity,
            passOpacity: passOpacity,
          ),
        ),
      ),
    );
  }

  Widget _buildBackCard(CardModel m, double bottom) {
    return Transform.scale(
      scale: .95,
      child: Padding(
        padding: EdgeInsets.only(bottom: bottom),
        child: _CardView(model: m),
      ),
    );
  }

  Widget _buildEmpty() {
    return Center(
      child: Column(
        mainAxisSize: MainAxisSize.min,
        children: [
          const Icon(Icons.inbox, size: 48),
          const SizedBox(height: 8),
          const Text('No more cards'),
          const SizedBox(height: 16),
          FilledButton(onPressed: () {}, child: const Text('Reload')),
        ],
      ),
    );
  }
}

class _CardView extends StatelessWidget {
  final CardModel model;
  final double likeOpacity;
  final double passOpacity;

  const _CardView({
    required this.model,
    this.likeOpacity = 0,
    this.passOpacity = 0,
  });

  @override
  Widget build(BuildContext context) {
    return AspectRatio(
      aspectRatio: 3/4,
      child: ClipRRect(
        borderRadius: BorderRadius.circular(24),
        child: Stack(
          fit: StackFit.expand,
          children: [
            Image.network(model.imageUrl, fit: BoxFit.cover),
            DecoratedBox(
              decoration: const BoxDecoration(
                gradient: LinearGradient(
                  begin: Alignment.bottomCenter,
                  end: Alignment.topCenter,
                  colors: [Colors.black54, Colors.transparent],
                ),
              ),
            ),
            Positioned(
              left: 16,
              bottom: 16,
              right: 16,
              child: Column(
                crossAxisAlignment: CrossAxisAlignment.start,
                children: [
                  Text(model.title, style: const TextStyle(
                    color: Colors.white, fontSize: 24, fontWeight: FontWeight.bold,
                  )),
                  if (model.subtitle.isNotEmpty)
                    Text(model.subtitle, style: const TextStyle(color: Colors.white70)),
                ],
              ),
            ),
            // LIKEラベル
            Positioned(
              top: 24,
              left: 24,
              child: Opacity(
                opacity: likeOpacity,
                child: _ribbon('LIKE', Colors.green),
              ),
            ),
            // PASSラベル
            Positioned(
              top: 24,
              right: 24,
              child: Opacity(
                opacity: passOpacity,
                child: _ribbon('PASS', Colors.red),
              ),
            ),
          ],
        ),
      ),
    );
  }

  Widget _ribbon(String text, Color color) {
    return Transform.rotate(
      angle: -8 * math.pi / 180,
      child: Container(
        padding: const EdgeInsets.symmetric(horizontal: 12, vertical: 6),
        decoration: BoxDecoration(
          border: Border.all(color: color, width: 3),
          borderRadius: BorderRadius.circular(8),
          color: Colors.black.withOpacity(.1),
        ),
        child: Text(text, style: TextStyle(
          color: color, fontSize: 20, fontWeight: FontWeight.w900,
        )),
      ),
    );
  }
}
これだけで「カードをスワイプしてLIKE/DISLIKE」できるUIが動きます。
3. 次のステップ(Firebase連携)
UIは作れましたが、実際のマッチングアプリには以下が必要です:
-
Firestore データモデル設計
-
スワイプ結果の保存
-
相互LIKEの検出とマッチ生成
-
チャットルームの自動生成
-
Firestoreセキュリティルール
🔒 続きは有料記事にて
ここから先の「実際にリリース可能なマッチングアプリを完成させる部分(Firestore設計・マッチ生成・チャット機能・セキュリティルールなど)」については、note有料記事で詳しく解説しています。
👉 Flutter × FirebaseでTinder風マッチングアプリを作る完全ガイド(ソースコード付き)
有料部分には以下を含んでいます:
-
動作確認済みFlutterプロジェクト一式(zip)
-
Firestore設計例(基本コレクション)
-
セキュリティルールひな型
-
相互LIKE → マッチ → 自動チャット生成までの実装コード
-
リリース可能レベルのアプリ基盤
まとめ
-
Flutterでも簡単にTinder風UIが作れる
-
Firebaseと組み合わせるとマッチングアプリに発展可能
-
本記事で紹介したUIをベースに、実運用可能な構成は note記事で公開中