変更差分 2022/12
- Androidアプリをよりナウい感じにリファクタしました
- モジュール分割
- Gradle Kotlin DSL導入
- データ層(リポジトリ)を適切に抽象化
- Android13以降の通知権限に対応しました
- Android12以降でForegroundService開始前にMediaProjectionを開始するとクラッシュする不具合の対応
Android端末でも楽して「うまぴょい!」したい

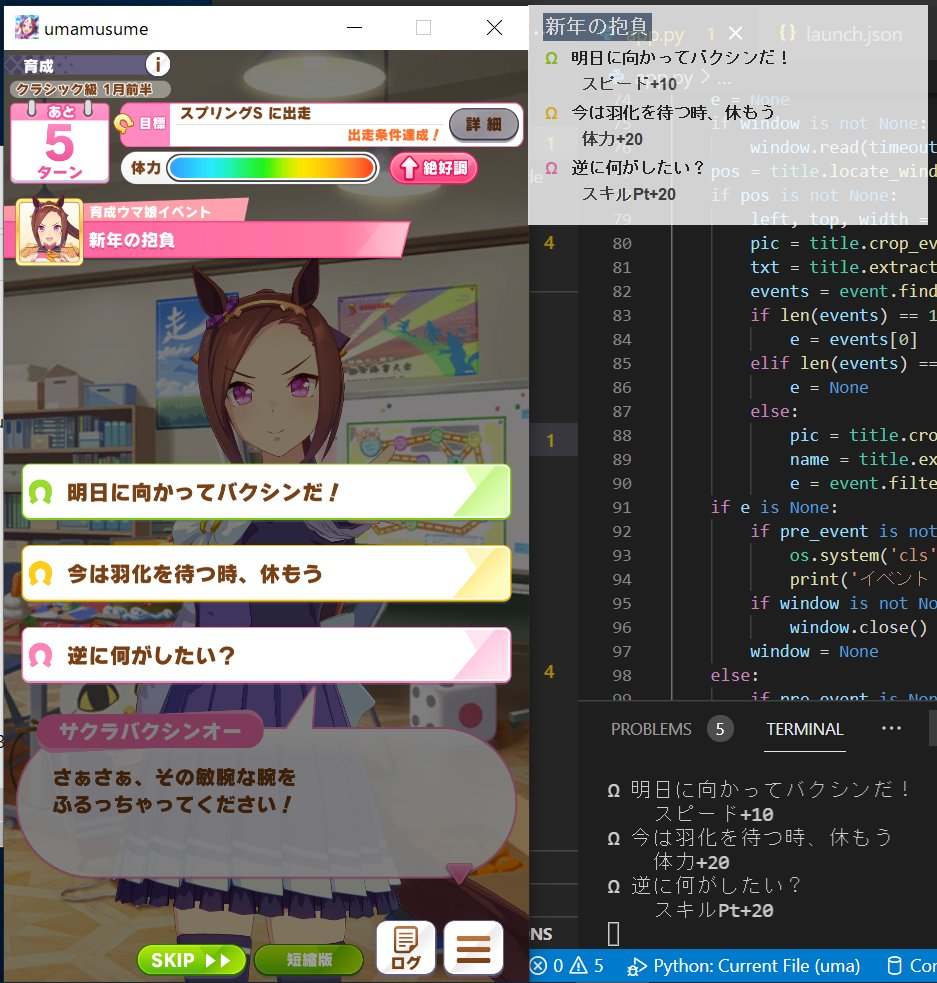
普段PC版でよく愛馬の育成するのですが、そこで便利なイベント選択肢チェッカーを@Carteletさんの記事を参考に自作してみました。
[Qiita] 「画像認識ウマ娘イベント選択肢チェッカー」をPythonで作るチュートリアル
出来たもの -> [Github] uma-event-checker
python+豊富なライブラリでバクシン的開発!便利ですね。ではでは手元のスマホでは?Android端末でも同様のイベントチェッカーを目指して開発しました。
後にPlayStoreで調べたら同様のアプリがいくつかありましたが、見なかったことに。車輪の再発明結構(#^.^#)
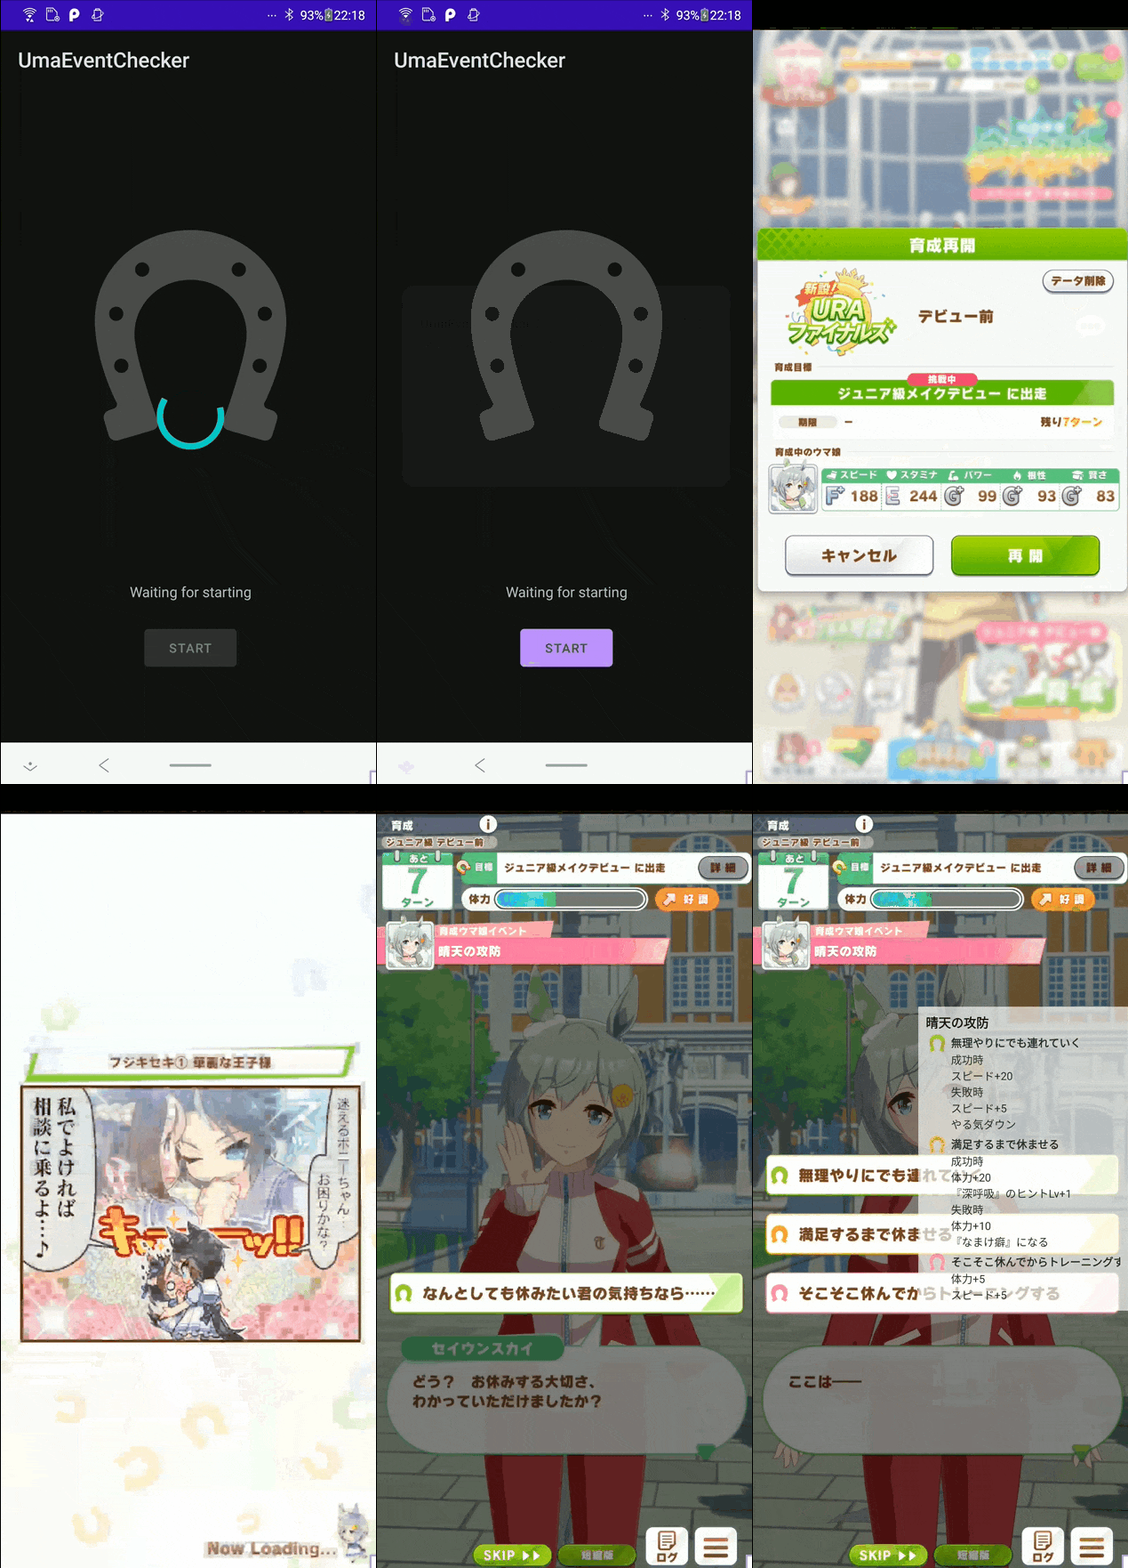
完成品

- Activityを開く
- Button押下でService開始&画面キャプチャ開始
- うまぴょい!
- 通知のAction ButtonまたはActivityのButton押下で終了
ポイント
- ForegroundService からバックグラウンドで処理
- MediaProjection API で画面を継続的にキャプチャ
- OCRライブラリ(Tesseract)でイベント文字列の識別
- タイトル文字からイベントを検索
- 検索結果をゲームアプリの上に重ねて表示
完全な成果物は以下のリポジトリに置いておきます。ただし、使用するイベントデータは著作権の観点から入れていませんので各自用意してください。
[Github] uma-event-checker-android
セットアップ
OCRの学習モデルの準備
オープンソフトで有名なTesseractを利用。日本語を識別するため、適宜GitHubリポジトリから学習モデルデータjpn.traineddataを取得してimgモジュールのassetsフォルダに保存します。
img/src/main/assets/jpn.traineddata
イベントデータの準備
肝心のゲーム内のイベントの情報が必要です。ここでは、冒頭で紹介した記事でも言及があったとおりGameWith ウマ娘攻略wikiにあるイベント選択肢チェッカーなる便利サイトから拝借。該当ページではjsファイルに直書きされたデータを利用しているようで、developerツールで覗いてごにょごにょすると見つけられます。
ちょちょっと修正してjson形式に変換してdataモジュールのassetsフォルダに保存。おおよそ次のような構造をしています。
[
  {
    "e": "今日も、明日からも",
    "n": "スペシャルウィーク",
    "l": "恒常",
    "k": "きょうもあすからも_じゃあついかとれーにんぐだ_ゆっくりやすんであすにそなえよう",
    "choices": [
      {
        "n": "じゃあ追加トレーニングだ",
        "t": "スピード+20[br]ランダムで『注目株』取得"
      },
      {
        "n": "ゆっくり休んで明日に備えよう",
        "t": "賢さ+20[br]ランダムで『注目株』取得"
      }
    ]
  }
]
OpenCVの準備
画像処理に使用するOpenCVはSDKを自前で落とす必要があるので、以下の記事を参考に用意しました。バージョンは4.5.2を使用しました。
[Qiita] Android StudioでOpenCVを使う
用意したSDKはモジュールとしてimportし使います。
アプリの構造
Android Architecture Componentを利用して設計します。OpenCV、OCRなどの画像処理、MVVMにおけるデータ層・UI層の4つでモジュールを分割しています。
-
opencvモジュール
基本的な画像処理の機能を提供します(OpenCV Android) -
imgモジュール
opencvモジュールとTesseractを利用して、画像からイベントタイトルを検出する機能を提供します -
dataモジュール
ゲームデータを管理・検索する機能を提供します- データモデルの定義・JSONパースの機能を提供
- リポジトリのインタフェース定義と実装クラス
- ScreenRepository: 入力となるスクリーン画面を取得する(MediaProjectionでキャプチャ)
- SettingRepository: キャプチャする画像のサイズなどの設定値を保持
- DataRepository: ゲームデータを管理&検索する
- SearchRepository:
imgモジュールと他リポジトリを利用して検索状態を更新&保持する
-
appモジュール
img, dataモジュールを利用して最終的なアプリを組み立てます-
MainActivity起動時に初期化・パーミッションを確認してからServiceを開始する -
CheckerServiceキャプチャされた画像をobserveして検索を更新し、検索結果を表示する
-
Hiltによる依存関係の注入
Googleもお勧めしている Dagger Hiltを使えば依存を簡単にInjectできます。特に今回のように、異なるライフサイクルを持つActivityとServiceに依存を用意して渡すのは面倒。ここでは@Singletonスコープで定義した依存をそれぞれ@Injectします。
dataモジュールで各リポジトリはインタフェースとして定義されており、別に実装クラスが用意されています。
interface DataRepository {
    val initialized: StateFlow<Boolean>
    suspend fun init(context: Context)
    fun searchEvent(title: String): GameEvent?
}
@Singleton
class DataRepositoryImpl @Inject constructor() : DataRepository {
  // TODO implementation here
}
appモジュールにおいてDIされる側(ViewModelなど)は抽象化された型で指定しますが、Hiltにどの実装クラスをinjectさせるか教える必要があります。
@Module
@InstallIn(SingletonComponent::class)
interface RepositoryModule {

    // DataRepository型でDIして欲しい場合はDataRepositoryImplクラスを使ってね
    @Binds
    fun bindDataRepository(impl: DataRepositoryImpl): DataRepository

    // TODO other binds
}
@HiltViewModel
class MainViewModel @Inject constructor(
    // DataRepositoryImplは@Singletonスコープに設定しているため、
    // Applicationを通じて同一のDataRepositoryImplインスタンスがDIされる
    private val dataRepository: DataRepository,
) : ViewModel() {
  // TODO interaction with UI
}
あとはby viewModels()と簡単なイディオムでActivityからViewModelを参照できます
@AndroidEntryPoint
class MainActivity : AppCompatActivity() {

    private val viewModel: MainViewModel by viewModels()
}
機能の実装
全部は説明せずに要点だけピックアップして説明しておきます。
minSdkVersion 26
初期化処理
OpenCV
OpenCVライブラリのロードを適切に待たないとクラッシュします。onCreateのタイミングでOpenCVLoader#initAsyncから初期化する必要があります。
[Qiita] AndroidアプリにOpenCVを導入してみる
ActivityがあるappモジュールはOpenCVに直接依存しない設計にしたので、imgモジュールのクラスに初期化用のメソッドを生やして呼び出すことにします。コールバックのままでは扱いづらいのでsuspendCoroutine関数でsuspend関数に変換してやります。
// Hiltで他のリポジトリやViewModelにDIされます
class ImageProcess {

    // onCreate時にMainViewModelを介して呼ばれます
    @MainThread
    suspend fun init(context: Context) {
        // OCRデータの読み出し
        loadData(context)
        // OpenCV初期化
        initOpenCV(context)
        // TODO その他の初期化
    }

    private suspend fun initOpenCV(context: Context) = suspendCoroutine {
        if (OpenCVLoader.initDebug()) {
            it.resume(Unit)
        } else {
            val callback = object : BaseLoaderCallback(context) {
                override fun onManagerConnected(status: Int) {
                    if (status == LoaderCallbackInterface.SUCCESS) {
                        it.resume(Unit)
                    } else {
                        it.resumeWithException(RuntimeException("fail to init OpenCV"))
                    }
                }
            }
            OpenCVLoader.initAsync("4.5.2", context, callback)
        }
    }
}
パーミッション
一部のパーミッションは実行時にユーザの許可が必要です。Serviceを開始する前に確認して、必要ならユーザに許可を求めておきます。
- 「他のアプリに重ねて表示」
Settings.ACTION_MANAGE_OVERLAY_PERMISSION - 「画面に表示されているコンテンツのキャプチャ」
MediaProjectionManager#createScreenCaptureIntent - 「通知の表示」(Android13以降はユーザの明示的な許可が無いと通知を送れません)
startAcivityForResultが非推奨になったので、Activity Result APIを利用します。すべての確認が得られたらstartForegroundServiceでServiceを開始。
class MainActivity : AppCompatActivity() {

    private val mediaProjectionPermissionLauncher = registerForActivityResult(
        ActivityResultContracts.StartActivityForResult()
    ) {
        val resultCode = it.resultCode
        val data = it.data
        if (resultCode == Activity.RESULT_OK && data != null) {
            // Serviceを開始する
            val intent = Intent(this, CheckerService::class.java)
            startForegroundService(intent)
        } else {
            // MediaProjectionを開始できない
        }
    }

    private val overlayPermissionLauncher = registerForActivityResult(
        ActivityResultContracts.StartActivityForResult()
    ) {
        if (it.resultCode == Activity.RESULT_OK) {
            // 再度Serviceの開始を試みる
            startService()
        } else {
            // 重ねて表示の権限が拒否された
        }
    }

    private val notificationPermissionLauncher = registerForActivityResult(
        ActivityResultContracts.RequestPermission()
    ) {
        if (it) {
            // 再度Serviceの開始を試みる
            startService()
        } else {
            // 通知の権限が拒否された
        }
    }

    private fun startService() {
        // check permission
        if (!Settings.canDrawOverlays(this)) {
            val intent = Intent(
                Settings.ACTION_MANAGE_OVERLAY_PERMISSION,
                Uri.parse("package:${packageName}")
            )
            overlayPermissionLauncher.launch(intent)
            return
        }

        if (
            Build.VERSION.SDK_INT >= 33 &&
            ContextCompat.checkSelfPermission(
                this,
                android.Manifest.permission.POST_NOTIFICATIONS
            ) != PackageManager.PERMISSION_GRANTED
        ) {
            notificationPermissionLauncher.launch(android.Manifest.permission.POST_NOTIFICATIONS)
            return
        }

        // init MediaProjection API
        projectionManager =
            getSystemService(Service.MEDIA_PROJECTION_SERVICE) as MediaProjectionManager
        mediaProjectionPermissionLauncher.launch(projectionManager.createScreenCaptureIntent())
    }

    private fun stopService() {
        val intent = Intent(this, CheckerService::class.java)
        stopService(intent)
    }
}
ユーザに権限を求めるUIや権限が拒否された時の処理は適宜追加しましょう。
ゲーム画面のキャプチャ
画面の大きさを取得する
Androidの画面のサイズとその取得は少々面倒なので気を付けましょう。
キャプチャする画面の大きさなどの設定値をSettingRepositoyで一括管理します。大きさを決定する具体的な処理は実装クラスの方を参照してください
interface SettingRepository {

    // キャプチャした画像からイベントを検索する最短間隔 ms
    val minUpdateInterval: Long

    // キャプチャする画像の大きさを決定する
    fun setMetrics(windowManager: WindowManager)

    // キャプチャする画像の大きさ
    val capturedScreenWidth: Int
    val capturedScreenHeight: Int
    val capturedStatusBarHeight: Int
    val capturedContentHeight: Int
}
画面のキャプチャ
MediaProjection + ImageReader を利用します。流れとしては、
-
ImageReaderの用意 -
MediaProjectionからVirtualDisplayを生成 -
VirtualDisplayにImageReaderを指定する - 画面が更新されると
ImageReaderのコールバックが呼ばれる
注意: 今回の実装ではコールバックのスレッドでそのまま画像処理を行うため、ImageReader#setOnImageAvailableListenerにMainThread以外のHandlerを指定する必要があり、適当に専用のThreadを用意しています。
// 使用する側ではScreenRepositoryインタフェースとしてDIされます
@Singleton
class ScreenCapture @Inject constructor(
    @ApplicationContext
    private val context: Context,
    private val repository: SettingRepository
) : ImageReader.OnImageAvailableListener, ScreenRepository {

    private var projection: MediaProjection? = null
    private var reader: ImageReader? = null
    private var display: VirtualDisplay? = null

    private var _callback: ((Image) -> Unit)? = null
    override fun setCallback(callback: ((Image) -> Unit)?) {
        _callback = callback
    }

    private val _running = MutableStateFlow(false)
    override val running = _running.asStateFlow()

    private var thread: HandlerThread? = null

    fun start(projection: MediaProjection) {
        if (display == null) {
            // Prepare another thread than Main one to process image
            val thread = HandlerThread("screen-capture")
            thread.start()
            this.thread = thread
            val handler = Handler(thread.looper)
            this.projection = projection
            display = createDisplay(projection, handler)
            _running.update { true }
        }
    }

    @SuppressLint("WrongConstant")
    private fun createDisplay(projection: MediaProjection, handler: Handler): VirtualDisplay {
        val width = repository.capturedScreenWidth
        val height = repository.capturedScreenHeight
        context.resources.displayMetrics.let {
            // 1. ImageReaderの用意
            val reader = ImageReader.newInstance(
                width,
                height,
                PixelFormat.RGBA_8888,
                4
            )
            // 注意: コールバックされるスレッドをここで指定
            reader.setOnImageAvailableListener(this, handler)
            this.reader = reader
            // 2. VirtualDisplayを生成
            return projection.createVirtualDisplay(
                "CapturedDisplay",
                width,
                height,
                it.densityDpi,
                DisplayManager.VIRTUAL_DISPLAY_FLAG_AUTO_MIRROR,
                // 3. ImageReaderを指定
                reader.surface,
                null, handler
            )
        }
    }

    // 4. 画面が更新されるとコールバックが呼ばれる
    override fun onImageAvailable(reader: ImageReader) {
        val img = reader.acquireLatestImage() ?: return
        kotlin.runCatching {
            _callback?.invoke(img)
        }
        img.close()
    }

    fun stop() {
        display?.release()
        display = null
        reader?.close()
        reader = null
        projection?.stop()
        projection = null
        thread?.quit()
        thread = null
        _running.update { false }
        _callback = null
    }
}
ゲーム画面の切り出し
画面をキャプチャできました。ただノッチ有り端末でプレイする場合、上部のステータスバー分の余白が生じる場合がります。欲しいのはゲームの画面のみでステータスバーの部分は邪魔です。イベント検索の開始時に、次のようなコードで必要なゲーム画面の部分のみ切り出します。
// キャプチャした画像からイベントを検索する機能
// 使用する側(MainViewModel)ではSearchRepositoryインタフェースとしてDIされます
@Singleton
class SearchRepositoryImpl @Inject constructor(
    private val setting: SettingRepository,
) : SearchRepository {

    override fun update(img: Image) {
        val bitmap = img.cropScreenContent()
        // TODO bitmapからイベントタイトルを検出 & イベントを検索
    }

    // システムUI(ステータスバー・ナビゲーションバー)の部分を削除
    private fun Image.cropScreenContent(): Bitmap {
        val plane = this.planes[0]
        val bitmap = Bitmap.createBitmap(
            plane.rowStride / plane.pixelStride,
            setting.capturedScreenHeight,
            Bitmap.Config.ARGB_8888
        )
        bitmap.copyPixelsFromBuffer(plane.buffer)
        // Remove area of status-bar and navigation-bar
        val crop = Bitmap.createBitmap(
            bitmap,
            0,
            setting.capturedStatusBarHeight,
            setting.capturedScreenWidth,
            setting.capturedContentHeight
        )
        bitmap.recycle()
        return crop
    }
}
画像処理
ここからはOpenCVによる画像処理とTesseractによるOCRを利用して、キャプチャした画像からイベントタイトルを検出する機能をimgモジュールに実装します。
ゲーム画面の判定
キャプチャされた画像はすべてが目的のゲーム画面とは限りません。次の段階のOCRは処理に時間がかかる(テスト端末で100~900ms)ので、何も考えず突っ込むのはリソースの無駄使い。まずは、ゲーム画面か否かを判定して次の段階へ進むか決めます。
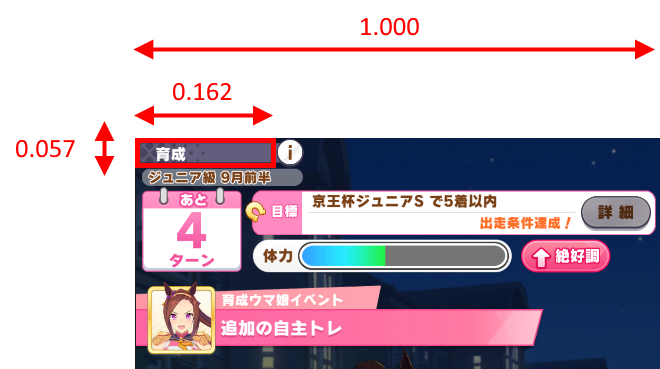
検索したいイベントはすべて育成中に発生するので、単純に画面上部に出ている「育成」の文字を頼りに判定します。別に文字として識別する必要はないので、画像処理的に済ませます。単純な画素値の比較でも十分かもしれまんせが、平行移動方向のずれを考慮してTemplateMatchで一致判定を行います。

赤枠で示したテンプレート画像はあらかじめmain/assets/template/game_header.pngとして保存しておきます。
ゲーム画面の一部を切り取る
画面全体の画像に直接TemplateMatchを適用してもいいですが、適当にCropして検査対象の範囲を限定したほうが賢いでしょう。画像をCropする位置・大きさは画面幅に対し正規化した値で決めます。
open class ScreenCropper(
    private val samplingX: Float,
    private val samplingY: Float,
    private val samplingW: Float,
    private val samplingH: Float
) {
    open fun crop(src: Mat): Mat {
        val width = src.width().toFloat()
        val rect = Rect(
            (width * samplingX).toInt(),
            (width * samplingY).toInt(),
            (width * samplingW).toInt(),
            (width * samplingH).toInt()
        )
        return Mat(src, rect)
    }
}
TemplateMatch実装
TemaplateMatchの処理を共通化したクラスを用意しておきます
/**
 * @constructor
 *
 * @param originW テンプレート画像のスケールにおける全体画面の幅 pixel
 */
abstract class TemplateMatcher(
    samplingX: Float,
    samplingY: Float,
    samplingW: Float,
    samplingH: Float,
    private val originW: Float
) : ScreenCropper(
    samplingX, samplingY, samplingW, samplingH
) {

    /**
     * Any operation at the last step of [preProcess]
     */
    open fun convertColor(src: Mat): Mat {
        return src
    }

    /**
     * Process src img before template matching
     */
    fun preProcess(src: Mat): Mat {
        val width = src.width().toFloat()
        val dst = crop(src)
        val scale = originW / width
        val size = Size(
            round(dst.width() * scale).toDouble(),
            round(dst.height() * scale).toDouble()
        )
        Imgproc.resize(dst, dst, size)
        return convertColor(dst)
    }

    /**
     * Run template matching and get score
     * @param src pre-processed src img
     * @param template
     * @return normalized value in range of [0,1]
     */
    fun match(src: Mat, template: Mat): Double {
        val result = Mat(
            src.width() - template.width() + 1,
            src.height() - template.height() + 1,
            CvType.CV_32FC1
        )
        Imgproc.matchTemplate(src, template, result, Imgproc.TM_CCOEFF_NORMED)
        val mm = Core.minMaxLoc(result)
        return mm.maxVal
    }
}
最終的にゲーム画面を判定するクラスが得られます。細かい数字はimg/src/main/res/values/*.xml に保存しておきましょう。
class GameHeaderDetector(context: Context) : TemplateMatcher(
    context.resources.readFloat(R.dimen.template_game_header_sampling_x),
    context.resources.readFloat(R.dimen.template_game_header_sampling_y),
    context.resources.readFloat(R.dimen.template_game_header_sampling_width),
    context.resources.readFloat(R.dimen.template_game_header_sampling_height),
    context.resources.readFloat(R.dimen.template_game_header_origin)
) {
    private val template = context.assets.getBitmap("template/game_header.png").toMat()
    private val threshold = context.resources.readFloat(R.dimen.template_game_header_threshold)

    fun detect(src: Mat): Boolean {
        val score = match(preProcess(src), template)
        return score > threshold
    }
}
イベントタイトルの識別
前処理
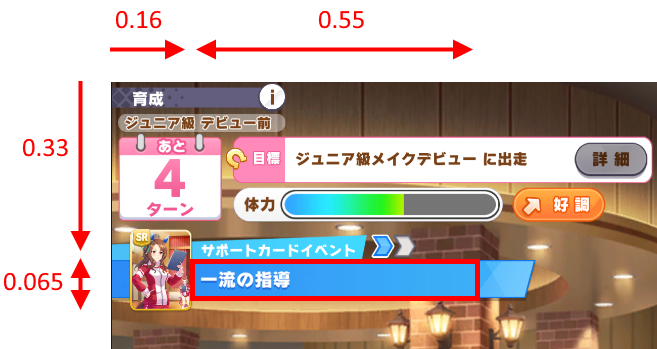
ゲーム画面の判定同様にまずは目的の範囲を切り出します。

加えて、OCRの認識精度を上げるため二値化も同時に行います。
class EventTitleCropper(context: Context) : ScreenCropper(
    context.resources.readFloat(R.dimen.ocr_title_sampling_x),
    context.resources.readFloat(R.dimen.ocr_title_sampling_y),
    context.resources.readFloat(R.dimen.ocr_title_sampling_width),
    context.resources.readFloat(R.dimen.ocr_title_sampling_height)
) {
    fun preProcess(img: Mat): Bitmap {
        // 認識の範囲を切り取り
        val crop = crop(img)
        // グレースケールに変換
        val gray = Mat()
        Imgproc.cvtColor(crop, gray, Imgproc.COLOR_BGR2GRAY)
        // 画像が小さいと認識率が下がるので2倍に拡大
        val size = Size(
            gray.width() * 2.0,
            gray.height() * 2.0
        )
        Imgproc.resize(gray, gray, size, 0.0, 0.0, Imgproc.INTER_CUBIC)
        // 二値化(閾値は適宜調整する)
        Imgproc.threshold(gray, gray, 220.0, 255.0, Imgproc.THRESH_BINARY_INV)
        return gray.toBitmap()
    }
}
Tesseractの利用
OCRまでを含めたコードは次のようになります。
注意: Tesseractクライアントを初期化するとき、TessBaseAPI#initで指定したパスに対し${path}/tessdata/jpn.traineddataに日本語の学習モデルデータが必要です。そのため、assetsからアプリ専用のディスクにデータをコピーしてから使用します。
[Qiita] Android開発者のためのOCR入門
[Github] Tesseract4Android
dependencies {
    implementation("com.github.adaptech-cz:tesseract4android:2.1.1")
}
class ImageProcess {

    companion object {
        const val OCR_DATA_DIR = "tessdata"
        const val OCR_TRAINED_DATA = "jpn.traineddata"
    }

    private lateinit var eventTitleCropper: EventTitleProcess

    @MainThread
    suspend fun init(context: Context) {
        if (_initialized) return
        loadData(context)
        eventTitleCropper = EventTitleProcess(context)

        // TODO その他の初期化
    }

    private suspend fun loadData(context: Context) = withContext(Dispatchers.IO) {
        val dir = File(context.filesDir, OCR_DATA_DIR)
        // tessdata フォルダの確認
        if (!dir.exists() || !dir.isDirectory) {
            if (!dir.mkdir()) {
                throw RuntimeException("fail to mkdir: $dir")
            }
        }
        // .traineddata のコピー
        val file = File(dir, OCR_TRAINED_DATA)
        if (!file.exists()) {
            context.copyAssetsToFiles(OCR_TRAINED_DATA, file)
        }
        // Tesseract APIの初期化
        ocrApi = TessBaseAPI()
        if (!ocrApi.init(context.filesDir.toString(), "jpn")) {
            throw RuntimeException("fail to ocr client")
        }
    }

    private fun extractEventTitle(img: Mat): String {
        val target = eventTitleCropper.preProcess(img)
        val title = extractText(target)
        return title
    }

    private fun extractText(img: Bitmap): String {
        ocrApi.setImage(img)
        val text = ocrApi.utF8Text
        // 余分な空白文字が挿入される場合あり
        // FIXME 認識率の低い記号文字の対応・数字が丸文字になる
        return text.replace(Regex("\\s+"), "")
    }
}

fun Context.copyAssetsToFiles(src: String, dst: File) {
    val manager = this.resources.assets
    manager.open(src).use { reader ->
        val buffer = ByteArray(1024)
        FileOutputStream(dst).use { writer ->
            while (true) {
                val length = reader.read(buffer)
                if (length < 0) break
                writer.write(buffer, 0, length)
            }
            writer.flush()
        }
    }
}
画像処理の完成
前項のゲーム画面の判定と合わせてImageProcessは完成です
class ImageProcess {

    // #init で初期化する
    private lateinit var headerDetector: GameHeaderDetector

    fun getEventTitle(img: Mat): String? {
        val isGame = headerDetector.detect(img)
        if (isGame) {
            val title = extractEventTitle(img)
            return title
        }
        return null
    }

}
最終的なImageProcessにはゲーム画面の判定に加えイベントタイプの判定も実装しています。「メインシナリオ」・「育成ウマ娘イベント」・「サポートカードイベント」を区別すればより高精度なイベント検索が可能かもしれません!
イベントデータの管理と検索
ここからは最終的なイベントの検索機能をdataモジュールに実装していきます
データのモデル化
イベントデータはDataRepositoryで管理します。まずはデータをモデル化します。JSONとの変換にはkotlinx.serializationを利用します。リンク先のREADMEに従ってセットアップをしましょう。
@Serializable
data class GameEvent(
    @SerialName("e")
    val title: String,
    @SerialName("n")
    val ownerName: String,
    @SerialName("k")
    val titleKana: String,
    @SerialName("choices")
    val choices: Array<EventChoice>
)

@Serializable
data class EventChoice(
    @SerialName("n")
    val name: String,
    @SerialName("t")
    val message: String
) {
    fun formatMessage(separator: String = "\n"): String {
        val lines = message.split("[br]", "<hr>")
        return lines.joinToString(separator = separator)
    }
}
データの初期化
Repositoryのデータの初期化処理を用意します。
@Singleton
class DataRepositoryImpl @Inject constructor() : DataRepository {

    companion object {
        const val DATA_FILE = "event.json"
    }

    private lateinit var events: Array<GameEvent>
    private var ocrThreshold: Float = 0.5f

    private val json = Json { ignoreUnknownKeys = true }

    override suspend fun init(context: Context) = withContext(Dispatchers.IO) {
        val manager = context.resources.assets
        manager.open(DATA_FILE).use { reader ->
            val str = reader.readBytes().toString(Charsets.UTF_8)
            events = json.decodeFromString(str)
        }
    }
}
文字列の類似度検索
データが用意できたのでいよいよ検索を行います。OCRで認識したイベントのタイトル文字列で検索をかけますが、ここでは編集距離(レーベンシュタイン距離)を計算して最も類似度の高いものを選びます。
dependencies {
    implementation("org.apache.lucene:lucene-core:8.9.0")
    implementation("org.apache.lucene:lucene-spellchecker:3.6.2")
}
@Singleton
class DataRepositoryImpl @Inject constructor() : DataRepository {

    override fun searchEvent(title: String): GameEvent? {
        val algo = LevensteinDistance()
        val score = events.map { event -> algo.getDistance(event.title, title) }
        return score.maxOrNull()?.let { maxScore ->
            if (maxScore > ocrThreshold) {
                val list = events.toList().filterIndexed { idx, e -> score[idx] >= maxScore }
                list[0]
            } else null
        }
    }

}
検索機能の完成
imgモジュールの画像処理とDataRepositoryの類似度検索を組み合わせて最終的な検索機能を組み立てます
@Singleton
class SearchRepositoryImpl @Inject constructor(
    private val detector: ImageProcess,
    private val setting: SettingRepository,
    private val dataRepository: DataRepository,
) : SearchRepository {

    private val _currentTitle = MutableStateFlow<String?>(null)
    override val currentTitle = _currentTitle.asStateFlow()

    private val _currentEvent = MutableStateFlow<GameEvent?>(null)
    override val currentEvent = _currentEvent.asStateFlow()

    override fun update(img: Image) {
        // システムUIの部分を削除
        val bitmap = img.cropScreenContent()
        // キャプチャした画像からタイトルを検出
        val title = detector.getEventTitle(bitmap)
        // イベントを検索
        if (title != _currentTitle.value) {
            _currentTitle.update { title }
            val event = title?.let {
                dataRepository.searchEvent(it)
            }
            _currentEvent.update { event }
        }
    }
}
MainActivityの完成
ようやくUI層の実装です。まず各リポジトリのデータを参照&操作するためのViewModelを用意します
@HiltViewModel
class MainViewModel @Inject constructor(
    private val dataRepository: DataRepository,
    private val imgProcess: ImageProcess,
    private val setting: SettingRepository,
    capture: ScreenRepository,
) : ViewModel() {

    // 画面キャプチャ&イベント検索の初期化処理の状態
    val loading = combine(
        dataRepository.initialized,
        imgProcess.initialized,
    ) { v1, v2 -> !v1 || !v2 }
        .stateIn(
            viewModelScope,
            SharingStarted.WhileSubscribed(),
            true,
        )

    // 初期化処理
    @MainThread
    fun init(context: Context) = viewModelScope.launch {
        imgProcess.init(context)
        dataRepository.init(context)
    }

    // キャプチャする画面の大きさを決定
    fun setMetrics(manager: WindowManager) = setting.setMetrics(manager)

    // 画面キャプチャの状態
    val runningCapture = capture.running
}
あとは初期化処理のinitをonCreateから、キャプチャサイズの決定setMetricsをstartServiceから呼び出してあげます。loading, runningCaptureの状態はView、Composeなどを利用してUIに反映させます。
@AndroidEntryPoint
class MainActivity : AppCompatActivity() {

    private val viewModel: MainViewModel by viewModels()

    override fun onCreate(savedInstanceState: Bundle?) {
        super.onCreate(savedInstanceState)
        // View + DataBindingの利用
        val binding =
            DataBindingUtil.setContentView<ActivityMainBinding>(this, R.layout.activity_main)
        binding.viewModel = viewModel
        binding.lifecycleOwner = this

        binding.buttonStart.setOnClickListener {
            when (viewModel.runningCapture.value) {
                true -> stopService()
                else -> startService()
            }
        }

        viewModel.init(this)
    }

    private fun startService() {

        // permission check here

        // init MediaProjection API
        val projectionManager =
            getSystemService(Service.MEDIA_PROJECTION_SERVICE) as MediaProjectionManager
        mediaProjectionPermissionLauncher.launch(projectionManager.createScreenCaptureIntent())
        viewModel.setMetrics(windowManager)
    }
}
ここまで実装した機能を統合してView層(Activity, Service)へ提供します。
ForegroundServieの利用
バックグラウンドに常駐させて仕事させるためにServiceを利用します。
- MediaProjectionからキャプチャされた画像を受け取る
- イベント検索を呼び出す
- 検索結果をUIに表示する
Android 8.0 以上で MediaProjectionAPIの利用にはForegroundServiceが必要です。How-to記事が沢山あるので参考にしてセットアップします。
ViewModelの作成
ServiceとViewModelの組み合わせは微妙な気もしますが、今回のアプリでは検索したイベントを表示するUIとして働くので、ServiceもUI層に置いて実装してみました。
注意 update関数の呼び出し方
ImageReaderは昔からのコールバックを用いたスタイルでAPIが提供されていますが、自前で実装した機能の方はcoroutine & suspend fun のスタイルで記述されています。そこでrunBlockingでコールバックからsuspend funを呼び出します。
class CheckerViewModel constructor(
    private val search: SearchRepository,
    private val setting: SettingRepository,
    private val capture: ScreenRepository,
) : ViewModel() {

    // ImageReaderに登録したコールバックから呼びだす
    fun updateScreen(img: Image) = runBlocking {
        val start = SystemClock.uptimeMillis()
        search.update(img)
        // 検索の最小間隔時間を設ける
        val wait = start + setting.minUpdateInterval - SystemClock.uptimeMillis()
        if (wait > 0L) {
            Log.d("update", "wait $wait ms")
            delay(wait)
        }
    }

    fun setScreenCallback(callback: ((Image) -> Unit)) = capture.setCallback(callback)

    fun startCapture(projection: MediaProjection) = capture.start(projection)

    fun stopCapture() = capture.stop()

    val currentEvent = search.currentEvent
}
画面の監視とイベント検索
基本的にはViewModelの関数を呼び出すだけです
注意 Android12以降ではMediapProjectionによるキャプチャ開始前にForegroundServiceが開始されている必要があります。ActivityでstartForegroundServiceを呼び出した直後にMediaProjectionを開始するとクラッシュするようです。そのため、Intent.dataをbundleでServiceに渡しonStartCommandで受け取ってからMediaProjectionを開始しています。
 @AndroidEntryPoint
 class MainActivity : AppCompatActivity() {

    private val viewModel: MainViewModel by viewModels()

    private val mediaProjectionPermissionLauncher = registerForActivityResult(
        ActivityResultContracts.StartActivityForResult()
    ) {
        val resultCode = it.resultCode
        val data = it.data
        if (resultCode == Activity.RESULT_OK && data != null) {
             val intent = Intent(this, CheckerService::class.java)
+               .putExtra("request", "start_media_projection")
+               .putExtra("data", data)
            startForegroundService(intent)
-           val projection = projectionManager.getMediaProjection(resultCode, data)
-           viewModel.startCapture(projection)
        } else {
@AndroidEntryPoint
class CheckerService : LifecycleService() {

    @Inject
    lateinit var capture: ScreenRepository

    @Inject
    lateinit var repository: SearchRepository

    @Inject
    lateinit var setting: SettingRepository

    private val viewModel: CheckerViewModel by lazy {
        CheckerViewModel(repository, setting, capture)
    }

    override fun onCreate() {
        super.onCreate()

        // ForegroundServieの初期化
        // startForeground() を呼び出すこと

        viewModel.setScreenCallback {
            // キャプチャした画像から検索
            viewModel.updateScreen(it)
        }
    }

    override fun onStartCommand(intent: Intent?, flags: Int, startId: Int): Int {
        super.onStartCommand(intent, flags, startId)
        intent?.let {
            if (it.hasExtra(KEY_REQUEST)) {
                when (it.getStringExtra("request")) {
                    // 通知のActionButton押下で終了する
                    "quit" -> stopSelf()
                    // 画面キャプチャを開始する
                    "start_media_projection" -> {
                        val projectionManager =
                            getSystemService(Service.MEDIA_PROJECTION_SERVICE) as MediaProjectionManager
                        val data = it.getParcelableExtra<Intent>("data")
                            ?: throw IllegalArgumentException()
                        val projection =
                            projectionManager.getMediaProjection(Activity.RESULT_OK, data)
                        viewModel.startCapture(projection)
                    }
                }
            }
        }
        return START_NOT_STICKY
    }

    override fun onDestroy() {
        super.onDestroy()
        viewModel.stopCapture()
    }
}
他のアプリに重ねて表示する
ゲームアプリを起動しながら利用するので必須の機能です。WindowManager.LayoutParams.TYPE_APPLICATION_OVERLAYを指定するのがポイントです。一切のタッチイベントを拾わないようにflagを与えておくと、ゲーム操作の邪魔にならず便利かもしれないです。
UIへの反映はDataBindingで実装しています。テキストを貼り付けるだけでは見た目が残念なので、ListView + カスタムAdapterで実装しましたが、本記事のターゲットではないので説明は省略します
@AndroidEntryPoint
class CheckerService : LifecycleService() {

    private lateinit var manager: WindowManager
    private var view: View? = null

    override fun onCreate() {
        super.onCreate()

        // ForegroundServieの初期化
        // startForeground() を呼び出すこと

        manager = getSystemService(WINDOW_SERVICE) as WindowManager

        // init overlay view
        val inflater = LayoutInflater.from(applicationContext)
        val layerType = WindowManager.LayoutParams.TYPE_APPLICATION_OVERLAY
        val layoutParam = WindowManager.LayoutParams(
            WindowManager.LayoutParams.WRAP_CONTENT,
            WindowManager.LayoutParams.WRAP_CONTENT,
            0,
            applicationContext.resources.getDimensionPixelSize(R.dimen.overlay_margin_top),
            layerType,
            WindowManager.LayoutParams.FLAG_NOT_FOCUSABLE or
                    WindowManager.LayoutParams.FLAG_NOT_TOUCH_MODAL or
                    WindowManager.LayoutParams.FLAG_NOT_TOUCHABLE,
            PixelFormat.TRANSLUCENT
        )
        layoutParam.gravity = Gravity.END or Gravity.TOP
        layoutParam.screenBrightness = -1f
        layoutParam.gravity = Gravity.END or Gravity.TOP
        layoutParam.screenBrightness = -1f
        val binding = OverlayMainBinding.inflate(inflater)
        // ViewModel と LifeCycleOwnerの登録
        binding.viewModel = viewModel
        binding.lifecycleOwner = this
        binding.listOverlayChoices.apply {
            // ListView の各要素の間の横線を消す
            divider = null
            dividerHeight = 0
        }
        this.view = binding.root
        manager.addView(binding.root, layoutParam)
    }

    override fun onDestroy() {
        super.onDestroy()
        // 後処理も忘れずに
        view?.let {
            manager.removeView(it)
            view = null
        }
    }
}
TODO
とりあえず今回は基本機能の実装に注力したので、実用にはまだまだ問題があります。例えば、
- 同じタイトルのイベントを区別して検索できない
- 記号文字などOCRの精度が低い文字への対応
- 新キャラの追加で逐次更新されるイベントデータへの対応
頑張ってみよう
皆さんも良きうまぴょいライフを!