概要
cocos2dx 3系にgamefeatの広告(オファーウォール型)を導入する記事です。(アイコン型の広告は、リリース前段階では動かないのか分かりませんが、動作が確認できませんでした)
今後はeclipseではなく、cocos2d-x 3.7から対応したandroid-studioでの開発がメインになってくると思いますが、android-studioから広告を導入する技術記事が見当たらなかったので投稿しました。
手順
環境
cocos2d-x 3.10(Cocosのランチャーから作成します)
Xcoce 7.2
android-studio 1.5.1
GameFeatSDK_Android_v3.3.1
共通処理
- iosとandorid両方から広告を表示させるのに使うヘッダファイルの作成
IOSの場合
- 外部ライブラリ(gamefeat SDK)の導入
- 広告を呼び出す用のmmファイルの作成
- AppController.h/.mmの編集
Androidの場合
- 外部ライブラリ(gamefeat SDK)の追加
- AndroidManifest.xmlの編集
- AppActivityの編集
- 広告を呼び出す用のcppファイル作成
共通処理
共通処理は、以下のファイルを作成するだけです。このヘッダを通して、IOS側もAndroid側も広告表示のメソッドを実行します。
# ifndef NativeBridge_hpp
# define NativeBridge_hpp

class NativeBridge
{
public:

    //オファーウォール型GameFeat
    static void showGameFeat();

    //アイコン型用
    static void showIconGameFeat();
    static void hideIconGameFeat();

};
# endif /* NativeBridge_hpp */
IOS
1. 外部ライブラリ(gamefeat SDK)の導入
gamefeatからダウンロードしてきた「GameFeatKit.framework」をxcodeのプロジェクトから追加します。私は、gamgefeatからIOS用のSDKがダウンロードできなかったので、gitから直接落としました。
https://github.com/kkyouhei/GameFeat_Cocos2D-X_Sample_Ver3
2. 広告を呼び出す用のmmファイルの作成
以下のファイルを作成します。
# import "NativeBridge.hpp"
# include "AppController.h"

# import <GameFeatKit/GFView.h>
# import <GameFeatKit/GFController.h>

/**
 * オファーウォール型GameFeat表示
 */
void NativeBridge::showGameFeat()
{
    AppController *appController = (AppController*)[[UIApplication sharedApplication] delegate];
    [GFController showGF:(UIViewController *)appController.viewController site_id:GF_SITE_ID];
    NSLog(@"showGameFeat");
}

/**
 * アイコン型GameFeat表示
 */
void NativeBridge::showIconGameFeat()
{
    AppController *appController = (AppController*)[[UIApplication sharedApplication] delegate];
    [appController showIconGameFeat];
    NSLog(@"showIconGameFeat");
}

/**
 * アイコン型GameFeat非表示
 */
void NativeBridge::hideIconGameFeat()
{
    AppController *appController = (AppController*)[[UIApplication sharedApplication] delegate];
    [appController hideIconGameFeat];
    NSLog(@"hideIconGameFeat");
}
3. AppController.hとAppCOntroller.mmの編集
GF_SITE_IDは自分のアプリ番号に変更してください。
# import <UIKit/UIKit.h>
# import <GameFeatKit/GFView.h>
# import <GameFeatKit/GFController.h>
# import <GameFeatKit/GFIconController.h>
# import <GameFeatKit/GFIconView.h>

@class RootViewController;

// GAMEFEAT MediaID
# define GF_SITE_ID @"GAMEFEAT APP NUMBER"
@interface AppController : NSObject <UIApplicationDelegate> {
    UIWindow *window;
}

@property(nonatomic, readonly) RootViewController* viewController;

@property (nonatomic, retain) GFIconController *gfIconController;
@property (nonatomic, retain) GFIconView *iconView;

//アイコン型GameFeat
- (void)addIconGameFeat;
- (void)showIconGameFeat;
- (void)hideIconGameFeat;

@end
   /* 省略 */

- (void)applicationDidBecomeActive:(UIApplication *)application {
    /*
     Restart any tasks that were paused (or not yet started) while the application was inactive. If the application was previously in the background, optionally refresh the user interface.
     */
     //We don't need to call this method any more. It will interupt user defined game pause&resume logic
    /* cocos2d::Director::getInstance()->resume(); */
    // GF Activate
    [GFController activateGF:GF_SITE_ID useCustom:YES useIcon:YES];

}

- (void)applicationDidEnterBackground:(UIApplication *)application {
    /*
     Use this method to release shared resources, save user data, invalidate timers, and store enough application state information to restore your application to its current state in case it is terminated later.
     If your application supports background execution, called instead of applicationWillTerminate: when the user quits.
     */
    UIDevice *device = [UIDevice currentDevice];
    BOOL backgroundSupported = NO;
    if ([device respondsToSelector:@selector(isMultitaskingSupported)]) {
        backgroundSupported = device.multitaskingSupported;
    }
    if (backgroundSupported) {
        [GFController backgroundTask];
    }

    cocos2d::Application::getInstance()->applicationDidEnterBackground();
}

- (void)applicationWillEnterForeground:(UIApplication *)application {
    /*
     Called as part of  transition from the background to the inactive state: here you can undo many of the changes made on entering the background.
     */
    cocos2d::Application::getInstance()->applicationWillEnterForeground();
}

- (void)applicationWillTerminate:(UIApplication *)application {
    /*
     Called when the application is about to terminate.
     See also applicationDidEnterBackground:.
     */
}


# pragma mark -
# pragma mark Memory management

- (void)applicationDidReceiveMemoryWarning:(UIApplication *)application {
    /*
     Free up as much memory as possible by purging cached data objects that can be recreated (or reloaded from disk) later.
     */
}


- (void)dealloc {
    [window release];
    [super dealloc];
}

- (void)viewDidAppear:(BOOL)animated
{
    // アイコン広告の表示
    [self.gfIconController loadAd:GF_SITE_ID];
}

- (void)viewWillDisappear:(BOOL)animated
{
    // アイコン広告の自動更新を停止
    [self.gfIconController stopAd];
}

/**
 * アイコン型GameFeat追加
 */
- (void)addIconGameFeat {

    // GFIconControllerの初期化
    self.gfIconController = [[GFIconController alloc] init];

    // アイコンの自動更新間隔を指定
    [self.gfIconController setRefreshTiming:10];

    // アイコンの配置位置を設定
    {
        GFIconView *iconView = [[[GFIconView alloc] initWithFrame:CGRectMake(10, 10, 60, 60)] autorelease];
        [self.gfIconController addIconView:iconView];
        [_viewController.view addSubview:iconView];
    }
    {
        GFIconView *iconView = [[[GFIconView alloc] initWithFrame:CGRectMake(80, 10, 60, 60)] autorelease];
        [self.gfIconController addIconView:iconView];
        [_viewController.view addSubview:iconView];
    }

    [self.gfIconController loadAd:GF_SITE_ID];
}

/**
 * アイコン型GameFeat表示
 */
- (void)showIconGameFeat {
    if ([self.gfIconController.arrIconView count] == 0) {
        [self addIconGameFeat];
    } else if (self.gfIconController.isTimerActive == NO) {
        [self.gfIconController loadAd:GF_SITE_ID];
    }
    [self.gfIconController visibleIconAd];
}

/**
 * アイコン型GameFeat非表示
 */
- (void)hideIconGameFeat {
    [self.gfIconController stopAd];
    [self.gfIconController invisibleIconAd];
}


@end
Android
1.外部ライブラリ(gamefeat SDK)の追加
ダウンロードしてきたディレクトリの中にある「GameFeatSDK.jar」ファイルを
cocos2d/cocos/platform/android/libcocos2dx/libs
配下に追加します。
追加した後、右クリックからのメニューで「Add As a Library」を選択してください。
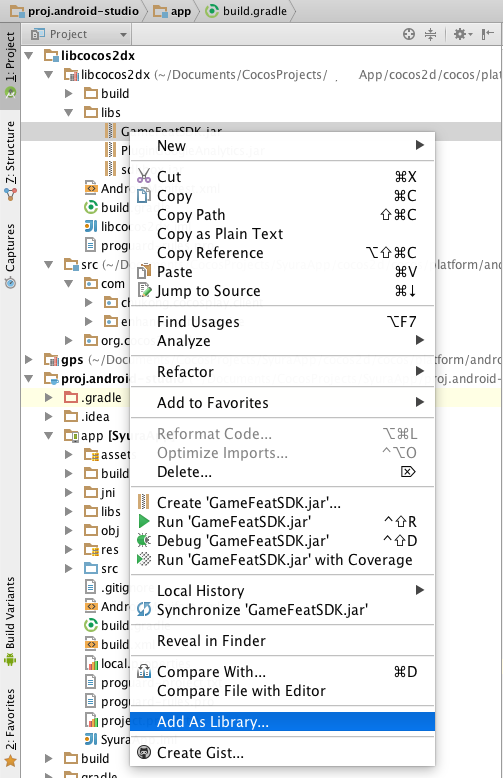
その後、自分の作成しているアプリ名のプロジェクトを選択します。
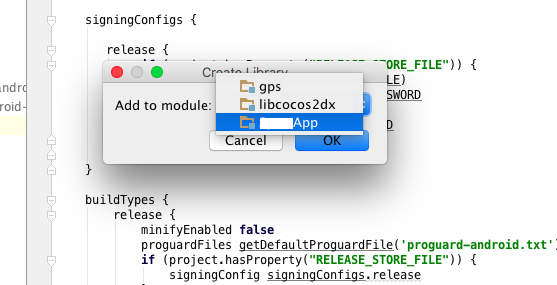
すると
proji.android-studio/app/build.grade
の中のdependenciesの中に追加したライブラリのパスが書き込まれていると思います
以上でライブラリの追加は終了です
2.AndroidManifest.xmlの編集
先ほどライブラリパスが書き込まれたbuidl.gradeと同じ層にあるAndroidManifest.xmlに以下のコードを追加します。追加した一行目にある「GAMEFEAT APP NUMBER」はゲームフィード内でのアプリ番号を入力してください。
    <!-- 省略-->
<application hardwareAccelerated="true" android:allowBackup="true" android:icon="@mipmap/ic_launcher">


		<meta-data android:name="android.app.lib_name" android:value="cocos2dcpp" />

        <activity android:configChanges="orientation|keyboardHidden|screenSize" android:label="@string/app_name" android:name="org.cocos2dx.cpp.AppActivity" android:screenOrientation="portrait" android:theme="@android:style/Theme.NoTitleBar.Fullscreen">
            <intent-filter>
                <action android:name="android.intent.action.MAIN" />

                <category android:name="android.intent.category.LAUNCHER" />
            </intent-filter>
        </activity>

        <!-- GameFeat ここから追加-->
        <meta-data android:name="gamefeat_site_id" android:value="GAMEFEAT APP NUMBER" />
        <activity
            android:name="jp.basicinc.gamefeat.android.sdk.view.GameFeatAppActivity"
            android:configChanges="orientation|keyboardHidden|screenSize"
            android:label="GameFeat" >
        </activity>
        <activity
            android:name="jp.basicinc.gamefeat.android.sdk.view.GameFeatAppChildActivity"
            android:configChanges="orientation|keyboardHidden|screenSize"
            android:label="GameFeat"
            android:screenOrientation="sensor" >
        </activity>
        <receiver
            android:name="jp.basicinc.gamefeat.android.sdk.receiver.GameFeatBroadcastReceiver"
            android:enabled="true"
            android:exported="false">
            <intent-filter>
                <action android:name="android.intent.action.PACKAGE_ADDED"/>
                <data android:scheme="package"/>
            </intent-filter>
        </receiver>
        <!-- GameFeat ここまで-->
    <!-- 以下略-->
3. AppActivityの編集
proj.android-studio/app/src/org/cocos2dx
の配下にあるAppActivityを以下の様に編集します。特に触っていなければまるまる移して大丈夫です。
package org.cocos2dx.cpp;
import jp.basicinc.gamefeat.android.sdk.controller.GameFeatAppController;
import org.cocos2dx.lib.Cocos2dxActivity;
import android.os.Bundle;
import android.util.Log;
import android.view.Gravity;
import android.view.View;
import android.widget.LinearLayout;

public class AppActivity extends Cocos2dxActivity {
    private static LinearLayout container;
    private static AppActivity me = null;
    static GameFeatAppController gfAppController;

    protected void onCreate(Bundle savedInstanceState){
        super.onCreate(savedInstanceState);
        me = this;
        container = new LinearLayout(me);
        me.addContentView(container, new LinearLayout.LayoutParams(LinearLayout.LayoutParams.MATCH_PARENT, LinearLayout.LayoutParams.MATCH_PARENT));

        gfAppController = new GameFeatAppController();
        // 広告設定初期化
        gfAppController.activateGF(me, true, true, true);
    }

    public void onStart() {
        super.onStart();
    }

    //================================================================================
    // GAMEFEAT オファーウォール表示・非表示
    //================================================================================
    public static void showGameFeatJNI()
    {
        gfAppController.show(me);
    }
}
4. 広告を呼び出す用のcppファイル作成
jniから呼び出す用のcppファイルを作成します。
# include "NativeBridge.hpp"
# include "platform/android/jni/JniHelper.h"

# define CLASS_NAME "org/cocos2dx/cpp/AppActivity"

using namespace std;
using namespace cocos2d;

/**
 * オファーウォール型GameFeat表示
 */
void NativeBridge::showGameFeat()
{
    JniMethodInfo t;

    if (JniHelper::getStaticMethodInfo(t, CLASS_NAME, "showGameFeatJNI", "()V"))
    {
        t.env->CallStaticVoidMethod(t.classID, t.methodID);
    }
}

/**
 * アイコン型GameFeat表示
 */
void NativeBridge::showIconGameFeat()
{
    JniMethodInfo t;

    if (JniHelper::getStaticMethodInfo(t, CLASS_NAME, "showIconGameFeatJNI", "()V"))
    {
        t.env->CallStaticVoidMethod(t.classID, t.methodID);
    }
}

/**
 * アイコン型GameFeat非表示
 */
void NativeBridge::hideIconGameFeat()
{
    JniMethodInfo t;

    if (JniHelper::getStaticMethodInfo(t, CLASS_NAME, "hideIconGameFeatJNI", "()V"))
    {
        t.env->CallStaticVoidMethod(t.classID, t.methodID);
    }
}
広告の呼び出し
以上で、各cppファイルからNativeBridje.hをインクルードし、showGameFeat()を呼び出してやることで、オファーウォール型の広告が表示できます。(アイコン型は動作確認できませんでした。)
なお、オファーウォール型の広告もデバッグ時は白い画面が表示されるだけです。
参考