概要
まずお断りを。
これは私の備忘録です。
私の場合、AWSだけでなく、自宅でVMware workstation proを使ったサーバなどもあり、家でも外でもあらゆる環境に一元的に入って作業をしたいな、ということで、OpenVPNでつないでしまえ、という乱暴な構成を作っていますが、それを後々再現するために書いています。
個人開発環境なので、全部ひとつのVPNで同じセグメント管理にしていますが、実際には、セグメントを分けて管理するべきだと思います。
まぁ、そんなに共感する方はいないとは思いますが、まずはひとつ。
あちこちに同じような内容は書いてありますが、やってみたところ、その通りにはいかなかったため、その部分を補足追加しています。
ちなみに、OpenVPNの勉強をする場合は、以下のサイトが非常に勉強になります。
https://qiita.com/MoriKen/items/50d226e8c6395487c0a6
EC2インスタンス
情報はあちこちに転がっているので概要のみ。
時間ができたら捕捉します・・・するかも。
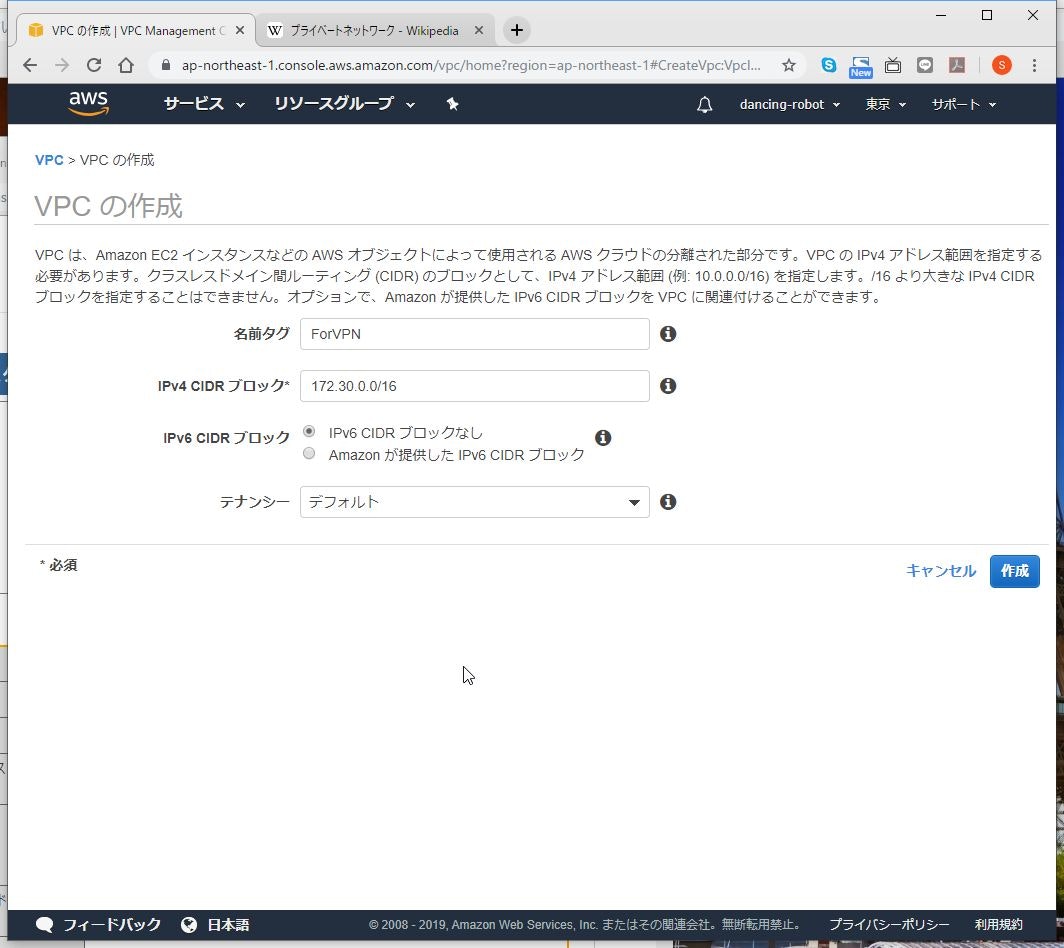
VPCの作成
やり方の詳細を知りたい方はこちら
https://qiita.com/SSMU3/items/534d78eff1ddb1c077e0
サブネットの作成
やり方の詳細を知りたい方はこちら
https://qiita.com/SSMU3/items/f7458b3cd1d9c6db4339
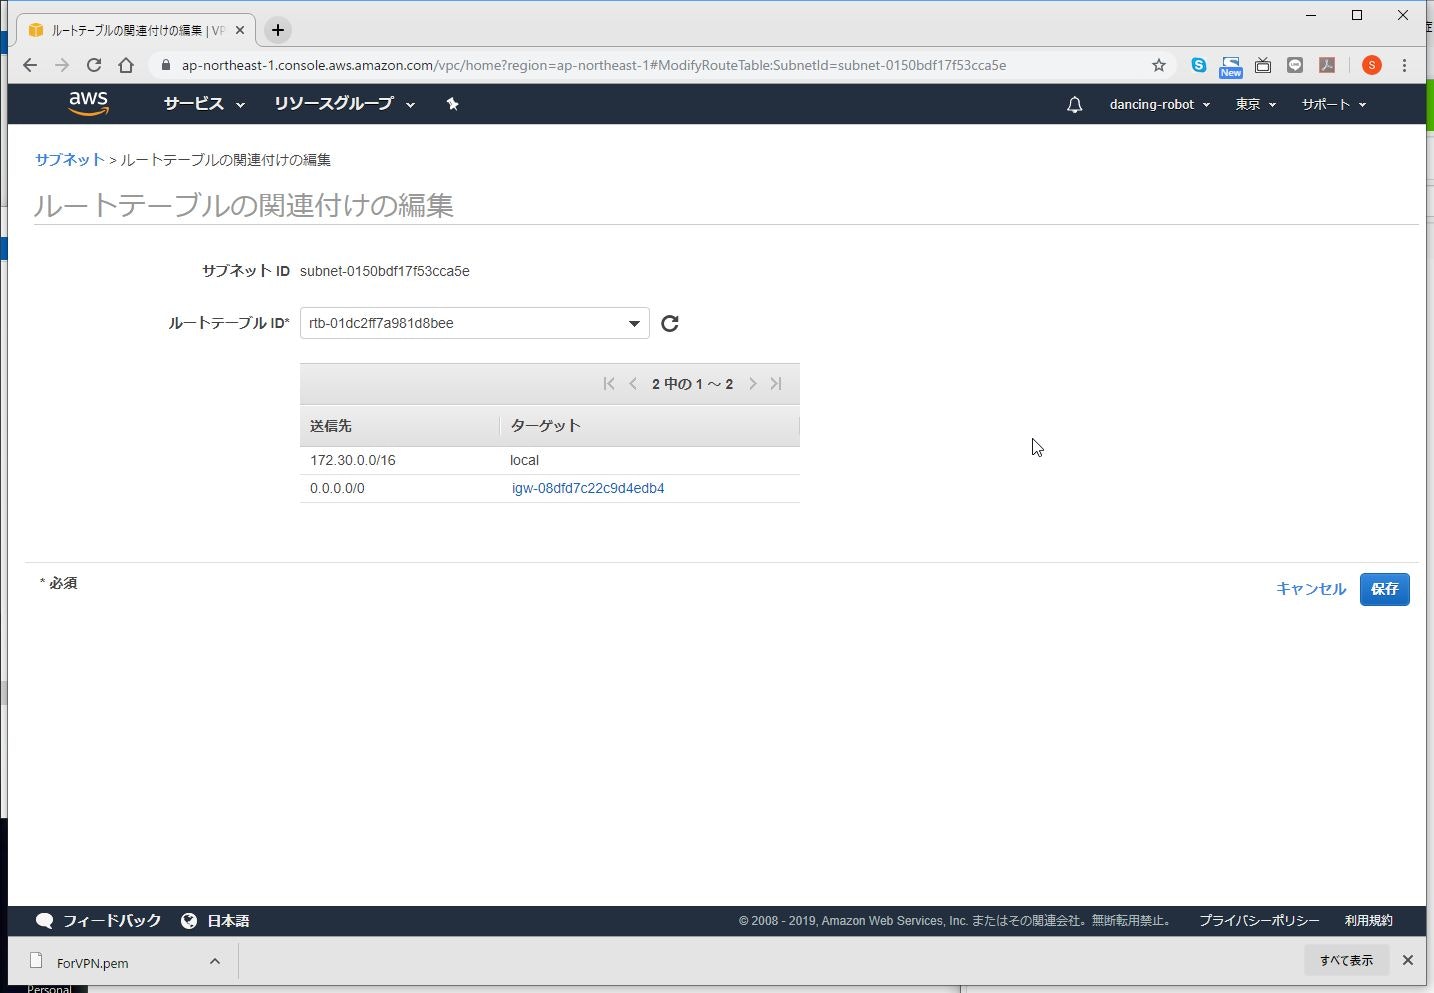
インターネットゲートウェイの設定
EC2インスタンスの作成
さくさくっと。
個人的な好みで、UBUNTU。
リザーブドインスタンスでt2.nano購入したので、t2.micro。

そして起動

UBUNTUの初期設定
# hostname の設定
$ sudo hostnamectl set-hostname <任意のホスト名>

# パッケージリストの更新
$ sudo apt-get update

# インストールされてるパッケージの更新
$ sudo apt-get upgrade

# binutilsをインストール
$ sudo apt install binutils

# 日本ロケール設定#
# language-pack-ja のインストール
$ sudo apt-get install language-pack-ja
# locale に ja_JP.UTF-8 を設定
$ sudo update-locale LANG=ja_JP.UTF-8
$ strings /etc/default/locale

# /usr/share/zoneinfo/Asia/Tokyo から /etc/localtime にリンクを張る
$ sudo ln -sf /usr/share/zoneinfo/Asia/Tokyo /etc/localtime

# timezone に Asia/Tokyo を設定
$ sudo dpkg-reconfigure --frontend noninteractive tzdata
$ strings /etc/localtime
OpenVPN構築
OpenVPNインストール
# OpenVPN インストール
$ sudo apt install openvpn
easy-rsaのインストール
以下のサイトの最新版をwgetしてインストールします。
OpenVPN/easy-rsa
$ wget https://github.com/OpenVPN/easy-rsa/releases/download/v3.0.6/EasyRSA-unix-v3.0.6.tgz
$ tar -xvzf EasyRSA-unix-v3.0.6.tgz
$ sudo mv EasyRSA-v3.0.6 /usr/local/EasyRSA
オレオレ認証機関
(1) varsファイルの準備
$ cd /usr/local/EasyRSA/
$cp -p vars.example vars
$vi vars
以下のように編集する
set_var EASYRSA_CA_EXPIRE       3650
set_var EASYRSA_CERT_EXPIRE     3650
【注釈】
ここで設定した期間が証明書の期限となります。
3650日に設定すると10年となります。
以下はお好みで編集。編集しなくとも問題はありません。
set_var EASYRSA_REQ_COUNTRY     "任意"
set_var EASYRSA_REQ_PROVINCE    "任意"
set_var EASYRSA_REQ_CITY        "任意"
set_var EASYRSA_REQ_ORG         "任意"
set_var EASYRSA_REQ_EMAIL       "メールアドレス"
set_var EASYRSA_REQ_OU          "任意"
(2) 初期化
$ cd /usr/local/EasyRSA/
$ ./easyrsa init-pki
init-pki complete; you may now create a CA or requests.
Your newly created PKI dir is: /usr/local/EasyRSA/pki
(3) 認証局作成
「Enter PEM pass phrase:」は任意のパスフレーズを入力します。
「Common Name (eg: your user, host, or server name) [Easy-RSA CA]:」は今回はデフォルトです。
$ cd /usr/local/EasyRSA/
$ ./easyrsa build-ca

Using SSL: openssl OpenSSL 1.1.1  11 Sep 2018

Enter New CA Key Passphrase:
Re-Enter New CA Key Passphrase:
Generating RSA private key, 2048 bit long modulus (2 primes)
.........+++++
...........................................................................+++++
e is 65537 (0x010001)
Can't load /usr/local/EasyRSA/pki/.rnd into RNG
139829042020800:error:2406F079:random number generator:RAND_load_file:Cannot open file:../crypto/rand/randfile.c:88:Filename=/usr/local/EasyRSA/pki/.rnd
You are about to be asked to enter information that will be incorporated
into your certificate request.
What you are about to enter is what is called a Distinguished Name or a DN.
There are quite a few fields but you can leave some blank
For some fields there will be a default value,
If you enter '.', the field will be left blank.
-----
Common Name (eg: your user, host, or server name) [Easy-RSA CA]:

CA creation complete and you may now import and sign cert requests.
Your new CA certificate file for publishing is at:
/usr/local/EasyRSA/pki/ca.crt
(4) DHパラメータを生成
時間がちょっとかかります。
$ cd /usr/local/EasyRSA/
$ ./easyrsa gen-dh

Using SSL: openssl OpenSSL 1.1.1  11 Sep 2018
Generating DH parameters, 2048 bit long safe prime, generator 2
This is going to take a long time
......+.........................+.....................................+...................+.............................................................................................................................+..................................+........................................................................................................................................................................................................................................................+....................................................+.............................................................................................+.........................................................................................................................................................+......................................................................................................................................................................................................................+.........................................................................................................................................................................................................+....................................................................+...............+........................................+...........................................................+..................................................................................................................................+...........................................+.............+.............................+.......+...................+............................................................................+............+................................................................................................................................................................................+.........................................................................+......................................+........................................................................................................................................................................................................................................................................................................++*++*++*++*

DH parameters of size 2048 created at /usr/local/EasyRSA/pki/dh.pem

$
サーバ用の秘密鍵と証明書の作成
「Enter pass phrase for /usr/local/EasyRSA/pki/private/ca.key:」では、さきほど入力したパスフレーズを入力します。
$ cd /usr/local/EasyRSA/
$ ./easyrsa build-server-full server nopass

Using SSL: openssl OpenSSL 1.1.1  11 Sep 2018
Can't load /usr/local/EasyRSA/pki/.rnd into RNG
139896210076096:error:2406F079:random number generator:RAND_load_file:Cannot open file:../crypto/rand/randfile.c:88:Filename=/usr/local/EasyRSA/pki/.rnd
Generating a RSA private key
.....+++++
.+++++
writing new private key to '/usr/local/EasyRSA/pki/private/server.key.QSqGCBSoSz'
-----
Using configuration from /usr/local/EasyRSA/pki/safessl-easyrsa.cnf
Can't load /usr/local/EasyRSA/pki/.rnd into RNG
140326773404096:error:2406F079:random number generator:RAND_load_file:Cannot open file:../crypto/rand/randfile.c:88:Filename=/usr/local/EasyRSA/pki/.rnd
Enter pass phrase for /usr/local/EasyRSA/pki/private/ca.key:
Can't open /usr/local/EasyRSA/pki/index.txt.attr for reading, No such file or directory
140326773404096:error:02001002:system library:fopen:No such file or directory:../crypto/bio/bss_file.c:72:fopen('/usr/local/EasyRSA/pki/index.txt.attr','r')
140326773404096:error:2006D080:BIO routines:BIO_new_file:no such file:../crypto/bio/bss_file.c:79:
Check that the request matches the signature
Signature ok
The Subject's Distinguished Name is as follows
commonName            :ASN.1 12:'server'
Certificate is to be certified until Aug 22 12:32:00 2022 GMT (1080 days)

Write out database with 1 new entries
Data Base Updated
$
クライアント用秘密鍵/証明書の作成
作成するクライアントの名前は「client1」にしています。
この名前を変えて、繰り返すことで、接続人数分の証明書を発行することができます。
「Enter pass phrase for /usr/local/EasyRSA/pki/private/ca.key:」では、さきほど入力したパスフレーズを入力します。
$ cd /usr/local/EasyRSA/
$ ./easyrsa build-client-full client1 nopass

Using SSL: openssl OpenSSL 1.1.1  11 Sep 2018
Can't load /usr/local/EasyRSA/pki/.rnd into RNG
140074673844672:error:2406F079:random number generator:RAND_load_file:Cannot open file:../crypto/rand/randfile.c:88:Filename=/usr/local/EasyRSA/pki/.rnd
Generating a RSA private key
...........+++++
................................................................................+++++
writing new private key to '/usr/local/EasyRSA/pki/private/client1.key.0NSxHTMKRs'
-----
Using configuration from /usr/local/EasyRSA/pki/safessl-easyrsa.cnf
Can't load /usr/local/EasyRSA/pki/.rnd into RNG
140436366164416:error:2406F079:random number generator:RAND_load_file:Cannot open file:../crypto/rand/randfile.c:88:Filename=/usr/local/EasyRSA/pki/.rnd
Enter pass phrase for /usr/local/EasyRSA/pki/private/ca.key:
Check that the request matches the signature
Signature ok
The Subject's Distinguished Name is as follows
commonName            :ASN.1 12:'client1'
Certificate is to be certified until Aug 22 12:34:49 2022 GMT (1080 days)

Write out database with 1 new entries
Data Base Updated
OpenVPNサーバの設定
(1) 作成したCA証明書、サーバ用証明書、サーバ用秘密鍵、DHパラメータを/etc/openvpn以下にコピーします。
$ cd /usr/local/EasyRSA/
$ sudo cp pki/ca.crt /etc/openvpn/
$ sudo cp pki/issued/server.crt /etc/openvpn/
$ sudo cp pki/private/server.key /etc/openvpn/
$ sudo cp pki/dh.pem /etc/openvpn/dh2048.pem
(2) サーバのコンフィグファイルを解凍し、ひな形からコピーします。
$ ls -l /usr/share/doc/openvpn/examples/sample-config-files/server.conf.gz
$
$ sudo gzip -d /usr/share/doc/openvpn/examples/sample-config-files/server.conf.gz
-rw-r--r-- 1 root root 4353 May 14 17:25 /usr/share/doc/openvpn/examples/sample-config-files/server.conf.gz
$
$ ls -l /usr/share/doc/openvpn/examples/sample-config-files/server.conf
-rw-r--r-- 1 root root 10853 May 14 17:25 /usr/share/doc/openvpn/examples/sample-config-files/server.conf
# sudo cp -p /usr/share/doc/openvpn/examples/sample-config-files/server.conf /etc/openvpn/server.conf
$
(3) 以下のようになるように編集します。
デフォルトでそうなっているものは編集する必要はありません。
$ sudo vi /etc/openvpn/server.conf
| 設定内容 | 備考 |
|---|---|
| port 1194 | VPN接続する際のポート。変更する場合はここを書き換える |
| proto udp | VPN接続する際のプロトコル。変更する場合はここを書き換える |
| push "dhcp-option DNS 8.8.8.8" | VPNサーバとして外に出ていく場合に名前解決を行うDNSサーバ |
| dev tun | |
| ca ca.crt | |
| cert server.crt | |
| key server.key | |
| dh dh2048.pem | |
| server 10.8.0.0 255.255.255.0 | VPN接続したクライアントに割り当てられるアドレス範囲 |
| ifconfig-pool-persist ipp.txt | |
| push "route xxx.xxx.xxx.xxx xxx.xxx.xxx.xxx" | サブネットのIPv4 CIDRアドレス範囲。例えば「172.30.0.0/020」なら「push "route 172.30.0.0 255.255.240.0"」 |
| push "redirect-gateway def1" | これを有効にするとトラフィックがVPNサーバ経由になる |
| client-config-dir ccd | これをつけるとクライアントに固定IPをわりあてられる |
| keepalive 10 120 | |
| tls-auth ta.key 0 # This file is secret | |
| cipher AES-256-CBC | |
| persist-key | |
| persist-tun | |
| status openvpn-status.log | |
| explicit-exit-notify 1 |
(4) ta.keyが存在しないので作成します。
$ sudo openvpn --genkey --secret /etc/openvpn/ta.key
(5) /etc/sysctl.confを編集してパケットの転送を有効にします。
$ sudo vi /etc/sysctl.conf
<編集内容>
# net.ipv4.ip_forward=1
↓
net.ipv4.ip_forward=1
(6) 下記コマンドで設定を反映します。
$ sudo sysctl -p
固定IP割り当て
(1) ディレクトリ作成
sudo mkdir /etc/openvpn/ccd
(2) rootになる
sudo su -
(3) クライアントごとのIPアドレスのファイルを作る
以下は標準の範囲で割り当てた場合。
cd /etc/openvpn/ccd
echo "ifconfig-push 10.8.0.5 10.8.0.6" > client1
echo "ifconfig-push 10.8.0.9 10.8.0.10" > client2
echo "ifconfig-push 10.8.0.13 10.8.0.14" > client3
echo "ifconfig-push 10.8.0.17 10.8.0.18" > client4
【注釈】
| 項目 | 設定値 |
|---|---|
| ファイル名 | クライアントのサーフィックスを除いた値 |
| 書式 | ifconfig-push <クライアントIPアドレス> <対になるサーバ側IPアドレス> |
IPアドレスは1から始まり、4ずつインクリメントする。
必ず3つ間をあけること。
(4) rootを抜ける
exit
OpenVPN起動
$ sudo systemctl start openvpn
$ sudo systemctl enable openvpn
$ sudo systemctl status openvpn
● openvpn.service - OpenVPN service
   Loaded: loaded (/lib/systemd/system/openvpn.service; enabled; vendor preset:
   Active: active (exited) since Sat 2019-09-07 22:29:13 JST; 1min 31s ago
 Main PID: 3491 (code=exited, status=0/SUCCESS)
    Tasks: 0 (limit: 547)
   CGroup: /system.slice/openvpn.service

Sep 07 22:29:13 VPN-SV-1A systemd[1]: Starting OpenVPN service...
Sep 07 22:29:13 VPN-SV-1A systemd[1]: Started OpenVPN service.
IPマスカレードの設定を行う
Internet Gateway がVPCのIP以外トラフィックを通さない為、対策として、IPマスカレードを有効にして、Internet GatewayへのアクセスをOpenVPNインスタンスからのアクセスに見せるようにします。
(1) インターフェースを確認する
外部とつながっているインターフェースを確認します。
この場合は、「eth0」になります。
$ sudo ifconfig
eth0: flags=4163<UP,BROADCAST,RUNNING,MULTICAST>  mtu 9001
        inet 172.26.2.193  netmask 255.255.240.0  broadcast 172.26.15.255
        inet6 fe80::46e:d8ff:fe17:73fc  prefixlen 64  scopeid 0x20<link>
        ether 06:6e:d8:17:73:fc  txqueuelen 1000  (イーサネット)
        RX packets 2224411  bytes 1675791047 (1.6 GB)
        RX errors 0  dropped 0  overruns 0  frame 0
        TX packets 2077239  bytes 1474293656 (1.4 GB)
        TX errors 0  dropped 0 overruns 0  carrier 0  collisions 0

lo: flags=73<UP,LOOPBACK,RUNNING>  mtu 65536
        inet 127.0.0.1  netmask 255.0.0.0
        inet6 ::1  prefixlen 128  scopeid 0x10<host>
        loop  txqueuelen 1000  (ローカルループバック)
        RX packets 2940  bytes 273680 (273.6 KB)
        RX errors 0  dropped 0  overruns 0  frame 0
        TX packets 2940  bytes 273680 (273.6 KB)
        TX errors 0  dropped 0 overruns 0  carrier 0  collisions 0

tun0: flags=4305<UP,POINTOPOINT,RUNNING,NOARP,MULTICAST>  mtu 1500
        inet 10.250.0.1  netmask 255.255.255.255  destination 10.250.0.2
        inet6 fe80::2ba0:c66e:2226:4a55  prefixlen 64  scopeid 0x20<link>
        unspec 00-00-00-00-00-00-00-00-00-00-00-00-00-00-00-00  txqueuelen 100  (不明なネット)
        RX packets 0  bytes 0 (0.0 B)
        RX errors 0  dropped 0  overruns 0  frame 0
        TX packets 7  bytes 336 (336.0 B)
        TX errors 0  dropped 0 overruns 0  carrier 0  collisions 0
(2) IPマスカレードを設定する
$ sudo iptables -t nat -A POSTROUTING -s 10.8.0.0/24 -o eth0 -j MASQUERADE
【失敗した場合】
削除コマンド
sudo iptables -t nat -F
確認コマンド
sudo iptables -t nat -n -L
(3) IPマスカレードの設定を保持するために、「iptables-persistent」をインストールする。
sudo apt install iptables-persistent
セキュリティグループの設定
OpenVPNはデフォルトでUDPの1194ポートを利用するので、これに対するアクセス許可を入れます。
ここは最終的にはSSHを閉じて、VPN内のみのアクセスとします。

OpenVPNのENI設定
OpenVPNがルータのような役割になるので、OpenVPNインスタンスの「Source/Dest Check」を「Disabled」に変更します。
DNS設定
後で書きます。
ここまででとりあえず、サーバは設定できています。
クライアント設定
(1) 以下のファイルをダウンロードします。
/usr/local/EasyRSA/pki/ca.crt
/usr/local/EasyRSA/pki/private/client1.key
/usr/local/EasyRSA/pki/issued/client1.crt
/etc/openvpn/ta.key
(2) 作成した証明書、鍵を元に「~.ovpn」ファイルを作ります。
以下に作成シェルの作り方を記載しました。
https://qiita.com/SSMU3/items/bf82f76af9534b21da8c
冗長化設定
アベイラビリティゾーンをわけて、Route53で冗長化予定。
もしかしたら、いくつかに構成を分けるかも。
ここからは別記事で書きます。
ここまででとりあえず、サーバは設定できています。
CloudWatchでサーバダウンを検知して、Lambdaで別のAZのインスタンスを上げる、とかまで書けるかなぁ。
参考
参考にさせて頂いたブログです。
設定自体はほとんどそのままの個所もあるのですが、記事自体をそのままコピペは行っておりません。もちろん自身の環境で試してから、書き直ししています。
非常に感謝しています。
ひとついえるのはクラスメソッド様素敵(´ω`)
https://dev.classmethod.jp/cloud/aws/openvpn24-aws/
https://dev.classmethod.jp/cloud/aws/openvpn-vpn-traffic/


