はじめに
今回はDockerとNuxt.jsとTypeScriptとExpressとPrismaを使って予約サイトを作成していきます。
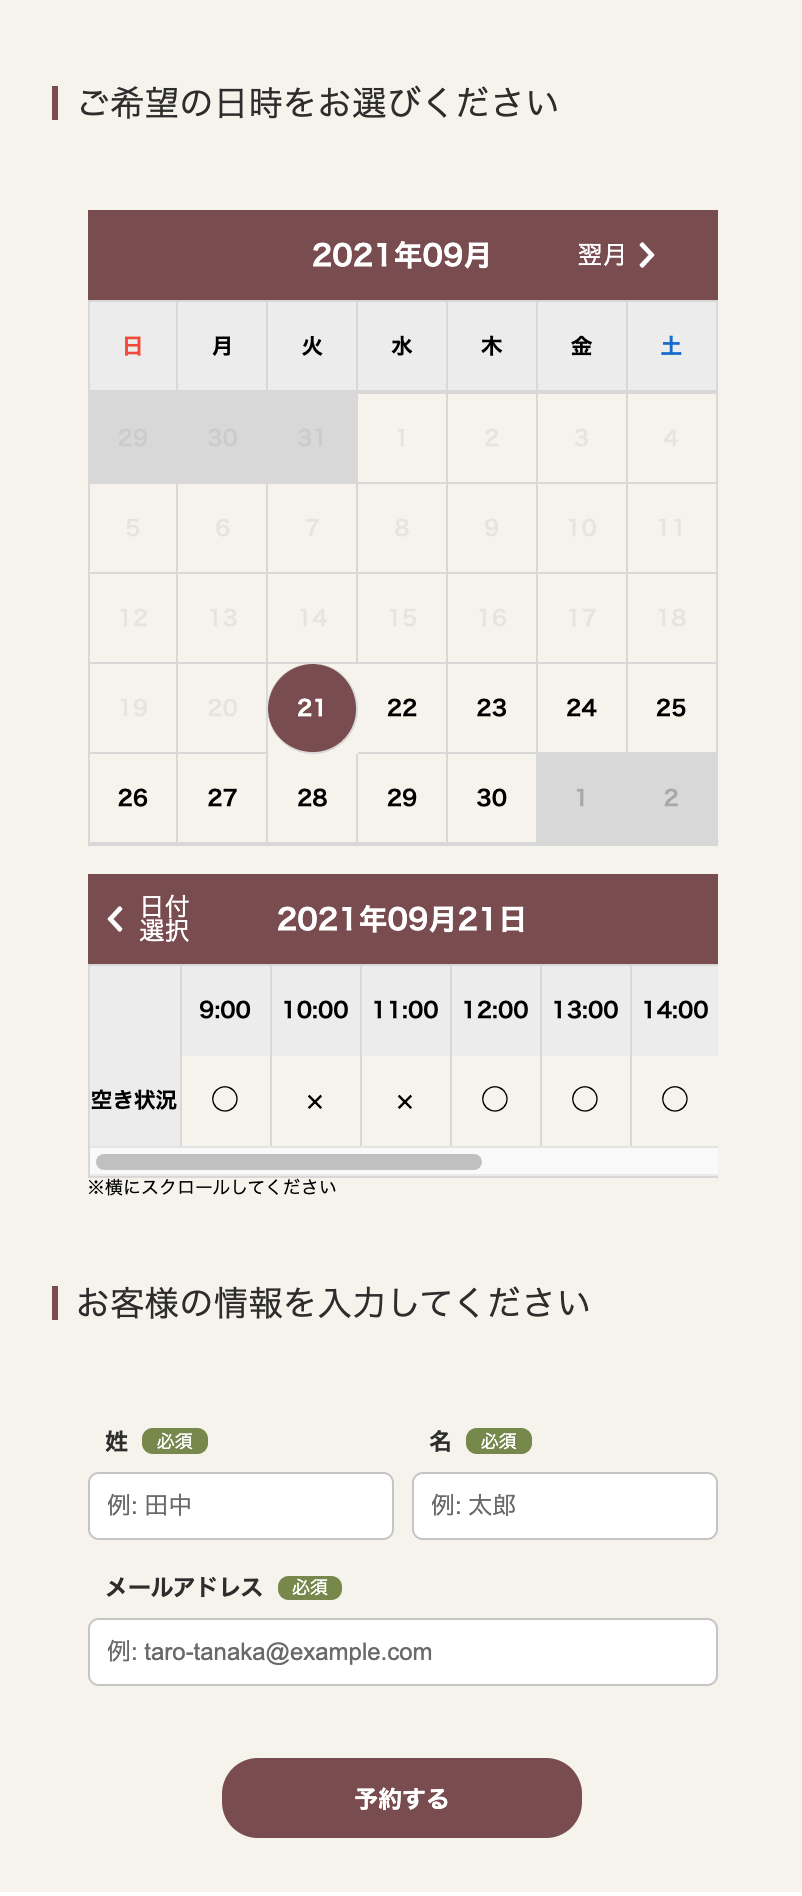
こんな感じのアプリです。
アプリの詳細
- GoogleCalendarの予定を見て、空いている時間に予約ができる
- 予約されたらDBに保存され、Googleカレンダーにも保存される


対象読者
- Dockerを使ったことがない方
- Nuxt.jsとExpressで何か作ってみたい方
- TypeScriptを使ったことがない方
- TypeScriptのORMであるPrismaを使ってみたい方
完成コード
それでは一緒に作っていきましょう!
Githubからクローン
Dockerから解説となると長くなるので省略します。
上記のファイルで環境構築が可能です。
以下の記事で具体的なやり方が書いてありますのでこちらを参考にしてください。
api/prisma/schema.prismaを修正する
今回作るテーブルは、UserとReservationの2つです。
User:Reservation = 1:Nの関係になります。

datasource db {
  provider = "mysql"
  url      = env("DATABASE_URL")
}

generator client {
  provider = "prisma-client-js"
}

+ model User {
+   id          Int           @id @default(autoincrement())
+   firstName   String
+   lastName    String
+   email       String        @unique
+   reservation Reservation[]
+ }

+ model Reservation {
+   id     Int    @id @default(autoincrement())
+   date   String
+   time   String
+   user   User?  @relation(fields: [userId], references: [id])
+   userId Int?
+ }
それでは、バックエンドから作成していきます。
まずはフォルダ構成に関してです。
. Nuxt-TypeScript-Express-Prisma-Reservation
├── src/
│   ├── controllers ・・・ビジネスロジックとフロントエンドを繋げる
│   │        └── ReservationController.ts
│   │        └── UserController.ts
│   ├── credentials ・・・GoogleCalendarを使うための認証ファイル
│   │        └── credentials.json
│   ├── helpers ・・・ビジネスロジック
│   │        └── google
│   │        │        └── insertEvent.ts
│   │        │        └── jwtClient.ts
│   │        │        └── listEvent.ts
│   │        │        └── types
|   │        │        │        └── listEvent.type.ts
│   ├── models ・・・ビジネスロジックとDB操作をまとめる
│   │        └── Reservations.ts
│   │        └── Users.ts
│   ├── repositories ・・・DB操作
│   │        └── reservation.repository.ts
│   │        └── user.repository.ts
│   ├── app.ts
│   ├── index.ts
momentをインストール
JavaScriptの日付操作用ライブラリである「Moment.js」を利用します。
$ docker-compose exec app npm install moment --save
GoogleCalendarを使うための準備
GoogleCalendarのAPIを使用するためにGCPのコンソールに入りましょう。
では、プロジェクトを作成し、GoogleCalendar APIを使えるようにしましょう。

では次にサービスアカウントを作成しましょう。

サービスアカウントが作成されたら、クレデンシャルファイルを作成しましょう。

これで完了です。
コード内でAPIが使えるようにするために、パッケージをインストールしましょう。
$ docker-compose exec app npm install googleapis@39 --save
最後にGoogleCalendarのカレンダーIDを.envに入力しましょう。

CALENDAR_ID = "XXXXXXXXX@gmail.com"
これで準備は完了です。
では、ビジネスロジックのhelpersから作成していきましょう。
【helpers】jwtClient
JWTクライアントをサービスアカウントで認証させるロジックです。
こちらは、Firebaseの記事になりますが一番わかりやすいためこちらの記事を参考として載せておきます。
// google
import { google, Auth } from 'googleapis';

// credential
import credentials from '../.././credentials/credentials.json';

export const jwtClient = (scopes: string[]) => {
  const jwtClient: Auth.JWT = new google.auth.JWT({
    email: credentials.client_email,
    key: credentials.private_key,
    keyFile: undefined,
    keyId: undefined,
    scopes: scopes,
    subject: undefined,
  });

  return jwtClient;
};
【helpers】insertEvent
イベントをカレンダーに追加するロジックです。
パッケージのドキュメントはこちらです。
公式サイトのドキュメントはこちらです。
パッケージのドキュメントに関しては、認証部分がごそっと抜けている。
GCPで、サービスアカウントを作成してキーを発行してクレデンシャル情報があるので、JWTで読み込む必要があります。
なので公式サイトを参考に作成していきます。
また、公式サイトのresourceはタイプの不一致のエラーが発生します。
こちらはGithubのissueに上がっています。
resourceをrequestBodyに修正することを忘れないでください。
// dotenv
import dotenv from 'dotenv';
dotenv.config();

// google
import { google, Auth, calendar_v3 } from 'googleapis';

export const insertEvent = async (
  firstName: string,
  lastName: string,
  email: string,
  date: string,
  time: string,
  jwt: Auth.JWT
) => {
  // カレンダー
  const calendar: calendar_v3.Calendar = google.calendar('v3');

  // イベント情報
  const event = {
    summary: `${firstName} ${lastName}のご予約`,
    description: `【お名前】 ${firstName} ${lastName}, \n【メールアドレス】 ${email}`,
    start: {
      dateTime: `${date}T${time}:00+09:00`,
      timeZone: 'Asia/Tokyo',
    },
    end: {
      dateTime: `${date}T${time}:00+09:00`,
      timeZone: 'Asia/Tokyo',
    },
  };

  // JWTの認証を行い問題なければイベントを追加する
  await jwt.authorize((err) => {
    if (err) {
      console.log(err);
    } else {
      calendar.events.insert({
        auth: jwt,
        calendarId: process.env.CALENDAR_ID,
        requestBody: event,
      });
    }
  });
};
【helpers】insertEvent
イベントのリストを表示するロジックです。
公式サイトのドキュメントはこちらです。
こちらのファイルはやっていることが多いので文章でも説明します。
- GoogleCalendarのイベントを取り出す
- そのイベントから何時に予定ができないかを表示する

ではコードを書いていきましょう。
// dotenv
import dotenv from 'dotenv';
dotenv.config();

// google
import { google, Auth, calendar_v3 } from 'googleapis';

// moment
import moment from 'moment';

// types
import { Events } from './types/listEvent.type';
import { start } from 'repl';

export const listEvent = async (date: string, jwt: Auth.JWT) => {
  // カレンダー
  const calendar: calendar_v3.Calendar = google.calendar('v3');

  // JWTの認証を行ってイベントのリストを表示する
  const calendars = await calendar.events.list({
    auth: jwt,
    calendarId: process.env.CALENDAR_ID,
    timeMax: `${date}T23:59:59.999Z`,
    timeMin: `${date}T00:00:00.000Z`,
    timeZone: 'Asia/Tokyo',
  });

  const results: calendar_v3.Schema$Event[] | undefined = calendars?.data.items;

  const events: Events = [];

  results?.forEach((result: calendar_v3.Schema$Event | undefined) => {
    const startDateTime = moment(result?.start?.dateTime);
    const endDateTime = moment(result?.end?.dateTime);

    const startDateTimeOClock = startDateTime.format('mm');
    const endDateTimeOClock = endDateTime.format('mm');

    // 予約の開始と終了の分が0の場合
    if (startDateTimeOClock === '00' && endDateTimeOClock === '00') {
      // 予約された時間が1時間以下とそれ以外で条件分岐を行う
      const differenceTime = endDateTime.diff(startDateTime, 'hours');

      // 1時間未満
      if (differenceTime <= 1) {
        events.push({
          date: result?.start?.dateTime?.substr(0, 10),
          time: result?.start?.dateTime?.substr(11, 5),
        });
      } else {
        // 1時間以上
        for (let i = 0; i < differenceTime; i++) {
          const START_DATE_TIME = startDateTime.add(i, 'hours').format();

          events.push({
            date: START_DATE_TIME.substr(0, 10),
            time: START_DATE_TIME.substr(11, 5),
          });
        }
      }
    } else {
      // 予約の開始と終了の分が0以外の場合
      const START_DATE_TIME = startDateTime.subtract(startDateTimeOClock, 'minute');
      let END_DATE_TIME;
      if (endDateTimeOClock === '00') {
        END_DATE_TIME = endDateTime;
      } else {
        END_DATE_TIME = endDateTime.add(60 - Number(endDateTimeOClock), 'minute');
      }

      // 予約された時間が1時間以下とそれ以外で条件分岐を行う
      const differenceTime = END_DATE_TIME.diff(START_DATE_TIME, 'hours');

      // 1時間未満
      if (differenceTime <= 1) {
        events.push({
          date: START_DATE_TIME.format('YYYY-MM-DD'),
          time: START_DATE_TIME.format('HH:mm'),
        });
      } else {
        // 1時間以上
        for (let i = 0; i < differenceTime; i++) {
          const ADD_START_DATE_TIME = START_DATE_TIME.add(i, 'hours').format();

          events.push({
            date: ADD_START_DATE_TIME.substr(0, 10),
            time: ADD_START_DATE_TIME.substr(11, 5),
          });
        }
      }
    }
  });

  return events;
};
TypeScriptの型定義ファイルを用意します。
export type Events = {
  date: string | undefined;
  time: string | undefined;
}[];
これでビジネスロジックのhelpersの作成が完了しました。
次に、DB操作を行うrepositoriesの作成をしていきましょう。
【repositories】user.repository.ts
findUser
「メールアドレスが一致するユーザーを1人取り出す」DB操作ロジックを作成します。
import { PrismaClient } from '@prisma/client';
const prisma = new PrismaClient();

const userRepository = {
  // メールアドレスが一致するユーザーを 1 人取り出す
  async findUser(email: string) {
    const user = await prisma.user.findUnique({
      where: {
        email: email,
      },
    });

    return user;
  },
};

export default userRepository;
registerUserReservation
「メールアドレスが一致したユーザーがいない場合、ユーザー情報と予約情報の登録を行う」DB操作ロジックを作成します。
import { PrismaClient } from '@prisma/client';
const prisma = new PrismaClient();

const userRepository = {
  // メールアドレスが一致するユーザーを 1 人取り出す
  async findUser(email: string) {
    const user = await prisma.user.findUnique({
      where: {
        email: email,
      },
    });

    return user;
  },

+ // メールアドレスが一致したユーザーがいない場合、ユーザー情報と予約情報の登録を行う
+ async registerUserReservation(
+   firstName: string,
+   lastName: string,
+   email: string,
+   date: string,
+   time: string
+ ) {
+   await prisma.user.create({
+     data: {
+      firstName: firstName,
+       lastName: lastName,
+       email: email,
+       reservation: {
+         create: {
+           date: date,
+           time: time,
+         },
+       },
+     },
+   });
+ },
};

export default userRepository;
【repositories】reservation.repository.ts
registerReservation
「メールアドレスが一致したユーザーがいた場合、予約情報のみ登録を行う」DB操作ロジックを作成します。
import { PrismaClient } from '@prisma/client';
const prisma = new PrismaClient();

const reservationRepository = {
  // メールアドレスが一致したユーザーがいた場合、予約情報のみ登録を行う
  async registerReservation(date: string, time: string, userId: number) {
    await prisma.reservation.create({
      data: {
        date: date,
        time: time,
        userId: userId,
      },
    });
  },
};

export default reservationRepository;
これでDB操作を行うrepositoriesの作成が完了しました。
次に、ビジネスロジックとDB操作をまとめるmodelsの作成をしていきましょう。
【models】Users.ts
// repositories
import userRepository from '../repositories/user.repository';
import reservationRepository from '../repositories/reservation.repository';

// helpers
import { jwtClient } from '../helpers/google/jwtClient';
import { insertEvent } from '../helpers/google/insertEvent';

const users = {
  async store(firstName: string, lastName: string, email: string, date: string, time: string) {
    try {
      // メールアドレスが一致するユーザーを取り出す
      const user = await userRepository.findUser(email);

      if (user) {
        // 予約情報を登録する
        await reservationRepository.registerReservation(date, time, user.id);
      } else {
        // ユーザーと予約情報を登録する
        await userRepository.registerUserReservation(firstName, lastName, email, date, time);
      }

      // 必要なスコープの定義
      const scopes = [
        'https://www.googleapis.com/auth/calendar',
        'https://www.googleapis.com/auth/calendar.events',
      ];

      // JWTクライアントをサービスアカウントで認証する
      const jwt = await jwtClient(scopes);

      // カレンダーに登録を行う
      await insertEvent(firstName, lastName, email, date, time, jwt);
    } catch (err) {
      console.log(err);
    }
  },
};

export default users;
【models】Reservations.ts
// helpers
import { jwtClient } from '../helpers/google/jwtClient';
import { listEvent } from '../helpers/google/listEvent';

const reservations = {
  async index(date: string) {
    // 必要なスコープの定義
    const scopes = [
      'https://www.googleapis.com/auth/calendar.readonly',
      'https://www.googleapis.com/auth/calendar',
      'https://www.googleapis.com/auth/calendar.events.readonly',
      'https://www.googleapis.com/auth/calendar.events',
    ];

    // JWTクライアントをサービスアカウントで認証する
    const jwt = await jwtClient(scopes);

    // イベントのリストを表示する
    const events = await listEvent(date, jwt);

    return events;
  },
};

export default reservations;
これでビジネスロジックとDB操作をまとめるmodelsの作成が完了しました。
次に、ビジネスロジックとフロントエンドを繋げるcontrollersの作成をしていきましょう。
【controllers】UserController.ts
import { Router, Request, Response } from 'express';
const router = Router();

// models
import users from '../models/users';

// POST /api/users/store
router.post('/store', async (req: Request, res: Response) => {
  const firstName: string = req.body.firstName;
  const lastName: string = req.body.lastName;
  const email: string = req.body.email;
  const date: string = req.body.date;
  const time: string = req.body.time;

  await users.store(firstName, lastName, email, date, time);
});

export default router;
【controllers】ReservationController.ts
import { Router, Request, Response } from 'express';
const router = Router();

// models
import reservations from '../models/reservations';

// GET /api/reservations/:date
router.get('/:date', async (req: Request, res: Response) => {
  const date = req.params.date;

  const events = await reservations.index(date);
  res.json(events);
});

export default router;
これでバックエンドの作成が完了しました。
次に、フロントエンドの作成をしていきましょう。
css-wipeのインストール
リセットCSSを採用します。
$ docker-compose exec front npm install css-wipe --save
これで、リセットCSSが読み込めます。
<template>
  <Nuxt />
</template>

<style lang="scss">
@import 'css-wipe';
</style>
FontAwesomeのインストール
アイコンを使うためにFontAwesomeをインストールします。
$ docker-compose exec front npm install @fortawesome/vue-fontawesome @fortawesome/fontawesome-svg-core @fortawesome/free-solid-svg-icons --save
nuxt.config.jsのファイルに追記します。
require('dotenv').config();
const { API_URL, API_URL_BROWSER } = process.env;

export default {
  head: {
    title: 'frontend',
    htmlAttrs: {
      lang: 'ja',
    },
    meta: [
      { charset: 'utf-8' },
      { name: 'viewport', content: 'width=device-width, initial-scale=1' },
      { hid: 'description', name: 'description', content: '' },
    ],
    link: [{ rel: 'icon', type: 'image/x-icon', href: '/favicon.ico' }],
  },

+ css: ['@fortawesome/fontawesome-svg-core/styles.css'],

+ plugins: ['@/plugins/fontawesome'],

  components: true,

  buildModules: ['@nuxt/typescript-build', '@nuxtjs/composition-api/module'],

  generate: {
    interval: 2000,
  },

  watchers: {
    webpack: {
      poll: true,
    },
  },

  modules: ['@nuxtjs/axios', '@nuxtjs/proxy', '@nuxtjs/dotenv'],

  env: {
    API_URL,
    API_URL_BROWSER,
  },

  proxy: {
    '/api': process.env.API_URL,
  },

  axios: {
    baseURL: process.env.API_URL,
    browserBaseURL: process.env.API_URL_BROWSER,
  },

  build: {},
};
次にプラグインファイルを追記する。
import Vue from 'vue';
import { FontAwesomeIcon } from '@fortawesome/vue-fontawesome';
import { config, library } from '@fortawesome/fontawesome-svg-core';
// solid Style
import { faChevronLeft, faChevronRight } from '@fortawesome/free-solid-svg-icons';

// nuxt.config.jsでCSSファイルを追加
config.autoAddCss = false;

// 利用するアイコンを配列に追加
const solidIcons = [faChevronLeft, faChevronRight];

// 利用するアイコンをlibraryに追加
solidIcons.forEach(icon => library.add(icon));

// グローバルコンポーネントに登録
Vue.component('fa', FontAwesomeIcon);
momentをインストール
JavaScriptの日付操作用ライブラリである「Moment.js」を利用します。
$ docker-compose exec front npm install moment --save
【コンポーネント作成】Atoms/Heading
見出しを作成します。
<template>
  <div class="heading-container">
    <h2 class="heading-content">{{ content }}</h2>
  </div>
</template>

<script lang="ts">
import { defineComponent } from '@nuxtjs/composition-api';

export default defineComponent({
  props: {
    content: {
      type: String,
      required: true,
    },
  },
});
</script>

<style lang="scss" scoped>
.heading {
  &-container {
    padding-top: 50px;
    padding-bottom: 50px;
  }
  &-content {
    margin-left: 30px;
    padding-left: 0.5em;
    font-size: 1.2rem;
    color: #333;
    border-left: 4px solid #89535a;
  }
}
</style>
【コンポーネント作成】Atoms/FormLabel
フォームのラベルを作成します。
<template>
  <div class="form-label">
    <div class="form-label-ttl">{{ title }}</div>
    <div class="form-label-op" :style="styles">{{ option }}</div>
  </div>
</template>

<script lang="ts">
import { defineComponent, computed, PropType } from '@nuxtjs/composition-api';

// type
import { Option, Props } from './types/FormLabel.type';

export default defineComponent({
  props: {
    title: {
      type: String,
      required: true,
    },
    option: {
      type: String as PropType<Option>,
      default: '必須',
    },
  },
  setup(props: Props) {
    const styles = computed(() => {
      if (props.option === '必須') {
        return {
          backgroundColor: '#7E954E',
          color: '#fff',
        };
      } else {
        return {
          backgroundColor: '#757171',
          color: '#e0e0e0',
        };
      }
    });

    return {
      styles,
    };
  },
});
</script>

<style lang="scss" scoped>
.form-label {
  margin-top: 10px;
  display: flex;
  align-items: center;

  &-ttl {
    font-size: 0.8rem;
    font-weight: bold;
    color: #333;
    margin-left: 10px;
  }

  &-op {
    font-size: 0.2rem;
    margin-left: 8px;
    padding: 2px 8px;
    border-radius: 6px;
  }
}
</style>
TypeScriptの型定義ファイルを用意します。
export type Option = '必須' | '任意';

export type Props = {
  title: string;
  option: Option;
};
【コンポーネント作成】Atoms/FormInput
フォームの入力欄を作成します。
<template>
  <div>
    <input
      class="form-input"
      :type="type"
      :placeholder="placeholder"
      :value="value"
      @input="$emit('input', $event.target.value)"
    />
  </div>
</template>

<script lang="ts">
import { defineComponent, PropType } from '@nuxtjs/composition-api';

// type
import { Type } from './types/FormInput.type';

export default defineComponent({
  props: {
    type: {
      type: String as PropType<Type>,
      default: 'text',
    },
    placeholder: {
      type: String,
      required: true,
    },
    value: {
      type: String,
      default: '',
      required: true,
    },
  },
});
</script>

<style lang="scss" scoped>
.form-input {
  display: block;
  width: 100%;
  padding: 10px 10px;
  margin: 10px 0;
  color: #333;
  border: solid 1px #ccc;
  border-radius: 6px;
  outline: 0;
  transition: 0.3s;

  &:focus {
    border: 1px solid #7e954e;
  }
}
</style>
TypeScriptの型定義ファイルを用意します。
export type Type = 'text' | 'email' | 'password';
【コンポーネント作成】Atoms/FormButton
フォームのボタンを作成します。
<template>
  <div class="form-button">
    <button class="button" @click="childClick">予約する</button>
  </div>
</template>

<script lang="ts">
import { defineComponent, PropType } from '@nuxtjs/composition-api';

// type
import { Click, Props } from './types/FormButton.type';

export default defineComponent({
  props: {
    click: {
      type: Function as PropType<Click>,
      required: true,
    },
    invalid: {
      type: Boolean,
    },
  },
  setup(props: Props) {
    const childClick = () => {
      props.click();
    };

    return {
      childClick,
    };
  },
});
</script>

<style lang="scss" scoped>
.form-button {
  padding-top: 30px;
  display: flex;
  justify-content: center;
}

.button {
  cursor: pointer;
  width: 200px;
  display: inline-block;
  padding: 0.7rem 0;
  font-weight: bold;
  color: #fff;
  background: #89535a;
  text-decoration: none;
  user-select: none;
  border: 1px #89535a solid;
  border-radius: 20px;
  transition: 0.4s ease;

  &:hover {
    color: #89535a;
    background: #fff;
  }
}
</style>
TypeScriptの型定義ファイルを用意します。
export type Click = {
  (): void;
};

export type Props = {
  click: Click;
  invalid: boolean;
};
【コンポーネント作成】Atoms/CalendarHeader
カレンダーのヘッダーを作成します。
<template>
  <div class="calendar-header">
    <div
      class="calendar-header-left"
      v-if="compareToday.yearMonth < compareCurrentDate.yearMonth"
      @click="grandChildPrevMonth()"
    >
      <span><fa icon="chevron-left" area-hidden="true" /></span>
      <p class="calendar-header-left-text">前月</p>
    </div>
    <div class="calendar-header-left empty" v-else></div>
    <p class="calendar-header-center">{{ getYearMonthToday }}</p>
    <div class="calendar-header-right" @click="grandChildNextMonth()">
      <p class="calendar-header-right-text">翌月</p>
      <span><fa icon="chevron-right" area-hidden="true" /></span>
    </div>
  </div>
</template>

<script lang="ts">
import { defineComponent, PropType } from '@nuxtjs/composition-api';

// types
import {
  CompareToday,
  CompareCurrentDate,
  ClickChildPrevMonth,
  ClickChildNextMonth,
  Props,
} from './types/CalendarHeader.type';

export default defineComponent({
  props: {
    compareToday: {
      type: Object as PropType<CompareToday>,
    },
    compareCurrentDate: {
      type: Object as PropType<CompareCurrentDate>,
    },
    getYearMonthToday: {
      type: String,
    },
    clickChildPrevMonth: {
      type: Function as PropType<ClickChildPrevMonth>,
    },
    clickChildNextMonth: {
      type: Function as PropType<ClickChildNextMonth>,
    },
  },
  setup(props: Props) {
    const grandChildPrevMonth = () => {
      props.clickChildPrevMonth();
    };
    const grandChildNextMonth = () => {
      props.clickChildNextMonth();
    };

    return {
      grandChildPrevMonth,
      grandChildNextMonth,
    };
  },
});
</script>

<style lang="scss" scoped>
.calendar-header {
  padding: 10px;
  height: 50px;
  width: 100%;
  max-width: 350px;
  background: #89535a;
  color: #fff;
  display: flex;
  justify-content: space-around;
  align-items: center;
  margin: 0 auto;

  &-left {
    display: flex;
    align-items: center;
    cursor: pointer;

    &.empty {
      width: 44px;
    }

    &-text {
      margin-left: 6px;
      font-size: 0.875rem;
    }
  }

  &-center {
    font-weight: bold;
  }

  &-right {
    display: flex;
    align-items: center;
    cursor: pointer;

    &-text {
      margin-right: 6px;
      font-size: 0.875rem;
    }
  }
}
</style>
TypeScriptの型定義ファイルを用意します。
export type CompareToday = {
  yearMonth: number;
  yearMonthDay: number;
};

export type CompareCurrentDate = {
  yearMonth: number;
  yearMonthDay: number;
};

export type ClickChildPrevMonth = {
  (): void;
};

export type ClickChildNextMonth = {
  (): void;
};

export type Props = {
  compareToday: CompareToday;
  compareCurrentDate: CompareCurrentDate;
  getYearMonthToday: string;
  clickChildPrevMonth: ClickChildPrevMonth;
  clickChildNextMonth: ClickChildNextMonth;
};
【コンポーネント作成】Atoms/CalendarTable
カレンダーを作成します。
<template>
  <table class="calendar-table">
    <thead class="calendar-table">
      <tr class="calendar-table-tr">
        <th class="calendar-table-tr-th">日</th>
        <th class="calendar-table-tr-th">月</th>
        <th class="calendar-table-tr-th">火</th>
        <th class="calendar-table-tr-th">水</th>
        <th class="calendar-table-tr-th">木</th>
        <th class="calendar-table-tr-th">金</th>
        <th class="calendar-table-tr-th">土</th>
      </tr>
    </thead>
    <tbody class="calendar-table">
      <tr class="calendar-table-tr" v-for="(week, index) in getCalendar" :key="index">
        <td
          class="calendar-table-tr-td"
          v-for="(day, index) in week"
          :key="index"
          :class="[
            { outside: compareCurrentDate.yearMonth !== day.yearMonth },
            { today: compareToday.yearMonthDay === day.yearMonthDay },
            { notClick: compareToday.yearMonthDay > day.yearMonthDay },
          ]"
          @click="grandChildChooseDate(day.googleCalendarDate)"
        >
          {{ day.day }}
        </td>
      </tr>
    </tbody>
  </table>
</template>

<script lang="ts">
import { defineComponent, PropType } from '@nuxtjs/composition-api';

// types
import {
  GetCalendar,
  CompareCurrentDate,
  CompareToday,
  ClickChildChooseDate,
  Props,
} from './types/CalendarTable.type';

export default defineComponent({
  props: {
    getCalendar: {
      type: Array as PropType<GetCalendar>,
    },
    compareCurrentDate: {
      type: Object as PropType<CompareCurrentDate>,
    },
    compareToday: {
      type: Object as PropType<CompareToday>,
    },
    clickChildChooseDate: {
      type: Function as PropType<ClickChildChooseDate>,
    },
  },
  setup(props: Props) {
    const grandChildChooseDate = (date) => {
      props.clickChildChooseDate(date);
    };

    return {
      grandChildChooseDate,
    };
  },
});
</script>

<style lang="scss" scoped>
.calendar-table {
  width: 100%;
  max-width: 350px;
  margin: 0 auto;
  border: 1px solid #ddd;
  border-right-width: 0;
  text-align: center;

  &-tr {
    display: flex;
    &:last-child {
      &-th,
      &-td {
        border-bottom-width: 0;
      }
    }

    &-th {
      flex: 1;
      height: 50px;
      font-size: 0.75rem;
      background-color: #efefef;
      border-bottom: 1px solid #ddd;
      border-right: 1px solid #ddd;
      font-weight: bold;
      line-height: 50px;

      &:first-child {
        color: #ff4136;
      }
      &:last-child {
        color: #0074d9;
      }
    }

    &-td {
      flex: 1;
      height: 50px;
      font-size: 0.75rem;
      border-bottom: 1px solid #ddd;
      border-right: 1px solid #ddd;
      font-weight: bold;
      line-height: 50px;
      cursor: pointer;
    }
  }
}

.outside {
  background-color: #ddd;
  color: rgba(0, 1, 17, 0.2);
}

.today {
  background: #89535a;
  border-radius: 50%;
  color: #fff;
  font-weight: bold;
}

.notClick {
  color: rgba(0, 1, 17, 0.05);
  pointer-events: none;
}
</style>
TypeScriptの型定義ファイルを用意します。
export type GetCalendar = {
  day: number;
  date: string;
  month: string;
  yearMonth: number;
  yearMonthDay: number;
  googleCalendarDate: string;
}[];

export type CompareCurrentDate = {
  yearMonth: number;
  yearMonthDay: number;
};

export type CompareToday = {
  yearMonth: number;
  yearMonthDay: number;
};

export type ClickChildChooseDate = {
  (date: string): void;
};

export type Props = {
  getCalendar: GetCalendar;
  compareCurrentDate: CompareCurrentDate;
  compareToday: CompareToday;
  clickChildChooseDate: ClickChildChooseDate;
};
【コンポーネント作成】Atoms/TimeHeader
タイムピッカーのヘッダーを作成します。
<template>
  <div class="time-header">
    <div class="time-header-left" @click="grandChildPrevSelectDate()">
      <span class="time-header-left-header-arrow">
        <fa icon="chevron-left" />
      </span>
      <p class="time-header-left-text">日付選択</p>
    </div>
    <p class="time-header-middle">{{ dateFormat }}</p>
    <div class="time-header-right"></div>
  </div>
</template>

<script lang="ts">
import { defineComponent, PropType } from '@nuxtjs/composition-api';

// types
import { ClickChildPrevSelectDate } from './types/TimeHeader.type';

export default defineComponent({
  props: {
    dateFormat: {
      type: String,
    },
    clickChildPrevSelectDate: {
      type: Function as PropType<ClickChildPrevSelectDate>,
    },
  },
  setup(props) {
    const grandChildPrevSelectDate = () => {
      props.clickChildPrevSelectDate();
    };

    return {
      grandChildPrevSelectDate,
    };
  },
});
</script>

<style lang="scss" scoped>
.time-header {
  padding: 10px;
  height: 50px;
  background: #89535a;
  color: #fff;
  display: flex;
  justify-content: space-between;
  align-items: center;

  &-left {
    display: flex;
    align-items: center;
    cursor: pointer;
    width: 50px;

    &-text {
      margin-left: 6px;
      font-size: 0.875rem;
    }
  }

  &-middle {
    font-weight: bold;
  }

  &-right {
    width: 50px;
  }
}
</style>
TypeScriptの型定義ファイルを用意します。
export type ClickChildPrevSelectDate = {
  (): void;
};
【コンポーネント作成】Atoms/TimePicker
タイムピッカーを作成します。
<template>
  <div class="time-table-header">
    <table class="time-table">
      <thead class="time-table-thead">
        <tr class="time-table-tr">
          <th class="time-table-th sticky"></th>
          <th class="time-table-th" v-for="(time, index) in timeTable" :key="index">
            {{ time.clock }}
          </th>
        </tr>
      </thead>
      <tbody>
        <tr class="time-table-tr">
          <th class="time-table-th sticky">空き状況</th>
          <td
            class="time-table-td"
            v-for="(time, index) in timeTable"
            :key="index"
            @click="grandChildChooseTime(time.clock)"
          >
            <span v-if="time.isEmpty">○</span>
            <span v-else>×</span>
          </td>
        </tr>
      </tbody>
    </table>
  </div>
</template>

<script lang="ts">
import { defineComponent, PropType } from '@nuxtjs/composition-api';

// types
import { TimeTable, ClickChildChooseTime, Props } from './types/TimePicker.type';

export default defineComponent({
  props: {
    timeTable: {
      type: Array as PropType<TimeTable>,
    },
    clickChildChooseTime: {
      type: Function as PropType<ClickChildChooseTime>,
    },
  },
  setup(props: Props) {
    const grandChildChooseTime = (time) => {
      props.clickChildChooseTime(time);
    };

    return {
      grandChildChooseTime,
    };
  },
});
</script>

<style lang="scss" scoped>
.time-table-header {
  border: 1px solid #ddd;
  border-right-width: 0;
  overflow-x: auto;

  & .time-table {
    width: 100%;
    text-align: center;

    &-tr {
      &:last-child {
        & th,
        & td {
          border-bottom-width: 0;
        }
      }
    }

    &-th {
      min-width: 50px;
      height: 50px;
      font-size: 0.75rem;
      background-color: #efefef;
      border-bottom: 1px solid #ddd;
      border-right: 1px solid #ddd;
      font-weight: bold;
      vertical-align: middle;
      white-space: nowrap;

      &.sticky {
        position: sticky;
        left: 0;
      }
    }

    &-td {
      border-bottom: 1px solid #ddd;
      border-right: 1px solid #ddd;
      vertical-align: middle;
      white-space: nowrap;
    }
  }
}
</style>
TypeScriptの型定義ファイルを用意します。
export type TimeTable = {
  clock: string;
  isEmpty: boolean;
}[];

export type ClickChildChooseTime = {
  (time: string): void;
};

export type Props = {
  timeTable: TimeTable;
  clickChildChooseTime: ClickChildChooseTime;
};
これで、Atomsが完成しました。
次に、Moleculesの作成をしていきます。
【コンポーネント作成】Molecules/Calendar
カレンダーを作成します。
<template>
  <div>
    <!-- カレンダーヘッダー -->
    <CalendarHeader
      :compareToday="compareToday"
      :compareCurrentDate="compareCurrentDate"
      :getYearMonthToday="getYearMonthToday"
      :clickChildPrevMonth="childPrevMonth"
      @childPrevMonth="childPrevMonth"
      :clickChildNextMonth="childNextMonth"
      @childNextMonth="childNextMonth"
    />
    <!-- カレンダーテーブル -->
    <CalendarTable
      :getCalendar="getCalendar"
      :compareCurrentDate="compareCurrentDate"
      :compareToday="compareToday"
      :clickChildChooseDate="childChooseDate"
      @childChooseDate="childChooseDate"
    />
  </div>
</template>

<script lang="ts">
import { defineComponent, ref, computed, PropType } from '@nuxtjs/composition-api';
import moment from 'moment';

// components
import CalendarHeader from '../Atoms/CalendarHeader.vue';
import CalendarTable from '../Atoms/CalendarTable.vue';

// types
import { ClickPrevMonth, ClickNextMonth, ClickChooseDate, Props } from './types/Calendar.type';

export default defineComponent({
  components: {
    CalendarHeader,
    CalendarTable,
  },
  props: {
    currentDate: {
      type: Object,
    },
    today: {
      type: Object,
    },
    clickPrevMonth: {
      type: Function as PropType<ClickPrevMonth>,
    },
    clickNextMonth: {
      type: Function as PropType<ClickNextMonth>,
    },
    clickChooseDate: {
      type: Function as PropType<ClickChooseDate>,
    },
  },
  setup(props: Props) {
    // computed
    const getStartDate = computed(() => {
      let date = moment(props.currentDate);
      date.startOf('month');
      const dayOfWeek = date.day();
      return date.subtract(dayOfWeek, 'days');
    });

    const getEndDate = computed(() => {
      let date = moment(props.currentDate);
      date.endOf('month');
      const dayOfWeek = date.day();
      return date.add(6 - dayOfWeek, 'days');
    });

    const getCalendar = computed(() => {
      let startDate = getStartDate.value;
      const endDate = getEndDate.value;
      const weekNumber = Math.ceil(endDate.diff(startDate, 'days') / 7);

      let calendars = [];

      for (let week = 0; week < weekNumber; week++) {
        let weekRow = [];
        for (let day = 0; day < 7; day++) {
          weekRow.push({
            day: startDate.get('date'),
            date: startDate.format('DD'),
            month: startDate.format('MM'),
            yearMonth: Number(startDate.format('YYYYMM')),
            yearMonthDay: Number(startDate.format('YYYYMMDD')),
            googleCalendarDate: String(startDate.format('YYYY-MM-DD')),
          });
          startDate.add(1, 'days');
        }
        calendars.push(weekRow);
      }
      return calendars;
    });

    const getYearMonthToday = computed(() => {
      return moment(props.currentDate).format('YYYY年MM月');
    });

    const compareToday = computed(() => {
      return {
        yearMonth: Number(moment(props.today).format('YYYYMM')),
        yearMonthDay: Number(moment(props.today).format('YYYYMMDD')),
      };
    });

    const compareCurrentDate = computed(() => {
      return {
        yearMonth: Number(moment(props.currentDate).format('YYYYMM')),
        yearMonthDay: Number(moment(props.currentDate).format('YYYYMMDD')),
      };
    });

    // methods
    const childPrevMonth = () => {
      props.clickPrevMonth();
    };

    const childNextMonth = () => {
      props.clickNextMonth();
    };

    const childChooseDate = (date) => {
      props.clickChooseDate(date);
    };

    return {
      // computed
      getStartDate,
      getEndDate,
      getCalendar,
      getYearMonthToday,
      compareToday,
      compareCurrentDate,
      // methods
      childPrevMonth,
      childNextMonth,
      childChooseDate,
    };
  },
});
</script>
TypeScriptの型定義ファイルを用意します。
export type ClickPrevMonth = {
  (): void;
};
export type ClickNextMonth = {
  (): void;
};
export type ClickChooseDate = {
  (date: string): void;
};

export type Props = {
  currentDate: object;
  today: object;
  clickPrevMonth: ClickPrevMonth;
  clickNextMonth: ClickNextMonth;
  clickChooseDate: ClickChooseDate;
};
【コンポーネント作成】Molecules/Time
タイムピッカーを作成します。
<template>
  <div class="time-wrapper">
    <!-- タイムピッカーヘッダ -->
    <TimeHeader
      :dateFormat="dateFormat"
      :clickChildPrevSelectDate="childPrevSelectDate"
      @childPrevSelectDate="childPrevSelectDate"
    />
    <!-- タイムピッカー -->
    <TimePicker
      :timeTable="timeTable"
      :clickChildChooseTime="childChooseTime"
      @childChooseTime="childChooseTime"
    />
    <p class="supplement">※横にスクロールしてください</p>
  </div>
</template>

<script lang="ts">
import { defineComponent, ref, computed, onMounted, PropType } from '@nuxtjs/composition-api';
import moment from 'moment';

// components
import TimeHeader from '../Atoms/TimeHeader.vue';
import TimePicker from '../Atoms/TimePicker.vue';

// types
import {
  Reservations,
  TimeTable,
  ClickPrevSelectDate,
  ClickChooseTime,
  Props,
} from './types/Time.type';

export default defineComponent({
  components: {
    TimeHeader,
    TimePicker,
  },
  props: {
    date: {
      type: String,
    },
    reservations: {
      type: Array as PropType<Reservations>,
    },
    today: {
      type: Object,
    },
    timeTable: {
      type: Array as PropType<TimeTable>,
    },
    clickPrevSelectDate: {
      type: Function as PropType<ClickPrevSelectDate>,
    },
    clickChooseTime: {
      type: Function as PropType<ClickChooseTime>,
    },
  },
  setup(props: Props) {
    // computed
    const dateFormat = computed(() => {
      return moment(props.date).format('YYYY年MM月DD日');
    });

    // methods
    const childPrevSelectDate = () => {
      props.clickPrevSelectDate();
    };

    const childChooseTime = (time) => {
      props.clickChooseTime(time);
    };

    return {
      // computed
      dateFormat,
      // methods
      childPrevSelectDate,
      childChooseTime,
    };
  },
});
</script>

<style lang="scss" scoped>
// wrapper
.time-wrapper {
  padding: 0 50px;
  max-width: 450px;
  margin: 0 auto;
  text-align: center;
}

.supplement {
  font-size: 0.5rem;
  text-align: left;
}
</style>
TypeScriptの型定義ファイルを用意します。
export type Reservations = {
  date: string;
  id: number;
  time: string;
  userId: number;
}[];
export type TimeTable = {
  clock: string;
  isEmpty: boolean;
}[];
export type ClickPrevSelectDate = {
  (): void;
};
export type ClickChooseTime = {
  (time: string): void;
};

export type Props = {
  date: string;
  reservations: Reservations;
  today: object;
  timeTable: TimeTable;
  clickPrevSelectDate: ClickPrevSelectDate;
  clickChooseTime: ClickChooseTime;
};
これで、Moleculesが完成しました。
次に、Organismsの作成をしていきます。
【コンポーネント作成】Organisms/CalendarTime
カレンダーとタイムピッカーを作成します。
<template>
  <div>
    <Calendar
      :currentDate="currentDate"
      :today="today"
      :clickPrevMonth="prevMonth"
      @prevMonth="prevMonth()"
      :clickNextMonth="nextMonth"
      @nextMonth="nextMonth()"
      :clickChooseDate="chooseDate"
      @chooseDate="chooseDate(date)"
    />
    <br />
    <Time
      :date="date"
      :reservations="reservations"
      :today="today"
      :timeTable="timeTable"
      :clickPrevSelectDate="prevSelectDate"
      @prevSelectDate="prevSelectDate()"
      :clickChooseTime="chooseTime"
      @chooseTime="chooseTime(time)"
    />
  </div>
</template>

<script lang="ts">
import { defineComponent, ref, onMounted, useContext } from '@nuxtjs/composition-api';
import axios from '@nuxtjs/axios';
import moment from 'moment';

// components
import Calendar from '../Molecules/Calendar.vue';
import Time from '../Molecules/Time.vue';

export default defineComponent({
  components: {
    Calendar,
    Time,
  },
  setup() {
    // axios
    const { $axios } = useContext();

    // onMounted
    onMounted(async () => {
      if (sessionStorage.date) {
        date.value = sessionStorage.date;
      }

      const sessionDate = sessionStorage.date;
      if (sessionDate) {
        reservations.value = await $axios.$get(`/api/reservations/${sessionDate}`);
      } else {
        const todayFormat = today.value.format('YYYY-MM-DD');
        reservations.value = await $axios.$get(`/api/reservations/${todayFormat}`);
      }

      reservations.value.forEach((reservation) => {
        timeTable.value.forEach((time) => {
          if (reservation.time === time.clock) {
            time.isEmpty = false;
          }
        });
      });
    });

    // data
    const currentDate = ref<any>(moment());
    const today = ref<any>(moment());
    const date = ref<string>();
    const reservations = ref<string[]>();
    const timeTable = ref<string[]>([
      { clock: '9:00', isEmpty: true },
      { clock: '10:00', isEmpty: true },
      { clock: '11:00', isEmpty: true },
      { clock: '12:00', isEmpty: true },
      { clock: '13:00', isEmpty: true },
      { clock: '14:00', isEmpty: true },
      { clock: '15:00', isEmpty: true },
      { clock: '16:00', isEmpty: true },
      { clock: '17:00', isEmpty: true },
      { clock: '18:00', isEmpty: true },
    ]);

    // methods
    const prevMonth = () => {
      currentDate.value = moment(currentDate.value).subtract(1, 'month');
    };

    const nextMonth = () => {
      currentDate.value = moment(currentDate.value).add(1, 'month');
    };

    const chooseDate = (date) => {
      window.location.href = 'http://localhost:3000';
      sessionStorage.date = date;
    };

    const prevSelectDate = () => {
      sessionStorage.date = '';
      sessionStorage.time = '';
      window.location.href = 'http://localhost:3000';
    };

    const chooseTime = (time) => {
      sessionStorage.time = time;
      window.location.href = 'http://localhost:3000';
    };

    return {
      // data
      currentDate,
      today,
      date,
      reservations,
      timeTable,
      // methods
      prevMonth,
      nextMonth,
      chooseDate,
      prevSelectDate,
      chooseTime,
    };
  },
});
</script>
【コンポーネント作成】Organisms/Form
フォームを作成します。
<template>
  <div class="form">
    <div class="form-name-container">
      <div class="form-name-container-item">
        <FormLabel :title="'姓'" />
        <FormInput :placeholder="'例: 田中'" :value="firstName" @input="firstName = $event" />
      </div>
      <div class="form-name-container-item">
        <FormLabel :title="'名'" />
        <FormInput :placeholder="'例: 太郎'" :value="lastName" @input="lastName = $event" />
      </div>
    </div>
    <FormLabel :title="'メールアドレス'" />
    <FormInput
      :type="'email'"
      :placeholder="'例: taro-tanaka@example.com'"
      :value="email"
      @input="email = $event"
    />
    <FormButton :click="submit" @submit="submit()" />
  </div>
</template>

<script lang="ts">
import { defineComponent, ref, useContext } from '@nuxtjs/composition-api';
import axios from '@nuxtjs/axios';

// component
import FormLabel from '../Atoms/FormLabel.vue';
import FormInput from '../Atoms/FormInput.vue';
import FormButton from '../Atoms/FormButton.vue';

export default defineComponent({
  components: {
    FormLabel,
    FormInput,
    FormButton,
  },
  setup() {
    // axios
    const { $axios } = useContext();

    // data
    const firstName = ref<string | undefined>();
    const lastName = ref<string | undefined>();
    const email = ref<string | undefined>();

    const submit = async () => {
      const date = sessionStorage.date;
      const time = sessionStorage.time;

      sessionStorage.date = '';
      sessionStorage.time = '';

      window.location.href = 'http://localhost:3000';

      await $axios.$post('/api/users/store', {
        firstName: firstName.value,
        lastName: lastName.value,
        email: email.value,
        date: date,
        time: time,
      });
    };

    return {
      // data
      firstName,
      lastName,
      email,
      // methods
      submit,
    };
  },
});
</script>

<style lang="scss" scoped>
.form {
  padding: 0px 50px 30px 50px;
  &-name-container {
    display: flex;
    align-items: center;

    &-item {
      width: 100%;
      &:nth-child(1) {
        margin-right: 5px;
      }

      &:nth-child(2) {
        margin-left: 5px;
      }
    }
  }
}
</style>
これで、Organismsが完成しました。
frontend/pages/index.vueの作成
上記までで作成したOrganismsを使って、pages/index.vueの修正を行いましょう。
<template>
  <div class="reservation-container">
    <Heading :content="'ご希望の日時をお選びください'" />
    <CalendarTime />
    <Heading :content="'お客様の情報を入力してください'" />
    <Form />
  </div>
</template>

<script lang="ts">
import { defineComponent } from '@nuxtjs/composition-api';

// component
import Heading from '../components/Atoms/Heading.vue';
import Form from '../components/Organisms/Form.vue';
import CalendarTime from '../components/Organisms/CalendarTime.vue';

export default defineComponent({
  components: {
    Heading,
    Form,
    CalendarTime,
  },
});
</script>

<style lang="scss" scoped>
.reservation {
  &-container {
    width: 100%;
    background: #f7f5ee;
    max-width: 450px;
    margin: 0 auto;
  }
}
</style>
これでフロントエンドは完成です。