初めてUnityでのテストコードを学びましたので、備忘録として残します。
Unityプロジェクトの作成
テスト開発するためにUnityプロジェクトを新規作成します。
Unity Test Ruuner の活用
Unityの標準で搭載されているテストツールです。
Unityのメニュー画面からWindow>General>Test Runnerで開くことが出来ます。
テスト方法には2つの方法があります。
Playモード:実際にバックグラウンドでアプリを起動しながらテストします。
Editモード:別途Editモード用のファイルを追加してテストできます。 テスト時のアプリ起動はしません。
テストするファイルを作成
テストしたいファイルを用意しておきます。
using System.Collections;
using System.Collections.Generic;
using UnityEngine;

public class SoundManager : MonoBehaviour
{

    public static SoundManager instance;


    private void Awake()
    {
        if(instance == null)
        {
            instance = this;
            DontDestroyOnLoad(this.gameObject);
        }
        else
        {
            Destroy(this.gameObject);

        }
    }
    //--シングルトン終わり--
    public AudioSource audioSourceBGM; //BGMのスピーカー
    public AudioClip[] audioClipsBGM; //BGMの素材 (0:Title, 1:Town, 2:Quest, 3:Battle)

    public AudioSource audioSourceSE; //SEのスピーカー
    public AudioClip[] audioClipsSE; //ならす素材
    private string v;

    public SoundManager(string v)
    {
        this.v = v;
    }

    public void StopBGM()
    {
        audioSourceBGM.Stop();
    }

    public void StopSE()
    {
        audioSourceSE.Stop();
    }

    // Start is called before the first frame update
    void Start()
    {
        PlayBGM("Title");

    }

    public void PlayBGM(string sceneName)
    {
        audioSourceBGM.Stop();
        switch (sceneName)
        {
            default:
            case "Title":
                audioSourceBGM.clip = audioClipsBGM[0];
                break;
            case "Town":
                audioSourceBGM.clip = audioClipsBGM[1];
                break;
            case "Quest":
                audioSourceBGM.clip = audioClipsBGM[2];
                break;
            case "Battle":
                audioSourceBGM.clip = audioClipsBGM[3];
                break;

        }
        audioSourceBGM.Play();

    }


    public void PlaySE(int index)
    {
        audioSourceSE.PlayOneShot(audioClipsSE[index]); //SEを一度鳴らす

        this.count = 0;
    }

    public int count { get; private set; }
    public int GetName() { return this.count; }


}
バックグランドBGMの設定やボタンクリック時に音が鳴る設定をしています。
ボタンが鳴るときにPlaySEが起動するのですが、その時にカウントに0を代入するようにしています。
テストコードの作成
テストするためのコードを記述します。
TestRunnerの画面からTestsフォルダを作成してテストファイルを作成します。
using System.Collections;
using System.Collections.Generic;
using NUnit.Framework;
using UnityEngine;
using UnityEngine.TestTools;


namespace Tests
{
    public class NewTestScript
    {


        // A UnityTest behaves like a coroutine in Play Mode. In Edit Mode you can use
        // `yield return null;` to skip a frame.


        [UnityTest]
        public IEnumerator SoundManagerTest()
        {
            var x = new SoundManager("count");

            //start()
            Assert.AreEqual(0,x.GetName());
            yield return null;

        }
    }
}
countの値と予測値を比べて正しければテストが通るようにしています。
テスト
テストコードを記述したら、テストします。
今回はPlayモードで実行しています。
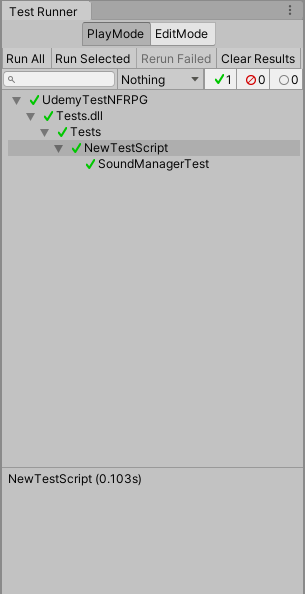
左上のRun Allでテストを実行します。
結果が正しければすべて緑のチェックがつきます。
まとめ
Unityでテスト開発するための手順を書きました。
PlayモードとEditモードの選択ができるので、必要に応じて使い分けてください。
テストするファイルの用意とテストコードを用意する必要があります。