本記事について
「TensorFlow開発入門」を読んで学んだことをアウトプットするための記事です。
追記:限定記事として公開してあったので、一般記事に変更しました。
環境
基本的な環境は以下の通り
- anaconda 3
- jupyter notebook
- python 3.6.10
参考にした書籍が2018年4月に出版されたものなので、書籍のままのversionだとエラーが出ます。
したがってversionを以下のように指定します。
tensorflowとtensorflow-gpuについてはどちらかをインストールしてください。
CUDAとcuDNNはtensorflow-gpuをインストールした場合に導入してください。
- tensorflow 1.14.0
- tensorflow-gpu 1.14.0
- CUDA 10.0
- cuDNN 7.4
- keras 2.3.1
- opencv 4.4.0
- numpy 1.18.5
- scipy 1.5.0
- matplotlib 3.2.2
- pillow 7.2.0
- h5py 2.10.0
ローカルマシンで行ったので、PCの詳細も載せておきます。
- windows 10 home 64bit
- CPU : Ryzen 7 2700x
- メモリ : 16GB
- GPU : RTX 2060
行うこと
おなじみmnistの手書き数字の分類をCNNで行います。
手順
大まかに以下のような手順で行います。
- データの読み込みと整形
- 畳み込み層と全結合層によるネットワークの構築
- 学習と評価
コードに関して
jupyter notebook に書いたものをコピペして貼り付けていきます。
本題
データの読み込みと確認
from tensorflow.python.keras.datasets import mnist
(x_train, y_train), (x_test, y_test) = mnist.load_data()

print('shape of x_train:', x_train.shape)
print('shape of y_train:', y_train.shape)
print('shape of x_test:', x_test.shape)
print('shape of y_test:', y_test.shape)

# shape of x_train: (60000, 28, 28)
# shape of y_train: (60000,)
# shape of x_test: (10000, 28, 28)
# shape of y_test: (10000,)
ここで注意すべきなのは、手書き文字のデータが「チャネル」の情報を保持していないことである。
データの整形
学習データはチャネルを持つ必要がある.
→ 3次元テンソルから4次元テンソルに変更
x_train = x_train.reshape(60000, 28, 28, 1)
x_test = x_test.reshape(10000, 28, 28, 1)
学習データは1ピクセルに 0~255 の値を保持している.
→ 標準化(0~1の範囲にまとめる)
x_train = x_train / 255.
x_test = x_test / 255.
正解データは0~9の数字として記録されている.
→ one-hot表現 に変更
from tensorflow.python.keras.utils import to_categorical
y_train = to_categorical(y_train, 10)
y_test = to_categorical(y_test, 10)
画像を表示してみる
画像データは数値の配列として入っているので、画像データに変換してみます。
from tensorflow.python.keras.preprocessing.image import array_to_img
from IPython.display import display_png
display_png(array_to_img(x_train[0]))

このような手書きの数字を分類していきます。
ネットワークの構築
keras の Sequential API では 各層を「レイヤー」と呼び、レイヤーを追加することでネットワークを構築する.
よく使用されるレイヤーの引数を記述しておく.
| 引数 | 詳細 |
|---|---|
| filters | 生成する特徴量マップの数=生成するカーネル(フィルタ)の数 |
| kernel_size | カーネルのサイズ |
| activation | 使用する活性化関数 |
| padding | 入力画像に対してパディングを行うかの設定('same'で入出力のサイズが同じになる) |
| input_shape | 入力データのサイズを指定する(最初の層のみ指定) |
畳み込み層への理解を深める
畳み込みは「畳み込み層」「プーリング層」の2つから構成される.
畳み込み層
入力からウィンドウを切り出し、ウィンドウとフィルタの内積を求める.
求めた内積は特徴量マップへ代入される.
特徴量マップは次の層への入力になる.
kerasでは Conv2D で層を追加できる.
プーリング層
プーリング層は入力された画像を区分けし、区分けされた小行列ごとに最大値や平均を求める処理を行う.
基本的に出力されるのは、入力よりもサイズが小さいデータである.
最大値を求める場合のプーリング層は MaxPool2D で追加できる.
from tensorflow.python.keras.models import Sequential
from tensorflow.python.keras.layers import Conv2D, MaxPool2D, Flatten, Dense

model = Sequential()

model.add(Conv2D(filters=64, kernel_size=(3, 3), activation='relu', padding='same', input_shape=(28, 28, 1), name='b1_Conv1'))
model.add(Conv2D(filters=64, kernel_size=(3, 3), activation='relu', padding='same', name='b1_Conv2'))
model.add(MaxPool2D(name='b1_Pool1'))
model.add(Conv2D(filters=64, kernel_size=(3, 3), activation='relu', padding='same', name='b2_Conv1'))
model.add(MaxPool2D(name='b2_Pool1'))
model.add(Flatten(name='Flatten'))
全結合層
我らがディープラーニングの基本形.
kerasでは Dense で層を追加できる. (DenDse は「濃い」や「密集」等を表す)
model.add(Dense(units=64, activation='relu', name='Dense1'))
model.add(Dense(units=10, activation='softmax', name='Dense2'))
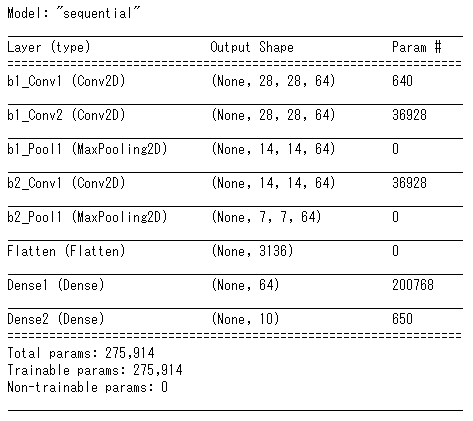
構築したネットワークは次のコードで確認できる。
model.summary()
学習と評価
学習
model.compile(loss='categorical_crossentropy', optimizer='adam', metrics=['accuracy'])
model.fit(x_train, y_train, batch_size=32, epochs=8, validation_split=0.2)
評価
今回は単純に正答率を出します
import numpy as np

pred = model.predict(x_test)
count = 0
for i in range(x_test.shape[0]):
    if np.argmax(pred[i]) == np.argmax(y_test[i]):
        count += 1
acc = count / x_test.shape[0]
print("accuracy = ", acc)

# accuracy =  0.9906
最後に
transformerなどの手法が出てきたので、それも取り入れてみたいですね。(小並感)