Update
- 2020/11/18: add content about scaling time and downtime
This is the step 1 of adding "Auto Scaling" to the Oracle Database Cloud Service.
If you want to check the other steps, please click the below links respectively.
- Step 1: Gather OCI DB System CPU Usage and write it into a custom log
- Step 2: Configure OCI Logging service to ingest the custom log
- Step 3: Configure OCI Service Connector Hub service to transfer the custom log to OCI Functions
- Step 4: Configure OCI Functions to act accordingly based on the CPU usage in the custom log
At the beginning
This will be a series of articles to talk about how to add "Auto Scaling" feature to the Oracle Database Cloud Service(DBCS) instance. There are three different sub DBCS services: VM based DB System, Bare Metal and Exadata Cloud Service. The content of this article has been tested on VM based DB System, but the idea, architecture and workflow should also be applicable for Bare Metal and Exadata Cloud Service, or even any target service which expose "scale" API.
Actually, for Bare Metal and Exadata Cloud Service, since they can online scale CPU resources, the final effect should be better than the VM based DB System. Because for VM based DB System, "Scale up/down" is based on changing the VM shape, that will result in restart of the instance nodes. Although for RAC system the changing shape restart takes place in the rolling model, there is still some performance impact.
Since the focus of this article is to introduce how to add "Auto Scaling" to the DBCS instance by leveraging various OCI services. So I only conducted some basic testing on VM based DB system. Below is the elapsed time of that
- For single instance DB system, it cost about 30 minutes to complete the scaling. And there are about 10+ minutes downtime.
- For RAC DB system, it cost about 40 minutes to complete the scaling. There is no downtime for the DB service, but the node will be down one by one.
- For Exadata Cloud service and Bare Metal, although I didn't do the testing, the scaling should be faster, because there is no restarting of the server.
Background
Server resource shortage, such as CPU usage being high means performance of the server is going down. If we cannot handle this kind of issue in time, the performance issue may turn to be a business issue, because the service may be down completely.
Traditionally, monitoring and fast reacting to the server resource shortage is a big challenge to the system administrators. But in the cloud era, it should not be. Because it is easy to composite some cloud services to achieve the "Auto-Scaling" target.
In this series of articles, we will try to leverage several Oracle Cloud Infrastructure services to achieve this goal.
Solution architecture
In this solution we will leverage following OCI services.
Besides the OCI services we also use OCI SDK for Python to interact with the OCI services in the Functions.
[Figure: Architecture chart]
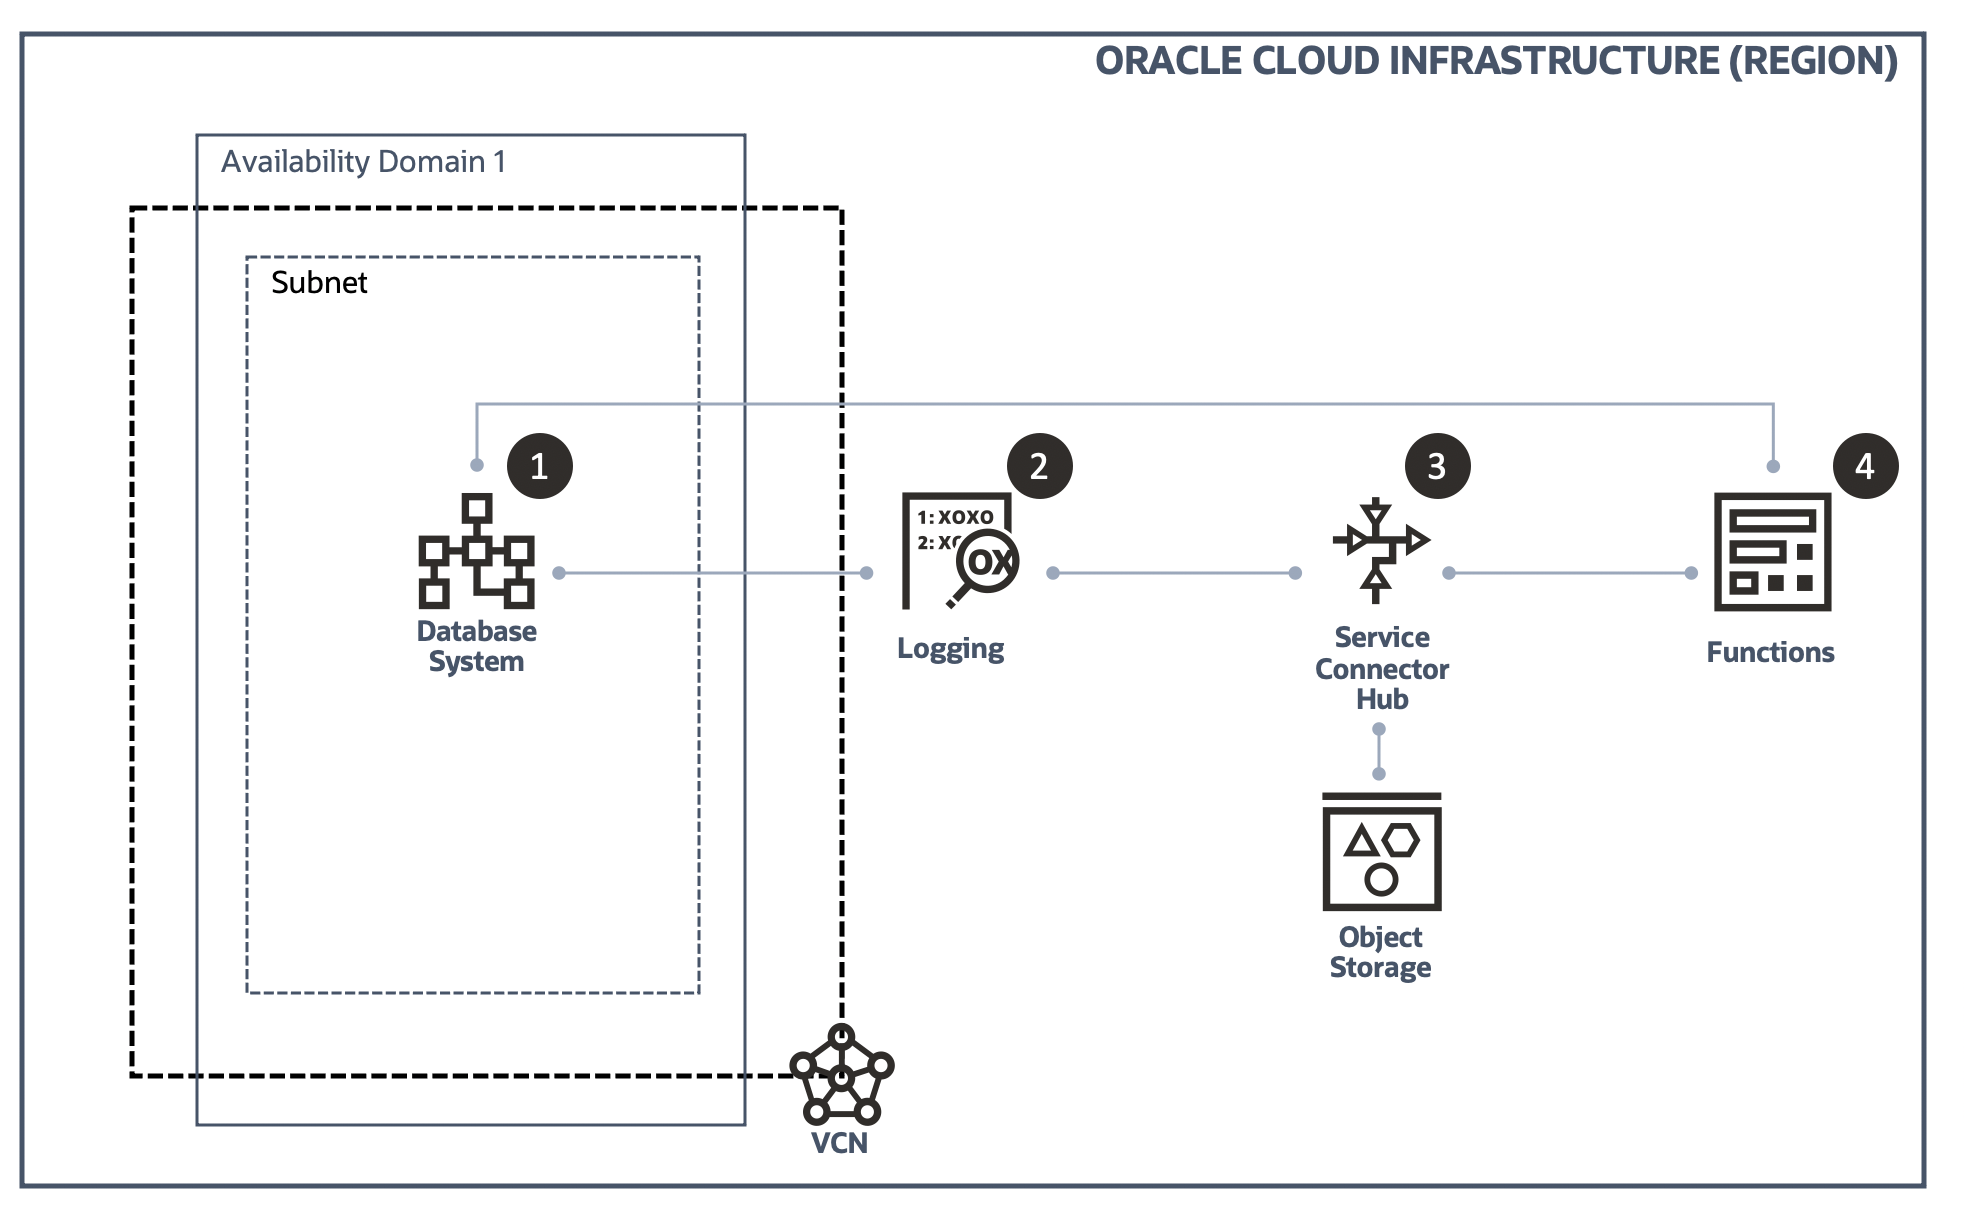
To achieve the "Auto-Scaling" target, we divide the path to be following steps. The series of articles will also be divided in this way.
- Gather OCI DB System CPU Usage and write it into a custom log
- Configure OCI Logging service to ingest the custom log
- Configure OCI Service Connector Hub service to transfer the custom log to OCI Functions
- Configure OCI Functions to act accordingly based on the CPU usage in the custom log
Gather OCI DB System CPU Usage and write it into a custom log
This is the beginning of the problem - server CPU usage is turning HIGH!
We are going to configure a simple Python script to gather the CPU usage information and write it into a custom log.
[Figure: CPU Usage becoming high]

Add yum repository
There is no yum repository configured on DBCS instance, so we need to add a repository to install Python3, which is required by OCI CLI and the script to gather CPU usage.
You can get the repository file oracle-linux-ol7.repo from any OCI compute instance at /etc/yum.repos.d. Or you can just create one with following content.
[ol7_latest]
name=Oracle Linux $releasever Latest ($basearch)
baseurl=https://yum$ociregion.oracle.com/repo/OracleLinux/OL7/latest/$basearch/
gpgkey=file:///etc/pki/rpm-gpg/RPM-GPG-KEY-oracle
gpgcheck=1
enabled=1

[ol7_u0_base]
name=Oracle Linux $releasever GA installation media copy ($basearch)
baseurl=https://yum$ociregion.oracle.com/repo/OracleLinux/OL7/0/base/$basearch/
gpgkey=file:///etc/pki/rpm-gpg/RPM-GPG-KEY-oracle
gpgcheck=1
enabled=0

[ol7_u1_base]
name=Oracle Linux $releasever Update 1 installation media copy ($basearch)
baseurl=https://yum$ociregion.oracle.com/repo/OracleLinux/OL7/1/base/$basearch/
gpgkey=file:///etc/pki/rpm-gpg/RPM-GPG-KEY-oracle
gpgcheck=1
enabled=0

[ol7_u2_base]
name=Oracle Linux $releasever Update 2 installation media copy ($basearch)
baseurl=https://yum$ociregion.oracle.com/repo/OracleLinux/OL7/2/base/$basearch/
gpgkey=file:///etc/pki/rpm-gpg/RPM-GPG-KEY-oracle
gpgcheck=1
enabled=0

[ol7_u3_base]
name=Oracle Linux $releasever Update 3 installation media copy ($basearch)
baseurl=https://yum$ociregion.oracle.com/repo/OracleLinux/OL7/3/base/$basearch/
gpgkey=file:///etc/pki/rpm-gpg/RPM-GPG-KEY-oracle
gpgcheck=1
enabled=0

[ol7_u4_base]
name=Oracle Linux $releasever Update 4 installation media copy ($basearch)
baseurl=https://yum$ociregion.oracle.com/repo/OracleLinux/OL7/4/base/$basearch/
gpgkey=file:///etc/pki/rpm-gpg/RPM-GPG-KEY-oracle
gpgcheck=1
enabled=0

[ol7_u5_base]
name=Oracle Linux $releasever Update 5 installation media copy ($basearch)
baseurl=https://yum$ociregion.oracle.com/repo/OracleLinux/OL7/5/base/$basearch/
gpgkey=file:///etc/pki/rpm-gpg/RPM-GPG-KEY-oracle
gpgcheck=1
enabled=0

[ol7_u6_base]
name=Oracle Linux $releasever Update 6 installation media copy ($basearch)
baseurl=https://yum$ociregion.oracle.com/repo/OracleLinux/OL7/6/base/$basearch/
gpgkey=file:///etc/pki/rpm-gpg/RPM-GPG-KEY-oracle
gpgcheck=1
enabled=0

[ol7_u7_base]
name=Oracle Linux $releasever Update 7 installation media copy ($basearch)
baseurl=https://yum$ociregion.oracle.com/repo/OracleLinux/OL7/7/base/$basearch/
gpgkey=file:///etc/pki/rpm-gpg/RPM-GPG-KEY-oracle
gpgcheck=1
enabled=0


[ol7_u8_base]
name=Oracle Linux $releasever Update 8 installation media copy ($basearch)
baseurl=https://yum$ociregion.oracle.com/repo/OracleLinux/OL7/8/base/$basearch/
gpgkey=file:///etc/pki/rpm-gpg/RPM-GPG-KEY-oracle
gpgcheck=1
enabled=0

[ol7_optional_latest]
name=Oracle Linux $releasever Optional Latest ($basearch)
baseurl=https://yum$ociregion.oracle.com/repo/OracleLinux/OL7/optional/latest/$basearch/
gpgkey=file:///etc/pki/rpm-gpg/RPM-GPG-KEY-oracle
gpgcheck=1
enabled=1

[ol7_addons]
name=Oracle Linux $releasever Add ons ($basearch)
baseurl=https://yum$ociregion.oracle.com/repo/OracleLinux/OL7/addons/$basearch/
gpgkey=file:///etc/pki/rpm-gpg/RPM-GPG-KEY-oracle
gpgcheck=1
enabled=1

[ol7_MODRHCK]
name=Latest RHCK with fixes from Oracle for Oracle Linux $releasever ($basearch)
baseurl=https://yum$ociregion.oracle.com/repo/OracleLinux/OL7/MODRHCK/$basearch/
gpgkey=file:///etc/pki/rpm-gpg/RPM-GPG-KEY-oracle
gpgcheck=1
priority=20
enabled=0

[ol7_latest_archive]
name=Oracle Linux $releasever Latest ($basearch) - Archive
baseurl=https://yum$ociregion.oracle.com/repo/OracleLinux/OL7/latest/archive/$basearch/
gpgkey=file:///etc/pki/rpm-gpg/RPM-GPG-KEY-oracle
gpgcheck=1
enabled=0

[ol7_optional_archive]
name=Oracle Linux $releasever Optional ($basearch) - Archive
baseurl=https://yum$ociregion.oracle.com/repo/OracleLinux/OL7/optional/archive/$basearch/
gpgkey=file:///etc/pki/rpm-gpg/RPM-GPG-KEY-oracle
gpgcheck=1
enabled=0


[ol7_security_validation]
name=Oracle Linux $releasever ($basearch) Security Validations
baseurl=https://yum$ociregion.oracle.com/repo/OracleLinux/OL7/security/validation/$basearch/
gpgkey=file:///etc/pki/rpm-gpg/RPM-GPG-KEY-oracle
gpgcheck=1
enabled=0
[ol7_ociyum_config]
name=OCI specific release packages Oracle Linux $releasever ($basearch)
baseurl=https://yum$ociregion.oracle.com/repo/OracleLinux/OL7/oci/included/x86_64/
gpgkey=file:///etc/pki/rpm-gpg/RPM-GPG-KEY-oracle
gpgcheck=1
enabled=0
Then, put the file oracle-linux-ol7.repo to directory /etc/yum.repos.d in the DBCS instance. After that, create a file named ociregion with following content at /etc/yum/vars
-tokyo
Verify the yum is working as expected with command yum list, we should be able to see a long list of packages.
Install Python3
Perform following commands to install Python3 and verify the version.
sudo yum install -y python3
sudo yum install -y python3-devel
python3 -V

# the version should be 3.6.8 as of today(2020/11/06)
Create script to gather CPU usage
Script name is cpu_usage.py. In this script, we use the package psutil to gather the CPU usage and write it to the custom log which is named as the OCID of the host.
import time
import psutil
import datetime

# gather CPU usage every 30 seconds
interval = 30
# replace the <DB System OCID> with the real one
db_system_ocid = '<DB System OCID>'

file_path = '/home/opc/py_monitor/{}_cpu.log'.format(db_system_ocid)
with open(file_path, mode='a', encoding='utf-8') as f:
    while True:
        time.sleep(interval)
        cpu_usage = psutil.cpu_percent(interval=None)
        now = datetime.datetime.now().strftime('%Y-%m-%d %H:%M:%S')
        log = '{} {}\n'.format(now, cpu_usage)
        f.write(log)
        f.flush()
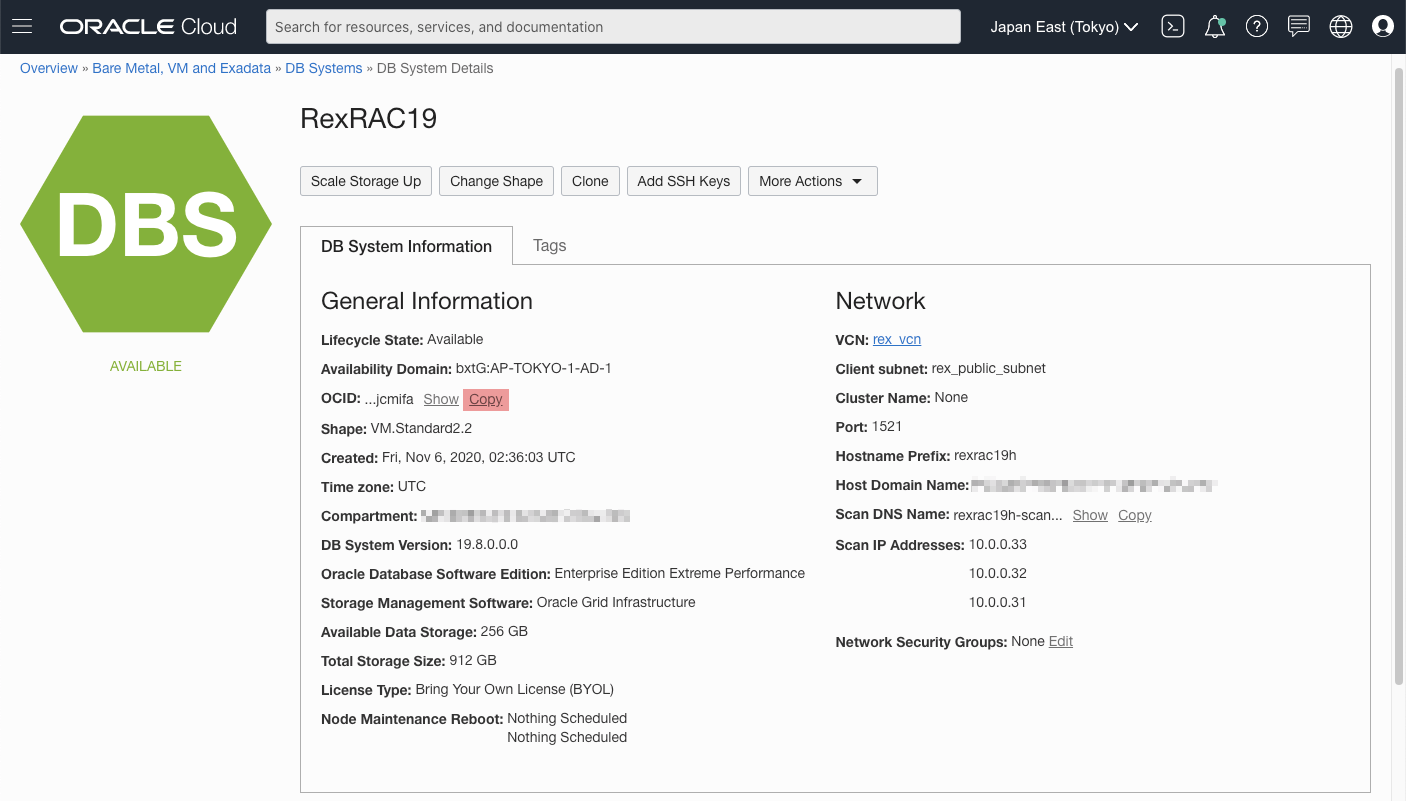
Please notice that the OCID refers to the OCID of the DB System, rather than the node. Because eventually, the target system we are going to manipulate is the DB System.
[Figure: copy OCID of the DB System]
Register the script as a system service
We hope this script could start to gather the CPU usage automatically when the host startup, so we register it as a system service cpu-usage.
At /usr/lib/systemd/system, create a file named cpu-usage.service with following content. You can modify the entries in this file as per your necessary.
[Unit]
Description=Log CPU Usage
After=multi-user.target

[Service]
WorkingDirectory=/home/opc/py_monitor/
User=opc
Type=idle
ExecStart=/home/opc/.local/bin/pipenv run python /home/opc/py_monitor/cpu_usage.py &> /dev/null
Restart=always

[Install]
WantedBy=multi-user.target
Start the newly created service with command sudo systemctl start cpu-usage and enable this service with command sudo systemctl enable cpu-usage.service.
Check status with command sudo systemctl status cpu-usage. You should be able to see something similar to following.
● cpu-usage.service - Log CPU Usage
   Loaded: loaded (/usr/lib/systemd/system/cpu-usage.service; disabled; vendor preset: disabled)
   Active: active (running) since Fri 2020-11-06 14:48:11 UTC; 3s ago
 Main PID: 19041 (python)
   CGroup: /system.slice/cpu-usage.service
           └─19041 /home/opc/.local/share/virtualenvs/py_monitor-aTAHi6f2/bin/python /home/opc/py_monitor/cpu_usage.py &> /dev/null

Nov 06 14:48:11 rexrac19h1 systemd[1]: Started Log CPU Usage.
We can also check the content in the generated custom log. You should be able to see something like below.
[Figure: generated CPU usage log]

Next
[Figure: step 1 completed]
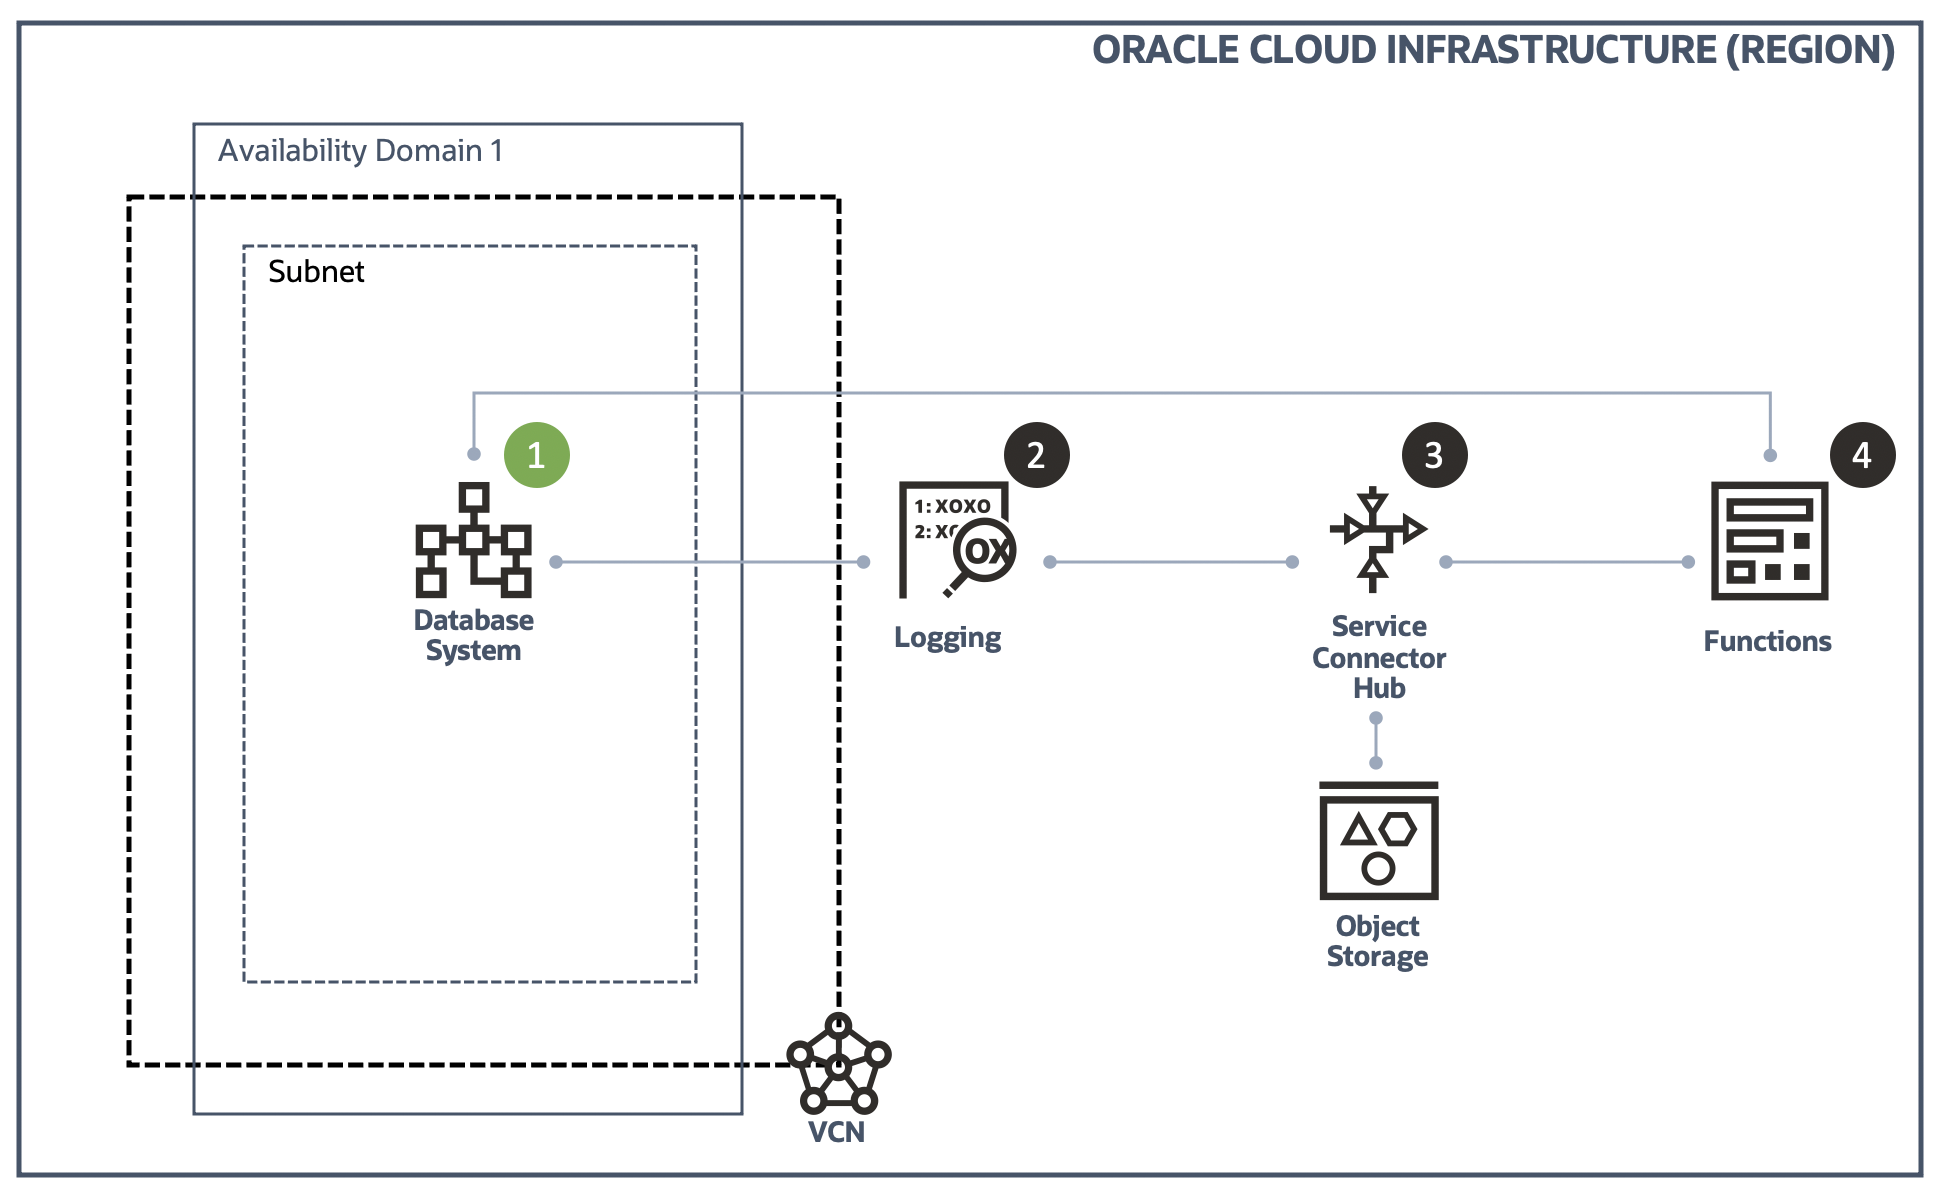
Until now, we have completed the step 1: Gather OCI DB System CPU Usage and write it into a custom log. In next step, we will continue to complete the step 2: Configure OCI Logging service to ingest the custom log
Note: if you are applying this solution to a RAC system, don't forget to do the setup jobs on the other node.