FlutterでTodo Listを作ってみた
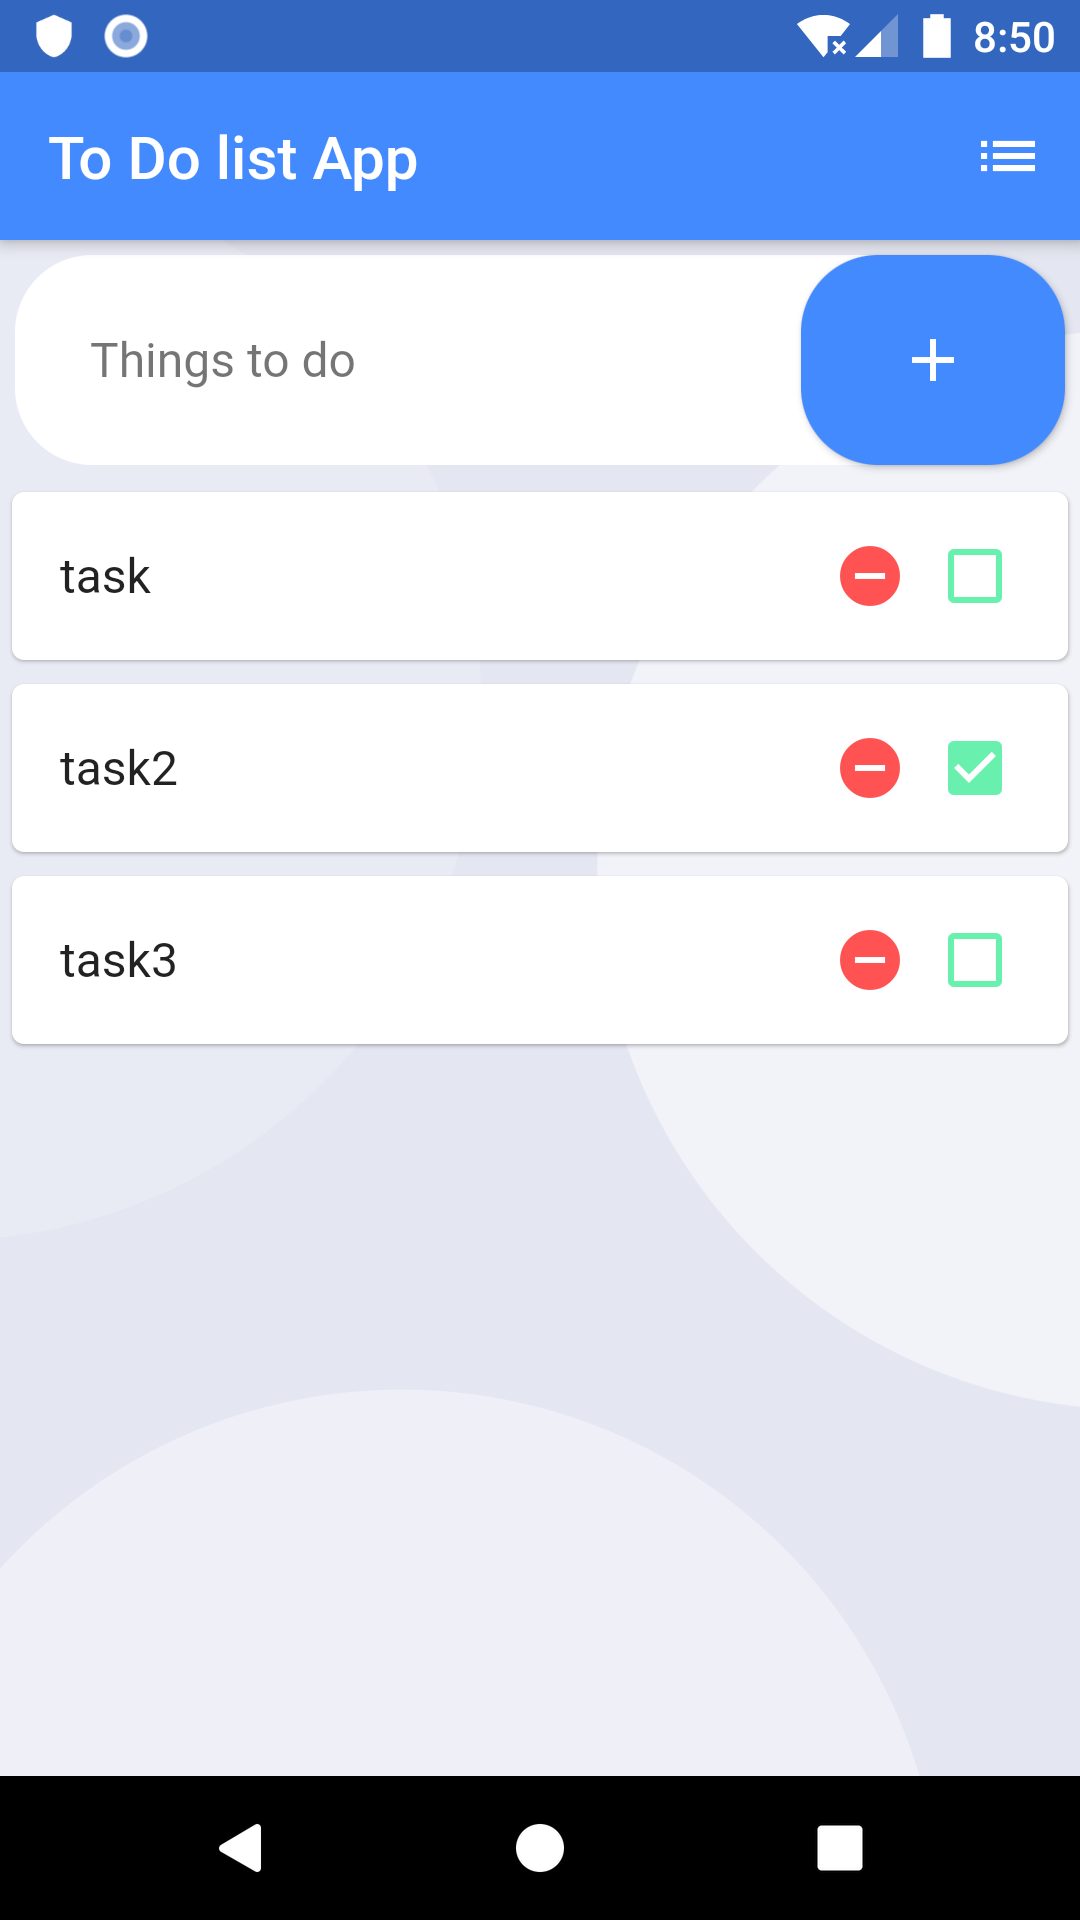
Flutterを始めて最初のころに練習として作成したTodo List(タスク管理)がレイアウトやウィジェットの種類、構成を学ぶのに良かったので完成形を上げたいと思います
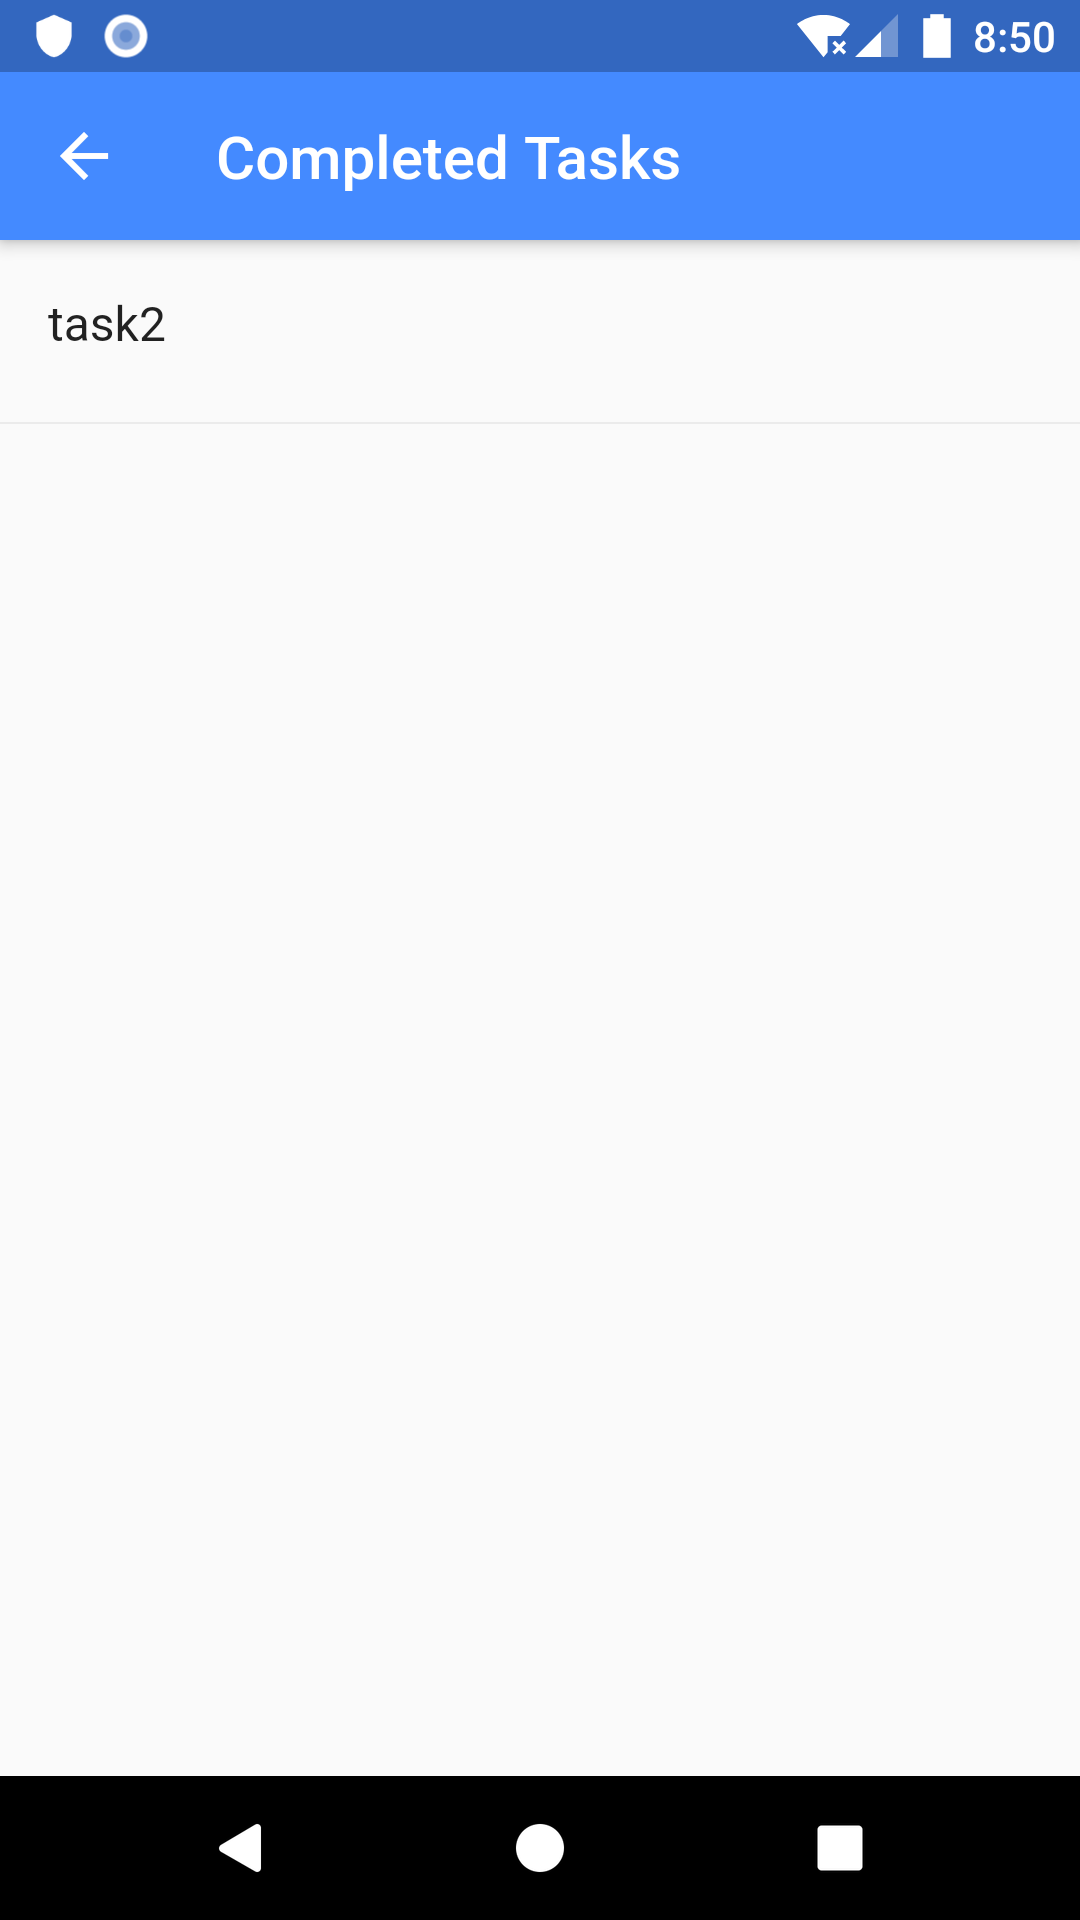
完成したアプリ
準備
使用したパッケージ
shared_preferences: ^0.5.3+4
shared_preferencesは端末上に文字列などの複雑なデータを保存するために利用されるパッケージです。初めて見るととてもややこしいですが、必須パッケージですので、ここで勉強しましょう。
ページの作成
今回は合計2つのページを作成しました
-main.dart
-home_page.dart
-completed_task.dart
Utilitiesを作成
Shared Preferenceを使用するためのファイルを作成します。のちに各ページで利用するメソッドをここで作成し、utilitiesとして参照します。
-shared_prefs.dart
-utils- Shared preferenceを利用してメソッドを作成
import 'package:shared_preferences/shared_preferences.dart';

class SharePrefs {
    //ここで文字列の型を作成します。あとはパーケージが保存してくれます。
  static final list_Items = "list_items";
  static final completed_Items = "completed_items";
  static SharedPreferences _sharedPreferences;

  static Future setInstance() async {
    if (null != _sharedPreferences) return;
    _sharedPreferences = await SharedPreferences.getInstance();
  }

  //setStringList()によって変更されたデータを更新し、新しいデータが方に保存されます。
  //getStringList()はinitState()(そのページに切り替わったとき)、Shared Preferenceから保存されたデータを呼び出す役割をします。

  static Future<bool> setListItems(List<String> value) =>
      _sharedPreferences.setStringList(list_Items, value);
  static List<String> getListItems() =>
      _sharedPreferences.getStringList(list_Items) ?? [];

  static Future<bool> setCompletedItems(List<String> value) =>
      _sharedPreferences.setStringList(completed_Items, value);
  static List<String> getCompletedItems() =>
      _sharedPreferences.getStringList(completed_Items) ?? [];
}
import 'package:flutter/material.dart';
import 'home_page.dart';

void main() => runApp(MainApp());

class MainApp extends StatelessWidget {
  @override
  Widget build(BuildContext context) {
    return MaterialApp(
      title: "TodoList App",
      debugShowCheckedModeBanner: false,
      home: HomePage(key: homePageKey),
    );
  }
}
-Page1-homepageの作成
import 'package:flutter/material.dart';
import 'package:flutter_todoList_app/shared_prefs.dart';
import 'completed_task_page.dart';

var homePageKey = GlobalKey<_HomePageState>();

class HomePage extends StatefulWidget {
  const HomePage({Key key}) : super(key: key);

  @override
  _HomePageState createState() => _HomePageState();
}

class _HomePageState extends State<HomePage> {
  List<String> listItems = [];
  List<String> completedItems = [];

  bool _validate = false;

  final TextEditingController eCtrl = TextEditingController();

  void _init() async {
      //インスタンスを取得
    await SharePrefs.setInstance();
    //Listにデータを取得させる
    listItems = SharePrefs.getListItems();
    completedItems = SharePrefs.getCompletedItems();
    setState(() {});
  }

  @override
  void initState() {
    _init();
    super.initState();
  }

  @override
  void dispose() {
      //ページがdispose(ページの切り替え?)が起きたときに
      //コントローラーの中身を削除する
    eCtrl.dispose();
    super.dispose();
  }

  @override
  Widget build(BuildContext context) {
    return Scaffold(
      appBar: AppBar(
        title: Text("To Do list App"),
        backgroundColor: Colors.blueAccent,
        actions: <Widget>[
          IconButton(
            icon: Icon(Icons.list),
            onPressed: () {
              setState(() {});
              Navigator.of(context).push(
                MaterialPageRoute(
                  builder: (context) => CompletedTasks(),
                ),
              );
            },
          ),
        ],
      ),
      body: Stack(
        children: <Widget>[
          Column(
            children: <Widget>[
              Container(
                height: 70,
                decoration: BoxDecoration(
                    borderRadius: BorderRadius.circular(25.7),
                    color: Colors.white),
                margin: EdgeInsets.all(5.0),
                child: Row(
                  children: <Widget>[
                    Expanded(
                      child: TextField(
                        controller: eCtrl,
                        decoration: InputDecoration(
                          border: InputBorder.none,
                          hintText: "Things to do",
                          errorText: _validate ? 'The input is empty.' : null,
                          contentPadding: const EdgeInsets.only(
                              left: 25.0, bottom: 15.0, top: 15.0),
                          focusedBorder: OutlineInputBorder(
                            borderSide: BorderSide(color: Colors.white),
                            borderRadius: BorderRadius.circular(25.7),
                          ),
                        ),
                        autocorrect: true,
                        onSubmitted: (text) {
                          if (text.isEmpty) {
                            _validate = true;
                            setState(() {});
                          } else {
                            _validate = false;
                            completedItems.add('false');
                            listItems.add(text);
                            SharePrefs.setCompletedItems(completedItems)
                                .then((_) {
                              setState(() {});
                            });
                            SharePrefs.setListItems(listItems).then((_) {
                              setState(() {});
                            });
                            eCtrl.clear();
                          }
                        },
                      ),
                    ),
                    Container(
                      height: 70,
                      child: RaisedButton(
                        shape: RoundedRectangleBorder(
                            borderRadius: BorderRadius.circular(25.7)),
                        onPressed: () {},
                        color: Colors.blueAccent,
                        child: IconButton(
                          padding: EdgeInsets.symmetric(vertical: 10.0),
                          color: Colors.white,
                          hoverColor: Colors.white,
                          icon: Icon(
                            IconData(57669, fontFamily: 'MaterialIcons'),
                          ),
                          onPressed: () {
                            if (eCtrl.text.isEmpty) {
                              _validate = true;
                              setState(() {});
                            } else {
                              _validate = false;
                              completedItems.add('false');
                              listItems.add(eCtrl.text);
                              SharePrefs.setListItems(listItems).then((_) {
                                  //setStateで現在いるページのStateを更新する。
                                setState(() {});
                              });
                              SharePrefs.setCompletedItems(completedItems)
                                  .then((_) {
                                setState(() {});
                              });
                              eCtrl.clear();
                            }
                          },
                        ),
                      ),
                    ),
                  ],
                ),
              ),
              Expanded(
                child: ListView.builder(
                  itemCount: listItems.length,
                  scrollDirection: Axis.vertical,
                  itemBuilder: (BuildContext context, int index) {
                    return Card(
                      child: ListTile(
                        title: Row(
                          mainAxisAlignment: MainAxisAlignment.spaceBetween,
                          children: <Widget>[
                            Expanded(child: Text(listItems[index])),
                            Container(
                              width: 40,
                              child: InkWell(
                                  child: Icon(
                                    Icons.remove_circle,
                                    color: Colors.redAccent,
                                  ),
                                  onTap: () {
                                    listItems.removeAt(index);
                                    completedItems.removeAt(index);
                                    SharePrefs.setListItems(listItems)
                                        .then((_) {
                                      setState(() {});
                                    });
                                    SharePrefs.setCompletedItems(completedItems)
                                        .then((_) {
                                      setState(() {});
                                    });
                                  }),
                            ),
                            Container(
                                width: 30,
                                child: InkWell(
                                  child: Icon(
                                    (completedItems[index] == 'false')
                                        ? Icons.check_box_outline_blank
                                        : Icons.check_box,
                                    color: Colors.greenAccent,
                                  ),
                                  onTap: () {
                                    if (completedItems[index] == 'false') {
                                      completedItems[index] = 'true';
                                    } else {
                                      completedItems[index] = 'false';
                                    }
                                    setState(() {});
                                  },
                                )),
                          ],
                        ),
                        onTap: () {
                          setState(() {});
                        },
                      ),
                    );
                  },
                ),
              ),
            ],
          ),
        ],
      ),
    );
  }
}
-Page2-Completed tasksをDrawerにリスト表示する
import 'package:flutter/material.dart';
import 'home_page.dart';

class CompletedTasks extends StatelessWidget {
  CompletedTasks({Key key}) : super(key: key);
  @override
  Widget build(BuildContext context) {
    return Scaffold(
      appBar: AppBar(
        title: Text("Completed Tasks"),
        backgroundColor: Colors.blueAccent,
      ),
      body: ListView.builder(
          //globalKeyを使って他ページから変数を参照する
          itemCount: homePageKey.currentState.completedItems.length,
          itemBuilder: (BuildContext context, int index) {
            if (homePageKey.currentState.completedItems[index] == 'true') {
              return Column(
                children: <Widget>[
                  ListTile(
                    title: Text(homePageKey.currentState.listItems[index]),
                  ),
                  Divider(
                    height: 10.0,
                  ),
                ],
              );
            } else {
              return Container();
            }
          }),
    );
  }
}
まとめ
私もFlutterは始めたばかりなので、うまく説明できていないかもしれませんがよろしくお願いします。
はじめは少々難しいかもしれませんが、Flutterのチュートリアルを終えて新しいアプリを作ってみたいという方にお勧めです
次回はリストを3つに増やし、重要度別にカテゴリーわけしたいと思います。
なにか改善点や、修正箇所、ご指摘があればよろしくお願いいたします。アニメーションの勉強もしていくので後々あげようかと思います。
参照
コードを参照
note
note :『初心者必見』 FlutterでTODOリストアプリを作ってみよう② ーUI完成,ローカルデータベース導入編ー
Flutter関連記事
flutterでQRコードリーダーを作ってみた
Flutter 入門 -textFieldを開いたときにkeyboardを表示しない-
カレンダーを使用して日付を指定する flutter

