1. Modbus TCP と RemoNavi
リモナビは、TCPレベルでのセキュア(暗号化、認証、ACL)なトンネルを構築することができます。
このトンネル上で Modbus TCP 通信をすることでセキュアかつ、ゼロトラストを容易に実現することができます。
順序が逆転しますが、 modbus は PLC(プログラマブルロジックコントローラ)などの産業機器で広く使われる通信プロトコルであり、産業機器の制御や情報収集などに利用されます。
近年では TCP 環境下でも通信できるようになり、より高度なネットワーク環境化で利用されています。
一方で、これまで閉域網での利用に限っていた利用が広域に及び、よりセキュリティでゼロトラストの実現はもはや必須といった状況にあります。
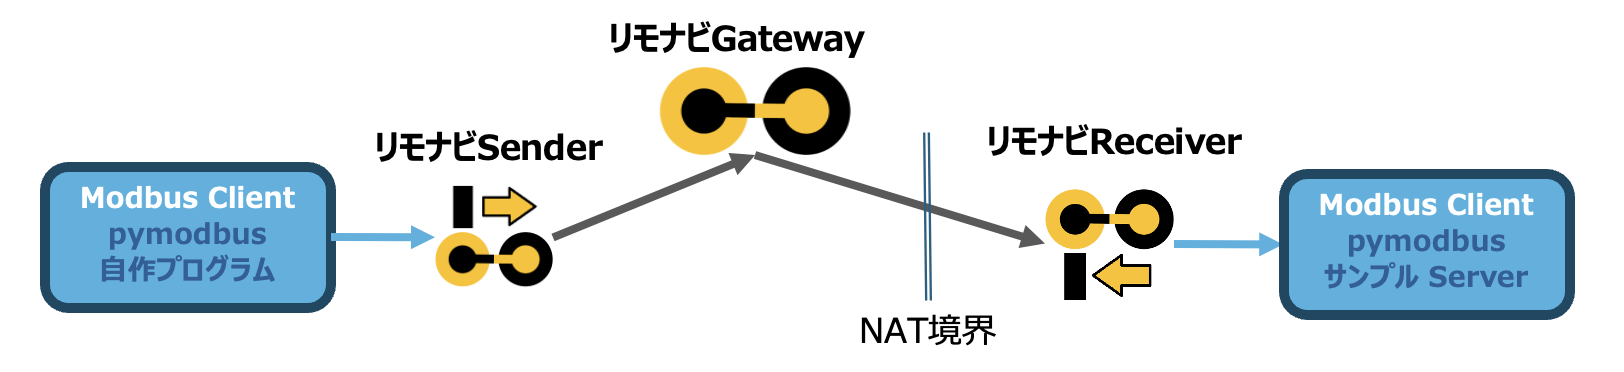
RemoNavi は 機器の追加なしに TCPレベルの通信をゼロトラスト化すると同時に、より高度なネットワークへの対応を可能とします。 今回の投稿では NAT境界超えのシンプルな構成での適用を説明します。 さらに高度な構成は、以下の資料を参考していただければです。
2. Modbus TCP を使ったネットワークの構築
2.1. 仮想Modbus環境の構築
今回の検証では、Modbus Slave(Server)、Client 共に ubuntu環境で pymodbus を利用しますので、Server , Client 共に以下を参考に pymodbus をインストールしてください。
-
pymodbus インストール
pymodbus は既存の python環境に影響を与える可能性があるため、venv にて環境を構築します。# python モジュールをインストール apt-get update apt-get install -y python3 python3-pip python3-venv # python (pymodbus) venv環境構築 cd ~/work python3 -m venv mypy source mypy/bin/activate python3 -m pip install pymodbus
2.2 RemoNavi の設定
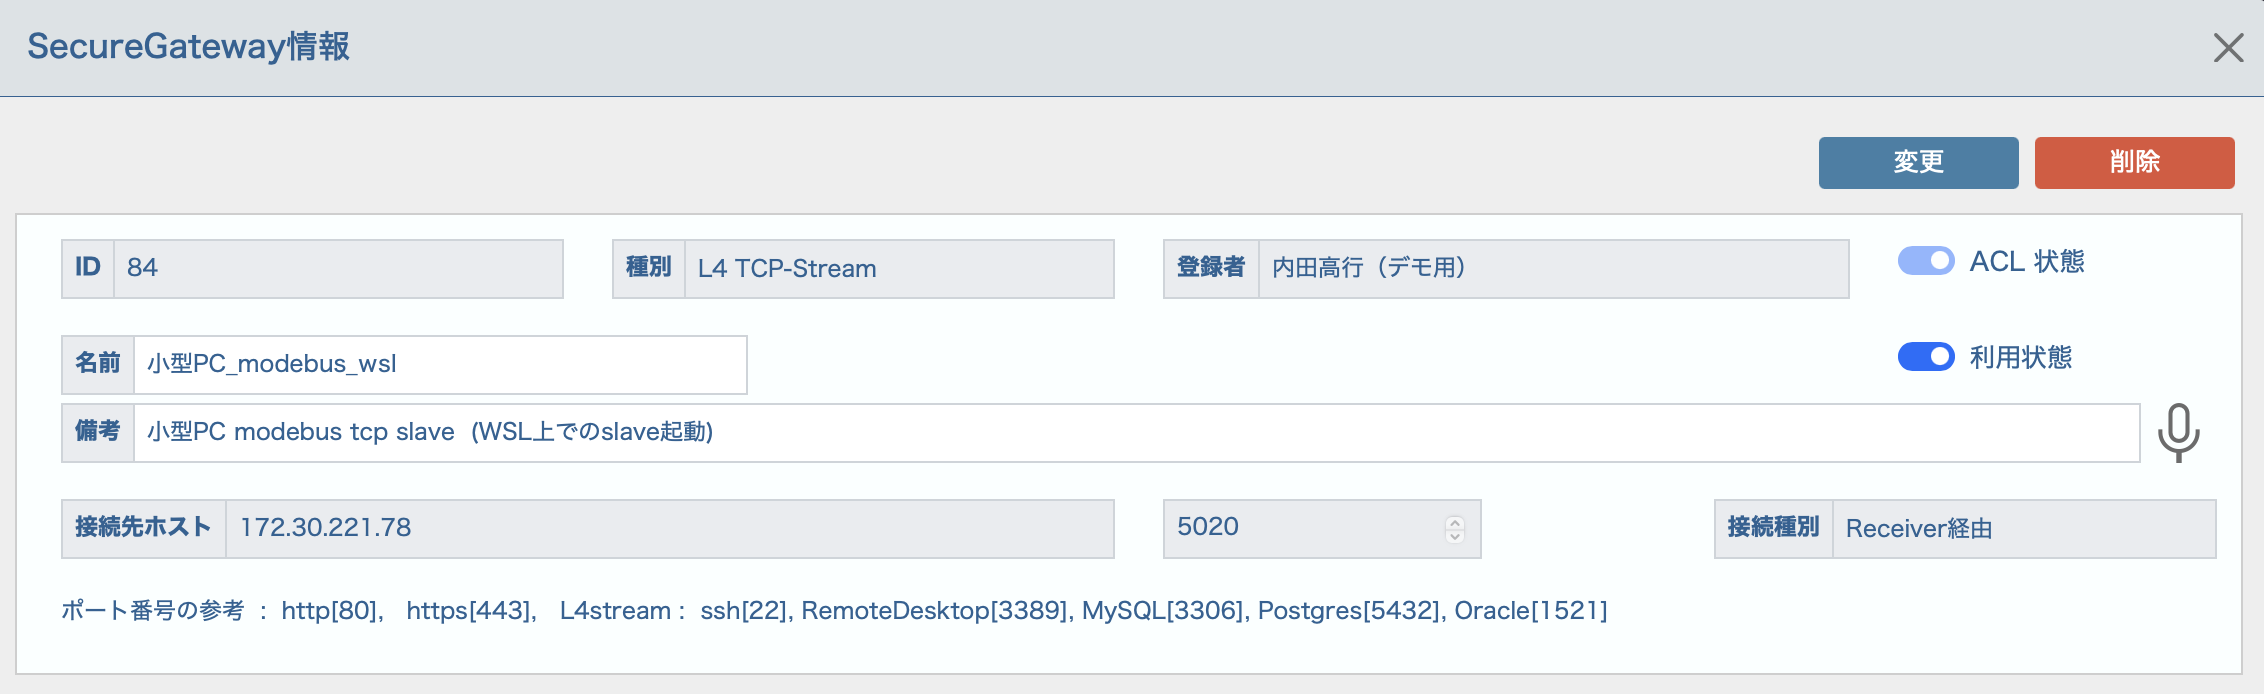
2.2.1 RemoNavi SaaS 側で Gateway(中継路の設定)
以下の登録をします。
今回 Modbus Slave は 小型WindowsPCの WSL上で動作させました。
WSL上で動作させた場合の IPアドレスは、WSL上で ip a コマンドの実行して表示される eth0 の値です。
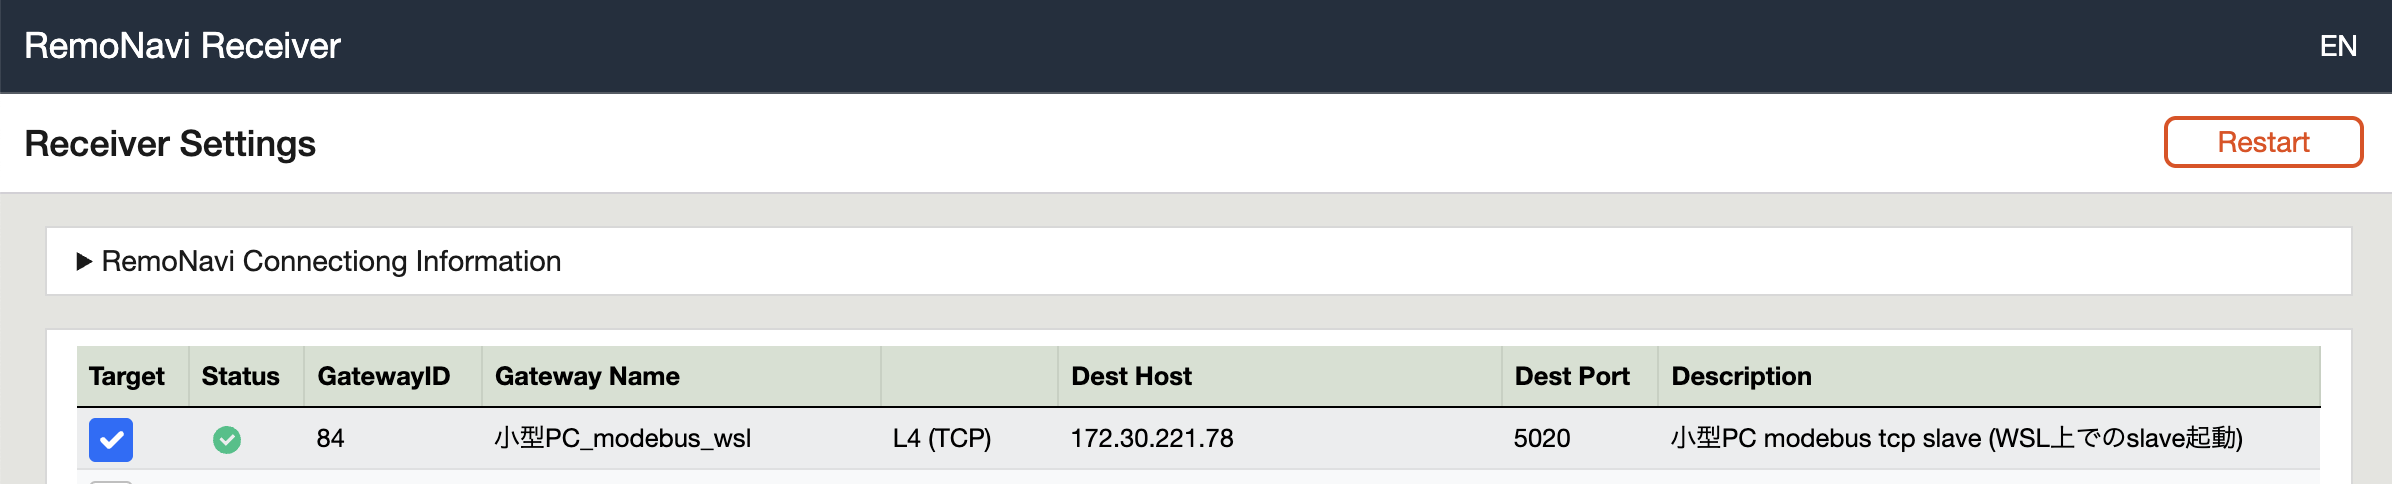
2.2.2 Server | Receiver の設定
Reciver の稼働設定は、Modbus Slaveの起動後に行うものですが、先に行っても問題はありませんので、この記事では先にしてしまいます。
-
Receiver設定
Gateway 設定の中経路を利用状態にします。
-
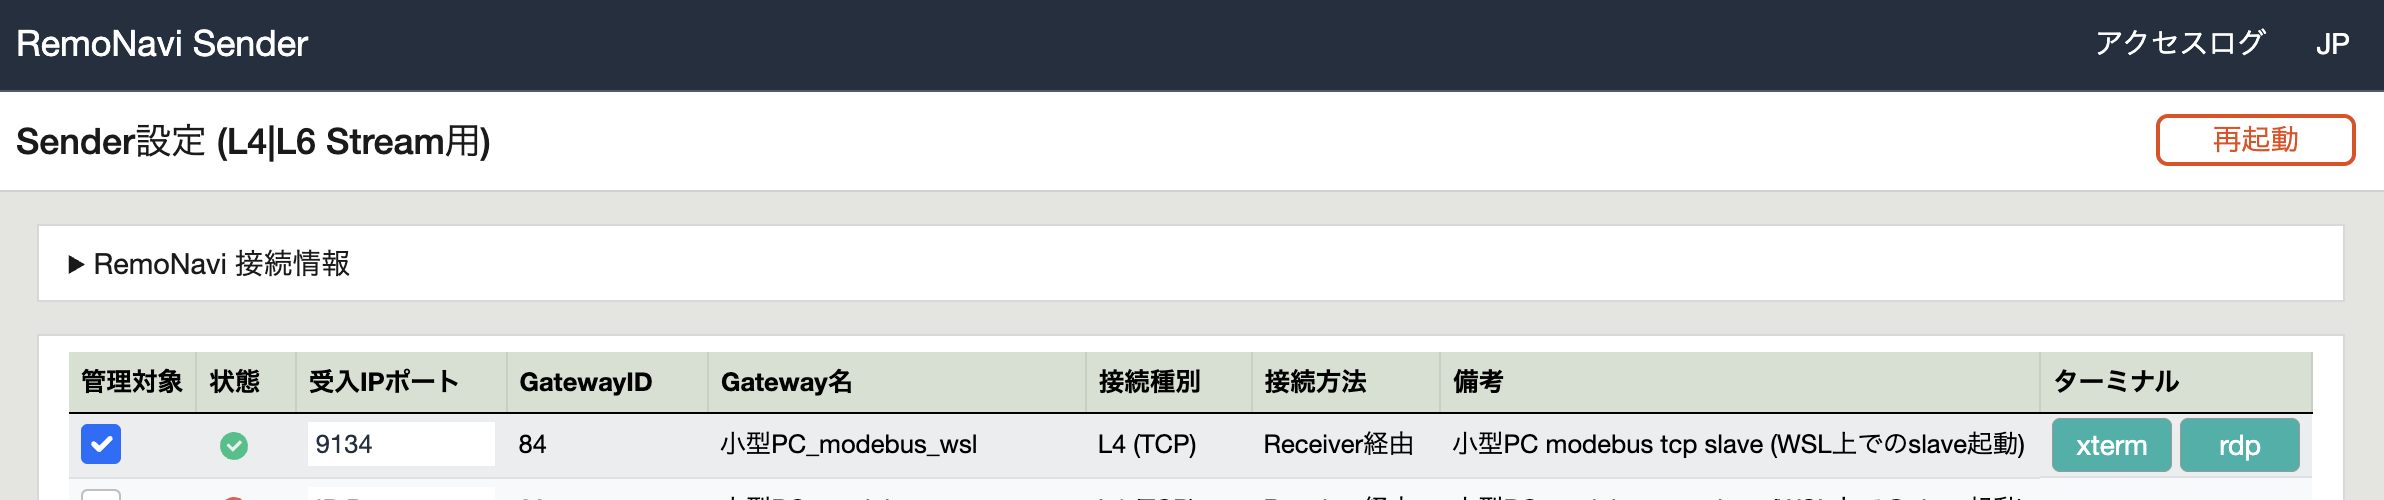
Sender設定
Gateway 設定の中経路を利用状態にします。
その際にSender の受付ポート番号を指定します。今回は 9134 としています。この値は、のちの Modbus Client の通信先 ポート番号で指定する値になります。
2.3. 仮想Modbus環境での接続検証
2.3.1 Modbus Slave (Server) の仮構築
pymodbus のサンプルSLAVEソースを起動することで擬似サーバを起動します。
-
インストール
# pymodbus のサンプルコードをダウンロードします
cd ~/work
git clone https://github.com/pymodbus-dev/pymodbus.git
-
Modbus Slave(Server) 起動
# pymodbus サンプルコードの擬似サーバーを起動
cd ~/work
source mypy/bin/activate
python3 pymodbus/examples/server_sync.py --comm tcp --port 5020 --log debug
Client からアクセスがあると、メッセージダンプが出力されるますので、アクセス通信内容を確認することができます。
今回はサンプルコードをそのまま利用しますが、pymodbus は Slave側実装にて、指定メッセージを hook する機構があるため、自作して以下のような実装をすることも可能です。
- tcp でのリクエストを RTU変換や
- modbus によって周期取得した値を mqtt変換して転送
2.3.2 Modbus Client
pymodbus を使って SLAVE への modbus tcp 通信をします。
以下 pymodbus を使った client のソースの一例で、コイルとレジスタ情報を取得しています。
-
クライアントのソースコード実装
python client.pyimport sys import pymodbus.client as ModbusClient from pymodbus import ( FramerType, ModbusException, pymodbus_apply_logging_config, ) def run_sync_simple_client(host, port): # activate debugging pymodbus_apply_logging_config("DEBUG") print("initialize client, [" + host + " : " + port + "]"); client = ModbusClient.ModbusTcpClient( host, port=port, framer=FramerType.SOCKET, # timeout=10, # retries=3, # source_address=("localhost", 0), ) print("\n-------") print("connect to server") client.connect() print("\n-------") print("get data : coil[1] count[1] device[1]") try: rr = client.read_coils(1, count=1, device_id=1) except ModbusException as exc: print(f"Received ModbusException({exc}) from library") client.close() return if rr.isError(): print(f"Received exception from device ({rr})") client.close() return print("\n-------") print("get data : register[10] count[2] device[1]") try: rr = client.read_holding_registers(10, count=2, device_id=1) except ModbusException as exc: print(f"Received ModbusException({exc}) from library") client.close() return if rr.isError(): print(f"Received exception from device ({rr})") client.close() return value_int32 = client.convert_from_registers(rr.registers, data_type=client.DATATYPE.INT32) print(f"Got int32: {value_int32}") print("\n-------") print("close connection") client.close() if __name__ == "__main__": run_sync_simple_client(sys.argv[1], sys.argv[2])
-
クライアント・ソースの実行
# 上記 client.py の実行
cd ~/work
source mypy/bin/activate
python3 client.py {Sender ホスト} {Sender 割当ポート番号}

※ Sender Dockerと同一ホストで、Sender設定例の場合
  python3 client.py  127.0.0.1  9134
-
クライアント・ソースの実行結果
接続、Coil取得、Register取得、切断の順に、通信結果が出力されます。(mypy) root@b58ce74b0942:~/work# python client.py 9134 initialize client, [127.0.0.1 : 9134] ------- connect to server 2025-09-08 09:25:28,868 DEBUG tcp:195 Connection to Modbus server established. Socket ('127.0.0.1', 47028) ------- get data : coil[1] count[1] device[1] 2025-09-08 09:25:29,027 DEBUG base:72 Processing: 0x0 0x1 0x0 0x0 0x0 0x4 0x1 0x1 0x1 0x1 2025-09-08 09:25:29,027 DEBUG decoders:113 decoded PDU function_code(1 sub -1) -> ReadCoilsResponse(dev_id=0, transaction_id=0, address=0, count=0, bits=[True, False, False, False, False, False, False, False], registers=[], status=1retries=0) ------- get data : register[10] count[2] device[1] 2025-09-08 09:25:29,055 DEBUG base:72 Processing: 0x0 0x2 0x0 0x0 0x0 0x7 0x1 0x3 0x4 0x0 0x11 0x0 0x11 2025-09-08 09:25:29,055 DEBUG decoders:113 decoded PDU function_code(3 sub -1) -> ReadHoldingRegistersResponse(dev_id=0, transaction_id=0, address=0, count=0, bits=[], registers=[17, 17], status=1retries=0) Got int32: 1114129 ------- close connection