概要
日本のトップ YouTuber といえば、そう HIKAKIN (ヒカキン) 氏です (以下「ヒカキン」と呼称します) 。僕も大好きで毎日動画を見ています。
ヒカキンは HIKAKIN, HikakinTV, HikakinGames, HikakinBlog という 4 つのチャンネルを運用しています。ここで、ある動画がどのチャンネルの動画なのかをサムネイル画像という情報のみで判別できたら面白いなと思い、機械学習を使って実装してみました。

機械学習のフレームワークには TensorFlow を使います。そして画像を集めるところから、TensorFlow で CNN (Convolutional Neural Network) を実装するところ、さらには実際に推論するところまで、実装の流れを紹介したいと思います。
コード
バージョン情報
Python
| ツール | バージョン | 用途・目的 |
|---|---|---|
| Python | 3.6.1 | |
| Selenium | 3.4.0 | スクレイピング |
| TensorFlow | 1.1.0 | 機械学習 |
| NumPy | 1.12.1 | 数値計算 |
その他のツール
| ツール | バージョン | 用途 |
|---|---|---|
| ChromeDriver | 2.29 | Selenium で Chrome を動かすため |
| iTerm2 | 3.0.15 | 画像をターミナル上に表示するため |
手順
流れ
- サムネイル画像の URL を取得する
- サムネイル画像をダウンロードする
- 画像を学習データとテストデータに分割する
- データとラベルを関連付ける CSV を出力する
- CNN モデルを表すクラスを実装する
- CSV から画像を読み込むための関数を実装する
- CNN モデルを学習する
- 学習済みモデルをテストする
- 学習済みモデルで推論する
1. サムネイル画像の URL を取得する
コード
import os
import sys
from selenium import webdriver
from selenium.common.exceptions import StaleElementReferenceException, TimeoutException
from selenium.webdriver.common.by import By
from selenium.webdriver.support import expected_conditions as EC
from selenium.webdriver.support.ui import WebDriverWait

def fetch_urls(channel):
  driver = webdriver.Chrome()
  url = os.path.join('https://www.youtube.com/user', channel, 'videos')
  driver.get(url)

  while True:
    driver.execute_script('window.scrollTo(0, document.body.scrollHeight);')

    try:
      # 「もっと読み込む」ボタンがクリック可能になるまで待機する。
      more = WebDriverWait(driver, 3).until(
        EC.element_to_be_clickable((By.CLASS_NAME, 'load-more-button'))
      )
    except StaleElementReferenceException:
      continue;
    except TimeoutException:
      break;

    more.click()

  selector = '.yt-thumb-default .yt-thumb-clip img'
  elements = driver.find_elements_by_css_selector(selector)
  src_list = [element.get_attribute('src') for element in elements]
  driver.quit()

  with open(f'urls/{channel}.txt', 'wt') as f:
    for src in src_list:
      print(src, file=f)

if __name__ == '__main__':
  fetch_urls(sys.argv[1])
説明
Selenium を使って Google Chrome を操作し、サムネイル画像の URL を集めます。
具体的には、まず画面下部の「もっと読み込む」ボタンが表示されなくなるまで画面を下方向にスクロールします。そうすることですべてのサムネイル画像がブラウザの画面に表示されます。その後、サムネイル画像に対応する全ての img 要素の src 属性の値を取得し urls ディレクトリ配下のテキストファイルに書き込みます。
実行結果
$ python fetch_urls.py HikakinTV

$ wc -l urls/HikakinTV.txt
    2178 urls/HikakinTV.txt
$ head -n 3 urls/HikakinTV.txt
https://i.ytimg.com/vi/ieHNKaG1KfA/hqdefault.jpg?custom=true&w=196&h=110&stc=true&jpg444=true&jpgq=90&sp=67&sigh=tRWLF3Pa-fZrEa5XTmPeHyVORv4
https://i.ytimg.com/vi/bolTkMSMrSA/hqdefault.jpg?custom=true&w=196&h=110&stc=true&jpg444=true&jpgq=90&sp=67&sigh=a0_PeYpyB9RrOhb3ySd4i7nJ9P8
https://i.ytimg.com/vi/jm4cK_XPqMA/hqdefault.jpg?custom=true&w=196&h=110&stc=true&jpg444=true&jpgq=90&sp=67&sigh=VymexTRKLE_wQaYtSKqrph1okcA
2. サムネイル画像をダウンロードする
コード
import os
import random
import re
import sys
import time
from urllib.request import urlretrieve


def download(channel):
  with open(f'urls/{channel}.txt', 'rt') as f:
    lines = f.readlines()

  dir = os.path.join('images', channel)
  if not os.path.exists(dir):
    os.makedirs(dir)

  for url in lines:
    # https://i.ytimg.com/vi/ieHNKaG1KfA/hqdefault.jpg
    # という URL の ieHNKaG1KfA の部分を画像名にする。
    name = re.findall(r'(?<=vi/).*(?=/hqdefault)', url)[0]
    path = os.path.join(dir, f'{name}.jpg')

    if os.path.exists(path):
      print(f'{path} already exists')
      continue

    print(f'download {path}')
    urlretrieve(url, path)
    time.sleep(1 + random.randint(0, 2))

if __name__ == '__main__':
  download(sys.argv[1])
説明
fetch_urls.py で出力したテキストファイルを読み込んだ後、urlretrieve() を使ってサムネイル画像をダウンロードします。
ちなみにダウンロードしたサムネイル画像はすべてサイズが 196 x 110 に統一されています。扱いやすくていいですね ![]()
実行結果
$ python download.py HikakinTV
download images/HikakinTV/1ngTnVb9oF0.jpg
download images/HikakinTV/AGonzpJtyYU.jpg
images/HikakinTV/MvwxFi3ypNg.jpg already exists
(略)

$ ls -1 images/HikakinTV | wc -l
    2178
$ ls -1 images/HikakinTV
-2DRamjx75o.jpg
-5Xk6i1jVhs.jpg
-9U3NOHsT1k.jpg
(略)
3. 画像を学習データとテストデータに分割する
コード
import glob
import numpy as np
import os
import shutil


def clean_data():
  for dirpath, _, filenames in os.walk('data'):
    for filename in filenames:
      os.remove(os.path.join(dirpath, filename))


def split_pathnames(dirpath):
  pathnames = glob.glob(f'{dirpath}/*')
  np.random.shuffle(pathnames)

  # 参考: NumPy でデータセット (ndarray) を任意の割合に分割する
  # http://qiita.com/QUANON/items/e28335fa0e9f553d6ab1
  return np.split(pathnames, [int(0.7 * len(pathnames))])


def copy_images(data_dirname, class_dirname, image_pathnames):
  class_dirpath = os.path.join('data', data_dirname, class_dirname)

  if not os.path.exists(class_dirpath):
    os.makedirs(class_dirpath)

  for image_pathname in image_pathnames:
    image_filename = os.path.basename(image_pathname)
    shutil.copyfile(image_pathname,
      os.path.join(class_dirpath, image_filename))


def split_images():
  for class_dirname in os.listdir('images'):
    image_dirpath = os.path.join('images', class_dirname)

    if not os.path.isdir(image_dirpath):
      continue

    train_pathnames, test_pathnames = split_pathnames(image_dirpath)

    copy_images('train', class_dirname, train_pathnames)
    copy_images('test', class_dirname, test_pathnames)

if __name__ == '__main__':
  clean_data()
  split_images()
説明
images/チャンネル名 ディレクトリにダウンロードした画像ファイルを、学習データとテストデータにランダムに分割します。具体的には、学習データとテストデータの割合が 7 : 3 となるように images/チャンネル名 ディレクトリの画像ファイルを data/train/チャンネル名 ディレクトリあるいは data/test/チャンネル名 ディレクトリにコピーします。
images/
 ├ HIKAKIN/
 ├ HikakinBlog/
 ├ HikakinGames/
 └ HikakinTV/

 ↓ train : test = 7 : 3 になるようにコピー

data/
 ├ train/
 │ ├ HIKAKIN/
 │ ├ HikakinBlog/
 │ ├ HikakinGames/
 │ └ HikakinTV/
 │
 └ test/
   ├ HIKAKIN/
   ├ HikakinBlog/
   ├ HikakinGames/
   └ HikakinTV/
実行結果
$ python split_images.py

$ find images -name '*.jpg' | wc -l
    3652
$ find data/train -name '*.jpg' | wc -l
    2555
$ find data/test -name '*.jpg' | wc -l
    1097
4. データとラベルを関連付ける CSV を出力する
コード
from enum import Enum


class Channel(Enum):
  HIKAKIN = 0
  HikakinBlog = 1
  HikakinGames = 2
  HikakinTV = 3

LOG_DIR = 'log'
import os
import csv
from config import Channel, LOG_DIR


def write_csv_file(dir):
  with open(os.path.join(dir, 'data.csv'), 'wt') as f:
    for i, channel in enumerate(Channel):
      image_dir = os.path.join(dir, channel.name)
      writer = csv.writer(f, lineterminator='\n')

      for filename in os.listdir(image_dir):
        writer.writerow([os.path.join(image_dir, filename), i])

if __name__ == '__main__':
  write_csv_file('data/train')
  write_csv_file('data/test')
説明
のちに学習とテストで TensorFlow を使って画像とラベルを読み込む際に使います。
出力結果
$ python write_csv_file.py

$ cat data/train/data.csv
data/test/HIKAKIN/-c07QNF8lmM.jpg,0
data/test/HIKAKIN/0eHE-jfRQPo.jpg,0
(略)
data/train/HikakinBlog/-OtqlF5BMNY.jpg,1
data/train/HikakinBlog/07XKtHfni1A.jpg,1
(略)
data/train/HikakinGames/-2VyYsCkPZI.jpg,2
data/train/HikakinGames/-56bZU-iqQ4.jpg,2
(略)
data/train/HikakinTV/-5Xk6i1jVhs.jpg,3
data/train/HikakinTV/-9U3NOHsT1k.jpg,3
(略)
$ cat data/test/data.csv
data/test/HIKAKIN/-c07QNF8lmM.jpg,0
data/test/HIKAKIN/0eHE-jfRQPo.jpg,0
(略)
data/test/HikakinBlog/2Z6GB9JjV4I.jpg,1
data/test/HikakinBlog/4eGZtFhZWIE.jpg,1
(略)
data/test/HikakinGames/-FpYaEmiq1M.jpg,2
data/test/HikakinGames/-HFXWY1-M8M.jpg,2
(略)
data/test/HikakinTV/-2DRamjx75o.jpg,3
data/test/HikakinTV/-9zt1EfKJYI.jpg,3
(略)
5. CNN モデルを表すクラスを実装する
コード
import tensorflow as tf


class CNN:
  def __init__(self, image_size=48, class_count=2, color_channel_count=3):
    self.image_size = image_size
    self.class_count = class_count
    self.color_channel_count = color_channel_count

  # 推論のための関数。
  def inference(self, x, keep_prob, softmax=False):
    # 重みを格納するための tf.Variable を生成する。
    def weight_variable(shape):
      initial = tf.truncated_normal(shape, stddev=0.1)

      return tf.Variable(initial)

    # バイアスを格納するための tf.Variable を生成する。
    def bias_variable(shape):
      initial = tf.constant(0.1, shape=shape)

      return tf.Variable(initial)

    # 畳み込みを行う。
    def conv2d(x, W):
      return tf.nn.conv2d(x, W, strides=[1, 1, 1, 1], padding='SAME')

    # [2x2] の大きさ、移動量 2 でプーリングを行う。
    def max_pool_2x2(x):
      return tf.nn.max_pool(x,
        ksize=[1, 2, 2, 1], strides=[1, 2, 2, 1],
        padding='SAME')

    x_image = tf.reshape(
      x,
      [-1, self.image_size, self.image_size, self.color_channel_count])

    with tf.name_scope('conv1'):
      W_conv1 = weight_variable([5, 5, self.color_channel_count, 32])
      b_conv1 = bias_variable([32])
      h_conv1 = tf.nn.relu(conv2d(x_image, W_conv1) + b_conv1)

    with tf.name_scope('pool1'):
      h_pool1 = max_pool_2x2(h_conv1)

    with tf.name_scope('conv2'):
      W_conv2 = weight_variable([5, 5, 32, 64])
      b_conv2 = bias_variable([64])
      h_conv2 = tf.nn.relu(conv2d(h_pool1, W_conv2) + b_conv2)

    with tf.name_scope('pool2'):
      h_pool2 = max_pool_2x2(h_conv2)

    with tf.name_scope('fc1'):
      W_fc1 = weight_variable(
        [int(self.image_size / 4) * int(self.image_size / 4) * 64, 1024])
      b_fc1 = bias_variable([1024])
      h_pool2_flat = tf.reshape(
        h_pool2,
        [-1, int(self.image_size / 4) * int(self.image_size / 4) * 64])
      h_fc1 = tf.nn.relu(tf.matmul(h_pool2_flat, W_fc1) + b_fc1)
      h_fc1_drop = tf.nn.dropout(h_fc1, keep_prob)

    with tf.name_scope('fc2'):
      W_fc2 = weight_variable([1024, self.class_count])
      b_fc2 = bias_variable([self.class_count])
      y = tf.matmul(h_fc1_drop, W_fc2) + b_fc2

    if softmax:
      with tf.name_scope('softmax'):
        y = tf.nn.softmax(y)

    return y

  # 推論結果と正解の誤差を計算するための損失関数。
  def loss(self, y, labels):
    # 交差エントロピーを計算する。
    # tf.nn.softmax_cross_entropy_with_logits の引数 logits には
    # ソフトマックス関数を適用した変数を与えないこと。
    cross_entropy = tf.reduce_mean(
      tf.nn.softmax_cross_entropy_with_logits(logits=y, labels=labels))
    tf.summary.scalar('cross_entropy', cross_entropy)

    return cross_entropy

  # 学習のための関数
  def training(self, cross_entropy, learning_rate=1e-4):
    train_step = tf.train.AdamOptimizer(learning_rate).minimize(cross_entropy)

    return train_step

  # 正答率 (accuracy) を求める。
  def accuracy(self, y, labels):
    correct_prediction = tf.equal(tf.argmax(y, 1), tf.argmax(labels, 1))
    accuracy = tf.reduce_mean(tf.cast(correct_prediction, tf.float32))
    tf.summary.scalar('accuracy', accuracy)

    return accuracy
説明
CNN モデルの実装です。今回のプロジェクトのいわば心臓部ですが、内容はほぼ TensorFlow のチュートリアル Deep MNIST for Experts の コード と同じです。ただ、汎用性を上げるためにクラス化しています。
6. CSV から画像を読み込むための関数を実装する
コード
import tensorflow as tf


def load_data(csvpath, batch_size, image_size, class_count,
  shuffle=False, min_after_dequeue=1000):

  queue = tf.train.string_input_producer([csvpath], shuffle=shuffle)
  reader = tf.TextLineReader()
  key, value = reader.read(queue)
  imagepath, label = tf.decode_csv(value, [['imagepath'], [0]])

  jpeg = tf.read_file(imagepath)
  image = tf.image.decode_jpeg(jpeg, channels=3)
  image = tf.image.resize_images(image, [image_size, image_size])
  # 平均が 0 になるようにスケーリングする。
  image = tf.image.per_image_standardization(image)

  # ラベルの値を one-hot 表現に変換する。
  label = tf.one_hot(label, depth=class_count, dtype=tf.float32)

  capacity = min_after_dequeue + batch_size * 3

  if shuffle:
    images, labels = tf.train.shuffle_batch(
      [image, label],
      batch_size=batch_size,
      num_threads=4,
      capacity=capacity,
      min_after_dequeue=min_after_dequeue)
  else:
    images, labels = tf.train.batch(
      [image, label],
      batch_size=batch_size,
      capacity=capacity)

  return images, labels
説明
CSV から画像とラベルを読み込むための関数です。 のちの学習とテストで使用します。学習時はテストデータをシャッフルするために tf.train.shuffle_batch() を使い、テスト時はシャッフルせずに tf.train.batch() を使うことを想定しています。
7. CNN モデルを学習する
コード
import os
import tensorflow as tf
from cnn import CNN
from config import Channel, LOG_DIR
from load_data import load_data

# TensorFlow の警告メッセージを抑制する。
os.environ['TF_CPP_MIN_LOG_LEVEL'] = '3'

flags = tf.app.flags
FLAGS = flags.FLAGS
flags.DEFINE_integer('image_size', 48, 'Image size.')
flags.DEFINE_integer('step_count', 1000, 'Number of steps.')
flags.DEFINE_integer('batch_size', 50, 'Batch size.')
flags.DEFINE_float('learning_rate', 1e-4, 'Initial learning rate.')


def main():
  with tf.Graph().as_default():
    cnn = CNN(image_size=FLAGS.image_size, class_count=len(Channel))
    images, labels = load_data(
      'data/train/data.csv',
      batch_size=FLAGS.batch_size,
      image_size=FLAGS.image_size,
      class_count=len(Channel),
      shuffle=True)
    keep_prob = tf.placeholder(tf.float32)

    logits = cnn.inference(images, keep_prob)
    loss = cnn.loss(logits, labels)
    train_op = cnn.training(loss, FLAGS.learning_rate)
    accuracy = cnn.accuracy(logits, labels)

    saver = tf.train.Saver()
    init_op = tf.global_variables_initializer()

    with tf.Session() as sess:
      sess.run(init_op)
      coord = tf.train.Coordinator()
      threads = tf.train.start_queue_runners(sess=sess, coord=coord)

      summary_op = tf.summary.merge_all()
      summary_writer = tf.summary.FileWriter(LOG_DIR, sess.graph)

      for step in range(1, FLAGS.step_count + 1):
        _, loss_value, accuracy_value = sess.run(
          [train_op, loss, accuracy], feed_dict={keep_prob: 0.5})

        if step % 10 == 0:
          print(f'step {step}: training accuracy {accuracy_value}')
          summary = sess.run(summary_op, feed_dict={keep_prob: 1.0})
          summary_writer.add_summary(summary, step)

      coord.request_stop()
      coord.join(threads)

      save_path = saver.save(sess, os.path.join(LOG_DIR, 'model.ckpt'))

if __name__ == '__main__':
  main()
説明
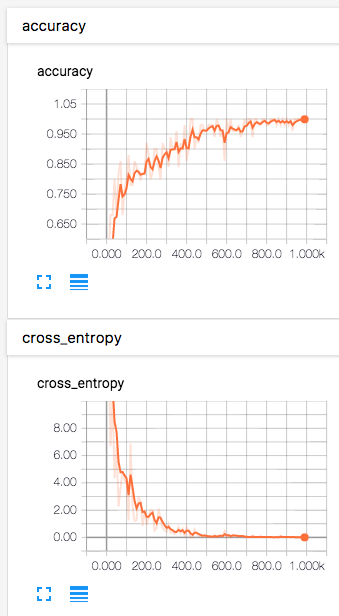
実際に画像を読み込んで CNN の学習を行います。今回は学習を 1,000 ステップ実行し、10 ステップごとに正答率 (accuray) を出力しています。学習したパラメータは log/model.ckpt に保存します。
実行結果
$ python train.py
step 10: training accuracy 0.5600000023841858
step 20: training accuracy 0.47999998927116394
step 30: training accuracy 0.7200000286102295
(略)
step 980: training accuracy 1.0
step 990: training accuracy 0.9800000190734863
step 1000: training accuracy 0.9800000190734863
また、ターミナルの別セッションで TensorBoard を起動して Web ブラウザで http://0.0.0.0:6006 にアクセスすると、学習データに対する正答率 (accuray) や交差エントロピー (cross_entropy) などの値の遷移をグラフで確認できます。
$ tensorboard --logdir ./log
Starting TensorBoard b'47' at http://0.0.0.0:6006
(Press CTRL+C to quit)
8. 学習済みモデルをテストする
コード
import os
import tensorflow as tf
from cnn import CNN
from config import Channel, LOG_DIR
from load_data import load_data

os.environ['TF_CPP_MIN_LOG_LEVEL'] = '3'

flags = tf.app.flags
FLAGS = flags.FLAGS
flags.DEFINE_integer('image_size', 48, 'Image size.')
flags.DEFINE_integer('batch_size', 1000, 'Batch size.')


def main():
  with tf.Graph().as_default():
    cnn = CNN(image_size=FLAGS.image_size, class_count=len(Channel))
    images, labels = load_data(
      'data/test/data.csv',
      batch_size=FLAGS.batch_size,
      image_size=FLAGS.image_size,
      class_count=len(Channel),
      shuffle=False)
    keep_prob = tf.placeholder(tf.float32)

    logits = cnn.inference(images, keep_prob)
    accuracy = cnn.accuracy(logits, labels)

    saver = tf.train.Saver()
    init_op = tf.global_variables_initializer()

    with tf.Session() as sess:
      sess.run(init_op)
      saver.restore(sess, os.path.join(LOG_DIR, 'model.ckpt'))
      coord = tf.train.Coordinator()
      threads = tf.train.start_queue_runners(sess=sess, coord=coord)

      accuracy_value = sess.run(accuracy, feed_dict={keep_prob: 0.5})

      print(f'test accuracy: {accuracy_value}')

      coord.request_stop()
      coord.join(threads)

if __name__ == '__main__':
  main()
説明
テストデータに対する正答率 (accuray) を求めることで、学習済みモデルの精度を計測します。
実行結果
$ find data/test -name '*.jpg' | wc -l
    1097
$ python test.py --batch_size 1097
test accuracy: 0.7657247185707092
今回、正答率は約 76.6 % でした。ランダムに推論した場合は 4 分の 1 つまり 25.0 % となるはずなので、正しく学習できるとは思いますが、まだまだ精度を上げる余地がありそうです。
9. 学習済みモデルで推論する
コード
import numpy as np
import os
import sys
import tensorflow as tf
from cnn import CNN
from config import Channel, LOG_DIR

os.environ['TF_CPP_MIN_LOG_LEVEL'] = '3'

flags = tf.app.flags
FLAGS = flags.FLAGS
flags.DEFINE_integer('image_size', 48, 'Image size.')


def load_image(imagepath, image_size):
  jpeg = tf.read_file(imagepath)
  image = tf.image.decode_jpeg(jpeg, channels=3)
  image = tf.cast(image, tf.float32)
  image = tf.image.resize_images(image, [image_size, image_size])
  image = tf.image.per_image_standardization(image)

  return image


def print_results(imagepath, softmax):
  os.system(f'imgcat {imagepath}')
  mex_channel_name_length = max(len(channel.name) for channel in Channel)
  for channel, value in zip(Channel, softmax):
    print(f'{channel.name.ljust(mex_channel_name_length + 1)}: {value}')

  print()

  prediction = Channel(np.argmax(softmax)).name
  for channel in Channel:
    if channel.name in imagepath:
      answer = channel.name
      break

  print(f'推測: {prediction}, 正解: {answer}')
説明
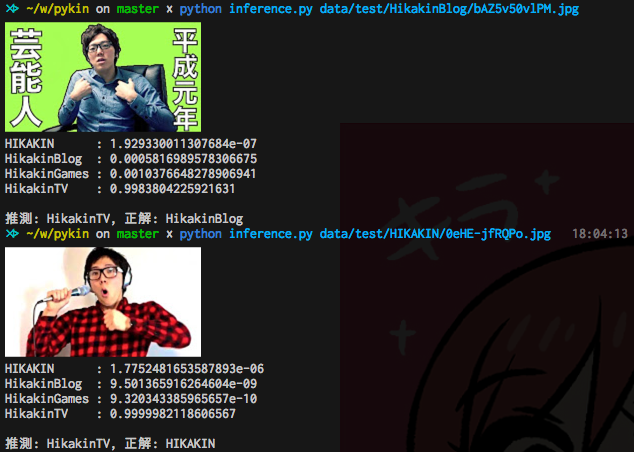
最後に、学習済みモデルを使って推論を行います。ソフトマックス関数の結果を見て、もっと値が大きいクラスを推論結果とします。
ちなみに iTerm2 と iTerm2 の Images ページで配布されている imgcat を使うと、画像をターミナル上にそのまま出力できます。入力画像と推論結果を合わせてターミナル上に出力できるので便利です。
実行結果
テストデータをいくつか選んで推論してみます。
成功例 
HikakinTV と HikakinGames はデータ数が多いためか、正答率が高い印象です。
失敗例 
一方 HIKAKIN と HikakinBlog はデータ数が少ないためか、正答率が低いです。
チャンネルごとの正答率
テストデータを 1 つのチャンネルのみに絞って正答率を計算してみました。
| チャンネル | テストデータ数 | 正答率 (%) |
|---|---|---|
| HIKAKIN | 50 | 20.0 |
| HikakinBlog | 19 | 15.8 |
| HikakinGames | 374 | 68.4 |
| HikakinTV | 654 | 69.4 |
うーん、やはりデータが少ないと正答率が極端に悪いですね。
改善案
- 学習時の画像サイズを大きくする。
- CNN の層の数を増やす。
- Data Augmentation (データ拡張) を行って、画像の数を水増しする。
特に学習データの数を増やすだけでもかなり改善できそうな気がするので、今後やってみようと思います。
参考
参考資料は無数にあるので、特にお世話になったものだけに厳選します。また、公式ドキュメントは除きます。
インターネット記事
TensorFlow を使った事例
神々の記事 ![]()
![]()
-
TensorFlowによるディープラーニングで、アイドルの顔を識別する
- 日本にいるほとんどの TensorFlow ユーザが すぎゃーん 氏の記事を参考にしたのではないでしょうか。偉大な記事です。
-
TensorFlowでアニメゆるゆりの制作会社を識別する
- 同じように TensorFlow でアニメキャラクターを識別しようとしたほとんどのプログラマが参考にしたのではないかという偉大な記事。僕も前に けものフレンズ のキャラクターを識別するプログラムを書いたので、そのときに参考にしました。
-
ある美女が,どの大学にいそうかを CNN で判別する
- 参考にした事例の中で最も新しいです。
TensorFlow での画像データ入力関連
TensorFlow のデータ入力には非常に悩まされました。先達の方々の記事に本当に感謝 ![]()
![]()
- TensorFlowのReaderクラスを使ってみる
-
TensorFlowによるももクロメンバー顔認識(前編)
- 画像データの入力についてはこの記事のコードを特に参考にさせて頂きました。
その他
書籍
-
ゼロから作るDeep Learning――Pythonで学ぶディープラーニングの理論と実装
- この本のおかげで TensorFlow での CNN の実装を理解できました。


