INTRODUCTION
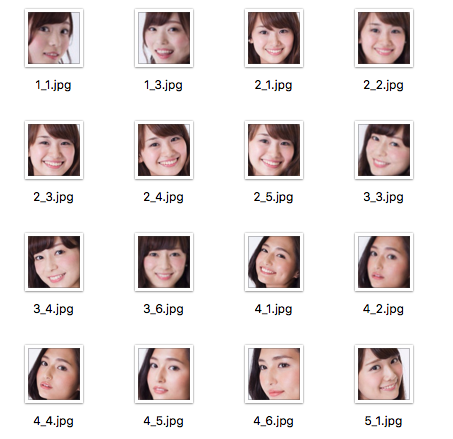
上の画像は,2014年のミスキャンパス立命館のものです.みんなとても美人ですね.
その一方で,パッと見た感じ,どの方も同じような顔をしているように見えます.類は友を呼ぶのでしょうか.これを 立命館っぽい顔 と呼ぶことにします.
また「青学っぽい」「学習院にいそう」みたいな言葉をよく耳にはさみますが,これもやはり 青学っぽい顔 や 学習院っぽい顔 というものがあるが故なように思います.
そこで今回は,大学ごとの顔の傾向を Deep Learning させ,ある美女がどの大学にいそうかを判別できるモデルを作成してみました.
APPROACH
1. 大学ごとの女性の画像収集
まず,各大学の女性の画像をひたすら取得します.ミスコンテストのポータルサイト に,各大学の過去のミスコンの写真が体系的にまとまっていたので,利用させていただきました.
# -*- coding:utf-8 -*-

import os
import bs4
import time
import random
import urllib2
from itertools import chain
from urllib import urlretrieve

base_url = 'http://misscolle.com'


def fetch_page_urls():
    html = urllib2.urlopen('{}/versions'.format(base_url))
    soup = bs4.BeautifulSoup(html, 'html.parser')

    columns = soup.find_all('ul', class_='columns')
    atags = map(lambda column: column.find_all('a'), columns)

    with open('page_urls.txt', 'w') as f:
        for _ in chain.from_iterable(atags):
            path = _.get('href')
            if not path.startswith('http'):  # Relative path
                path = '{}{}'.format(base_url, path)
            if path[-1] == '/':  # Normalize
                path = path[:-1]
            f.write('{}\n'.format(path))


def fetch_photos():
    with open('page_urls.txt') as f:
        for url in f:
            # Make directories for saving images
            dirpath = 'photos/{}'.format(url.strip().split('/')[-1])
            os.makedirs(dirpath)

            html = urllib2.urlopen('{}/photo'.format(url.strip()))
            soup = bs4.BeautifulSoup(html, 'html.parser')

            photos = soup.find_all('li', class_='photo')
            paths = map(lambda path: path.find('a').get('href'), photos)

            for path in paths:
                filename = '_'.join(path.split('?')[0].split('/')[-2:])
                filepath = '{}/{}'.format(dirpath, filename)
                # Download image file
                urlretrieve('{}{}'.format(base_url, path), filepath)
                # Add random waiting time (4 - 6 sec)
                time.sleep(4 + random.randint(0, 2))


if __name__ == '__main__':
    fetch_page_urls()
    fetch_photos()
実行すると,以下のようなディレクトリ構成で保存されます.
http://misscolle.com/img/contests/aoyama2015/1/1.jpg が photos/aoyama/2015/1_1.jpg にマッピングされます.
photos/
├── aoyama
│   ├── 2008
│   │   ├── 1_1.jpg
│   │   ├── 1_2.jpg
│   │   ├── ...
│   │   ├── 2_1.jpg
│   │   ├── 2_2.jpg
│   │   ├── ...
│   │   └── 6_9.jpg
│   ├── 2009
│   │   ├── 1_1.jpg
│   │   ├── 1_2.jpg
│   │   ├── ...
これにより,計 82 大学,全 10,725 枚の画像 (約2.5G) が集まりました.見ていて幸せな気分になります.
2. OpenCV で顔領域のトリミング
次に,これらの画像から OpenCV で顔領域を検出し,トリミングをおこないます.評価器は frontalface_alt2 を用いました.
# -*- coding:utf-8 -*-

import os
import cv2

def main():
    for srcpath, _, files in os.walk('photos'):
        if len(_):
            continue
        dstpath = srcpath.replace('photos', 'faces')
        os.makedirs(dstpath)
        for filename in files:
            if filename.startswith('.'):  # Pass .DS_Store
                continue
            try:
                detect_faces(srcpath, dstpath, filename)
            except:
                continue


def detect_faces(srcpath, dstpath, filename):
    cascade = cv2.CascadeClassifier('haarcascade_frontalface_alt2.xml')
    image = cv2.imread('{}/{}'.format(srcpath, filename))
    gray_image = cv2.cvtColor(image, cv2.COLOR_BGR2GRAY)
    faces = cascade.detectMultiScale(gray_image)
    # Extract when just one face is detected
    if (len(faces) == 1):
        (x, y, w, h) = faces[0]
        image = image[y:y+h, x:x+w]
        image = cv2.resize(image, (100, 100))
        cv2.imwrite('{}/{}'.format(dstpath, filename), image)


if __name__ == '__main__':
    main()
これを実行すると,faces/ に,先程と同じディレクトリ構成で顔画像が保存されます.これも見ていて幸せな(ry
3. Tensorflow で CNN にかける
いよいよ CNN で学習させます.まず,以下の基準で大学をスクリーニングしました.
- 過去 5 年分以上のミスコンのデータが存在する.
- 全体で 100 枚以上の画像が存在する.
そして,このスクリーニングでしぼられた 20 大学から,独断で以下の 10 大学を選定し,10 クラス分類をおこなうことにしました.
- 青山学院大学
- 実践女子大学
- 慶應義塾大学
- 日本大学 (法学部)
- 東京理科大学
- 立教大学
- 成蹊大学
- 上智大学
- 東京大学
- 東京女子大学
各大学,直近の 1 年分をテストデータとし,それ以外を訓練データとします.訓練データ,テストデータはそれぞれ 1,700 枚,154 枚となりました.
Tensorflow で CNN を組み,学習をおこないます.
# -*- coding:utf-8 -*-

import os
import random
import numpy as np
import tensorflow as tf

label_dict = {
    'aoyama': 0, 'jissen': 1, 'keio': 2, 'phoenix': 3, 'rika': 4,
    'rikkyo': 5, 'seikei': 6, 'sophia': 7, 'todai': 8, 'tonjo': 9
}


def load_data(data_type):
    filenames, images, labels = [], [], []
    walk = filter(lambda _: not len(_[1]) and data_type in _[0], os.walk('faces'))
    for root, dirs, files in walk:
        filenames += ['{}/{}'.format(root, _) for _ in files if not _.startswith('.')]
    # Shuffle files
    random.shuffle(filenames)
    # Read, resize, and reshape images
    images = map(lambda _: tf.image.decode_jpeg(tf.read_file(_), channels=3), filenames)
    images = map(lambda _: tf.image.resize_images(_, [32, 32]), images)
    images = map(lambda _: tf.reshape(_, [-1]), images)
    for filename in filenames:
        label = np.zeros(10)
        for k, v in label_dict.iteritems():
            if k in filename:
                label[v] = 1.
        labels.append(label)

    return images, labels


def get_batch_list(l, batch_size):
    # [1, 2, 3, 4, 5,...] -> [[1, 2, 3], [4, 5,..]]
    return [np.asarray(l[_:_+batch_size]) for _ in range(0, len(l), batch_size)]


def weight_variable(shape):
  initial = tf.truncated_normal(shape, stddev=0.1)
  return tf.Variable(initial)


def bias_variable(shape):
  initial = tf.constant(0.1, shape=shape)
  return tf.Variable(initial)


def conv2d(x, W):
  return tf.nn.conv2d(x, W, strides=[1, 1, 1, 1], padding='SAME')


def max_pool_2x2(x):
  return tf.nn.max_pool(x, ksize=[1, 2, 2, 1], strides=[1, 2, 2, 1], padding='SAME')


def inference(images_placeholder, keep_prob):
    # Convolution layer
    x_image = tf.reshape(images_placeholder, [-1, 32, 32, 3])
    W_conv1 = weight_variable([5, 5, 3, 32])
    b_conv1 = bias_variable([32])
    h_conv1 = tf.nn.relu(conv2d(x_image, W_conv1) + b_conv1)

    # Pooling layer
    h_pool1 = max_pool_2x2(h_conv1)

    # Convolution layer
    W_conv2 = weight_variable([5, 5, 32, 64])
    b_conv2 = bias_variable([64])
    h_conv2 = tf.nn.relu(conv2d(h_pool1, W_conv2) + b_conv2)

    # Pooling layer
    h_pool2 = max_pool_2x2(h_conv2)

    # Full connected layer
    W_fc1 = weight_variable([8 * 8 * 64, 1024])
    b_fc1 = bias_variable([1024])
    h_pool2_flat = tf.reshape(h_pool2, [-1, 8 * 8 * 64])
    h_fc1 = tf.nn.relu(tf.matmul(h_pool2_flat, W_fc1) + b_fc1)

    # Dropout
    h_fc1_drop = tf.nn.dropout(h_fc1, keep_prob)

    # Full connected layer
    W_fc2 = weight_variable([1024, 10])
    b_fc2 = bias_variable([10])

    return tf.nn.softmax(tf.matmul(h_fc1_drop, W_fc2) + b_fc2)


def main():
    with tf.Graph().as_default():
        train_images, train_labels = load_data('train')
        test_images, test_labels = load_data('test')
        x = tf.placeholder('float', shape=[None, 32 * 32 * 3])  # 32 * 32, 3 channels
        y_ = tf.placeholder('float', shape=[None, 10])  # 10 classes
        keep_prob = tf.placeholder('float')

        y_conv = inference(x, keep_prob)
        # Loss function
        cross_entropy = -tf.reduce_sum(y_ * tf.log(y_conv))
        tf.summary.scalar('cross_entropy', cross_entropy)
        # Minimize cross entropy by using SGD
        train_step = tf.train.AdamOptimizer(1e-4).minimize(cross_entropy)
        # Accuracy
        correct_prediction = tf.equal(tf.argmax(y_conv, 1), tf.argmax(y_, 1))
        accuracy = tf.reduce_mean(tf.cast(correct_prediction, 'float'))
        tf.summary.scalar('accuracy', accuracy)

        saver = tf.train.Saver()
        sess = tf.InteractiveSession()
        sess.run(tf.global_variables_initializer())

        summary_op = tf.summary.merge_all()
        summary_writer = tf.summary.FileWriter('./logs', sess.graph)

        batched_train_images = get_batch_list(train_images, 25)
        batched_train_labels = get_batch_list(train_labels, 25)

        train_images = map(lambda _: sess.run(_).astype(np.float32) / 255.0, np.asarray(train_images))
        test_images = map(lambda _: sess.run(_).astype(np.float32) / 255.0, np.asarray(test_images))
        train_labels, test_labels = np.asarray(train_labels), np.asarray(test_labels)

        # Train
        for step, (images, labels) in enumerate(zip(batched_train_images, batched_train_labels)):
            images = map(lambda _: sess.run(_).astype(np.float32) / 255.0, images)
            sess.run(train_step, feed_dict={ x: images, y_: labels, keep_prob: 0.5 })
            train_accuracy = accuracy.eval(feed_dict = {
                x: train_images, y_: train_labels, keep_prob: 1.0 })
            print 'step {}, training accuracy {}'.format(step, train_accuracy)
            summary_str = sess.run(summary_op, feed_dict={
                x: train_images, y_: train_labels, keep_prob: 1.0 })
            summary_writer.add_summary(summary_str, step)
        # Test trained model
        test_accuracy = accuracy.eval(feed_dict = {
            x: test_images, y_: test_labels, keep_prob: 1.0 })
        print 'test accuracy {}'.format(test_accuracy)
        # Save model
        save_path = saver.save(sess, "model.ckpt")


if __name__ == '__main__':
    main()
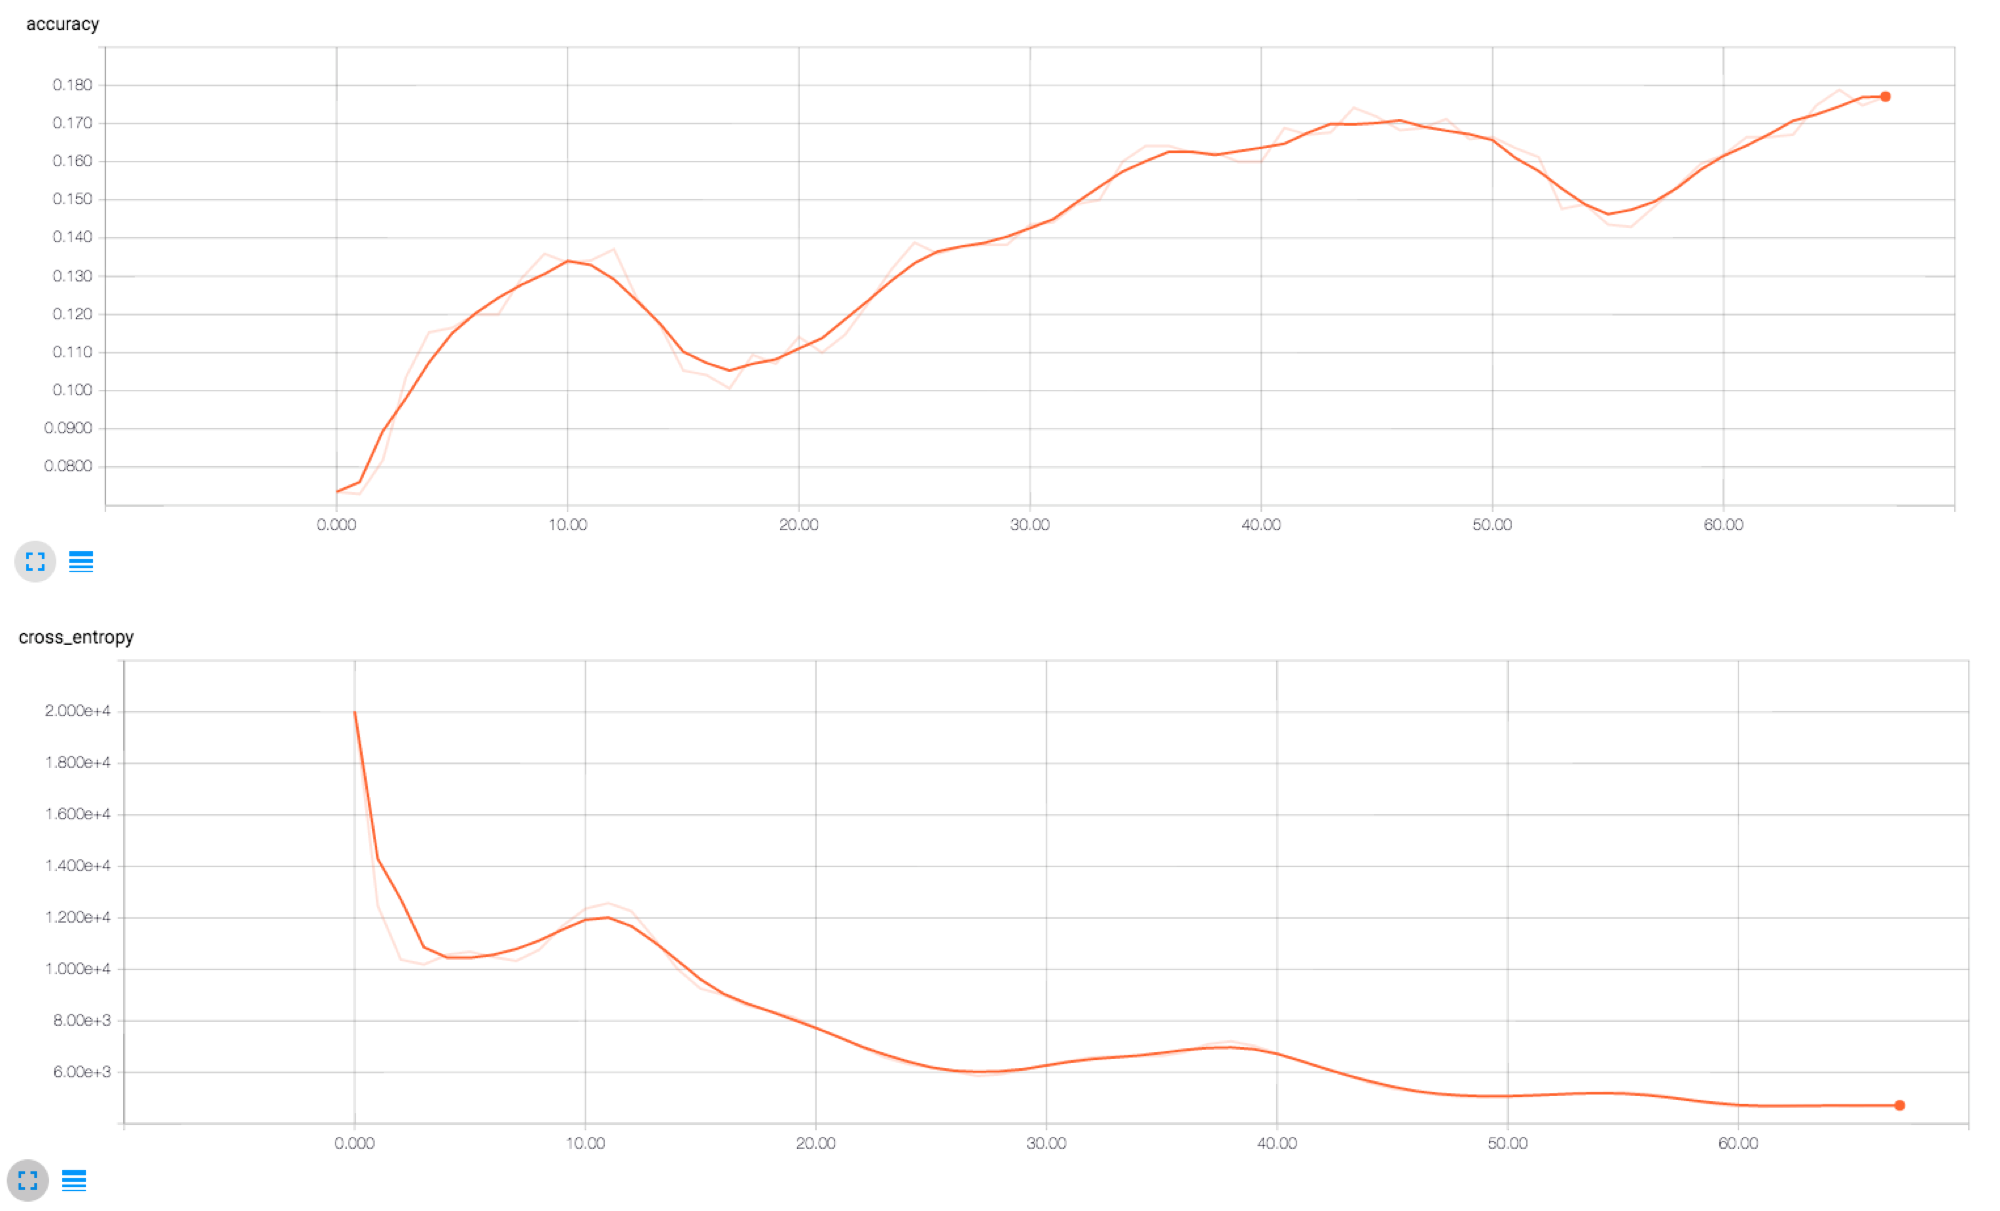
訓練データが少ないこともあり,適合率は 20% くらいと学習はあまり進みませんでした.ただ,テストデータの精度も 19.48% (10 クラス分類なのでベースは 10%) で,5 人に 1 人は当てれていることになるので,この学習結果からすると,まずまずの傾向はおさえられた,ということなのでしょうか…
EXPERIMENTAL RESULTS
この学習モデルを用いて,ガッキーがどこの大学っぽいかを,以下の画像で判別してみようと思います.cnn.py の main を以下に差し替えました.
def main():
    with tf.Graph().as_default():
        test_images, test_labels = load_data('experiment')
        x = tf.placeholder('float', shape=[None, 32 * 32 * 3])  # 32 * 32, 3 channels
        y_ = tf.placeholder('float', shape=[None, 10])  # 10 classes
        keep_prob = tf.placeholder('float')

        y_conv = inference(x, keep_prob)

        sess = tf.InteractiveSession()
        sess.run(tf.global_variables_initializer())
        saver = tf.train.Saver()
        saver.restore(sess, "./model.ckpt")

        test_images = map(lambda _: sess.run(_).astype(np.float32) / 255.0, np.asarray(test_images))

        print y_conv.eval(feed_dict={ x: [train_images[0]], keep_prob: 1.0 })[0]
        print np.argmax(y_conv.eval(feed_dict={ x: [train_images[0]], keep_prob: 1.0 })[0])
以下が実行結果です.ガッキーは青学っぽい顔 (34.83%),という結果になりました.何だか分かるような気がします.青学の次は日大,立教と続きました.
# 以下に対応している
#
# label_dict = {
#     'aoyama': 0, 'jissen': 1, 'keio': 2, 'phoenix': 3, 'rika': 4,
#     'rikkyo': 5, 'seikei': 6, 'sophia': 7, 'todai': 8, 'tonjo': 9
# }
[ 0.34834844  0.0005422   0.00995418  0.21047674  0.13970862  0.15559362 0.03095848  0.09672297  0.00721581  0.00047894]
# argmax
0
RELATED WORK
先日 シンガポールで発表 されてて,すごいなあと思いました.
以前自分が開発した (Apple の審査は通らなかった),スマホを胸にはさむだけでカップ数が分かるアプリ ChiChi ととっちが高精度で識別できるか勝負したいです.
FUTURE WORK
各大学において,顔に多少の傾向はあることを示唆するような結果となりましたが,まだまだ精度が低いので,データをもっと増やしたり,モデルのチューニングをしたりして精度を高めていきたいです.今回はかなりシンプルなモデルを構築しましたが,Tensorflow の tutorial の cifar10 のコードなんかを見ると,チューニングできる要素が散らばっているように思います.
また,横展開として,美人時計 の各都道府県の美女の画像を学習させて,ある美女がどの都道府県っぽい顔か,なんかを出せてもおもしろいかなあと思います.


