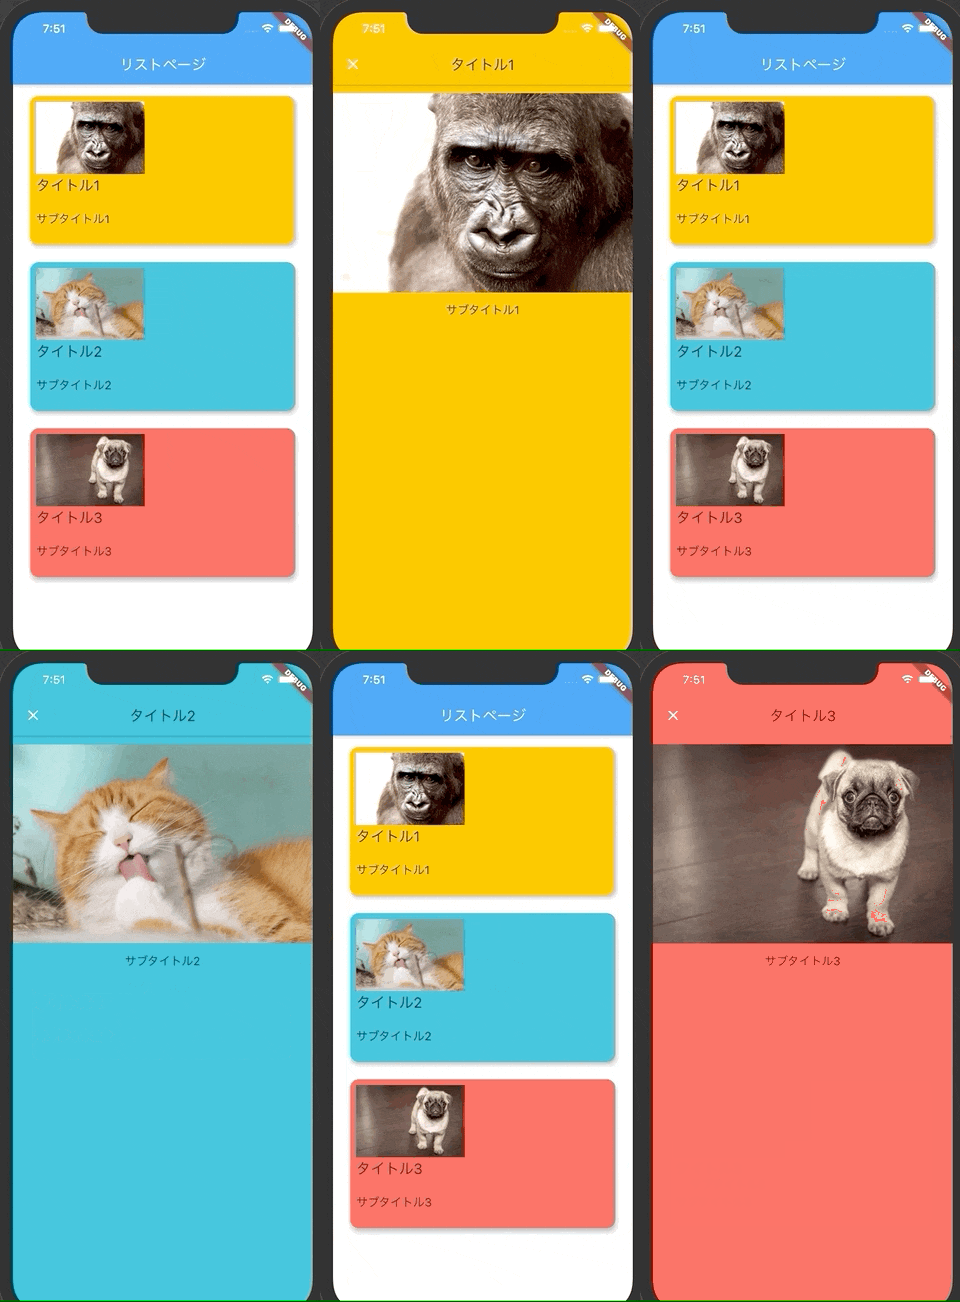
実装イメージ
実装
全体コード
今回コピペで使用できるように1ファイルに全て実装しています。
main.dart
import 'package:flutter/material.dart';

void main() {
  runApp(MyApp());
}

class MyApp extends StatelessWidget {
  @override
  Widget build(BuildContext context) {
    return MaterialApp(
      title: 'Flutter Demo',
      theme: ThemeData(
        primarySwatch: Colors.blue,
        visualDensity: VisualDensity.adaptivePlatformDensity,
      ),
      home: MyHomePage(),
    );
  }
}

// リストを表示してるページ
class MyHomePage extends StatelessWidget {
  @override
  Widget build(BuildContext context) {
    return Scaffold(
      appBar: AppBar(
        title: Text('リストページ'),
      ),
      body: Center(
        child: ListView.builder(
            itemExtent: 230.0,
            itemCount: list.length,
            itemBuilder: (BuildContext context, int index) {
              return GestureDetector(
                onTap: () {
                  Navigator.of(context).push(
                    MaterialPageRoute(
                      fullscreenDialog: true,
                      builder: (BuildContext context) => DetailPage(
                        item: list[index],
                      ),
                    ),
                  );
                },
                child: Card(
                  margin: EdgeInsets.fromLTRB(24.0, 16.0, 24.0, 8.0),
                  elevation: 4.0,
                  shape: RoundedRectangleBorder(
                      borderRadius: BorderRadius.circular(12.0)),
                  clipBehavior: Clip.antiAlias,
                  child: Stack(
                    children: <Widget>[
                      Hero(
                        tag: 'background' + list[index].id,
                        child: Container(
                          color: list[index].backgroundColor,
                        ),
                      ),
                      Padding(
                        padding: const EdgeInsets.all(8.0),
                        child: Column(
                          crossAxisAlignment: CrossAxisAlignment.start,
                          children: <Widget>[
                            Hero(
                              tag: 'image' + list[index].id,
                              child: Image.network(list[index].imagePath,fit: BoxFit.fitWidth,height: 100,),
                            ),
                            Hero(
                              tag: 'title' + list[index].id,
                              child: Material(
                                color: Colors.transparent,
                                child: Text(
                                  list[index].title,
                                  style: TextStyle(fontSize: 20),
                                ),
                              ),
                            ),
                            SizedBox(
                              height: 20,
                            ),
                            Hero(
                              tag: 'subtitle' + list[index].id,
                              child: Material(
                                color: Colors.transparent,
                                child: Text(
                                  list[index].subtitle,
                                  style: TextStyle(fontSize: 16),
                                ),
                              ),
                            ),
                          ],
                        ),
                      ),
                    ],
                  ),
                ),
              );
            }),
      ),
    );
  }
}

// 詳細ページ
class DetailPage extends StatelessWidget {
  final ItemModel item;
  DetailPage({this.item});

  @override
  Widget build(BuildContext context) {
    return Scaffold(
      appBar: AppBar(
        title: Hero(
          tag: 'title' + item.id,
          child: Material(
            color: Colors.transparent,
            child: Text(
              item.title,
              style: TextStyle(fontSize: 20),
            ),
          ),
        ),
        backgroundColor: item.backgroundColor,
      ),
      body: Stack(
        children: <Widget>[
          Hero(
            tag: 'background' + item.id,
            child: Container(
              color: item.backgroundColor,
            ),
          ),
          Center(
            child: Column(
              children: <Widget>[
                Hero(
                  tag: 'image' + item.id,
                  child: Image.network(item.imagePath,fit: BoxFit.fitWidth,height: 300,),
                ),
                Hero(
                  tag: 'subtitle' + item.id,
                  child: Material(
                    color: Colors.transparent,
                    child: Text(
                      item.subtitle,
                      style: TextStyle(fontSize: 16),
                    ),
                  ),
                ),
              ],
            ),
          ),
        ],
      ),
    );
  }
}

// リストに表示するデータ
final list = [
  ItemModel(
    id: '1',
    title: 'タイトル1',
    subtitle: 'サブタイトル1',
    imagePath: 'https://cdn.pixabay.com/photo/2017/05/16/21/24/gorilla-2318998_1280.jpg',
    backgroundColor: Colors.amber,
  ),
  ItemModel(
    id: '2',
    title: 'タイトル2',
    subtitle: 'サブタイトル2',
    imagePath: 'https://cdn.pixabay.com/photo/2014/04/13/20/49/cat-323262_1280.jpg',
    backgroundColor: Colors.cyan,
  ),
  ItemModel(
    id: '3',
    title: 'タイトル3',
    subtitle: 'サブタイトル3',
    imagePath: 'https://cdn.pixabay.com/photo/2015/03/26/09/54/pug-690566_1280.jpg',
    backgroundColor: Colors.redAccent,
  ),
];

// リストに表示するデータモデル
class ItemModel {
  String id;
  String title;
  String subtitle;
  String imagePath;
  Color backgroundColor;

  ItemModel({
    this.id,
    this.title,
    this.subtitle,
    this.imagePath,
    this.backgroundColor,
  });
}
実装のポイント
1. 追跡したいWidgetを同じtagのHeroでラップする
タグをみてWidgetを認識するので、追跡させるものは同じタグをつけましょう。
main.dart
class MyHomePage extends StatelessWidget {
  // 省略
  Hero(
    // tagの値を同じにする
    tag: 'image' + list[index].id,
    child: Image.network(list[index].imagePath,fit: BoxFit.fitWidth,height: 100,),
  ),
  // 省略
}

class DetailPage extends StatelessWidget {
  // 省略
   Hero(
    // tagの値を同じにする
     tag: 'image' + item.id,
     child: Image.network(item.imagePath,fit: BoxFit.fitWidth,height: 300,),
  ),
 // 省略
}
2. ContainerをStackする
これがないと画面遷移がいい感じにならないです。
main.dart
class MyHomePage extends StatelessWidget {
  // 省略
  Stack(
    children: <Widget>[
      Hero(
        // ここももちろん同じタグ
        tag: 'background' + list[index].id,
        child: Container(
          color: list[index].backgroundColor,
        ),
      ),
      Padding(
  // 省略
}

class DetailPage extends StatelessWidget {
  // 省略
  Stack(
    children: <Widget>[
      Hero(
        // ここももちろん同じタグ
        tag: 'background' + item.id,
          child: Container(
            color: item.backgroundColor,
          ),
      ),
      Center(
 // 省略
}
実装時の注意
1. Heroの中にHeroは使えない
こういうパターンです。
main.dart
class MyHomePage extends StatelessWidget {
  // 省略
  Hero(
     tag: 'tag'
     child Hero(
        tag: 'tag2'
        child Container(),
     )
  )
}
2. 同じWidgetTreeの中で同じtagは使えない
よくあるのはList表示してる時に、同じtagをつけちゃうパターンなどです。
つけると画面遷移時にエラーが出ます。
main.dart
  Column(
    children: <Widget>[
      Hero(
        // 同じのつけられない
        tag: 'tag',
        child: Image.network(item.imagePath,fit: BoxFit.fitWidth,height: 300,),
      ),
      Hero(
        // 同じのつけられない
        tag: 'tag',
        child: Material(
          color: Colors.transparent,
            child: Text(
              item.subtitle,
              style: TextStyle(fontSize: 16),
            ),
        ),
      ),
    ],
  ),
3. Textを追跡する場合はMaterialでラップする
Materialでラップしないと文字の下に黄色い二重線がでます。
main.dart
class MyHomePage extends StatelessWidget {
  // 省略
  Hero(
    tag: 'title' + list[index].id,
    // 遷移前もラップする
    child: Material(
      color: Colors.transparent,
      child: Text(
        list[index].title,
        style: TextStyle(fontSize: 20),
      ),
    ),
  ),
  // 省略
}

class DetailPage extends StatelessWidget {
  // 省略
    appBar: AppBar(
      title: Hero(
        tag: 'title' + item.id,
        // 遷移後もラップする
        child: Material(
          color: Colors.transparent,
          child: Text(
            item.title,
            style: TextStyle(fontSize: 20),
          ),
        ),
      ),
     backgroundColor: item.backgroundColor,
   ),
 // 省略
}
最後に
Flutterでできること増えてきていい感じですね!
個人開発とかでどんどん取り入れていこうと思います!
