前回の続き
Layout management
こちらのサイトを日本語でざっくりとまとめていきます。
【絶対位置】
Absolute_positioning.py
# !/usr/bin/python3
# -*- coding: utf-8 -*-

import sys
from PyQt5.QtWidgets import QWidget, QLabel, QApplication


class Example(QWidget):

    def __init__(self):
        super().__init__()

        self.initUI()


    def initUI(self):

        # ラベル名の設定
        lbl1 = QLabel('Zetcode', self)
        # ラベルをx=15,y=10へ移動
        lbl1.move(15, 10)

        lbl2 = QLabel('tutorials', self)
        lbl2.move(35, 40)

        lbl3 = QLabel('for programmers', self)
        lbl3.move(55, 70)

        self.setGeometry(300, 300, 250, 150)
        self.setWindowTitle('Absolute')
        self.show()


if __name__ == '__main__':

    app = QApplication(sys.argv)
    ex = Example()
    sys.exit(app.exec_())

【ボックスレイアウト】
Box_layout.py
# !/usr/bin/python3
# -*- coding: utf-8 -*-


import sys
from PyQt5.QtWidgets import (QWidget, QPushButton,
    QHBoxLayout, QVBoxLayout, QApplication)


class Example(QWidget):

    def __init__(self):
        super().__init__()

        self.initUI()


    def initUI(self):

        # OKボタンとCancelボタンの作成
        okButton = QPushButton("OK")
        cancelButton = QPushButton("Cancel")

        # 水平なボックスを作成
        hbox = QHBoxLayout()
        # ボタンの大きさが変わらないようにする
        # ボタンの左側に水平方向に伸縮可能なスペースができるため、ボタンは右に寄る
        hbox.addStretch(1)
        hbox.addWidget(okButton)
        hbox.addWidget(cancelButton)

        # 垂直なボックスを作成
        vbox = QVBoxLayout()
        # 垂直方向に伸縮可能なスペースを作る
        vbox.addStretch(1)
        # 右下にボタンが移る
        vbox.addLayout(hbox)

        # 画面に上で設定したレイアウトを加える
        self.setLayout(vbox)

        self.setGeometry(300, 300, 300, 150)
        self.setWindowTitle('Buttons')
        self.show()


if __name__ == '__main__':

    app = QApplication(sys.argv)
    ex = Example()
    sys.exit(app.exec_())

【格子状にボタン配置】
QGridLayout.py
# !/usr/bin/python3
# -*- coding: utf-8 -*-


import sys
from PyQt5.QtWidgets import (QWidget, QGridLayout,
    QPushButton, QApplication)


class Example(QWidget):

    def __init__(self):
        super().__init__()

        self.initUI()


    def initUI(self):

        # アプリケーション画面のためのオブジェクト作成
        grid = QGridLayout()
        self.setLayout(grid)

        # ボタンのラベル
        names = ['Cls', 'Bck', '', 'Close',
                 '7', '8', '9', '/',
                '4', '5', '6', '*',
                 '1', '2', '3', '-',
                '0', '.', '=', '+']

        # ボタンの位置設定
        positions = [(i,j) for i in range(5) for j in range(4)]

        # ボタンを画面に追加
        for position, name in zip(positions, names):

            # ボタンのラベルがない要素はとばす
            if name == '':
                continue
            # ボタンのラベルを設定
            button = QPushButton(name)
            # *positionの位置にボタンを配置
            grid.addWidget(button, *position)

        self.move(300, 150)
        self.setWindowTitle('Calculator')
        self.show()


if __name__ == '__main__':

    app = QApplication(sys.argv)
    ex = Example()
    sys.exit(app.exec_())

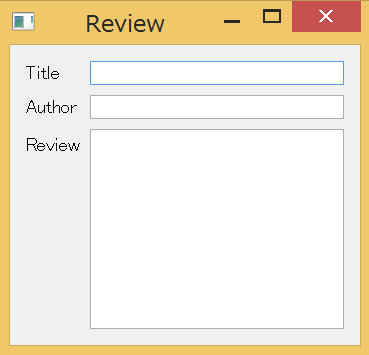
【テキストボックスのレイアウト】
Review_example
# !/usr/bin/python3
# -*- coding: utf-8 -*-


import sys
from PyQt5.QtWidgets import (QWidget, QLabel, QLineEdit,
    QTextEdit, QGridLayout, QApplication)


class Example(QWidget):

    def __init__(self):
        super().__init__()

        self.initUI()


    def initUI(self):

        title = QLabel('Title')
        author = QLabel('Author')
        review = QLabel('Review')

        titleEdit = QLineEdit()
        authorEdit = QLineEdit()
        reviewEdit = QTextEdit()

        # 格子状の配置を作り、各ウィジェットのスペースを空ける
        grid = QGridLayout()
        grid.setSpacing(10)

        # ラベルの位置設定
        grid.addWidget(title, 1, 0)
        # 入力欄の位置設定
        grid.addWidget(titleEdit, 1, 1)

        grid.addWidget(author, 2, 0)
        grid.addWidget(authorEdit, 2, 1)

        grid.addWidget(review, 3, 0)
        grid.addWidget(reviewEdit, 3, 1, 5, 1)

        self.setLayout(grid)

        self.setGeometry(300, 300, 350, 300)
        self.setWindowTitle('Review')
        self.show()


if __name__ == '__main__':

    app = QApplication(sys.argv)
    ex = Example()
    sys.exit(app.exec_())

次回はEvents and signalsをざっくり試していきます。