0.0 はじめに
2次元配列について調べたので備忘録として記載しています。2次元配列の作り方、宣言、要素、初期化について書いてます。
1.0 多次元配列
1.1 多次元配列の宣言の書き方
C# Test.cs
int[,] intValues;
string[,] stringValues;
1.2 要素の確保の仕方
C# Test.cs
intValues = new int[4, 3]; // 4行3列の2次元配列
stringValues = new string[2, 3]; // 2行3列の2次元配列
1.3 まとめて初期化するときの書き方
C# Test.cs
int[,] intValues = new int[3, 3] {{0, 1, 2}, {3, 4, 5}, {6, 7, 8}}; // 4行3列の2次元配列
下記のように書くと見やすいです。
C# Test2.cs
// 3行3列の2次元配列
int[,] intValues = new int[3, 3] {
        {0, 1, 2},
        {3, 4, 5},
        {6, 7, 8}
};
1.4 まとめ
C# Test.cs
/* 配列のイメージ
| 10 | 20 | 30 |
| 40 | 50 | 60 |
*/

// 宣言と初期化、2行3列の2次元配列を作成してその中に数値を入れる
int[,] intValues = new int[2, 3] {
        { 10, 20, 30 },
        { 40, 50, 60 }
};

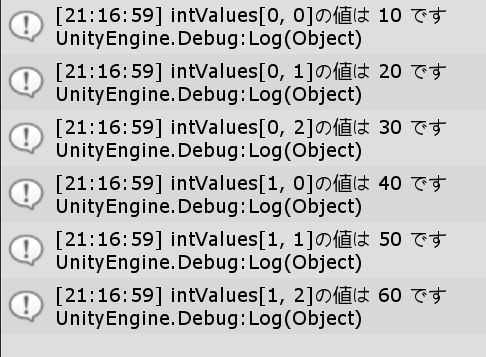
// コンソールに2次元配列の要素を表示します
private void Start() {
    Debug.Log($"intValues[0, 0]の値は {intValues[0, 0]} です"); // 10
    Debug.Log($"intValues[0, 1]の値は {intValues[0, 1]} です"); // 20
    Debug.Log($"intValues[0, 2]の値は {intValues[0, 2]} です"); // 30
    Debug.Log($"intValues[1, 0]の値は {intValues[1, 0]} です"); // 40
    Debug.Log($"intValues[1, 1]の値は {intValues[1, 1]} です"); // 50
    Debug.Log($"intValues[1, 2]の値は {intValues[1, 2]} です"); // 60
}
1.5 for文での取り出し
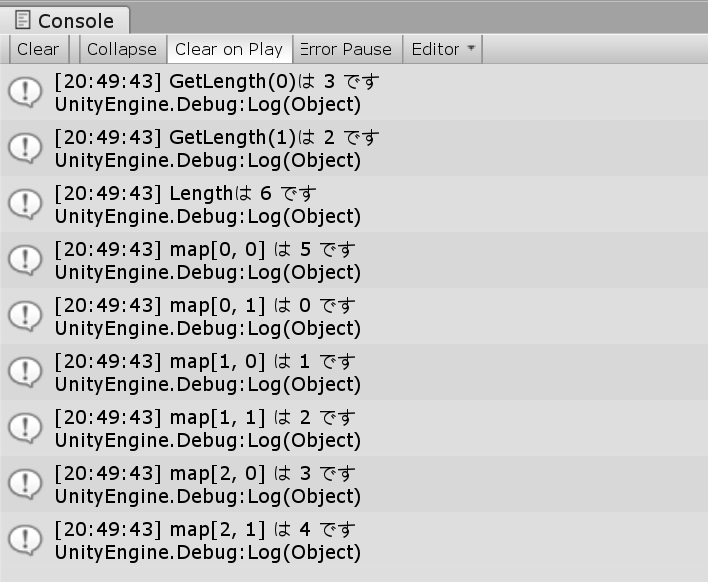
2次元配列はGetLength(0)、GetLength(1)を使えば1次元、2次元数が取り出せます。
これらとfor文を使えばまとめて取り出しができます。
参考までにLengthは全要素数です。
C# Test.cs
int[,] map = new int [,]{
    {5,0},
    {1,2},
    {3,4},
};

void Start()
{
    Draw(); // コンソールに表示
}

void Draw() {

    Debug.Log($"GetLength(0)は {map.GetLength(0)} です"); // 1次元(縦方向)
    Debug.Log($"GetLength(1)は {map.GetLength(1)} です"); // 2次元(横方向)
    Debug.Log($"Lengthは {map.Length} です"); // 要素数

    for (int i = 0; i < map.GetLength(0); i++) {
        for (int j = 0; j < map.GetLength(1); j++) {
            Debug.Log($"map[{i}, {j}] は {map[i, j]} です");
        }
    }
}
2.0 ジャグ配列
1.0で書いたように、多次元配列では各行の要素はすべて同じ数です。各行で別々の要素数を設定したい場合はジャグ配列を使うと便利です。ジャグ配列のイメージは配列の中に配列を作る感じです。
2.1 ジャグ配列宣言の方法
C# Test.cs
int[,] intValues = new int[2][]; // 2行のジャグ配列を宣言
intValues[0] = new int[1]; // 1行目の配列の長さを1に設定
intValues[1] = new int[2]; // 2行目の配列の長さを2に設定
2.2 ジャグ配列初期化の方法
C# Test.cs
int[,] intValues = new int[3][]; // 3行のジャグ配列を宣言
intValues[0] = new int[]{1, 2, 3}; // 1行目の配列に3つの要素
intValues[1] = new int[]{5, 6}; // 2行目の配列に2つの要素
intValues[2] = new int[]{9}; // 3行目の配列に1つの要素
2.3 まとめ
C# Test99.cs
/* 配列のイメージ
| りんご | とまと |
| きゅうり | にんじん | きゃべつ |
*/

// 宣言と初期化、2行ジャグ配列を作成してその中に数値を入れる
string[][] strs = new string[][] {
    new string[]{ "りんご", "とまと" },
    new string[]{ "きゅうり", "にんじん", "きゃべつ" },
};

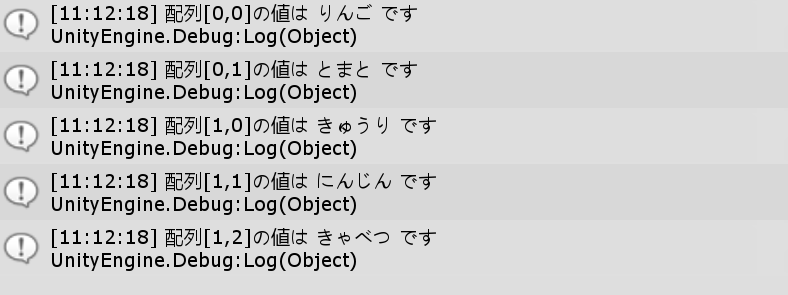
// コンソールにジャグ配列の要素を表示(入れ子で各要素にアクセス)
private void Start() {
    for (int i = 0; i < strs.Length; i++) { // 行数だけループ
        for (int j = 0; j < strs[i].Length; j++) { // 列数のループ
            Debug.Log($"配列[{i},{j}]の値は {strs[i][j]} です");
        }
    }
}


