0. はじめに
OpenFOAMはオープンソースのCFDソフトウェアであり,多くのソルバや拡張機能がある.
用意されているチュートリアルは多いものの,自分のやりたいことを直観的にできるわけではないのが難点である.
超音速(ラバール)ノズルは圧縮性流体の問題として一般的な問題であるが,あまりよいサンプルが見受けられなかったので,最終的に書いにたどり着くまでに苦労した.
ここではWindows PCでOpenFOAMを用いて軸対称超音速ノズルの解析を行うまでの手順を解説する.
0.1. 環境
| ソフトウェア | バージョン |
|---|---|
| Windows 10 Pro | 2004 |
| Ubuntu | 18.04.4 |
| OpenFOAM(ESI) | v2006 |
1. OpenFOAMの導入~実行テスト
- OpenFOAMには,OpenFOAM Foundationによる"OpenFOAM #"と,OpenCFD社(ESI)による"OpenFOAM v####"の2種類がある.
- (おま環かもしれないが,)公式OpenFOAM版(openFOAM 8)では,規定通りのインストール方法でなぜかUbuntu-WSL2で通せないコマンドがあったため,ESI版openFOAMv2006を用いた.
- 一連の導入方法はこちら等にまとまっている.
- ただしWSL2で導入している記事は見当たらなかったので一部追加してまとめ直す.
1.1. Ubuntuの導入
- Windows10を最新版に更新(1903以降に)
- WSL機能を有効化
- Microsoft StoreよりUbuntuのインストール
- デフォルトディストリビューションをWSL"2"に設定
※上記かなり省略しているのでこちらなどを参考にしてください.
1.2. OpenFOAM本体の導入
-
こちらより,
OpenFOAM-v2006-windows10.tgzをダウンロード - 必要なツールをインストール
$ sudo apt install tar bison flex m4
- ESI 版 OpenFOAM をディレクトリ /opt 以下に展開し、現在のユーザーを所有者に設定.
$ sudo tar -xvzf  OpenFOAM-v2006-windows10.tgz -C /opt/
$ sudo chown -R $USER /opt/OpenFOAM
- OpenFOAMで必要なコマンド等のパスをbashを開くたびに通す(直接.bashrcを開いて書き込むのも可)
$ echo "source /opt/OpenFOAM/OpenFOAM-v2006/etc/bashrc" >> $HOME/.bashrc
$ source $HOME/.bashrc
- ただしこのままでははWSL上のUbuntuターミナルを立ち上げてもbashが読み込まれなかったので,ホームディレクトリに
.bash_profileを作成し,以下の記述を書き込む.(参考)
if [ -f ~/.bashrc ] ; then
. ~/.bashrc
fi
- paraviewをインストール(ESI版では含まれていないため)
sudo apt install paraview
1.3. Xサーバーの導入
- paraview等のGUIアプリをWindows上で開くようにするためXサーバーアプリが必要
- こちら参照)
- VcXsrvをこちらよりダウンロードし,インストール
- スタートメニューからXLaunchを開き,VcXsrvの起動オプションを設定
- 起動オプションで,Display numberを明示的に「0」に,Additional parameters for VcXsrvに「-ac -nowgl」を指定(※WSL2では毎回異なるIPで接続する用になっているため,WSLとは設定が異なることに注意)
- Ubuntuで必要なアプリをインストール
$ sudo apt install libgl1-mesa-dev xorg-dev
- ホームデリレクトリの
.profileにDISPLAY環境変数を設定- なんらかのエディタで開く,または作成する.
-
export DISPLAY=$(cat /etc/resolv.conf | grep nameserver | awk '{print $2}'):0.0を末尾に書き込み保存
- 表示できるかサンプルアプリで確認
$ sudo apt install x11-apps
xeyes
- ウインドウにマウスカーソルを追う目が出てくれば完了.
1.4. チュートリアル実行
- 最後にチュートリアルを使って環境テスト
$ mkdir -p $FOAM_RUN
$ run
$ cp -r $FOAM_TUTORIALS/incompressible/simpleFoam/pitzDaily .
$ cd pitzDaily
$ blockMesh
$ simpleFoam
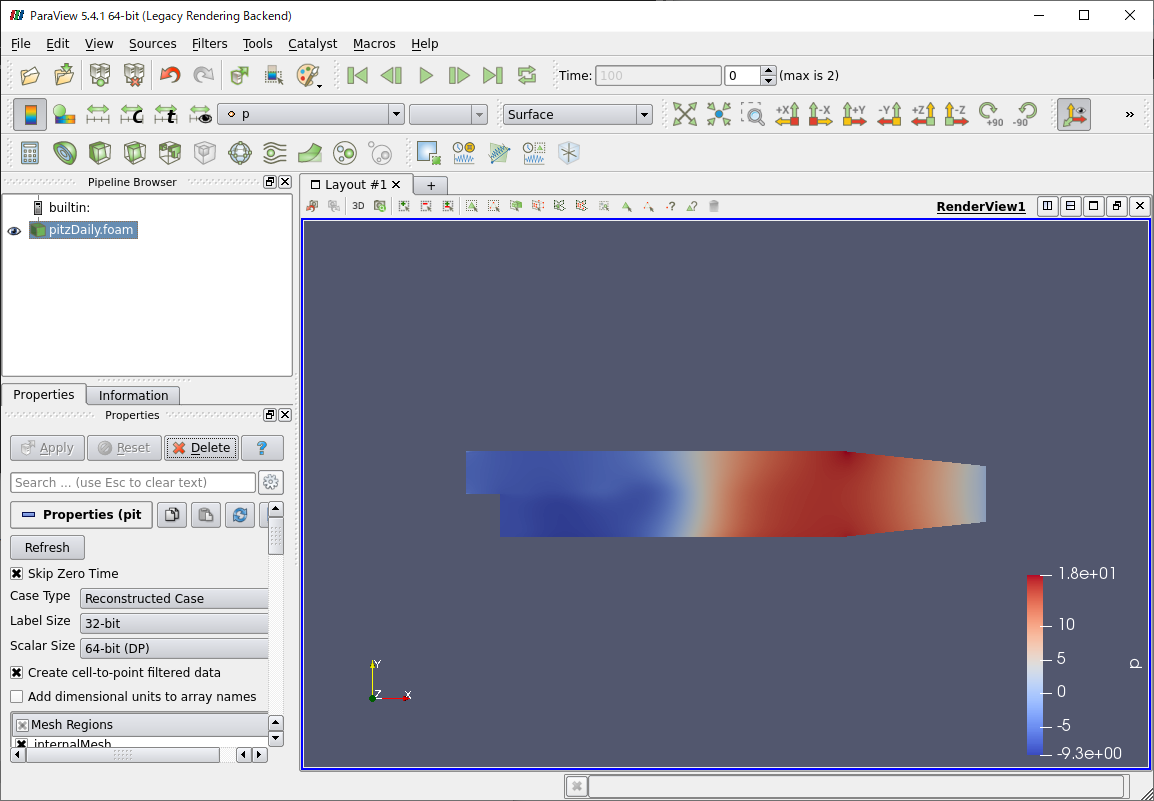
$ paraFoam
- paraviewが表示され,左の"Apply"で以下のような表示なれば完了.
2. ノズル軸対称流れの計算
今回実施したいのは,二次元軸対称ラバールノズル内部の超音速流れである.(メッシュ作成のところの図参照)
2.1. チュートリアルのコピー
- 近いケースをコピーしてそこから改変するのが良い.
- 今回はsonicFoamのソルバーを用いているので,
$FOAM_TUTORIALS/compressible/sonicFoam/laminar/forwardStepのあたりからコピーする- チュートリアル解説:障害物への超音速流れの衝突
$ run
$ cp -r $FOAM_TUTORIALS/compressible/sonicFoam/laminar/forwardStep .
$ cd forwardStep
2.2. メッシュの作成
- メッシュ情報は"blockMeshDict"に記載する.
- 直接ファイラーから開いて編集するか,ターミナルでblockMeshDictのあるディレクトリまで移動し
code blockMeshDict等で編集する.(codeの部分は使いやすいエディタで各自どうぞ)
- 直接ファイラーから開いて編集するか,ターミナルでblockMeshDictのあるディレクトリまで移動し
- メッシュの記法はこちらにわかりやすく解説されている.
- 軸対称計算では,軸上の点を二度使って体積を記述できる.
- 軸対称の書き方はこのチュートリアルを参考にした.
- 今回のコードでの点(青)とブロック(赤)の割り振りは以下のような感じ.4, 5, 6, 7の手前にそれぞれ8, 9, 10, 11の点がある.
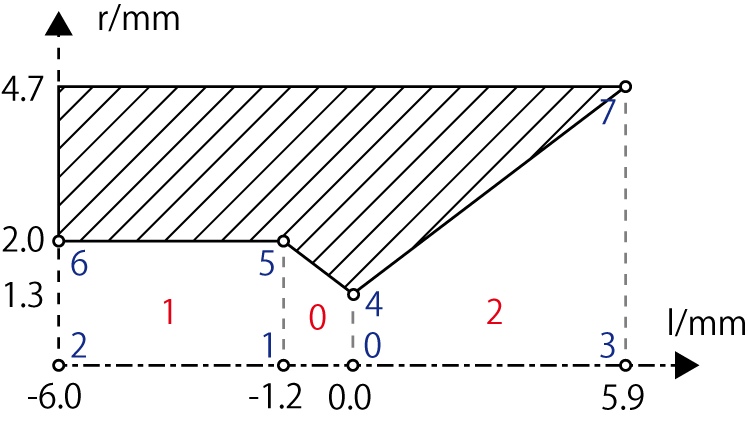
- 以下に実際のblockMeshDictのコードを示す.
blockMeshDict
FoamFile
{
    version     2.0;
    format      binary;
    class       dictionary;
    object      blockMeshDict;
}
// * * * * * * * * * * * * * * * * * * * * * * * * * * * * * * * * * * * * * //

scale 0.001; //m to mm

vertices
(
    (   0 0 0)         //#0
    (-1.2 0 0)         //#1
    (  -6 0 0)         //#2
    ( 5.9 0 0)         //#3
    (0 1.3 -0.01625)   //#4
    (-1.2 2 -0.025)    //#5
    (-6.0 2 -0.025)    //#6
    (5.9 4.7 -0.05875) //#7
    (0 1.3 0.01625)    //#8 < #4
    (-1.2 2 0.025)     //#9 < #5
    (-6.0 2 0.025)     //#10 < #6
    (5.9 4.7 0.05875)  //#11 < #7
);

blocks
(
    hex (1 0 4 5 1 0 8 9) (10 20 1) simpleGrading (1 1 1)  //#0
    hex (2 1 5 6 2 1 9 10) (40 20 1) simpleGrading (1 1 1) //#1
    hex (0 3 7 4 0 3 11 8) (40 20 1) simpleGrading (1 1 1) //#2
);

boundary
(
    inlet
    {
        type patch;
        faces
        (
            (2 10 6 2)
        );
    }
    outlet
    {
        type patch;
        faces
        (
            (3 11 7 3)
        );
    }
    nozzle
    {
        type wall;
        faces
        (
            (5 6 10 9)
            (4 5 9 8)
            (7 4 8 11)
        );
    }
    back
    {
        type wedge;
        faces
        (
            (1 0 4 5)
	        (2 1 5 6)
	        (0 3 7 4)
        );
    }
    flont
    {
        type wedge;
        faces
        (
            (1 0 8 9)
	        (2 1 9 10)
	        (0 3 11 8)
        );
    }
);

mergePatchPairs
(
);
- 設定ができたら以下のコマンドでメッシュをチェックする.
$ blockMesh
$ checkMesh
- 今回は以下の2つの警告が出たが,自動で修正されており問題ない模様.
 ***Zero or negative face area detected.  Minimum area: 0
  <<Writing 90 zero area faces to set zeroAreaFaces
 ***Max skewness = 6.66667e+145, 90 highly skew faces detected which may impair the quality of the results
  <<Writing 90 skew faces to set skewFaces
2.3. 境界条件の作成
- 境界条件は
/0の内部にあるp, T, Uの3つのファイルに記載する.- それぞれの解説はこちら参照のこと.
- それぞれ以下のように境界条件は決めた
- inlet:固定値
- outlet:勾配0条件
- 壁面:slip条件
p
FoamFile
{
    version     2.0;
    format      ascii;
    class       volScalarField;
    object      p;
}
// * * * * * * * * * * * * * * * * * * * * * * * * * * * * * * * * * * * * * //

dimensions      [1 -1 -2 0 0 0 0]; // [kg/ms2] = [Pa]

internalField   uniform 100;


boundaryField
{
    inlet
    {
        type            fixedValue;
        gamma		    1.67;
        value           $internalField;
    }

    outlet
    {
        type            zeroGradient;
    }

    nozzle
    {
        type            zeroGradient;
    }

    flont
    {
        type            wedge;
    }

    back
    {
        type            wedge;
    }

    defaultFaces
    {
        type            empty;
    }
}
T
FoamFile
{
    version     2.0;
    format      ascii;
    class       volScalarField;
    object      T;
}
// * * * * * * * * * * * * * * * * * * * * * * * * * * * * * * * * * * * * * //

dimensions      [0 0 0 1 0 0 0]; // [K]

internalField   uniform 298;

boundaryField
{
    inlet
    {
        type            fixedValue;
        value           uniform 298;
    }

    outlet
    {
        type            zeroGradient;
    }

    nozzle
    {
        type            slip;
    }

    flont
    {
        type            wedge;
    }

    back
    {
        type            wedge;
    }

    defaultFaces
    {
        type            empty;
    }
}
U
FoamFile
{
    version     2.0;
    format      ascii;
    class       volVectorField;
    object      U;
}
// * * * * * * * * * * * * * * * * * * * * * * * * * * * * * * * * * * * * * //

dimensions      [0 1 -1 0 0 0 0]; // [m/s]

internalField   uniform (0 0 0);

boundaryField
{
    inlet
    {
        type            fixedValue;
        value           uniform (73 0 0);
    }

    outlet
    {
        type            zeroGradient;
    }

    nozzle
    {
        type            slip;
    }

    flont
    {
        type            wedge;
    }

    back
    {
        type            wedge;
    }

    defaultFaces
    {
        type            empty;
    }
}
2.4. 物性値の設定
- 物性値を設定する.
- 物性値は
/constant/thermophysicalPropertiesに記載する. - 解説はここ.
- 物性値は
- 流体としてアルゴンを選択している.
- 実際の諸値は以下のコード内の通り
thermophysicalProperties
FoamFile
{
    version     2.0;
    format      ascii;
    class       dictionary;
    location    "constant";
    object      thermophysicalProperties;
}
// * * * * * * * * * * * * * * * * * * * * * * * * * * * * * * * * * * * * * //


thermoType // for compressible flow
{
    type            hePsiThermo;
    mixture         pureMixture;
    transport       const;
    thermo          hConst;
    equationOfState perfectGas;
    specie          specie;
    energy          sensibleInternalEnergy;
}

mixture  // argon properties
{
    specie
    {
        nMoles          1;
        molWeight       39.948;
    }
    thermodynamics
    {
        Cp              520; // [J/kg-K]
        Hf              0; // [J/kg]
    }
    transport
    {
        mu              2.29e-05; // [Pa s]
        Pr              0.68; // Prandtl number
    }
}
2.5. 計算条件
- 計算条件を
/system/controlDictを編集して調整する- クーラン条件を満たすように時間刻みを決めた.
- ほかはほぼサンプルそのままである.
controlDict
FoamFile
{
    version     2.0;
    format      binary;
    class       dictionary;
    location    "system";
    object      controlDict;
}
// * * * * * * * * * * * * * * * * * * * * * * * * * * * * * * * * * * * * * //

application     sonicFoam;

startFrom       startTime;

startTime       0;

stopAt          endTime;

endTime         1.0e-03;

deltaT          1.0e-07;

writeControl    runTime;

writeInterval   1.0e-05;

purgeWrite      0;

writeFormat     ascii;

writePrecision  6;

writeCompression off;

timeFormat      general;

timePrecision   6;

runTimeModifiable true;

functions
{
    libs            (fieldFunctionObjects);

    Ma
    {
        type            MachNo;
        executeControl  writeTime;
        writeControl    writeTime;
    }
}
ほか,"fvSchemes","fvSolution"ファイルも計算するために重要なファイルだが,コピーしてきたチュートリアルと同じソルバーを使う場合は編集する必要はない.
2.6. 実行
- すべての編集が終わったら結果を出力してみる.
$FOAM_RUN/forwardStepで$ sonicFoamで実行する.- 計算は環境にもよるが数分程度かかる.
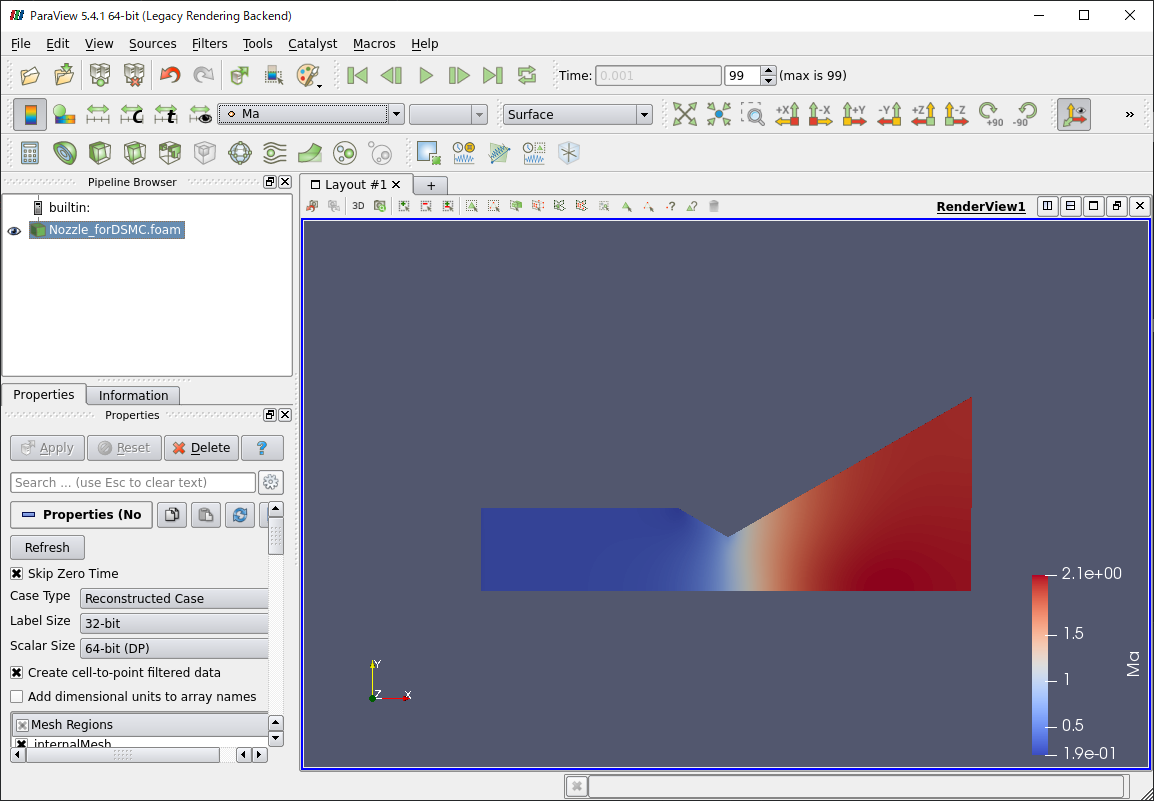
- 計算が終了したら,
$ paraFoamで計算結果を表示する. - 時間を最後のステップにして,Mach数表示に変えると,以下のようななめらかな流れが表示されるはずである.
3. まとめ
WLS上でOpenFOAMを動かし,軸対称超音速ノズル内部流を計算した.各種設定ファイルはそのサンプルコードを記載した.
ソルバー・境界条件などは最適化したわけではなく,より物理に即した現象を選ぶ余地がある.
このコードを拡張するなどして計算を進めてもらえれば幸いである.