はじめに
PythonファイルだけでWebアプリが作れてしまうStreamlitの導入についてはこちらやこちらをご覧ください。
今回はそんなHTMLファイル要らずのStreamlitで遂にHTMLが使えるようになったので、試していきたいと思います。
まずは、streamlit --versionで現在のバージョンを確認してください。0.63以下だと動作しません。
pip install --upgrade pip
pip install -U streamlit
でアップデートしましょう。
components.html()
それでは新機能を試していきます。Streamlitはst.textやst.markdown,
st.writeを使えばアプリ上に文章を表示させることが可能でした。
でも時には充実した見た目のかっこいいアプリにしたい時や、自分好みの見た目の文章を表示させたい時がありますよね。そんなときに使えるのがcomponents.html()です。
早速、他との違いを見ながら実装していきます。
import streamlit as st
import streamlit.components.v1 as stc

st.write('Streamlit is cool.')
st.text('Streamlit is cool.')
st.markdown('Streamlit is **_really_ cool**.')
stc.html("<p style='color:red;'> Streamlit is Awesome")
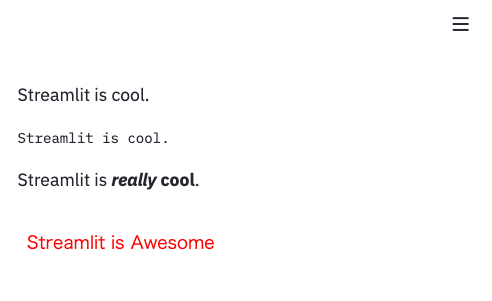
こうしてみると違いがよくわかりますね。
HTMLだけでなくCSSやJavascriptもベタ張りして動きのあるサイト構築も可能です。
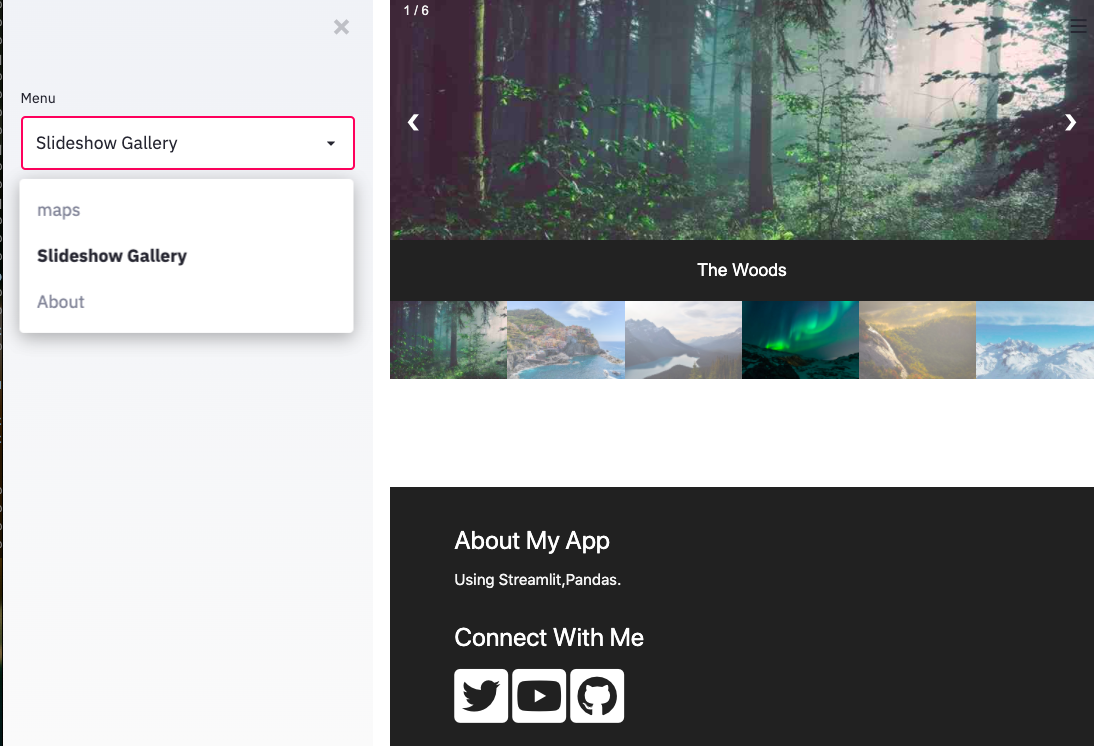
試しに以下のサイトから貼り付けてみます。
https://www.w3schools.com/howto/howto_js_tab_img_gallery.asp
stc.html("""
<meta name="viewport" content="width=device-width, initial-scale=1">
<style>
* {
box-sizing: border-box;
}
body {
margin: 0;
font-family: Arial;
}
/* The grid: Four equal columns that floats next to each other */
.column {
float: left;
width: 25%;
padding: 10px;
}
/* Style the images inside the grid */
.column img {
opacity: 0.8;
cursor: pointer;
}
.column img:hover {
opacity: 1;
}
/* Clear floats after the columns */
.row:after {
content: "";
display: table;
clear: both;
}
/* The expanding image container */
.container {
position: relative;
display: none;
}
/* Expanding image text */
#imgtext {
position: absolute;
bottom: 15px;
left: 15px;
color: white;
font-size: 20px;
}
/* Closable button inside the expanded image */
.closebtn {
position: absolute;
top: 10px;
right: 15px;
color: white;
font-size: 35px;
cursor: pointer;
}
</style>
</head>
<body>
<div style="text-align:center">
<h2>Tabbed Image Gallery</h2>
<p>Click on the images below:</p>
</div>
<!-- The four columns -->
<div class="row">
<div class="column">
<img src="https://www.w3schools.com/howto/img_nature.jpg" alt="Nature" style="width:100%" onclick="myFunction(this);">
</div>
<div class="column">
<img src="https://www.w3schools.com/howto/img_snow.jpg" alt="Snow" style="width:100%" onclick="myFunction(this);">
</div>
<div class="column">
<img src="https://www.w3schools.com/howto/img_mountains.jpg" alt="Mountains" style="width:100%" onclick="myFunction(this);">
</div>
<div class="column">
<img src="https://www.w3schools.com/howto/img_lights.jpg" alt="Lights" style="width:100%" onclick="myFunction(this);">
</div>
</div>
<div class="container">
<span onclick="this.parentElement.style.display='none'" class="closebtn">×</span>
<img id="expandedImg" style="width:100%">
<div id="imgtext"></div>
</div>
<script>
function myFunction(imgs) {
var expandImg = document.getElementById("expandedImg");
var imgText = document.getElementById("imgtext");
expandImg.src = imgs.src;
imgText.innerHTML = imgs.alt;
expandImg.parentElement.style.display = "block";
}
</script>
</body>
</html>
""",height = 500)
heightがデフォルトだと150なのでそこだけ調整しています。
components.iflame()
components.iframeはcomponents.htmlとは違い、URLを入力として受け取ります。アプリ内にページ全体を含めたい場合などに使ってください。
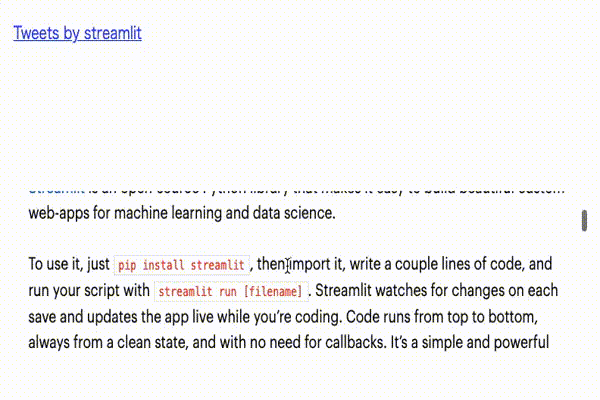
stc.html("""
                <a class="twitter-timeline"
                href="https://twitter.com/streamlit?ref_src=twsrc%5Etfw">Tweets by streamlit</a>
                <script async src="https://platform.twitter.com/widgets.js" charset="utf-8"></script>
                """
                )
stc.iframe("https://docs.streamlit.io/en/stable/develop_streamlit_components.html",scrolling=True)
さらに充実したフロントにするために
どうやら、開発環境に
- node.js
- npm か yarn
を構築し、Javascript単体で動くような環境を作れれば、さらに充実した機能が使えるみたいですね。
公式のテンプレート
こちらも試してみたいと思います。
最後に
componentsを使うことでさらにwebサイトらしいものを簡単に作れるようになりました。
ただのstreamlit.componentsではなくv1が付いているのはこれからさらに機能を拡充させる予定なんでしょうか?そうだとしたら楽しみですね。