はじめに
私の所属する研究室(https://qiita.com/advent-calendar/2025/tuat-sysbiolab) では、omochiemon先輩(https://qiita.com/OMOCHIEMON) が各地のマグネットを買い集めています。
ですが、最近どこのどんなマグネットが既に購入されていて、何が未購入であるのかわからないと思う瞬間が多々あります。困っちゃいますよね。
ということで、私の今年のアドベントカレンダーでは、旅行先マグネット収集の可視化ツールを作っていきたいと思います。
第1回のテーマ:基盤作り
今回は「データ→地図上に表示」を目標とします。
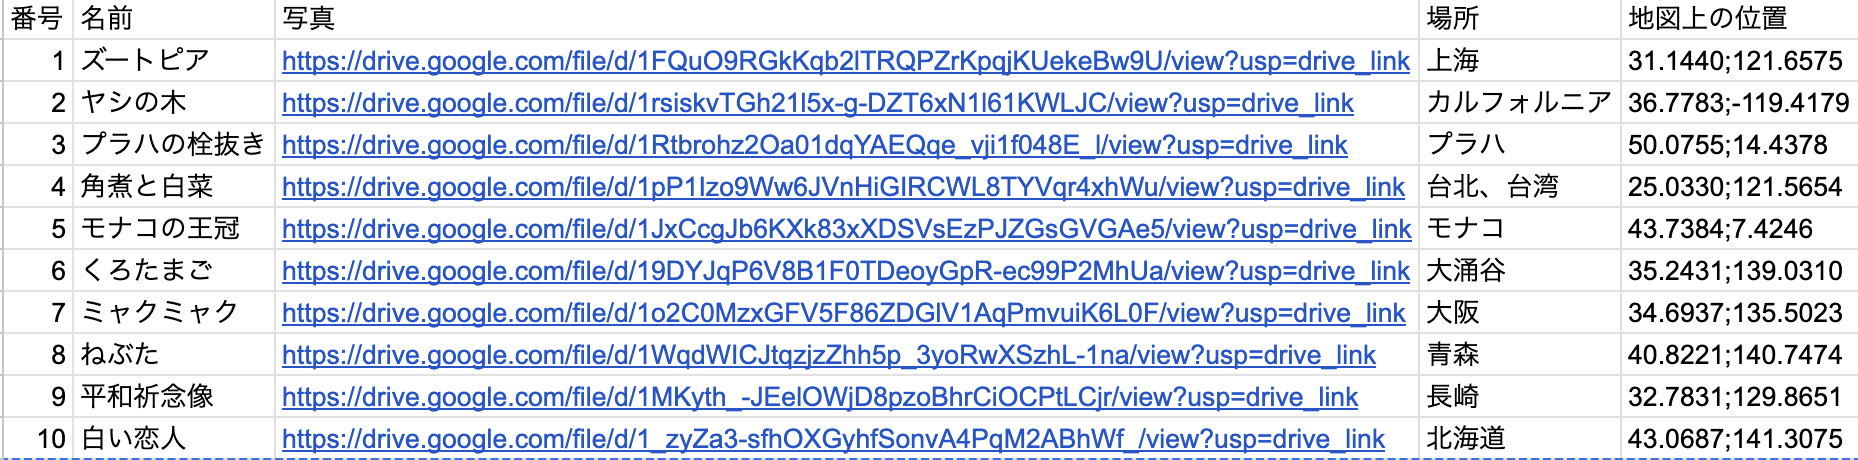
簡単のために、まずは10個のマグネットデータを用います。
用意したデータはこちら(https://docs.google.com/spreadsheets/d/1eIkN4NH7eozFj5kQIk5TpLqfeyYx_yGxhhO21zCdink/edit?gid=0#gid=0)
中身はこんな感じです。
これを表示するために以下の二つのファイルを用意します。
用意したindex.html
index.html
<!DOCTYPE html>
<html lang="ja">
<head>
  <meta charset="utf-8" />
  <title>マグネットマップ</title>

  <!-- Leaflet のCSS -->
  <link
    rel="stylesheet"
    href="https://unpkg.com/leaflet/dist/leaflet.css"
  />

  <!-- MarkerCluster の CSS -->
  <link
    rel="stylesheet"
    href="https://unpkg.com/leaflet.markercluster/dist/MarkerCluster.css"
  />
  <link
    rel="stylesheet"
    href="https://unpkg.com/leaflet.markercluster/dist/MarkerCluster.Default.css"
  />

  <style>
    #map {
      height: 100vh;
      margin: 0;
      padding: 0;
    }
  </style>
</head>

<body>
  <div id="map"></div>

  <!-- Leaflet 本体 -->
  <script src="https://unpkg.com/leaflet/dist/leaflet.js"></script>

  <!-- MarkerCluster -->
  <script src="https://unpkg.com/leaflet.markercluster/dist/leaflet.markercluster.js"></script>

  <!-- Papaparse(CSV パーサー) -->
  <script src="https://cdn.jsdelivr.net/npm/papaparse@5.4.1/papaparse.min.js"></script>

  <!-- カスタムスクリプト -->
  <script src="script.js"></script>
</body>
</html>
用意したscript.js
script.js
// ------------------------------------------------------------
// 1. 地図初期化
// ------------------------------------------------------------
const map = L.map('map').setView([35.7, 139.7], 5);
L.tileLayer('https://{s}.tile.openstreetmap.org/{z}/{x}/{y}.png', {
  attribution: '© OpenStreetMap contributors'
}).addTo(map);

// ------------------------------------------------------------
// 2. MarkerCluster
// ------------------------------------------------------------
const markers = L.markerClusterGroup();
map.addLayer(markers);

// ------------------------------------------------------------
// 3. Google Drive URL → サムネイル画像URL変換
// ------------------------------------------------------------
function convertDriveUrl(url) {
  if (!url) return "";

  // Google Drive URLからファイルIDを抽出してサムネイル化
  const match = url.match(/\/d\/([a-zA-Z0-9_-]+)/) || url.match(/[?&]id=([a-zA-Z0-9_-]+)/);
  if (match) {
    return `https://drive.google.com/thumbnail?id=${match[1]}&sz=w200`;
  }

  return url;
}

// ------------------------------------------------------------
// 4. CSV 読み込み(Papaparse)
// ------------------------------------------------------------
const dataUrl = "https://docs.google.com/spreadsheets/d/e/2PACX-1vSLRy3D5guCveAbZdrG7jHPcbUGKNlHXw6IYId7AuZh1A8Ji-Wvpohu66l1uKLOue1eEDNmIhiEpK5l/pub?output=csv";

Papa.parse(dataUrl, {
  download: true,
  header: true,
  skipEmptyLines: true,
  transform: (value) => value.trim(),
  complete: function (result) {
    result.data.forEach(row => {
      const id = row["番号"];
      const name = row["名前"];
      const place = row["場所"];
      const pos = row["地図上の位置"];
      const photo = row["写真"];

      if (!pos) return;

      const [latStr, lonStr] = pos.split(";");
      const lat = parseFloat(latStr);
      const lon = parseFloat(lonStr);

      if (isNaN(lat) || isNaN(lon)) return;

      const photoUrl = photo ? convertDriveUrl(photo) : "";

      const popupHtml = `
        <div style="min-width: 200px; padding: 10px;">
          <strong style="color: #2c3e50; font-size: 16px;">${name || '名前なし'}</strong><br>
          ${id ? `<span style="color: #7f8c8d;">番号: ${id}</span><br>` : ""}
          ${place ? `<span style="color: #34495e;">📍 場所: ${place}</span><br>` : ""}
          ${photoUrl ? `
            <br>
            <img src="${photoUrl}"
                 style="width: 150px; max-width: 100%; height: auto; border-radius: 5px; margin-top: 5px; cursor: pointer;"
                 onclick="window.open('${photo}', '_blank')">
          ` : ""}
        </div>
      `;

      const marker = L.marker([lat, lon]).bindPopup(popupHtml);
      markers.addLayer(marker);
    });
  },
  error: function (err) {
    console.error("CSV parse error:", err);
  }
});
表示してみる
最後にこれらのファイルがあるパスで
python3 -m http.server 8000
を実行します。
これで http://localhost:8000/ を開いてみると、
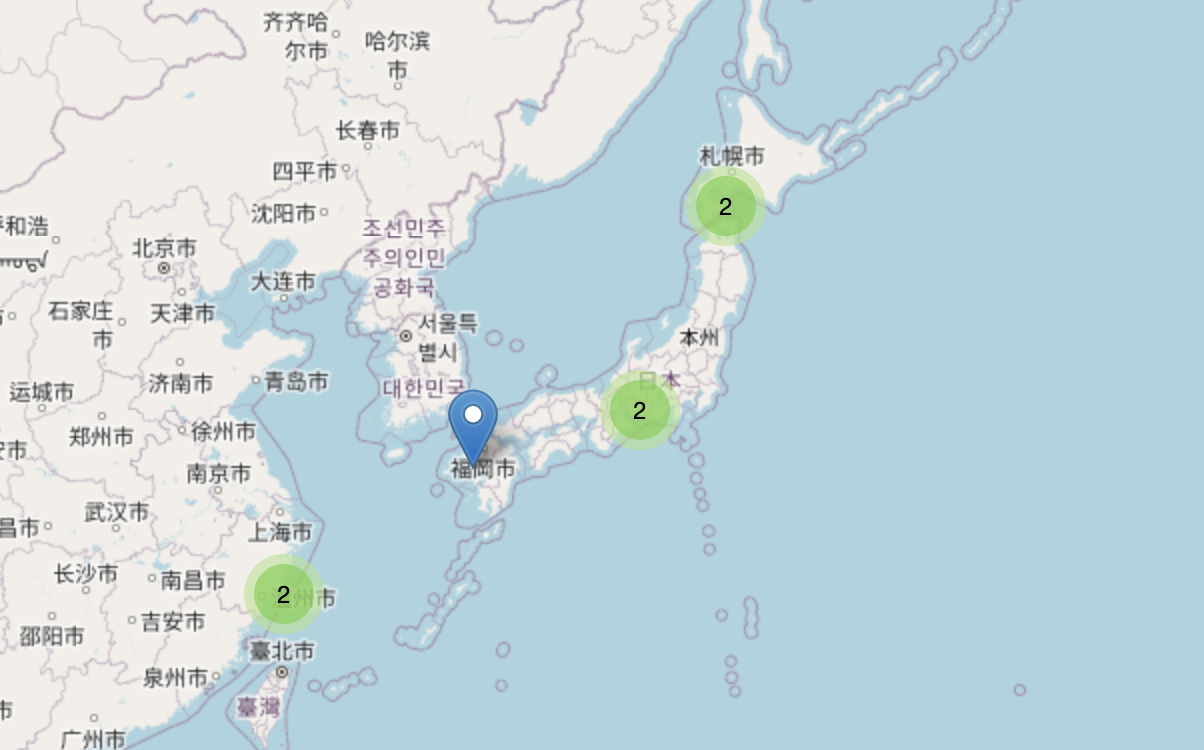
こんな感じになっていて、一個のピンを押してみると、
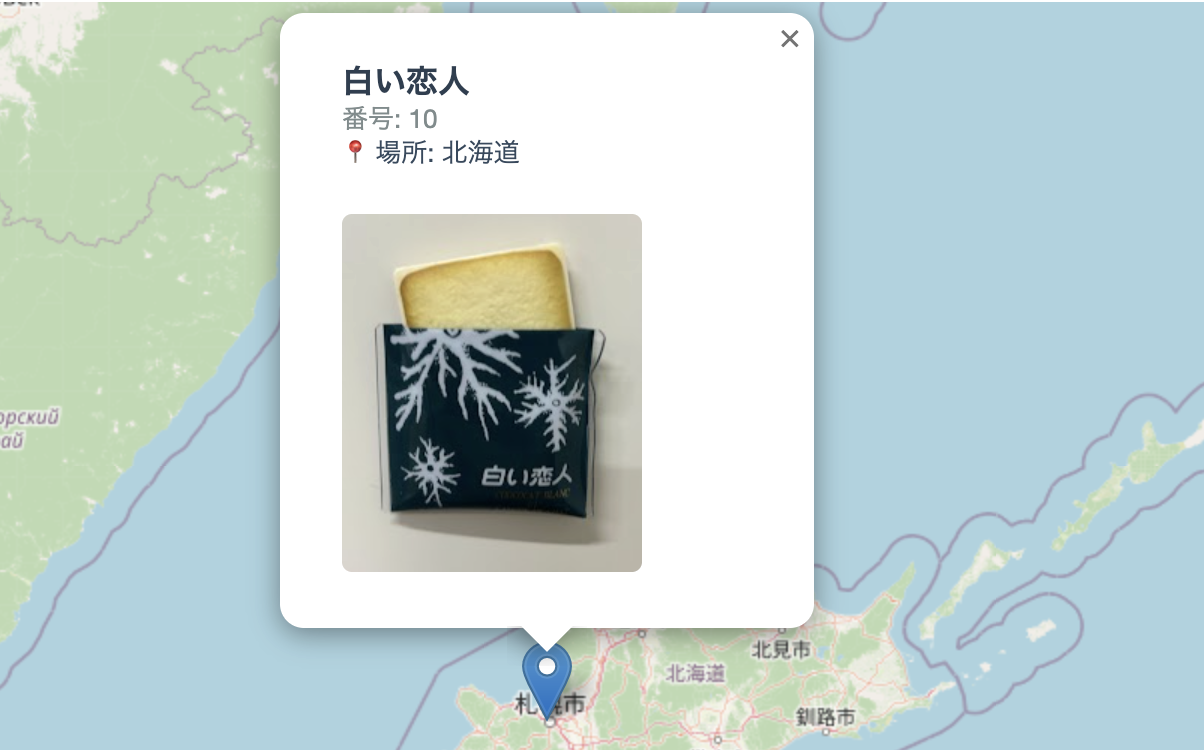
ちゃんと写真が表示されました!やったー1
おわりに
次回は地名から位置の自動入力とか、新規入力の簡易化とか、やりたいなって思います!(時間があれば)
乞うご期待!!!