Jetson_nanoが格安なGPU開発及び実行環境だという評判なのでやってみた。
実際、13,000円程度で購入できて、ほぼそのまま使えそうである。
ということで、いつものように環境構築をやってみたので、記事にしておこうと思う。
やったこと
・nanoを動かす
・Tensorflowの環境構築
・Chainerの環境構築
・Keras環境構築
・nanoを動かす
JetsonTX1やTX2と比較すると格段に容易に動かすことができた。
まず、ほとんどは参考①のとおりに実施すれば動くので省略と行きたいところだが、一応日本語の記事が参考になるので、参考②に示しておく。
【参考】
①Getting Started With Jetson Nano Developer Kit
②小型 AI コンピュータ NVIDIA Jetson Nano 開発者キットのセットアップ
マイクロ SD カードに OS イメージの書き込み
これは、以下のリンク先からダウンロードすると使えます。
参考①から、Download the Jetson Nano Developer Kit SD Card Image, and note where it was saved on the computer.
普通にWindowsのダウンロードに格納すればOKです。
そして、WindowsにmaicroSDcardをセットして、以下のアプリでFormatします。
なお、マイクロ SD カードの最低推奨条件は 16GB UHS-1 ですが、ウワンは64GBにしました。
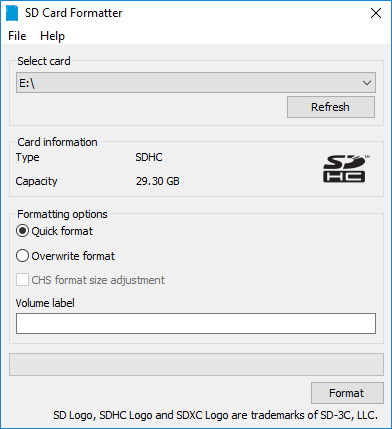
1.Download, install, and launch SD Memory Card Formatter for Windows.
2.Select card drive
3.Select “Quick format”
4.Leave “Volume label” blank
5.Click “Format” to start formatting, and “Yes” on the warning dialog
マイクロSDカードへImageを書き込む
1.EtcherをDownload, installし実行すると以下の画面が表れます。
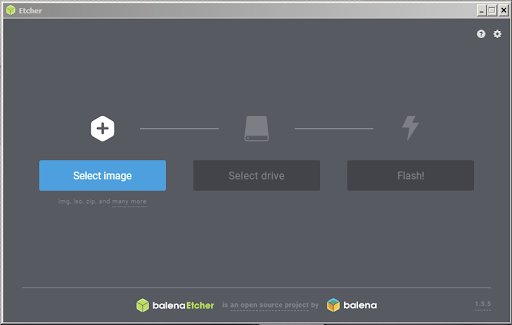
2.Click “Select image” and choose the zipped image file downloaded earlier.
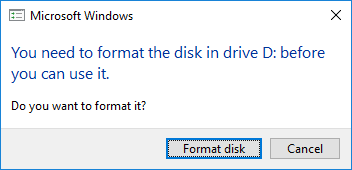
3.下の情報が重要で、以下のようなフォーマットしますか?という、drive;D..NみたいなWindowsプロンプト画面がたくさん出てきますが、すべてCancelしてください
4.ここは指示に従って、セレクトしていきます。
セレクトイメージで、ダウンロードしたSDimageを選択します。
セレクトドライブで、SDカードを選択します。
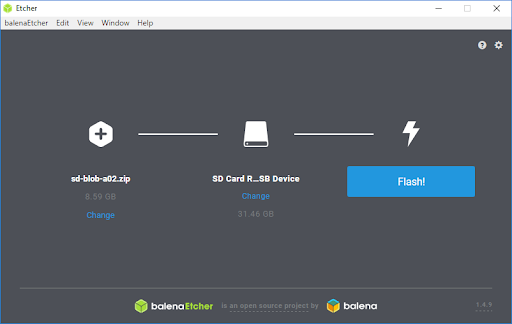
5.そして、Flashを押すと書込みが始まり、10分位で終了します
画像は参考②のような画面ですが、省略します。
6.終了すると以下のような表示が出ていると思うので、これもcancelして下さい。
これで実際にTegraが起動できるSDカードができました。
Jetson-nanoの起動
ケーブル類をつなげて、起動します。SDカードを指す場所は以下のとおりです。
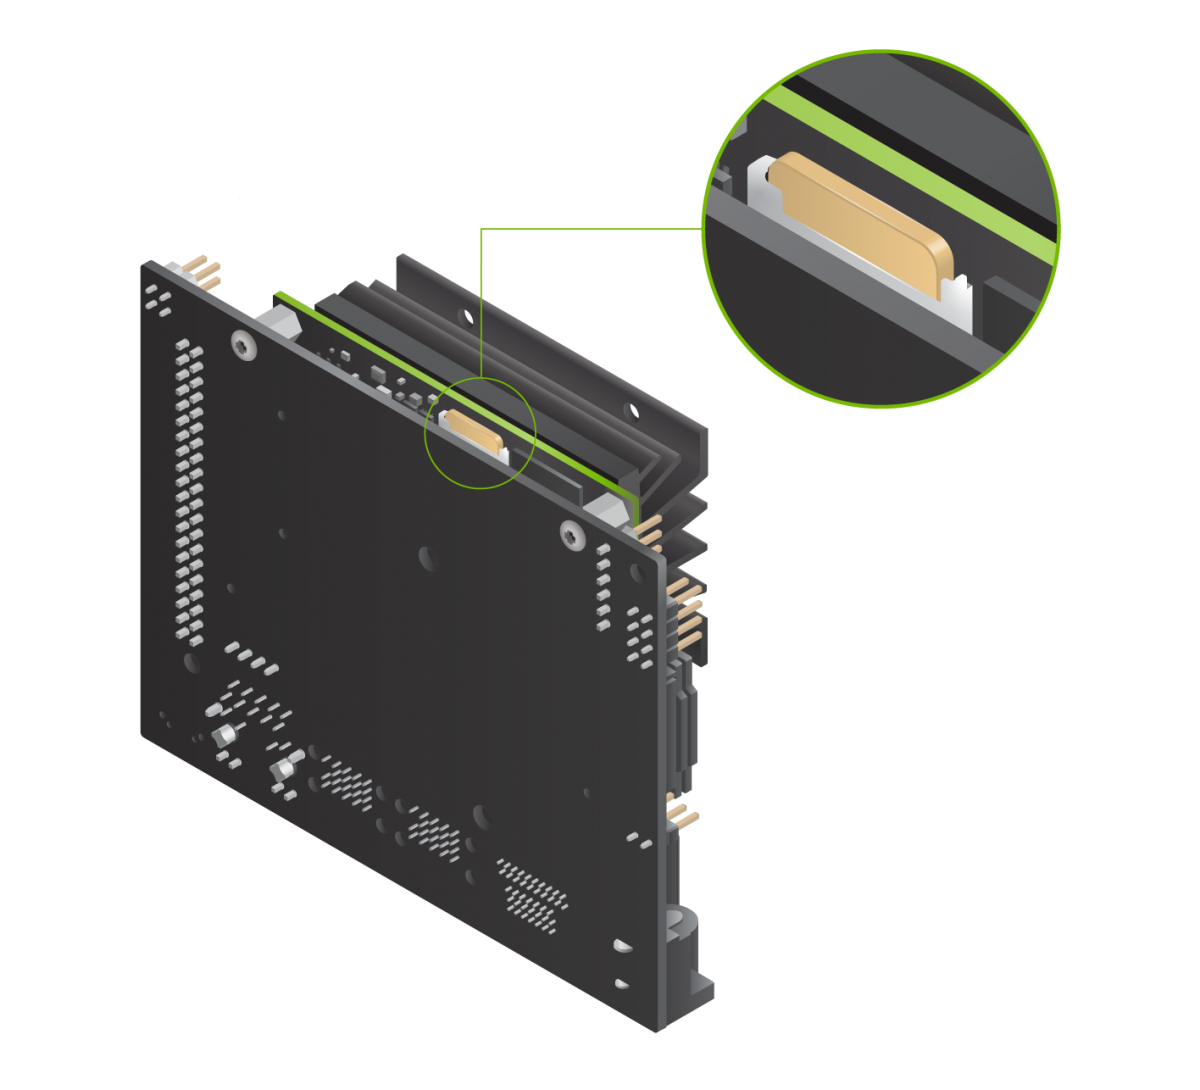
ここで大切なことは、USB電源は5v2A以上必要です。
※当初1A程度の電源でやったところ、NVDIAという表示が画面に出ますが、そのあたりで電源供給がストップして消えてしまいました
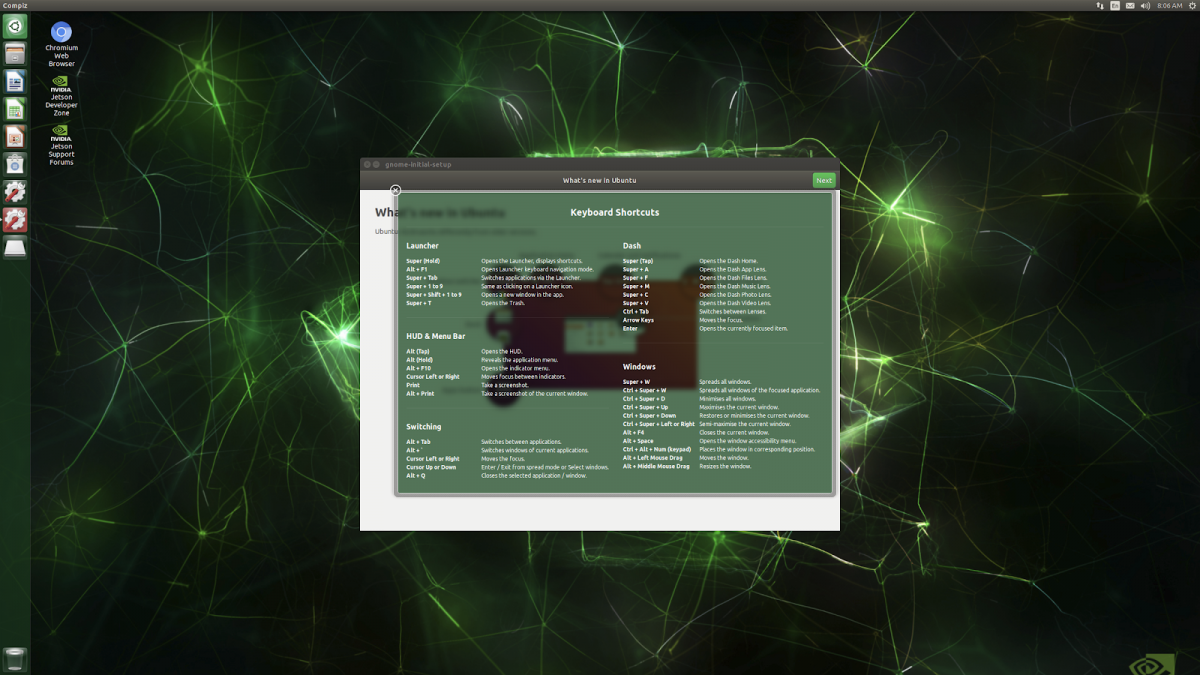
また、電源スイッチはありません。USB電源を差し込むとほんちょっと間があって起動し、初期画面が表示されます。
初期画面では以下のことを実施します(参考②に詳細があります)
1.NVIDIA Jetson software ライセンスを承諾します
2.system language, keyboard layout, and time zoneを選びます
言語は当初は英語がいいとされています。
日本語化は安定して設定できてから、実施するのが一般的に推奨されているようですが、ウワンは設定できていません。
3.username, password, and computer nameを記入します
4.Log in
そして、参考①には以下の記載があります。
Many popular AI frameworks like TensorFlow, PyTorch, Caffe, and MXNet are supported, and Jetson Nano is capable of running multiple neural networks in parallel to process data and drive action.
あとは、音声出力は左側の歯車SystemSettingの絵を選んで、SoundからHDMIを選んで設定しました。
あと、大切なのはterminalの表示ですが当初はマウス右クリックでnew terminalが表示されるのでそれを選びます。その後は左側のLaunchの真ん中あたりにありますので、クリックして開けます。
ここでは、以下Tensorflow、Chainer,そしてKerasをインストールしました。
あとは、コード作成環境としては、使い慣れたjupyter notebookをインストールしました。
・Tensorflowの環境構築
これはググると以下の参考③が出てきます。
【参考】
③Official TensorFlow for Jetson Nano !!!
ということで、以下のコマンドをterminalを開いてたたいてみます。
sudo apt-get install python3-pip libhdf5-serial-dev hdf5-tools
そして、
pip3 install --extra-index-url https://developer.download.nvidia.com/compute/redist/jp/v42 tensorflow-gpu==1.13.1+nv19.5 --user
上記の上の実行時にエラーが出たら、以下を試してみましょう。
※ウワンはこれでうまくいきました
④Jetson nano libhdf5-serial-dev install issue
つまり、以下の3つのコマンドを実行します。
sudo add-apt-repository universe
sudo apt-get update
sudo apt-get install libhdf5-serial-dev
ここまでで、Tensorflow-gpuのアプリが実行できます。
ということで、プログラム作成のために、jupyter-notebookをインストールします。
これもググるとたくさん出てきますが、今回は以下を参考にしました。
【参考】
⑤UbuntuでPython + Jupyter Notebookを使ってディープラーニング勉強用サーバーを構築してみた!
つまり、以下のコマンドをたたきました。
これで無事にインストールは成功しました。
sudo apt install jupyter-notebook
実行は、以下のとおり
jupyter-notebook
ということで、Tensorflowの以下の例を動かして検証しました。
【参考】
⑥Get Started with TensorFlow
import tensorflow as tf
mnist = tf.keras.datasets.mnist

(x_train, y_train),(x_test, y_test) = mnist.load_data()
x_train, x_test = x_train / 255.0, x_test / 255.0

model = tf.keras.models.Sequential([
  tf.keras.layers.Flatten(input_shape=(28, 28)),
  tf.keras.layers.Dense(512, activation=tf.nn.relu),
  tf.keras.layers.Dropout(0.2),
  tf.keras.layers.Dense(10, activation=tf.nn.softmax)
])
model.compile(optimizer='adam',
              loss='sparse_categorical_crossentropy',
              metrics=['accuracy'])

model.fit(x_train, y_train, epochs=5)
model.evaluate(x_test, y_test)
とりあえず、動きました。
実はこの段階で参考のようにやるとKerasのExampleも動かせました。
【参考】
⑦How to run Keras model on Jetson Nano
つまり、import kerasなどをimport tensorflow.kerasなどで置き換えると動きました。
※詳細は割愛します
これでとりあえず、DeepLearningは動かせます。
しかし、いつもKerasやChainerを使っているので、それらのインストールもやってみます。
・Chainerの環境構築
ちょっとショックなのは、「単体のKerasのインストールが簡単にはできません」と参考⑧の記事に記載されています。
ということで、上記で一応動いてはいるので、Chainerをインストールします。
【参考】
⑧Jetson Nano関係のTIPSまとめ
⑨Jetson NanoでCuPy
➉Jetson NanoでChainerを動かす
参考➉の通りやるとうまくいきました。
muauan@muauan-desktop:~$ sudo apt install python3-pip
muauan@muauan-desktop:~$ pip3 install pipenv --user
ということで、まず、参考⑨に従って、CuPyのインストールから実施します。
まず、以下のようにpip3を更新してから、pipenvをインストールします。
これで個別環境が構築できます。
muauan@muauan-desktop:~$ sudo fallocate -l 4G /swapfile
muauan@muauan-desktop:~$ sudo chmod 600 /swapfile
muauan@muauan-desktop:~$ sudo mkswap /swapfile
Setting up swapspace version 1, size = 4 GiB (4294963200 bytes)
no label, UUID=af550cae-47aa-427a-b1cb-e111a63dac54
muauan@muauan-desktop:~$ sudo swapon /swapfile
muauan@muauan-desktop:~$ mkdir ~/Documents/Chainer
muauan@muauan-desktop:~$ cd ~/Documents/Chainer
muauan@muauan-desktop:~/Documents/Chainer$ pip3 install pipenv --user
Collecting pipenv
  Downloading https://files.pythonhosted.org/packages/13/b4/3ffa55f77161cff9a5220f162670f7c5eb00df52e00939e203f601b0f579/pipenv-2018.11.26-py3-none-any.whl (5.2MB)
    100% |████████████████████████████████| 5.2MB 94kB/s
Collecting virtualenv-clone>=0.2.5 (from pipenv)
まず、PATHを通しておいて、pipenv --threeを実行して、Python 3の仮想環境を初期化します。
そして、Successfully created virtual environment! 仮想環境が構築できました。
その後、pipenv install cupyでcupyをインストールします。
小一時間するとインストールが無事に終わりました。
muauan@muauan-desktop:~/Documents/Chainer$ export PATH=$HOME/.local/bin:$PATH
muauan@muauan-desktop:~/Documents/Chainer$ pipenv --three
Creating a virtualenv for this project…
...
Installing setuptools, pip, wheel...
done.
Running virtualenv with interpreter /usr/bin/python3.6m
✔ Successfully created virtual environment!
Virtualenv location: /home/muauan/.local/share/virtualenvs/Chainer-5OoHeYCj
Creating a Pipfile for this project…
muauan@muauan-desktop:~/Documents/Chainer$ pipenv install cupy
以下でCupyの環境構築ができていることを確認します。
muauan@muauan-desktop:~/Documents/Chainer$ export PATH=$HOME/.local/bin:$PATH
muauan@muauan-desktop:~/Documents/Chainer$ pipenv run python3 -c 'import cupy as cp; print(cp.__version__)'
6.0.0
muauan@muauan-desktop:~/Documents/Chainer$ pipenv run python3 test-cupy.py
3.7416573867739413
muauan@muauan-desktop:~/Documents/Chainer$ sudo apt install libfreetype6-dev
[sudo] password for muauan:
Reading package lists... Done
Building dependency tree
Reading state information... Done
The following packages were automatically installed and are no longer required:
  apt-clone archdetect-deb busybox-static cryptsetup-bin dpkg-repack
Chainerをインストールします。
muauan@muauan-desktop:~/Documents/Chainer$ pipenv install chainer
次にMatplotlibをインストールします。
muauan@muauan-desktop:~/Documents/Chainer$ pipenv install matplotlib
Installing matplotlib…
Adding matplotlib to Pipfile's [packages]…
✔ Installation Succeeded
Pipfile.lock (aa38fa) out of date, updating to (385c92)…
Locking [dev-packages] dependencies…
Locking [packages] dependencies…
✔ Success!
Updated Pipfile.lock (aa38fa)!
Installing dependencies from Pipfile.lock (aa38fa)…
  🐍   ▉▉▉▉▉▉▉▉▉▉▉▉▉▉▉▉▉▉▉▉▉▉▉▉▉▉▉▉▉▉▉▉ 14/14 — 00:00:10
To activate this project's virtualenv, run pipenv shell.
Alternatively, run a command inside the virtualenv with pipenv run.
muauan@muauan-desktop:~/Documents/Chainer$ pipenv shell
Launching subshell in virtual environment…
 . /home/muauan/.local/share/virtualenvs/Chainer-5OoHeYCj/bin/activate
muauan@muauan-desktop:~/Documents/Chainer$  . /home/muauan/.local/share/virtualenvs/Chainer-5OoHeYCj/bin/activate
(Chainer) muauan@muauan-desktop:~/Documents/Chainer$
環境のクロックを確認します。
(Chainer) muauan@muauan-desktop:~/Documents/Chainer$ sudo jetson_clocks --show
[sudo] password for muauan:
SOC family:tegra210  Machine:jetson-nano
Online CPUs: 0-3
CPU Cluster Switching: Disabled
cpu0: Online=1 Governor=schedutil MinFreq=1428000 MaxFreq=1428000 CurrentFreq=1428000 IdleStates: WFI=0 c7=0
cpu1: Online=1 Governor=schedutil MinFreq=1428000 MaxFreq=1428000 CurrentFreq=1428000 IdleStates: WFI=0 c7=0
cpu2: Online=1 Governor=schedutil MinFreq=1428000 MaxFreq=1428000 CurrentFreq=1428000 IdleStates: WFI=0 c7=0
cpu3: Online=1 Governor=schedutil MinFreq=1428000 MaxFreq=1428000 CurrentFreq=1428000 IdleStates: WFI=0 c7=0
GPU MinFreq=921600000 MaxFreq=921600000 CurrentFreq=921600000
EMC MinFreq=204000000 MaxFreq=1600000000 CurrentFreq=1600000000 FreqOverride=1
Fan: speed=255
NV Power Mode: MAXN
Chainerの環境ができたので、以下でCheinerのmnist版を動くかどうか確認します。
(Chainer) muauan@muauan-desktop:~/Documents/Chainer$ pipenv run python3 mnist-chainer.py
Downloading from http://yann.lecun.com/exdb/mnist/train-images-idx3-ubyte.gz...
Downloading from http://yann.lecun.com/exdb/mnist/train-labels-idx1-ubyte.gz...
Downloading from http://yann.lecun.com/exdb/mnist/t10k-images-idx3-ubyte.gz...
Downloading from http://yann.lecun.com/exdb/mnist/t10k-labels-idx1-ubyte.gz...
epoch       main/loss   main/accuracy  validation/main/loss  validation/main/accuracy  elapsed_time
1           0.539245    0.847298       0.270844              0.9196                    57.8052
2           0.232592    0.932603       0.190205              0.946005                  69.5756
3           0.174353    0.949394       0.163729              0.952433                  81.3858
4           0.139208    0.959836       0.133754              0.959553                  93.1795
5           0.116407    0.966268       0.113253              0.964794                  105.063
6           0.100622    0.971015       0.100782              0.969838                  116.798
7           0.0870802   0.974714       0.0963247             0.968651                  128.544
8           0.0765406   0.977547       0.0895415             0.972607                  140.304
9           0.0689751   0.979478       0.0872399             0.972706                  152.139
10          0.0618221   0.981743       0.0811577             0.974782                  163.948
(Chainer) muauan@muauan-desktop:~/Documents/Chainer$ pipenv run python3 mnist-chainer.py
epoch       main/loss   main/accuracy  validation/main/loss  validation/main/accuracy  elapsed_time
1           0.541671    0.849247       0.257504              0.927512                  24.2369
2           0.2315      0.931886       0.199984              0.94106                   36.2506
3           0.175838    0.94906        0.161554              0.953026                  47.9614
4           0.140873    0.959101       0.13079               0.960542                  60.0867
5           0.11809     0.965202       0.119582              0.965684                  71.9868
6           0.0999434   0.971149       0.115242              0.965684                  83.8085
7           0.0884536   0.974464       0.101388              0.969442                  95.7385
8           0.0772879   0.977047       0.0930919             0.974189                  107.597
9           0.0686662   0.980261       0.0962066             0.969244                  119.508
10          0.0610976   0.982226       0.0858338             0.974782                  131.488
Keras環境構築
単体のKerasの環境構築は難しいということでしたが、ググってみると以下の参考が見つかりました。
【参考】
⑪ 2019-05-17Jetson NanoにTensorFlowとKerasをインストール@動かざることバグの如し
まず、gfortranは以下のとおり更新されませんでした。
(Chainer) muauan@muauan-desktop:~/Documents/Chainer$ sudo apt install libatlas-base-dev gfortran
[sudo] password for muauan:
Reading package lists... Done
Building dependency tree
Reading state information... Done
libatlas-base-dev is already the newest version (3.10.3-5).
gfortran is already the newest version (4:7.4.0-1ubuntu2.3).
...
0 upgraded, 0 newly installed, 0 to remove and 242 not upgraded.
次に、cythonをインストールします。これが肝心なようです。
pip3 install -U cython
そして、kerasをpip3でインストールします。
ほとんどはsatisfiedとなっていますが、最難関のscipyが無事にインストールできました。
(Chainer) muauan@muauan-desktop:~/Documents/Chainer$ pip3 install keras
Collecting keras
  Using cached https://files.pythonhosted.org/packages/5e/10/aa32dad071ce52b5502266b5c659451cfd6ffcbf14e6c8c4f16c0ff5aaab/Keras-2.2.4-py2.py3-none-any.whl
Collecting h5py (from keras)
Collecting keras-preprocessing>=1.0.5 (from keras)
  Using cached https://files.pythonhosted.org/packages/28/6a/8c1f62c37212d9fc441a7e26736df51ce6f0e38455816445471f10da4f0a/Keras_Preprocessing-1.1.0-py2.py3-none-any.whl
Requirement already satisfied: six>=1.9.0 in /home/muauan/.local/share/virtualenvs/Chainer-5OoHeYCj/lib/python3.6/site-packages (from keras) (1.12.0)
Collecting keras-applications>=1.0.6 (from keras)
  Using cached https://files.pythonhosted.org/packages/71/e3/19762fdfc62877ae9102edf6342d71b28fbfd9dea3d2f96a882ce099b03f/Keras_Applications-1.0.8-py3-none-any.whl
Requirement already satisfied: numpy>=1.9.1 in /home/muauan/.local/share/virtualenvs/Chainer-5OoHeYCj/lib/python3.6/site-packages (from keras) (1.16.4)
Collecting pyyaml (from keras)
Collecting scipy>=0.14 (from keras)
  Using cached https://files.pythonhosted.org/packages/cb/97/361c8c6ceb3eb765371a702ea873ff2fe112fa40073e7d2b8199db8eb56e/scipy-1.3.0.tar.gz
  Installing build dependencies ... done
  Getting requirements to build wheel ... done
    Preparing wheel metadata ... done
Building wheels for collected packages: scipy
  Building wheel for scipy (PEP 517) ... done
  Stored in directory: /home/muauan/.cache/pip/wheels/58/c7/8f/6e0f7d9c19f1b28b317b3c22e2af7131f2834db64f5828b9ee
Successfully built scipy
Installing collected packages: h5py, keras-preprocessing, keras-applications, pyyaml, scipy, keras
Successfully installed h5py-2.9.0 keras-2.2.4 keras-applications-1.0.8 keras-preprocessing-1.1.0 pyyaml-5.1.1 scipy-1.3.0
ところが、mnistのkeras版を実行すると、Tensorflowが無いと怒られます。
ということで、参考⑪を見ながら、以下のようにインストールしました。
(Chainer) muauan@muauan-desktop:~/Documents/Chainer$ pip3 install --pre --extra-index-url https://developer.download.nvidia.com/compute/redist/jp/v42 tensorflow-gpu
Looking in indexes: https://pypi.org/simple, https://developer.download.nvidia.com/compute/redist/jp/v42
Collecting tensorflow-gpu
...
Successfully installed absl-py-0.7.1 astor-0.8.0 gast-0.2.2 grpcio-1.21.1 markdown-3.1.1 mock-3.0.5 tensorboard-1.13.1 tensorflow-estimator-1.13.0 tensorflow-gpu-1.13.1+nv19.5 termcolor-1.1.0 werkzeug-0.15.4
無事にインストールできました。
ということで、mnistのkeras版を実行してみました。
仮想環境と実環境共に実行できて、以下のとおりになりました。
(Chainer) muauan@muauan-desktop:~/Documents/Chainer$ pipenv run python3 mnist_keras.py
Using TensorFlow backend.
60000 train samples
10000 test samples
...
Epoch 20/20
60000/60000 [==============================] - 9s 154us/step - loss: 0.0180 - acc: 0.9953 - val_loss: 0.1126 - val_acc: 0.9832
Test loss: 0.11256657051997822
Test accuracy: 0.9832
(Chainer) muauan@muauan-desktop:~/Documents/Chainer$ python3 mnist_keras.py
...
Epoch 20/20
60000/60000 [==============================] - 9s 145us/step - loss: 0.0169 - acc: 0.9957 - val_loss: 0.0982 - val_acc: 0.9857
Test loss: 0.09820390864623105
Test accuracy: 0.9857
まとめ
・Jetson-nanoの環境構築を実施した
・Tensorflow,Chainer、そしてKerasの環境構築ができた
・MNISTのそれぞれのExampleを実行して環境ができていることを確認した
おまけ
【参考】
keras/examples/mnist_mlp.py
'''Trains a simple deep NN on the MNIST dataset.
Gets to 98.40% test accuracy after 20 epochs
(there is *a lot* of margin for parameter tuning).
2 seconds per epoch on a K520 GPU.
'''

from __future__ import print_function

import keras
from keras.datasets import mnist
from keras.models import Sequential
from keras.layers import Dense, Dropout
from keras.optimizers import RMSprop

batch_size = 128
num_classes = 10
epochs = 20

# the data, split between train and test sets
(x_train, y_train), (x_test, y_test) = mnist.load_data()

x_train = x_train.reshape(60000, 784)
x_test = x_test.reshape(10000, 784)
x_train = x_train.astype('float32')
x_test = x_test.astype('float32')
x_train /= 255
x_test /= 255
print(x_train.shape[0], 'train samples')
print(x_test.shape[0], 'test samples')

# convert class vectors to binary class matrices
y_train = keras.utils.to_categorical(y_train, num_classes)
y_test = keras.utils.to_categorical(y_test, num_classes)

model = Sequential()
model.add(Dense(512, activation='relu', input_shape=(784,)))
model.add(Dropout(0.2))
model.add(Dense(512, activation='relu'))
model.add(Dropout(0.2))
model.add(Dense(num_classes, activation='softmax'))

model.summary()

model.compile(loss='categorical_crossentropy',
              optimizer=RMSprop(),
              metrics=['accuracy'])

history = model.fit(x_train, y_train,
                    batch_size=batch_size,
                    epochs=epochs,
                    verbose=1,
                    validation_data=(x_test, y_test))
score = model.evaluate(x_test, y_test, verbose=0)
print('Test loss:', score[0])
print('Test accuracy:', score[1])