はじめに
Jetson NanoでChainerを動かしたのでその記録。本記事は「Jetson NanoでCuPy」の続きである。特にpipenvの初期化部分は前の記事しか書いていない。CuPyをインストールしていない場合は前の記事から実行する必要がある。
セットアップ
matplotlibをインストールするためにfreetypeを入れておく。
ターミナル
yamamo-to@jetson-nano:~$ sudo apt install libfreetype6-dev
インストール
pipenvでCuPyをインストールしたディレクトリ$HOME/Documents/Chainerを使う。CuPyと違ってChainerはすぐにインストールされた。matplotlibは数分かかった。
ターミナル
yamamo-to@jetson-nano:~$ cd ~/Documents/Chainer
yamamo-to@jetson-nano:~/Documents/Chainer$ pipenv install chainer
yamamo-to@jetson-nano:~/Documents/Chainer$ pipenv install matplotlib
最初の確認
まずはchainer.print_runtime_info()で各種情報を表示してみる。
ターミナル
yamamo-to@jetson-nano:~/Documents/Chainer$ pipenv run python3 -c 'import chainer; chainer.print_runtime_info()'
Platform: Linux-4.9.140-tegra-aarch64-with-Ubuntu-18.04-bionic
Chainer: 6.0.0
NumPy: 1.16.3
CuPy:
  CuPy Version          : 6.0.0
  CUDA Root             : /usr/local/cuda
  CUDA Build Version    : 10000
  CUDA Driver Version   : 10000
  CUDA Runtime Version  : 10000
  cuDNN Build Version   : 7301
  cuDNN Version         : 7301
  NCCL Build Version    : None
  NCCL Runtime Version  : None
iDeep: Not Available
NCCL関連はマルチGPUでないので None で正しい。iDeepもIntel CPUでないので Not Available で正しい。その他、各種バージョンはJetson Nanoの開発環境で確認した通り(と思う)。
MNISTの実行
避けては通れないMNISTを実行してみる。
訓練フェーズ
下記のURL1を参考にmnist_train.py作成した。
https://docs.chainer.org/en/stable/examples/mnist.html
mnist_train.py
from chainer import Chain
from chainer import functions as F
from chainer import links as L
from chainer import datasets
from chainer import iterators
from chainer import optimizers
from chainer import training
from chainer.training import extensions as ext


class MLP(Chain):

    def __init__(self, n_mid_units=100, n_out=10):
        super(MLP, self).__init__()
        with self.init_scope():
            self.l1 = L.Linear(None, n_mid_units)
            self.l2 = L.Linear(None, n_mid_units)
            self.l3 = L.Linear(None, n_out)

    def forward(self, x):
        h1 = F.relu(self.l1(x))
        h2 = F.relu(self.l2(h1))
        return self.l3(h2)


def main():
    train, test = datasets.mnist.get_mnist()

    batchsize = 128
    train_iter = iterators.SerialIterator(train, batchsize)
    test_iter = iterators.SerialIterator(test, batchsize, False, False)

    gpu_id = 0
    model = MLP()
    model.to_gpu(gpu_id)

    max_epoch = 10
    model = L.Classifier(model)
    optimizer = optimizers.MomentumSGD()
    optimizer.setup(model)
    updater = training.updaters.StandardUpdater(train_iter, optimizer, device=gpu_id)
    trainer = training.Trainer(updater, (max_epoch, 'epoch'), out='mnist_out')
    trainer.extend(ext.LogReport())
    trainer.extend(ext.snapshot(filename='snapshot_epoch-{.updater.epoch}'))
    trainer.extend(ext.snapshot_object(model.predictor,
        filename='model_epoch-{.updater.epoch}'))
    trainer.extend(ext.Evaluator(test_iter, model, device=gpu_id))
    trainer.extend(ext.PrintReport(['epoch', 'main/loss', 'main/accuracy',
        'validation/main/loss', 'validation/main/accuracy', 'elapsed_time']))
    trainer.extend(ext.PlotReport(['main/loss', 'validation/main/loss'],
        x_key='epoch', file_name='loss.png'))
    trainer.extend(ext.PlotReport(['main/accuracy', 'validation/main/accuracy'],
        x_key='epoch', file_name='accuracy.png'))
    trainer.extend(ext.DumpGraph('main/loss'))

    trainer.run()


if __name__ == "__main__":
    main()
実行する。
ターミナル
yamamo-to@jetson-nano:~/Documents/Chainer$ pipenv run python3 mnist_train.py
結果は下記の通り。
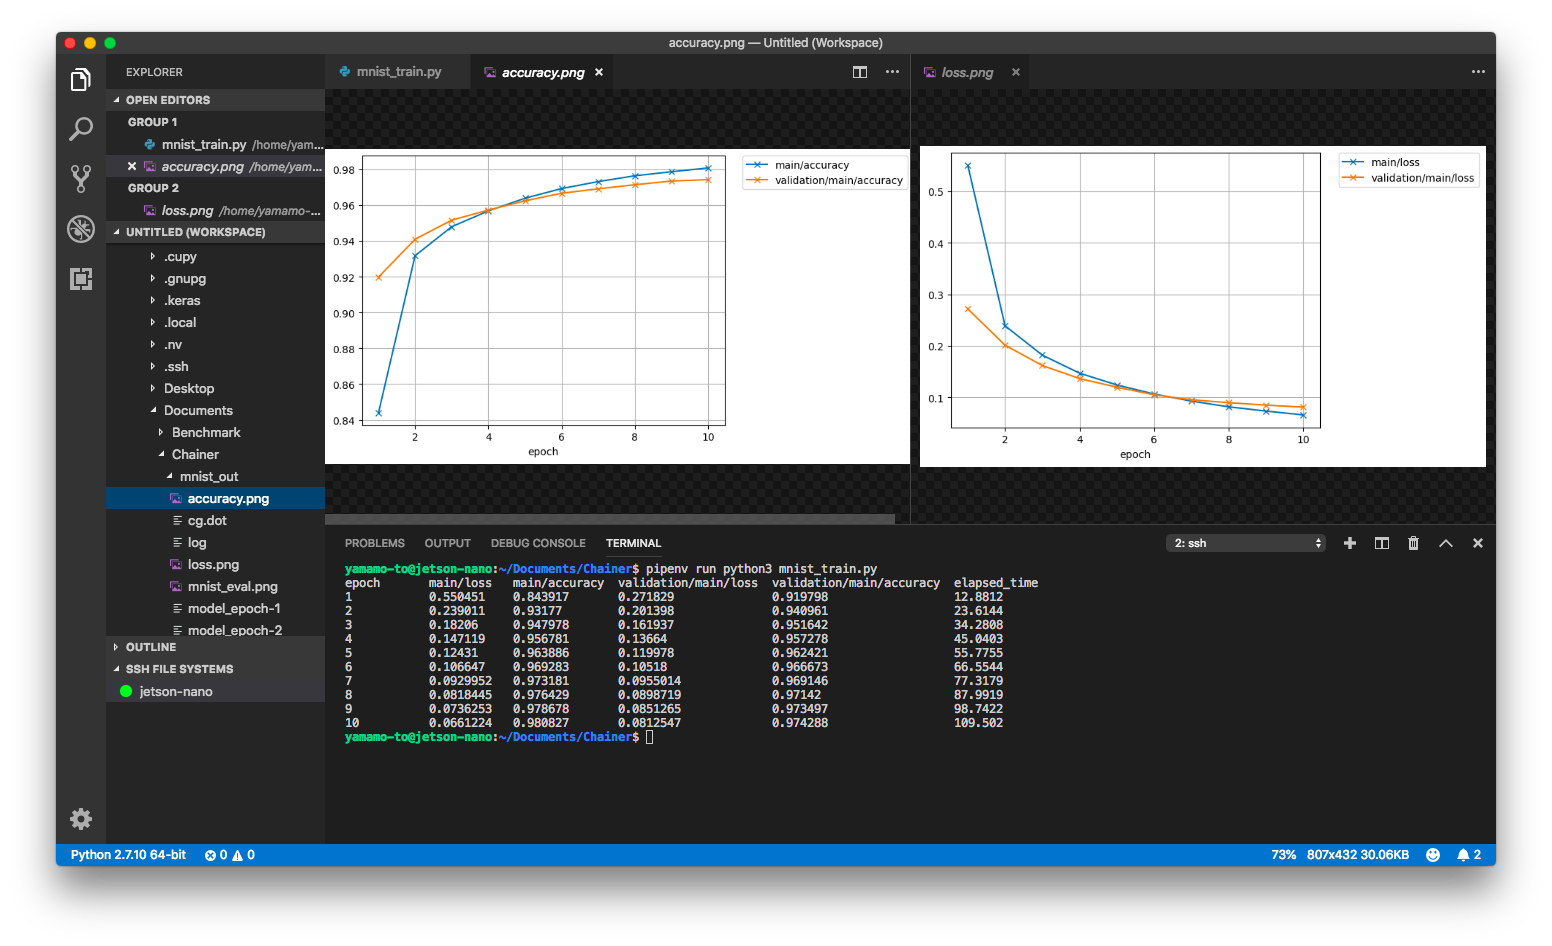
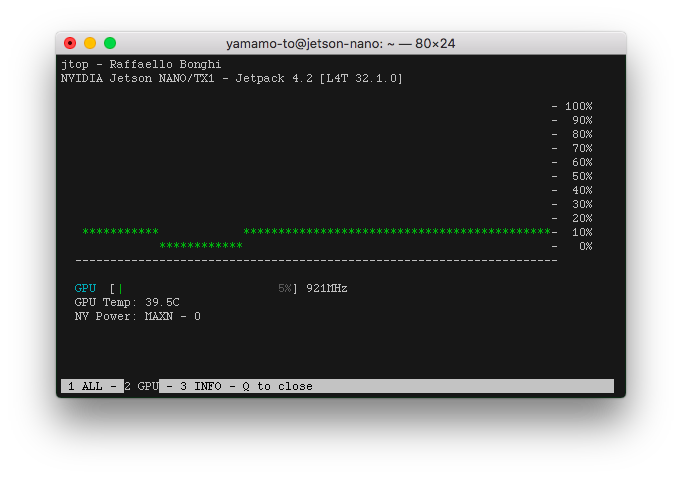
GPUはどのくらい使われていたのかというと5〜6%くらい使用されていた。
作ったモデルの利用
作ったモデルを使って画像から数字を判別してみる。
モデルは再定義しないでmnist_train.pyから読み込んだので同じディレクトリに置く。
ソースコードは下記の通り。
mnist_eval.py
import random
import matplotlib.pyplot as plt

from chainer import datasets
from chainer import serializers

from mnist_train import MLP


def main():
    # Load dataset
    train, test = datasets.mnist.get_mnist()

    # Load model
    model = MLP()
    serializers.load_npz('mnist_out/model_epoch-10', model)

    # Show the output
    no = random.randint(0, len(test) - 1)
    x, t = test[no]
    plt.imshow(x.reshape(28, 28), cmap='gray')
    plt.savefig('mnist_out/mnist_eval.png')
    print('label:', t)

    y = model(x[None, ...])

    print('predicted_label:', y.array.argmax(axis=1)[0])


if __name__ == "__main__":
    main()
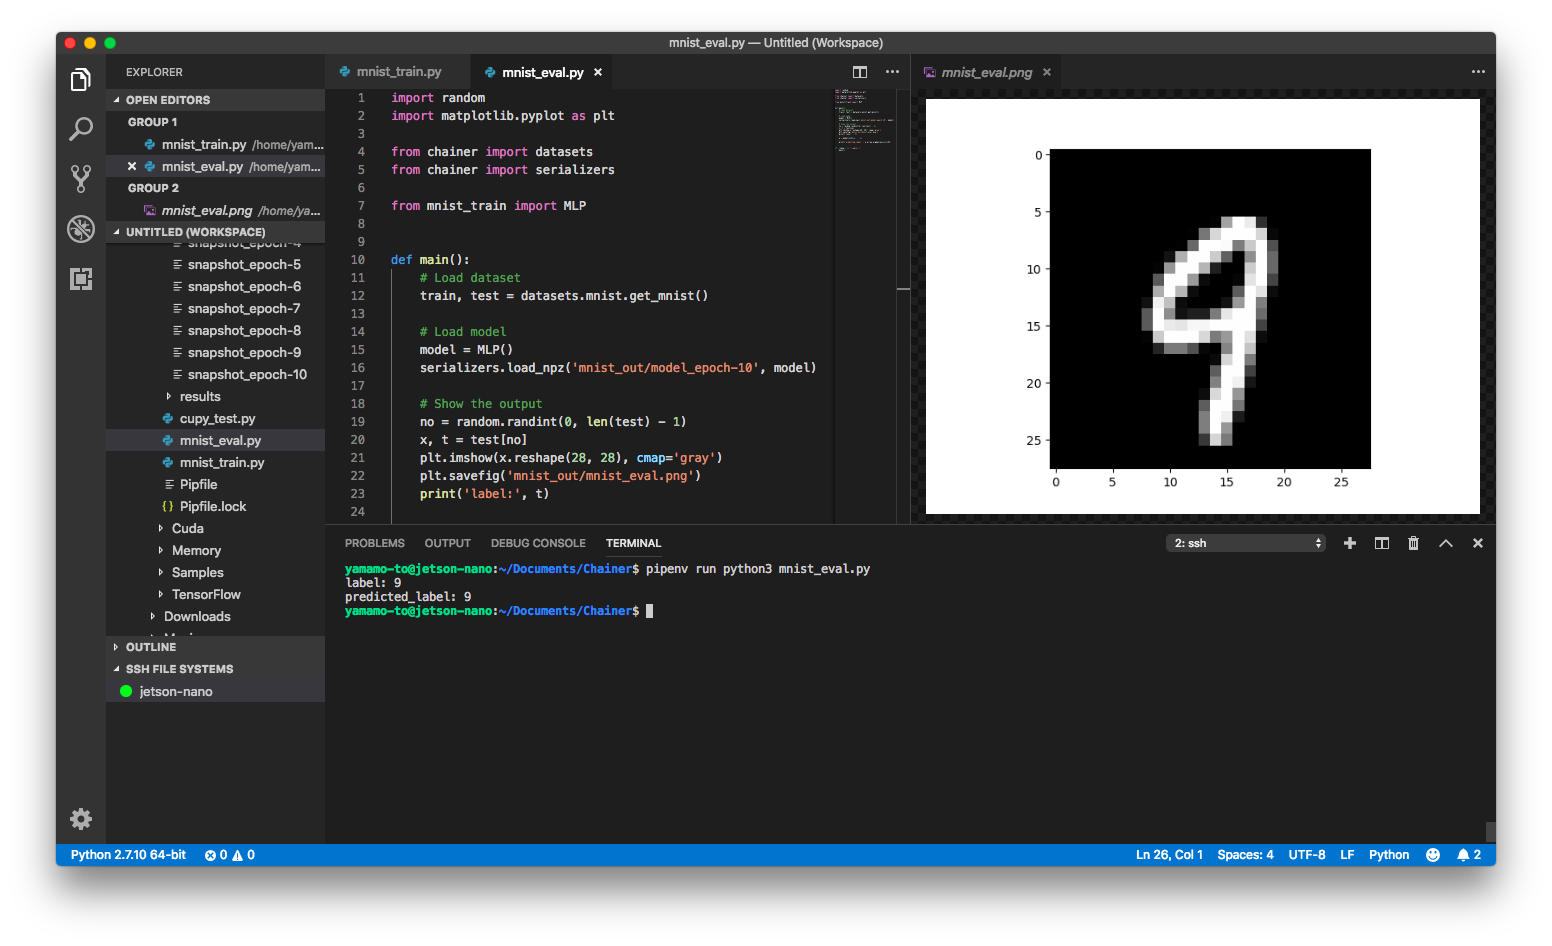
これを実行する。
ターミナル
yamamo-to@jetson-nano:~/Documents/Chainer$ pipenv run python3 mnist_eval.py
結果。ラベルも画像も「9」になっている。予測結果も「9」。
参考文献
-
enをjpやjaにしても日本語版はなかった! ↩