話は簡単なように見えるが、いくつかハードルがあったので、紹介しておこうと思う。
OculusGo;Flaskから受け取った時間に基づいて相互作用する二つの物体♬
<img src="http://img.youtube.com/vi/9X6AHlRKAZU/0.jpg"
※画像をクリックするとYouTube動画につながります
以前、Flask-Unity連携として、TextをFlaskで生成してUnityで表示した。
今回は、そのTextを時刻とし、その時刻をUnityの物体の運動に転嫁した。
やったこと
(1)前回のおさらい
(2)Flask側コードと受け取るUnity側コード
(3)Stringをfloatに変換するコードとTextの設定
(4)二個の相互作用する物体の運動のコード
(1)前回のおさらい
以下再掲する。
flask側
from flask import Flask
app = Flask(__name__)
@app.route("/", methods=['GET'])
def index():
    return "Hello Unity"
if __name__ == "__main__":
    app.debug = True
    app.run()
前回は"Hello Unity"を出力しているが、今回はここを時刻を出力するように変更する。
Unity側
using System.Collections;
using System.Collections.Generic;
using UnityEngine;
using UnityEngine.UI;  ////ここを追加////

public class GetText : MonoBehaviour {
    // Use this for initialization
    IEnumerator Start () {
        WWW www = new WWW("http://localhost:5000/");
        yield return www;
        Debug.Log(www.text);
        this.GetComponent<Text>().text = www.text;
    }
    // Update is called once per frame
    void Update () {
    }
}
ここで大切なことは、
WWW www = new WWW("http://localhost:5000/");
はOculusGoで動かすには、
WWW www = new WWW("http://192.***.***.***:5000/");
とサーバーのIPアドレスを入れることが必要でした。
そして、上記は時間変化が無いのでStart()でYieldしているが、実際時間変化する場合は、これはUpdate()に記載すべきであろう。
ということで、今回のコードは以下のとおりである。
(2)Flask側コードと受け取るUnity側コード
flask側
# !/usr/bin/env python
# python
from flask import Flask
import time

ts=time.time()

app = Flask(__name__)
@app.route("/", methods=['GET'])
def index():
    t=time.time()
    x= t-ts
    x1=str(x)
  #10桁出力する
    return x1[0:10]
if __name__ == "__main__":
    app.debug = True
    app.run(host="192.***.***.***")
Unity側
コードが上記と少し飛んでるので、試行錯誤の話は以下参考見てください。
【参考】
・【Unity入門】OculusGo⇐Unity⇐Flask連携;Textをもらって表示するが出来た♬
using System.Collections;
using System.Collections.Generic;
using UnityEngine;
using UnityEngine.UI;  ////ここを追加////
using System.IO;

public class GetText : MonoBehaviour
{
    public Text m_MyText;
    public Text m_MyText1;

    //通信開始(http://192.***.***.***:5000/)
    public void connectionStart(string name)
    {
        string POST_URL = "http://192.***.***.***:5000/";
        WWW www = new WWW(POST_URL);
        StartCoroutine("WaitForRequest", www);
    }
    //通信の処理待ち
    private IEnumerator WaitForRequest(WWW www)
    {
        yield return www;
        connectionEnd(www);
    }
    //通信終了後の処理
    private void connectionEnd(WWW www)
    {
        //通信結果をLogで出す
        if (www.error != null)
        {
            //Debug.Log(www.error);
            var strB = www.error.Substring(0, 11);
            GetComponent<Text>().text = strB;
            textSave(strB);
        }
        else
        {
            //通信結果 -> www.text
            //Debug.Log(www.text);
            var strA = www.text.Substring(0, 10);
            GetComponent<Text>().text = strA;
            textSave(strA);
        }
    }
    // Update is called once per frame
    void Update()
    {
        connectionStart(name);
    }
    // 引数でStringを渡してやる
    public void textSave(string txt)
    {
        StreamWriter sw = new StreamWriter("LogData.txt", false); //true=追記 false=上書き
        sw.WriteLine(txt);
        sw.Flush();
        sw.Close();
    }
}
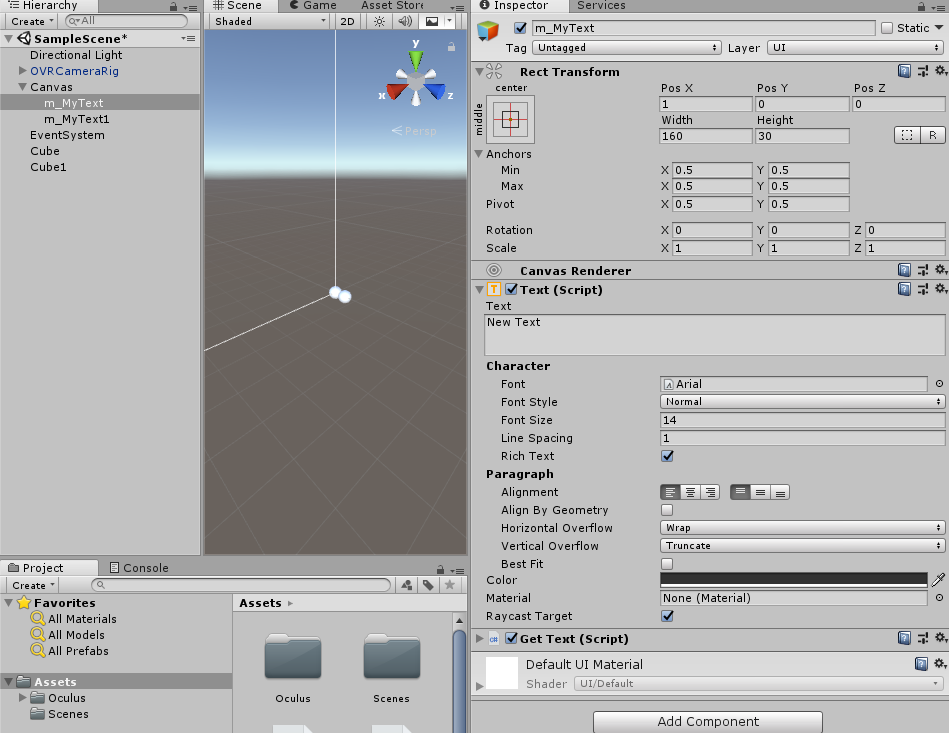
(3)Stringをfloatに変換するコードとTextの設定
これはググってみるとなかなか出てこない。。。ということでつまり以下のコードで変換できた。
float s = float.Parse(m_MyText.text);
Unity側のm_MyTextを通常のTextとして貼る。
そして、以下のように設定している。
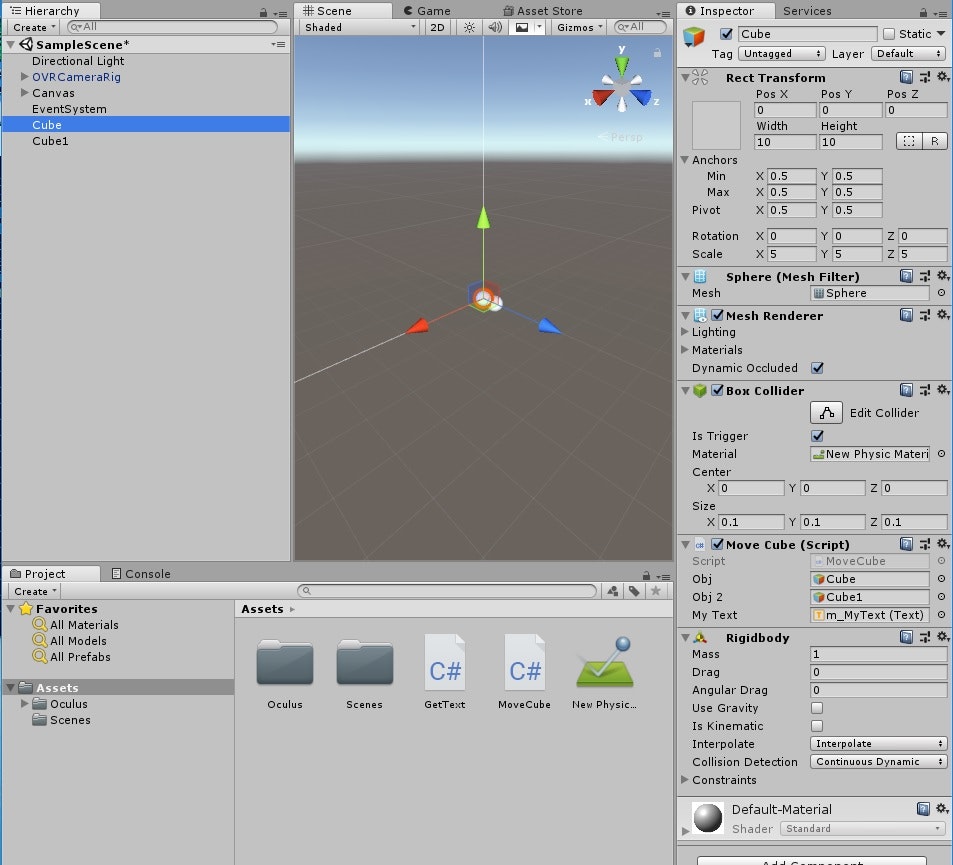
(4)二個の相互作用する物体の運動のコード
これは、前回のSolar_Systemの話を参考にしてください。
ここで大切なことは、以下のようにpublic Text m_MyText;とするか、または以下のように領域確保する必要がある。このm_MyTextのTextエリアの文字を上記の変換で数値化して使う。
  [SerializeField]
    private Text m_MyText;
using System.Collections;
using System.Collections.Generic;
using UnityEngine;
using UnityEngine.UI;

public class MoveCube : MonoBehaviour
{
    [SerializeField]
    private GameObject obj;
    [SerializeField]
    private GameObject obj2;
    private Vector3 m_NewForce;
    private Vector3 m_NewForce1;
    private float gMm;
    private float r;
    //private float s;
    private float x;
    private float y;
    private float z;
    private float x1;
    private float y1;
    private float z1;
    private float x01;
    private float y01;
    private float z01;
    private float m;
    private float M;
    private float fc;
    public Text m_MyText;

    // Use this for initialization
    void Start()
    {
        M = obj.transform.GetComponent<Rigidbody>().mass;
        m = obj2.transform.GetComponent<Rigidbody>().mass;
        gMm = getgMm();
        fc = 1f;
    }
    // Update is called once per frame
    void Update()
    {
        float s = float.Parse(m_MyText.text); //これ大切
        x = 10f * Mathf.Sin(s);
        y = 10f * Mathf.Cos(s);
        z = obj.transform.GetComponent<Rigidbody>().position.z;
        //x1 = 20f * Mathf.Cos(s);
        //y1 = 20f * Mathf.Sin(s);
        //z1 = obj2.transform.GetComponent<Rigidbody>().position.z;
        obj.transform.GetComponent<Rigidbody>().position = new Vector3(x, y, z);
        //obj2.transform.GetComponent<Rigidbody>().position = new Vector3(x1, y1, z1);
        x01 = obj2.transform.GetComponent<Rigidbody>().position.x - obj.transform.GetComponent<Rigidbody>().position.x;
        y01 = obj2.transform.GetComponent<Rigidbody>().position.y - obj.transform.GetComponent<Rigidbody>().position.y;
        z01 = obj2.transform.GetComponent<Rigidbody>().position.z - obj.transform.GetComponent<Rigidbody>().position.z;
        // objに与える力を定義する。WorldSpaceの(x1,y1,z1)に向かうベクトルに比例した力としている
        r = calcRadius(x01, y01, z01);
        m_NewForce = new Vector3(gMm * fc * fc * x01 / (r * r * r), gMm * fc * fc * y01 / (r * r * r), gMm * fc * fc * z01 / (r * r * r));
        m_NewForce1 = new Vector3(-gMm * fc * fc * x01 / (r * r * r), -gMm * fc * fc * y01 / (r * r * r), -gMm * fc * fc * z01 / (r * r * r));
        Debug.Log(m_NewForce);
        // objに力を加える
        obj.transform.GetComponent<Rigidbody>().AddForce(m_NewForce, ForceMode.Impulse);
        obj2.transform.GetComponent<Rigidbody>().AddForce(m_NewForce1, ForceMode.Impulse);
    }

    private float calcRadius(float x, float y, float z)
    {
        r = Mathf.Sqrt(x * x + y * y + z * z);
        return r;
    }
    private float getgMm()
    {
        M = obj.transform.GetComponent<Rigidbody>().mass;
        m = obj2.transform.GetComponent<Rigidbody>().mass;
        gMm = 1.32f * M * m * 0.008f;
        //Debug.Log(gMm);
        return gMm;
    }
}
こうして、とりあえず以下のようにFlaskからGetした時間に依存して二つの相互作用する物体の運動ができる。ちなみに、一つは時間に支配されて動いているが、もう一つの物体は相互作用のみで動いている。
<img src="http://img.youtube.com/vi/9X6AHlRKAZU/0.jpg"
※画像をクリックするとYouTube動画につながります
まとめ
・Flaskで生成した時刻をUnityでGetして、その経過時間に基づいて円運動する物体と相互さようするもう一つの物体の運動を実施した
・複数の引数の受け渡しができていない
・運動する物体と多くのチリの相互作用を見たいと思う