Update
続編を(ようやく)作りました。
こちらからどうぞ
はじめに
今回は Azure Bot Service を使用して連続した対話に対応できる Bot を作成します.
Azure Bot Service を初めて使用する人を(できる限り)想定してます.
(熟練の方々からしたら退屈するかと思います.)
また,今回は Bot の sample を local test するところまでで
Azure への Deploy については次回行います.
(訂正や指摘などあれば,温かく教えていただけると助かります.)
私の開発環境
- PC : surface laptop2 (windows 10)
- Editor : VS Code
PC に関しては何でも大丈夫です.
Editor に関しては 本記事を参考にされる場合は VS Code をご使用ください.
(後程お話しますが, Azure への deploy 時に VS Code の Extension を使用しています)
Azure Bot Service の概要
Azure Bot Service とは,Microsoft 社のクラウドサービスである Azure のサービスの1つです.
公式の document は以下をご参考ください.
Azure Bot Service のリソースを作成すると,セットで Azure App Service のリソースが作成されます.App Service とは同じく Azure のサービスの 1 つで,Web Application を作成することの出来るサービスです.
Bot の基本
まずは,Bot が初めての方,Auzre Bot Service に初めて触れる方のためにいくつかの用語や実装法の紹介をします.
専門用語
Azure Bot Service を使用する上で参考になる用語をいくつか先にご紹介しておきます.
- channel
- Bot への通話手段.窓口のようなイメージ.
- User は channel を通じて Bot App と会話をします.
- Teams や LINE, Slack,Web chat などがあります.
- channel によって仕様が異なるため,実際の Bot 開発では channel が何かも大事.
- connecter
- channel と Bot アプリを繋ぐ.
- Azure Bot Service この機能も含めている
- Bot App
- 実際に処理を行う部分.
- 実態としては,一般的な Web App と変わらない
- Azure Bot Service の Web App は App Service に相当します
- Bot Registration というものを選ぶと、App Service 以外のものも使えた(はずです)
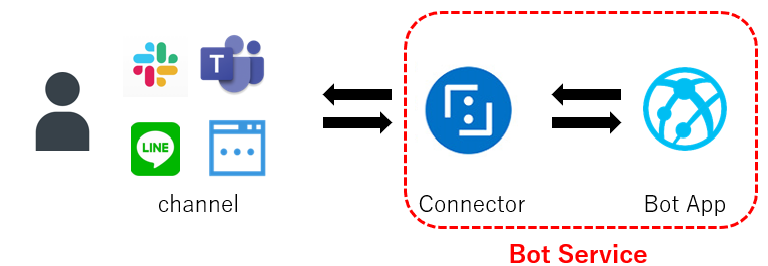
ご存知の方もいらっしゃるかもしれませんが,Azure Bot Service は単なる Bot Application ではありません.channel を通してきたメッセージを Bot へと伝える connecter のと 実際の処理を行う Web Bot の二つをまとめて指します.(くらいの認識でいてもらえば大丈夫です。)
Bot の実装方法
Bot アプリを作成する場合,Line や Slack などの channel ではなく,実装の観点で話すと2つの実装方法があります.
- function 型
- AWS lambda や Azure Function などの Serverless Function を活用した場合
- 非常にシンプルな作り
- Function を使用した回数だけ課金対象になるので使用頻度によっては非常に安価
- Server 型
- 今回のAzure Bot Service(厳密には Web App Service)のような場合
- serverを起動している間機能する
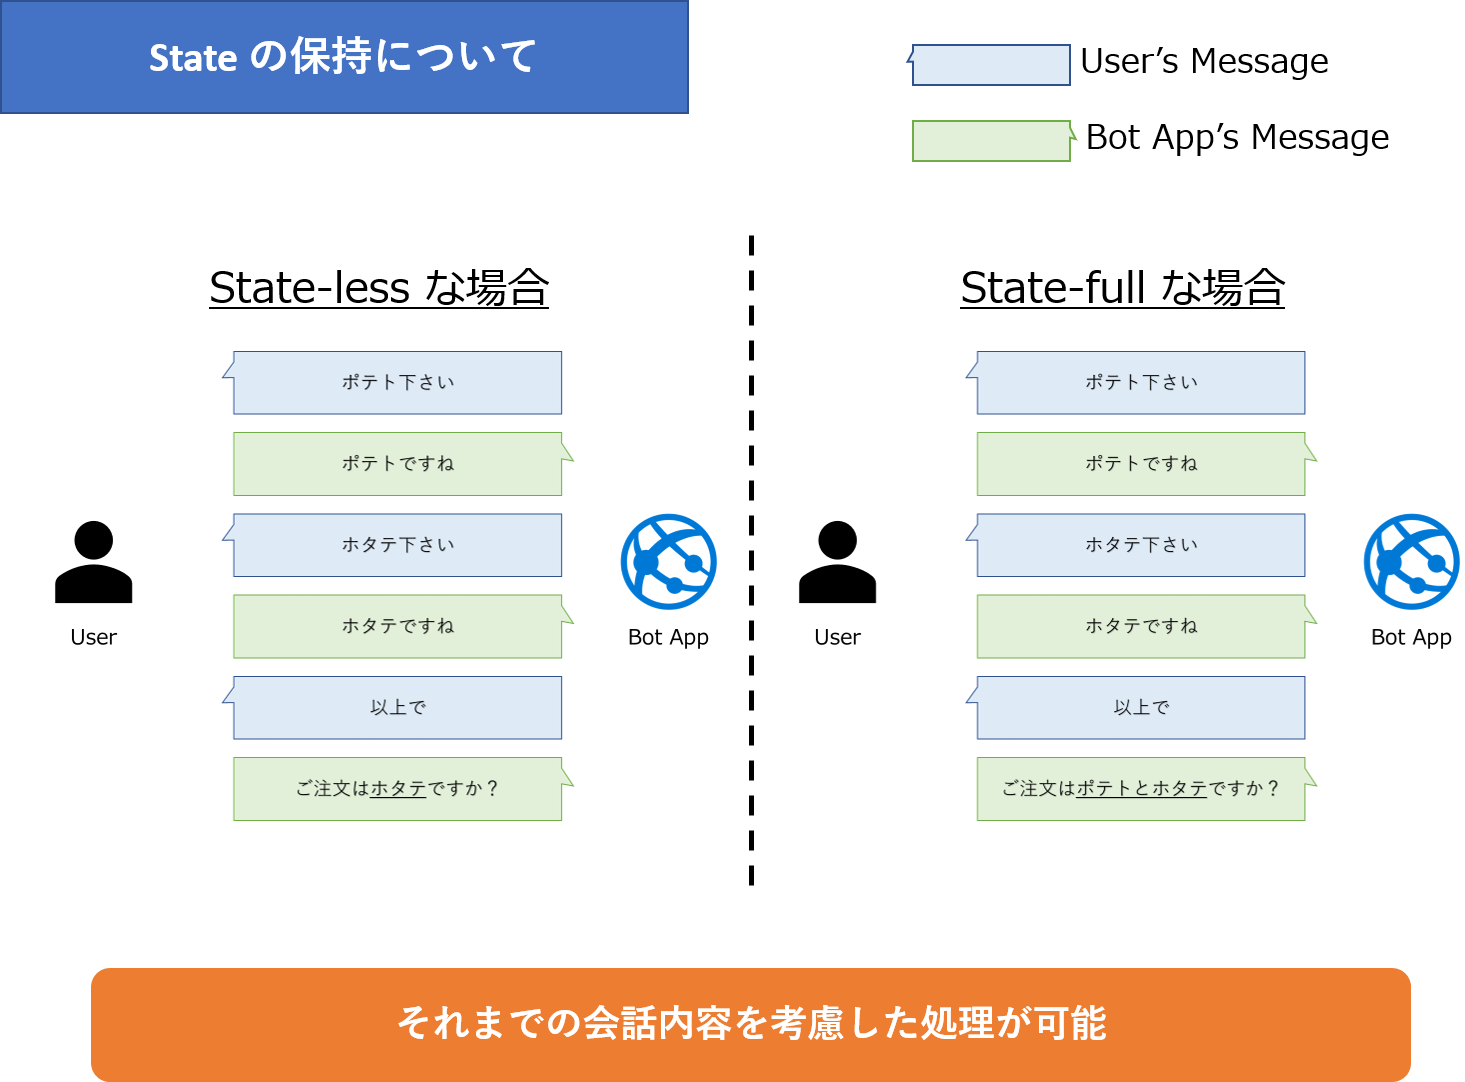
- State(変数の値など)を保持することができる
Azure Bot Service を使用した場合は,下の server 型になります.
function 型では リクエスト(Bot の場合は Bot への呼びかけ)が発生する度に function が実行されます.一方,server 型では server が起動している間のみ応答を返します. これらの特性の大きな違い(の 1 つ)は server側で変数の値などを保持してステートフルな会話が可能なことです.
ステートフルな会話とは簡単に言うと一連の流れを記憶した状態で会話ができるということです.
Serverless Function であれば,基本的には 「1 Question : 1 Answer」 であるのに対して,ステートフルな実装であれば「 n Question : m Answer」と複数の情報から返答を返すことができます.
とりあえずここでは,ざっくりと下図のようなイメージだけで大丈夫です.
(私も厳密な定義は微妙です(笑))
sample の実行
それでは実際に sample を動かしつつ確認していきます.
sample コードの取得
以下の Github から sample コードを取得します.
Azure Bot Service の sample Code (Github)
今回は連続した会話フローのsample (Node.js版) を使用します.
先ほど取得したコードのうち,以下の directory を開いてください.
/BotBuilder-Samples/samples/javascript_nodejs/05.multi-turn-prompt/
少しコードを見てみましょう.
プログラムを実行すると index.js が実行されます.
まずは index.js をみてみます.一部抜粋したものを記載しておきます.
// Copyright (c) Microsoft Corporation. All rights reserved.
// Licensed under the MIT License.
const restify = require('restify');
const path = require('path');

// Import required bot services.
// See https://aka.ms/bot-services to learn more about the different parts of a bot.
const { BotFrameworkAdapter, ConversationState, MemoryStorage, UserState } = require('botbuilder');

// Import our custom bot class that provides a turn handling function.
const { DialogBot } = require('./bots/dialogBot');
const { UserProfileDialog } = require('./dialogs/userProfileDialog');

// Read environment variables from .env file
const ENV_FILE = path.join(__dirname, '.env');
require('dotenv').config({ path: ENV_FILE });

/**********
  中略
**********/

// Define the state store for your bot.
// See https://aka.ms/about-bot-state to learn more about using MemoryStorage.
// A bot requires a state storage system to persist the dialog and user state between messages.
const memoryStorage = new MemoryStorage();

// Create conversation state with in-memory storage provider.
const conversationState = new ConversationState(memoryStorage);
const userState = new UserState(memoryStorage);

// Create the main dialog.
const dialog = new UserProfileDialog(userState);
const bot = new DialogBot(conversationState, userState, dialog);

// Create HTTP server.
const server = restify.createServer();
server.listen(process.env.port || process.env.PORT || 3978, function() {
    console.log(`\n${ server.name } listening to ${ server.url }.`);
    console.log('\nGet Bot Framework Emulator: https://aka.ms/botframework-emulator');
    console.log('\nTo talk to your bot, open the emulator select "Open Bot"');
});

// Listen for incoming requests.
server.post('/api/messages', (req, res) => {
    adapter.processActivity(req, res, async (context) => {
        // Route the message to the bot's main handler.
        await bot.run(context);
    });
});
前半部分では必要な module を import したり,
sample プログラムの別の js ファイルでインスタンスを作成しています.
HTTP server を create しているところでは,PORT の設定なんかもしていますね.
また,最後の部分で post する際のエンドポイントを設定しています.
今回はしませんが,Proactive なメッセージ(push 通知など)を実装する際には,
同様の方法で Proactive 用のエンドポイントを用意することもあります.
続いて,実際の会話フローの制御をしているプログラムを確認しましょう.
/dialogs/userProfileDialog.js を開いてください.一部抜粋したものを記載しておきます.
constructor(userState) {
        super('userProfileDialog');

        this.userProfile = userState.createProperty(USER_PROFILE);

        // 典型的な会話のパターンを用意してくれている
        this.addDialog(new TextPrompt(NAME_PROMPT));
        this.addDialog(new ChoicePrompt(CHOICE_PROMPT));
        this.addDialog(new ConfirmPrompt(CONFIRM_PROMPT));
        this.addDialog(new NumberPrompt(NUMBER_PROMPT, this.agePromptValidator));

        // ここで連続する会話を追加している
        this.addDialog(new WaterfallDialog(WATERFALL_DIALOG, [
            this.transportStep.bind(this),
            this.nameStep.bind(this),
            this.nameConfirmStep.bind(this),
            this.ageStep.bind(this),
            this.confirmStep.bind(this),
            this.summaryStep.bind(this)
        ]));

        this.initialDialogId = WATERFALL_DIALOG;
    }
TextPrompt や NumberPrompt はその名の通り,テキストや数値入力などの典型的な会話のパターンを実装するために用意されています.
そして,抜粋した code の後半部分にあるWatarfallDialog に様々な dialo を add することで,add した dialog が一連の会話として扱われます.ここで add されている dialog は抜粋部分より後ろの sample code で上記の Prompt を継承して実装されたものです.
local test
まずは Azure に deploy(ざっくり言うとプログラムを Azure 上で動作させる) せずに,local で動作テストできるようにします.以下のリンクより Bot Framework Emulator の exe ファイルを取得して実行します.
ちょっと分かりにくいですが,ページ中頃にある以下の画像ようなファイル群から自分に適したものを入手してください.

上 4 つのどれかで大丈夫なはずです.
Bot Framework Emulator が起動できること(アプリが実行できて window が開くこと)を確認したら,sample program のある場所で command prompt やら Power Shell やらのコマンドツールを開きましょう.何かしらのコマンドツールを開けたら,npm install とnpm startを実行してください.
すると,以下のような画面になります.

この画面になり,Bot App が Listen 状態になったことを確認したら,
先ほどの Bot Framework Emulator を実行してOpen Botを押してください.
そして,URL の欄にhttp://lovalhost:3978/api/messages と入力します.
これは sample code で index.js の最後に書かれている server.post のエンドポイントです.
このポイントに http post リクエストを送ることで Bot と会話します.

こんな感じですね!入力したら Connect してください.
無事にsample を実行できたら,何か話しかけてみましょう.
下の gif のように会話ができると思います.

ちなみに,Bot を停止させたい時は shell の画面で ctr+c を押してください.
次の内容
少し長くなりそうなので今回はここまでで終了とします.
もう1回くらいは書こうと思うので,予定している内容を書いておきます.
- Dialog の分岐
- 今回は決まった会話内容でしたが,次回はもう少し複雑に会話を分岐させます.
- Azure への Deploy
- 今回は localtest で終わりましたが,次回は実際に Azure に Deploy します.
- channel の設定
- とりあえず Teams との連携でも目指します.
(よくよく考えたら今回まだ Azure Bot Service 使ってない説)