WPFでBaslerライブビューにHUDを重ねる【FPS・露光・ゲイン/二層レイアウト】
カメラから得られた情報をUIに分かりやすく表示したい。あるいは、組み込み機器のディスプレイサイズの制約で、情報を詰め込む必要があるということはよくあります。
ライブビューが映るようになったら、次の“一歩”として HUD(FPS・露光・ゲイン・クロスヘアなど) を重ねてみましょう。
取得した画像に直接情報を書き込むと、ズーム/パンしたときに文字がにじむ・揺れるといったことが起きてしまいます。そこで、本記事では レイヤー分離(映像レイヤ+HUDレイヤ)を採用し、ズーム/パンに強い 実装を紹介します。
将来的にGUI上でのROI(Region of interest)編集やHUD込みの画像保存にも拡張しやすい骨組みです。
使用環境 / 前提
- Basler pylon Camera Software Suite(
Basler.Pylon参照済み) - .NET 8 / WPF(Windowsデスクトップ)
- カメラ:acA2500-14gm(Mono8想定)
ゴール
前回記事(WPFでBaslerカメラのライブビューを実装する【pylon SDK / C# / .NET 8】)の内容に以下の機能を追加していきます。
- 映像レイヤ(Image)と HUDレイヤ(透明Grid)を二重化
- HUDは 画面座標で固定(ズーム非追従)→ 文字がにじまない・揺れない
- FPSは 10Hz程度で間引きして更新、露光/ゲインを併記
- 将来 HUD込みキャプチャ(
RenderTargetBitmap)に発展可能な設計にする。
画面(XAML):二層+(任意で)ROI層
表示領域のGridに要素を並べていきます。
画像はズーム/パン、HUDは固定。ROI表示など追加したい場合は必要に応じて
Canvasを足していきます。
<Window x:Class="BaslerGUISample.MainWindow"
        xmlns="http://schemas.microsoft.com/winfx/2006/xaml/presentation"
        xmlns:x="http://schemas.microsoft.com/winfx/2006/xaml"
        xmlns:d="http://schemas.microsoft.com/expression/blend/2008"
        xmlns:mc="http://schemas.openxmlformats.org/markup-compatibility/2006"
        xmlns:local="clr-namespace:BaslerGUISample"
        mc:Ignorable="d"
        Title="BaslerGUISample" Height="450" Width="500" Closing="Window_Closing">

    <Grid>
        <Grid.RowDefinitions>
            <RowDefinition Height="Auto"/>
            <RowDefinition Height="*"/>
        </Grid.RowDefinitions>
        <Grid.ColumnDefinitions>
            <ColumnDefinition Width="*"/>
            <ColumnDefinition Width="*"/>
            <ColumnDefinition Width="*"/>
            <ColumnDefinition Width="*"/>
            <ColumnDefinition Width="*"/>
        </Grid.ColumnDefinitions>
        <!-- ボタン群は省略 -->

        <!-- 表示領域(ズーム/パンのマウス操作をここで拾う場合はイベントを付与、今後紹介) -->
        <Grid Grid.Row="1" Grid.Column="0" Grid.ColumnSpan="5"
              UseLayoutRounding="True"
              SnapsToDevicePixels="True"
              TextOptions.TextFormattingMode="Display"
              TextOptions.TextRenderingMode="ClearType">

            <!-- 映像レイヤ(ズーム/パン適用) -->
            <Canvas x:Name="ImageLayer">
                <Image x:Name="CameraImage"
                       Source="{Binding CurrentFrame}"
                       RenderOptions.BitmapScalingMode="NearestNeighbor"
                       Stretch="Uniform"/>
            </Canvas>

            <!-- ROIレイヤ(任意/画像に追従させる。今後実装予定。) -->
            <Canvas x:Name="RoiLayer" IsHitTestVisible="False">
            </Canvas>

            <!-- HUDレイヤ(ズーム非追従・画面固定) -->
            <Grid x:Name="HudLayer" IsHitTestVisible="False">
                <!-- 左上HUDボックス -->
                <Border Background="#66000000" CornerRadius="6" Padding="8" Margin="8"
                HorizontalAlignment="Left" VerticalAlignment="Top">
                    <StackPanel>
                        <TextBlock Text="{Binding FpsText}"      Foreground="White" FontSize="14"/>
                        <TextBlock Text="{Binding ExposureText}" Foreground="White" FontSize="12"/>
                        <TextBlock Text="{Binding GainText}"     Foreground="White" FontSize="12"/>
                    </StackPanel>
                </Border>

                <!-- ここにHUD要素を足していく -->
            </Grid>
        </Grid>
    </Grid>
</Window>
NearestNeighbor は画素忠実表示向け。見栄え優先なら HighQuality に。
HUDは IsHitTestVisible="False" でマウス操作を奪わないようにします。
ViewModel:FPS間引き+露光/ゲインのHUD更新
前回記事(WPFでBaslerカメラのライブビューを実装する)の内容に以下の機能を追加していきます。
- 連続取得(
ImageGrabbed)のたびに 映像更新 と HUD更新 を行います。 - FPSは毎フレーム計算しつつ 約10HzでUI更新 に間引きします。
Connect、Disconnectは省略します。こちらは以前の記事(WPFアプリでBaslerカメラの静止画を表示する)を参考にしてください。
using Basler.Pylon;
using BaslerSamples;
using Common;
using System;
using System.Diagnostics;
using System.Threading;
using System.Threading.Tasks;
using System.Windows;
using System.Windows.Controls;
using System.Windows.Input;
using System.Windows.Media;
using System.Windows.Media.Imaging;
using System.Windows.Threading;
using Application = System.Windows.Application;

namespace BaslerGUISample.ViewModels
{
    public class MainViewModel : BindableBase
    {
        BaslerCameraSample _cameraService = new BaslerCameraSample();
        // 表示に必要なフィールドを追加
        private readonly Stopwatch _fpsSw = new();
        private int _frameCount;
        private long _lastHudUpdateMs;

        // カメラの接続状態を示します。
        private bool _isConnected;
        public bool IsConnected
        {
            get => _isConnected;
            set
            {
                SetProperty(ref _isConnected, value);
            }
        }

        // カメラが画像を連続取得中かどうかを示します。
        private bool _isGrabbing;
        public bool IsGrabbing
        {
            get => _isGrabbing;
            set => SetProperty(ref _isGrabbing, value);
        }

        // 画面表示
        private ImageSource? _currentFrame;
        public ImageSource? CurrentFrame { get => _currentFrame; set => SetProperty(ref _currentFrame, value); }

        // HUDテキスト
        public string FpsText
        {
            get => _fpsText;
            private set => SetProperty(ref _fpsText, value);
        }
        public string ExposureText
        {
            get => _expText;
            private set => SetProperty(ref _expText, value);
        }
        public string GainText
        {
            get => _gainText;
            private set => SetProperty(ref _gainText, value);
        }
        private string _fpsText = "FPS: --.-";
        private string _expText = "Exposure: -- μs";
        private string _gainText = "Gain: -- dB";

        // コマンド(実装はお好みのDelegateCommand/RelayCommandで)
        // 変更するコマンド以外は省略します。Connect, Disconnectは以前の記事[WPFアプリでBaslerカメラの静止画を表示する](https://qiita.com/MilleVision/items/2ba235c7ff3478b83610)を参照ください。
        public DelegateCommand StartCommand      { get; }
        public DelegateCommand StopCommand       { get; }

        public MainViewModel()
        {
            StartCommand = new DelegateCommand(Start, () => IsConnected && !IsGrabbing);
            StopCommand = new DelegateCommand(Stop, () => IsConnected && IsGrabbing);
        }

        public void Start()
        {
            if (IsConnected == false) return;

            // イベント購読(重複防止のため一度外す)
            _cameraService.RemoveImageGrabbedEventHandler(OnImageGrabbed);
            _cameraService.AddImageGrabbedEventHandler(OnImageGrabbed);

            _cameraService.StartLive();
            IsGrabbing = _cameraService.IsGrabbing;

            // HUD更新用の初期化
            _fpsSw.Restart();
            _lastHudUpdateMs = 0;
            Interlocked.Exchange(ref _frameCount, 0);
        }

        public void Stop()
        {
            if (_cameraService.IsConnected == false) return;
            _cameraService.StopGrabbing();
            _cameraService.RemoveImageGrabbedEventHandler(OnImageGrabbed);
            IsGrabbing = _cameraService.IsGrabbing;
        }

        private int _updating; // UI過負荷対策(1フレーム処理中は次を捨てる)

        /// <summary>
        /// フレーム受信時の処理を行います。
        /// </summary>
        /// <param name="sender"></param>
        /// <param name="frame"></param>
        private async void OnImageGrabbed(object? sender, ImageGrabbedEventArgs e)
        {
            IsGrabbing = _cameraService.IsGrabbing;

            // UI過負荷対策(フレーム処理中は次を捨てる)
            if (Interlocked.Exchange(ref _updating, 1) == 1) return;
            try
            {
                using IGrabResult result = e.GrabResult.Clone();

                // 映像更新(UIスレッドに切り替え)
                await Application.Current.Dispatcher.InvokeAsync(() =>
                {
                    var frame = BaslerCameraSample.ConvertGrabResultToBitmap(result);
                    CurrentFrame = frame;
                });

                // フレーム数加算
                Interlocked.Increment(ref _frameCount);

                // HUD更新(~10Hz)
                var nowMs = _fpsSw.ElapsedMilliseconds;
                if (nowMs - _lastHudUpdateMs >= 100)
                {
                    int count = Interlocked.Exchange(ref _frameCount, 0);
                    double fps = count * 1000.0 / Math.Max(1, nowMs - _lastHudUpdateMs);
                    _lastHudUpdateMs = nowMs;

                    // 露光/ゲインの取得(機種差に配慮して例外握りつぶし)
                    string expText = _expText, gainText = _gainText;
                    try
                    {
                        double exp = _cameraService.GetExposureTime();
                        expText = double.IsNaN(exp) ? "Exposure: -- μs" : $"Exposure: {exp:0} μs";
                    }
                    catch { /* 未対応ならそのまま */ }
                    try
                    {
                        // Gain がない機種は GainRawで取得
                        double gain = _cameraService.GetGainRaw();
                        // Gainに対応している場合はdBと単位を表示
                        //gainText = double.IsNaN(gainDb) ? "Gain: -- dB" : $"Gain: {gainDb:0.0} dB";
                        gainText = double.IsNaN(gain) ? "Gain: --" : $"Gain: {gain:0.0}";
                    }
                    catch { /* 未対応ならそのまま */ }

                    Application.Current?.Dispatcher.Invoke(() =>
                    {
                        FpsText = $"FPS: {fps:0.0}";
                        ExposureText = expText;
                        GainText = gainText;
                    });
                }
            }
            catch (InvalidOperationException ex)
            {
                MessageBox.Show($"Failed to grab. Error: {ex.Message}");
            }
            catch (TaskCanceledException)
            {
                // ライブ中にアプリが終了すると例外がでる。
            }
            finally
            {
                Interlocked.Exchange(ref _updating, 0);
            }
        }
    }
}
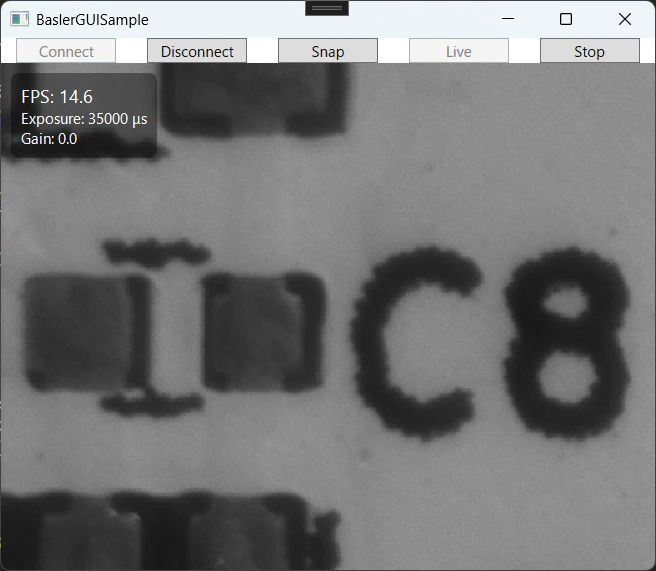
実行例
映像の左上に情報が出ています。
ライブビューだとFPSの値が刻々と変わって面白いです。皆様の工夫でもっとかっこよくしてください。ドラッグで動かせるようにするのも面白いかもしれません。
よくあるハマりどころ & 対策
-
文字がにじむ/揺れる → HUDを別レイヤにしてズーム非追従。
UseLayoutRounding/ SnapsToDevicePixels/ TextRenderingModeを有効化。 - UIが重い → 映像更新は短く、HUD更新を 10Hz程度に間引き。保存や解析は別スレッドへ。
-
イベント二重登録 →
Start前に-=→+=で購読し、Stop/Disconnectで確実に解除。
まとめ
- 二層レイアウトで、ズーム/パンに強く、文字がにじまないHUDを実装
- FPS・露光・ゲインをHUDに表示(FPSは10Hz更新)
- ROIレイヤやHUD込み保存(
RenderTargetBitmap)に発展可能な骨組み
今後の実装予定
- マウスホイールでズーム/パン
-
HUD込みキャプチャ(
RenderTargetBitmap)と保存処理 - ピクセル値表示、ROIドラッグ編集 への拡張
👨💻 筆者について
@MilleVision
産業用カメラ・画像処理システムの開発に関する情報を発信中。
pylon SDK × C# の活用シリーズを連載しています。
🛠 サンプルコード完全版のご案内
Qiita記事のサンプルをまとめた C#プロジェクト(単体テスト付き) を BOOTH で配布しています。
本記事で省略した BindableBase や DelegateCommand の実装も同梱。
- 撮影・露光・ゲイン・フレームレート・ROI・イベント駆動撮影など主要機能を網羅
- WPFへの実装もフォロー
- 単体テスト同梱で動作確認や学習がスムーズ
- 記事更新に合わせてアップデート予定