WPFでBaslerカメラのライブビューを実装する【pylon SDK / C# / .NET 8】
前回記事 (WPFアプリでBaslerカメラの静止画を表示する)で、カメラ画像を1枚撮影してImageコントロールに表示させてみました。
今回は、WPFの画面にカメラの映像をライブ表示してみます。
ライブ表示はイベント駆動でフレームを受け取り、BitmapSource に変換して Image に表示します。
使用環境 / 前提
- Basler pylon Camera Software Suite(
Basler.Pylonを参照済み) - .NET 8 / WPF(Windowsデスクトップ)
- カメラ:acA2500-14gm(Mono8想定)
※カラー機の場合はBGR8packedなどに合わせて変換が必要です
ゴール
-
Connect / Start / Stop / Disconnectのボタン操作でライブプレビュー -
ImageにバインドしたBitmapSourceを更新して滑らかに表示 - UIスレッドを塞がない安全な更新(Dispatcher経由)
画面(XAML)
ライブ表示を開始するLiveボタンと、ライブ表示を停止するStopボタンを追加します。
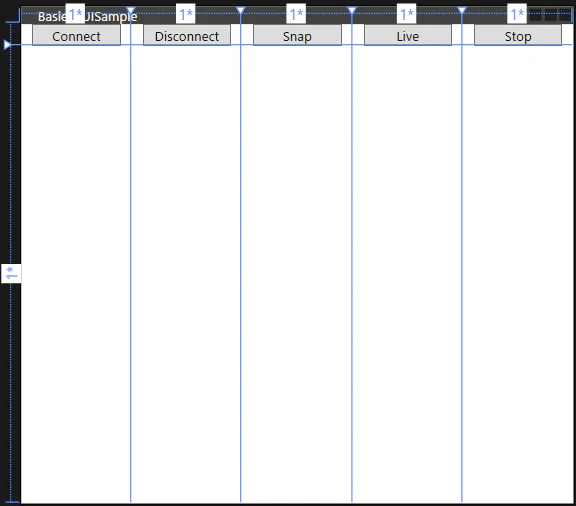
<Window x:Class="BaslerGUISample.MainWindow"
        xmlns="http://schemas.microsoft.com/winfx/2006/xaml/presentation"
        xmlns:x="http://schemas.microsoft.com/winfx/2006/xaml"
        xmlns:d="http://schemas.microsoft.com/expression/blend/2008"
        xmlns:mc="http://schemas.openxmlformats.org/markup-compatibility/2006"
        xmlns:local="clr-namespace:BaslerGUISample"
        mc:Ignorable="d"
        Title="BaslerGUISample" Height="450" Width="500" Closing="Window_Closing">
    <Grid>
        <Grid.RowDefinitions>
            <RowDefinition Height="Auto"/>
            <RowDefinition Height="*"/>
        </Grid.RowDefinitions>
        <Grid.ColumnDefinitions>
            <ColumnDefinition Width="*"/>
            <ColumnDefinition Width="*"/>
            <ColumnDefinition Width="*"/>
            <ColumnDefinition Width="*"/>
            <ColumnDefinition Width="*"/>
        </Grid.ColumnDefinitions>
        <Grid Grid.Row="0" Grid.Column="0">
            <Button Content="Connect" Width="80" Margin="4,0" Command="{Binding ConnectCommand}"/>
        </Grid>
        <Grid Grid.Row="0" Grid.Column="1">
            <Button Content="Disconnect" Width="80" Margin="4,0" Command="{Binding DisconnectCommand}"/>
        </Grid>
        <Grid Grid.Row="0" Grid.Column="2">
            <Button Content="Snap" Width="80" Margin="4,0" Command="{Binding SnapCommand}"/>
        </Grid>
        <Grid Grid.Row="0" Grid.Column="3">
            <Button Content="Live" Width="80" Margin="4,0" Command="{Binding StartCommand}"/>
        </Grid>
        <Grid Grid.Row="0" Grid.Column="4">
            <Button Content="Stop" Width="80" Margin="4,0" Command="{Binding StopCommand}"/>
        </Grid>
        <Grid Grid.Row="1" Grid.Column="0" Grid.ColumnSpan="5">
            <Image x:Name="PreviewImage" Source="{Binding CurrentFrame}" Stretch="Uniform"/>
        </Grid>
    </Grid>
</Window>
コードビハインドは前回と同様です。
モデル側(BaslerCameraSample)
これまでの実装で使ってきたStartGrabbing()を用いると、どんどんConcurrentQueue<(DateTime, IGrabResult)> _bufferedImageQueueに画像がたまって処理が複雑になってしまいます。(Basler pylon SDKで連続撮影(バーストキャプチャ)をC#で実装する)
そこでシンプルな連続撮影開始メソッドを用意しておきます。
/// <summary>
/// ストリーミングを開始します。_bufferedImageQueueに画像を追加せず、Live表示に特化させています。
/// </summary>
public void StartLive()
{
    if (Camera == null || !IsConnected)
        throw new InvalidOperationException("Camera is not connected.");

    if (IsGrabbing)
        throw new InvalidOperationException("Camera is already grabbing.");

    // 画像取得モードを連続モードに設定
    SetPLCameraParameter(PLCamera.AcquisitionMode, PLCamera.AcquisitionMode.Continuous);
    Camera.StreamGrabber.Start(GrabStrategy.OneByOne, GrabLoop.ProvidedByStreamGrabber);
}
また、フレーム受信時のイベントハンドラを登録・解除できるようにしておきます。
このようなメソッドを用意しておくことで、拡張性が増して変更に強くなります。
/// <summary>
/// 画像が取得されたときに呼び出されるイベントハンドラを追加します。
/// </summary>
/// <param name="handler"></param>
public void AddImageGrabbedEventHandler(EventHandler<ImageGrabbedEventArgs> handler)
{
    if (Camera == null)
        return;
    Camera!.StreamGrabber!.ImageGrabbed += handler;
}

public void RemoveImageGrabbedEventHandler(EventHandler<ImageGrabbedEventArgs> handler)
{
    if (Camera == null)
        return;
    Camera.StreamGrabber!.ImageGrabbed -= handler;
}
ViewModel(イベント駆動 → WriteableBitmap 反映)
これまでの BaslerCameraSample を利用しつつ、
ImageGrabbed で受け取ったフレームをBitmapSourceに変換してImageに表示します。
パフォーマンスが気になる場合は毎回BitmapSourceを生成するのではなく、WriteableBitmapを使用する方がいいです。
using Basler.Pylon; // 今回はImageGrabbedEventArgsを利用するため追加。
using BaslerSamples; // これまで作ってきたカメラ制御ライブラリ
// 筆者は`BindableBase`、`DelegateCommand`を`Common`で実装しています。
// お使いの環境に合わせて実装してください。
// using Common;
using System;
using System.ComponentModel;
using System.Windows;
using System.Windows.Input;
using System.Windows.Media.Imaging;
using Application = System.Windows.Application;

namespace BaslerGUISample.ViewModels
{
    public partial class MainViewModel : BindableBase
    {
        private readonly BaslerCameraSample _cameraService = new();

        public MainViewModel()
        {
            // ConnectCommand, DisconnectCommand, SnapCommandは前回記事と同様のため省略
            StartCommand = new DelegateCommand(Start, () => IsConnected && !IsGrabbing);
            StopCommand = new DelegateCommand(Stop, () => IsConnected && IsGrabbing);
        }

        private bool _isConnected;
        public bool IsConnected
        {
            get => _isConnected;
            set
            {
                SetProperty(ref _isConnected, value);
            }
        }

        /// <summary>
        /// カメラが画像を連続取得中かどうかを示します。
        /// </summary>
        private bool _isGrabbing;
        public bool IsGrabbing
        {
            get => _isGrabbing;
            set => SetProperty(ref _isGrabbing, value);
        }

        private BitmapSource? _currentFrame;
        public BitmapSource? CurrentFrame
        {
            get => _currentFrame;
            set => SetProperty(ref _currentFrame, value);
        }

        public void Start()
        {
            if (IsConnected == false) return;

            // イベント登録(重複防止のため一度外す)
            _cameraService.RemoveImageGrabbedEventHandler(OnImageGrabbed);
            _cameraService.AddImageGrabbedEventHandler(OnImageGrabbed);

            _cameraService.StartLive();
            IsGrabbing = _cameraService.IsGrabbing;
        }

        public void Stop()
        {
            if (_cameraService.IsConnected == false) return;
            _cameraService.StopGrabbing();
            // イベント解除
            _cameraService.RemoveImageGrabbedEventHandler(OnImageGrabbed);
            IsGrabbing = _cameraService.IsGrabbing;
        }

        /// <summary>
        /// フレーム受信時の処理を行います。
        /// </summary>
        /// <param name="sender"></param>
        /// <param name="frame"></param>
        private async void OnImageGrabbed(object? sender, ImageGrabbedEventArgs e)
        {
            IsGrabbing = _cameraService.IsGrabbing;
            // どこでGrabResultがDisposeされるかわからないので、Cloneしておく。
            using IGrabResult result = e.GrabResult.Clone();
            try
            {
                // かならずUIスレッドで画像を更新する。
                await Application.Current.Dispatcher.InvokeAsync(() =>
                {
                    var frame = BaslerCameraSample.ConvertGrabResultToBitmap(result);
                    CurrentFrame = frame;
                });
            }
            catch (InvalidOperationException ex)
            {
                MessageBox.Show($"Failed to grab. Error: {ex.Message}");
            }
        }
    }
}
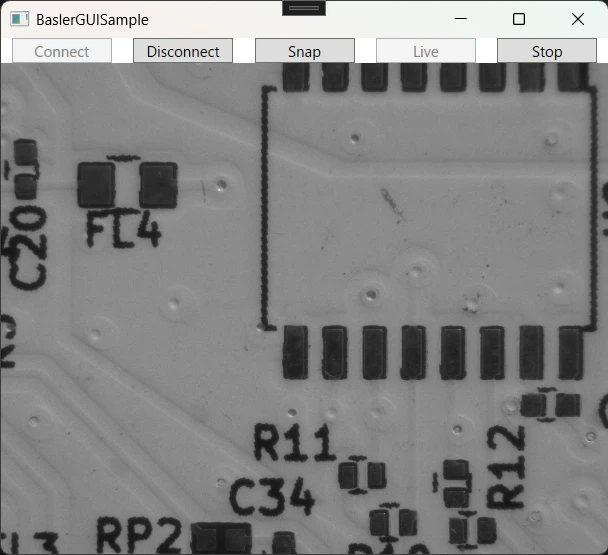
実行例
Connectボタンを押してカメラに接続し、Liveボタンを押すと、連続撮影の様子が確認できます。Stopボタンを押すと、停止します。
よくあるハマりどころ & 対策
-
カラー機のときに色が崩れる
PixelType.BGR8packed等に合わせてOutputPixelFormatとPixelFormatsを揃える(WriteableBitmapならPixelFormats.Bgr24) -
イベントが二重登録される
Start()前に一度-=で外してから+=で登録 - カメラ側のフレームレートに描画がついていけない
カメラ側が高フレームレートのとき、すべて描画しなくてもいいことは多いです。(裏で重要な処理が走っている。)その場合、Monitor.TryEnterやInterlocked.Exchangeを追加して排他処理にすることで、フレームを間引くことができます
まとめ
- pylon のイベント駆動で、滑らかなライブビューを実装できた
- UI 更新は Dispatcher 経由で安全に行う
- ROI や解像度変更にも耐える作り
今回扱った連続撮影とソフトウェアトリガーを組み合わせるだけでも、実験担当者から喜ばれることは多いです。
新しいカメラを買ったら早めにGUIにしてあげるのがいいと思います。
次回予告(HUD編)
今回のライブビューに、FPS・露光・ゲインなどの表示を重ねます。
👨💻 筆者について
@MilleVision
産業用カメラ・画像処理システムの開発に関する情報を発信中。
pylon SDK × C# の活用シリーズを連載しています。
🛠 サンプルコード完全版のご案内
Qiita記事のサンプルをまとめた C#プロジェクト(単体テスト付き) を BOOTH で配布しています。
本記事で省略した BindableBase や DelegateCommand の実装も同梱。
- 撮影・露光・ゲイン・フレームレート・ROI・イベント駆動撮影など主要機能を網羅
- 単体テスト同梱で動作確認や学習がスムーズ
- 記事更新に合わせてアップデート予定