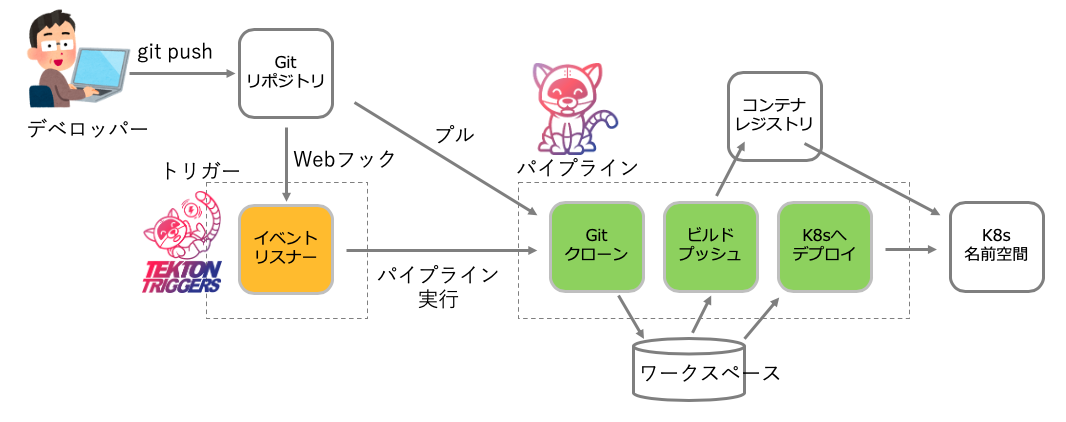
この記事は、TektonパイプラインでコンテナをビルドしてK8sクラスタへデプロイする方法の続きで、次図の左上のデベロッパーが git push するだけで、右端のKubernetesクラスタの環境にデプロイされるまでの途中工程を Tekton Trigger と Pipeline を組み合わせて実現する。前回の記事は、図後半のパイプラインの構築したものであった。今回は前半のGitリポジトリのWebhookを受けて、パイプラインを実行する部分を重点に書いていく。
環境設定
どのクラウド上でもTektonは動作するので、下記 kubectl get node でワーカーノードがリストされた状態から、記事の内容は始める。GitHubからのWebHookを受ける部分で、イングレスコントローラに割り当てられたドメインとシークレットを参照するために、IBM Cloud 固有のコマンドを実行する部分がるが、それ以外はどのクラウドでも同じように利用できる。
$ kubectl get node
NAME            STATUS   ROLES    AGE     VERSION
10.192.31.215   Ready    <none>   10m     v1.17.7+IKS
10.192.31.223   Ready    <none>   9m59s   v1.17.7+IKS
10.192.31.228   Ready    <none>   9m34s   v1.17.7+IKS
Tektonは、次の3つのマニフェストでインストールが完了する。
kubectl apply -f https://storage.googleapis.com/tekton-releases/pipeline/latest/release.yaml
kubectl apply -f https://storage.googleapis.com/tekton-releases/triggers/latest/release.yaml
kubectl apply -f https://github.com/tektoncd/dashboard/releases/latest/download/tekton-dashboard-release.yaml
上記の1行目は Tekton パイプライン、2行目はトリガー、3行目はダッシュボードだ。ダッシュボードは必須ではないが、途中で止まった場合の原因追求のためには重宝する。
これらを適用すると、名前空間 teketon-pipelines が作られる。
å$ kubectl get ns
NAME               STATUS   AGE
default            Active   33m
ibm-cert-store     Active   29m
ibm-operators      Active   29m
ibm-system         Active   31m
kube-node-lease    Active   33m
kube-public        Active   33m
kube-system        Active   33m
tekton-pipelines   Active   15s

$ kubectl get pod -n tekton-pipelines
NAME                                           READY   STATUS    RESTARTS   AGE
tekton-pipelines-controller-79876fd95c-knqdl   1/1     Running   0          5m20s
tekton-pipelines-webhook-5585867b79-9kzmx      1/1     Running   0          5m19s
tekton-triggers-controller-7796888967-ngw4x    1/1     Running   0          5m17s
tekton-triggers-webhook-68cb768d5c-hrcwz       1/1     Running   0          5m17s
tekton-dashboard-5dc769889-vp86s               1/1     Running   0          3m20s
利用した環境は、IBM Cloud Kubernetes Service を VPC 上で起動している。Kubernetes クラスタの起動と管理は IBM Cloud Schematices から Terraform を実行した。この部分については、別の機会に記事にしたい。
Tekton パイプラインとトリガー のマニフェスト
Tektonトリガーを動かすために必要なマニフェストをクローンする。
$ git clone -b plus-trigger https://github.com/takara9/tekton-pipeline-1 tp1
パイプラインを構築する部分と、トリガーを追加する部分の2部構成としている。
$ cd tp1
$ tree
.
├── README.md
├── pipeline
│   ├── README.md
│   ├── pipeline-build-and-deploy.yaml
│   ├── pipeline-sa-and-rbac.yaml
│   ├── pipeline-ws-pvc.yaml
│   ├── pipelinerun-apl.yaml
│   ├── setup_secret.sh
│   ├── task-deploy-using-kubectl.yaml
│   ├── task-git-clone.yaml
│   └── task-kaniko.yaml
└── trigger
    ├── README.md
    ├── rbac-trigger.yaml
    ├── rbac-webhook.yaml
    ├── secret-github.yaml.sample
    ├── task-ingress.yaml
    ├── task-webhook.yaml
    ├── taskrun-ingress.yaml.sample
    ├── taskrun-webhook.yaml.sample
    └── triggers.yaml.sample
専用の名前空間の作成
Tektonのトリガーやパイプラインを実行する専用の名前空間を作成する。
$ kubectl create ns cicd
$ kubectl config get-contexts | grep `kubectl config current-context`
上記で、コンフィグファイルに登録されたクラスタ名と認証情報が判るので、次のコマンドで、コンテキストを作成する。
そして、コンテキストを cicd に切り替え、確認のために、コンテキストをリストして確認する。
$ kubectl config set-context cicd --namespace=cicd --cluster=<CLUSTER> --user=<AUTHINFO>
$ kubectl config use-context cicd
$ kubectl config get-contexts
レジストリサービスのトークンをコピー
IBM クラウドの レジストリサービスへのアクセスのために、トークンを名前空間default から cicd へコピーする。そして、imagePullSecretsの値をall-icr-ioへ変更する。
$ kubectl get secret all-icr-io -n default -o yaml | sed 's/default/cicd/g' | kubectl create -n cicd -f -
$ kubectl patch -n cicd serviceaccount/default -p '{"imagePullSecrets":[{"name": "all-icr-io"}]}'
サービスアカウントを表示して、Image pull secrets の値に、コピーしたシークレット名がセットされていることを確認する。
$ kubectl describe sa default
Name:                default
Namespace:           cicd
Labels:              <none>
Annotations:         <none>
Image pull secrets:  all-icr-io
Mountable secrets:   default-token-fwz84
Tokens:              default-token-fwz84
Events:              <none>
Tektonパイプラインの設定
この部分は説明は、TektonパイプラインでコンテナをビルドしてK8sクラスタへデプロイする方法 で行ったので省略する。 対象となるプログラム言語や実施したいタスクの内容によって、タスクやパイプラインは作り変えると良い。
$ cd pipeline
$ kubectl apply -f task-git-clone.yaml
$ kubectl apply -f task-kaniko.yaml
$ kubectl apply -f task-deploy-using-kubectl.yaml
$ kubectl apply -f pipeline-build-and-deploy.yaml
レジストリへのアクセス権の設定
タスクの中から、レジストリへコンテナイメージを登録できるように、シークレットを追加する。このAPIキーの取得方法は、前述の記事にあるので省略する。
$ kubectl create secret generic ibm-registry-secret \
--type="kubernetes.io/basic-auth" \
--from-literal=username=iamapikey \
--from-literal=password=OaO**************************************rsd

$ kubectl annotate secret ibm-registry-secret tekton.dev/docker-0=jp.icr.io
以下で、シークレットができたことを確認できる。
$ kubectl get secret
NAME                  TYPE                                  DATA   AGE
all-icr-io            kubernetes.io/dockerconfigjson        1      4m9s
default-token-fwz84   kubernetes.io/service-account-token   3      4m50s
ibm-registry-secret   kubernetes.io/basic-auth              2      26s
ワークスペース用ストレージとサービスアカウント
ワークスペース用のストレージ作成、そして、サービスアカウントと権限の付与
$ kubectl apply -f pipeline-ws-pvc.yaml
$ kubectl apply -f pipeline-sa-and-rbac.yaml
パイプラインのテスト
前述の図の後半部分をマニュアルで実行してテストする。
$ kubectl apply -f pipelinerun-apl.yaml
これでタスクの進捗状況が確認できる。
$ kubectl get pod -w
このコマンドで正常終了を確認できたら、パイプラインの構築は成功だ。
$ kubectl get pipelinerun
トリガーの構築
トリガーのディレクトリへ移動して、一部のサンプルのマニフェストを編集してトリガーの設定を進めていく。ここからは、前述の記事にない内容なので、解説も加えながら進める。
$ cd ../trigger/
サービスアカウントとRBAC設定
カスタムリソースへのアクセス権を設定するために、サービスアカウント tekton-triggers-admin を作成して、アクセス権限を付与する。また、サービスアカウント tekton-triggers-createwebhook に対しても同様に実施する。
$ kubectl apply -f rbac-trigger.yaml
$ kubectl apply -f rbac-webhook.yaml
tekton-triggers-adminは イベントリスナーの特権を設定、tekton-triggers-createwebhookは イングレス と WebHookイベントを受けるための特権を設定する。
トリガーの設定
triggers.yaml.sample の末尾 .sample を無くす様にリネームして編集する。このtriggers.yamlが、git push した後の動作を決定するマニフェストであり、トリガー設定のキーとなるファイルである。
- (1) パイプラインの設定 この部分的は、前述の pipelinerun-apl.yaml と同じ内容を展開する。つまり、パイプラインで設定した内容にパラメータを与えて実行する。ここには複数のパイプライン実行を定義できる。
- (2) ソースコードの GitHub URLを設定する。 GitLabを使う場合は、タスクから変更が必要なので注意。ここでは、https://github.com/takara9/web-nginx を対象として設定する。
- (3) gitのブランチ名を設定する。
- (4) ビルドコンテキストは、 "docker build --tag test:1.0 . "として Dockerfileの場所を指定するのと同じ
- (5) デプロイ用マニフェストで、ソースコードリポジトリに設定されている必要がある。イメージの名前をマニフェストで受けるために、Tekton専用のマニフェストにする必要がある。
- (6) イメージのリポジトリURL
- (7) イメージのタグであり、必ずデプロイが実行される様に、タグが変わる様に $(uid) を付与してる。
apiVersion: triggers.tekton.dev/v1alpha1
kind: TriggerTemplate
metadata:
  name: cicd-triggertemplate
spec:
  params:
    - name: gitrevision
      description: The git revision
      default: master
    - name: gitrepositoryurl
      description: The git repository url
    - name: namespace
      description: The namespace to create the resources
  resourcetemplates:
    - apiVersion: tekton.dev/v1beta1 #(1) パイプラインの設定
      kind: PipelineRun
      metadata:
        name: webapl-pipeline-run-$(uid)
      spec:
        pipelineRef:
          name: build-and-deploy-pipeline
        params:
          - name: gitUrl #(2) ソースコード
            value: https://github.com/takara9/web-nginx
          - name: gitRevision #(3) ブランチ
            value: master
          - name: pathToContext #(4) ビルドコンテキスト
            value: .
          - name: pathToYamlFile #(5) デプロイ用のマニフェスト
            value: "kubernetes/web-nginx.yaml" # Gitに実在するファイル
          - name: imageUrl #(6) イメージのリポジトリURL
            value: jp.icr.io/takara/web-nginx  # イメージリポジトリ
          - name: imageTag #(7) イメージのタグ
            value: 1.1-$(uid)
        serviceAccountName: pipeline-account
        workspaces:
          - name: git-source
            persistentVolumeClaim:
              claimName: workspace-source-pvc
---
apiVersion: triggers.tekton.dev/v1alpha1
kind: TriggerBinding
metadata:
  name: cicd-pipelinebinding
spec:
  params:
    - name: gitrevision
      value: $(body.head_commit.id)
    - name: namespace
      value: cicd      # 名前空間の設定は必須
    - name: gitrepositoryurl
      value: "https://github.com/$(body.repository.full_name)"
---
apiVersion: triggers.tekton.dev/v1alpha1
kind: EventListener
metadata:
  name: cicd-listener
  namespace: cicd      # 名前空間の設定は必須
spec:
  serviceAccountName: tekton-triggers-admin
  triggers:
    - bindings:
      - ref: cicd-pipelinebinding
      template:
        name: cicd-triggertemplate
トリガーを設定する。
$ kubectl apply -f triggers.yaml
タスクの設定
KubernetesクラスタのAPIオブジェクト Ingress を設定するタスクを設定して、次にWebhookに応対するポッドを起動するためのタスクを設定する。
$ kubectl apply -f task-ingress.yaml
$ kubectl apply -f task-webhook.yaml
イングレスコントローラーの情報取得
IBM Cloud では Kubernetesクラスタを起動することによって、Ingressコントローラも起動しており、次のコマンドで、URLアドレス、TLS証明書のシークレットの情報を表示できる。この値を taskrun-ingress.yamlのパラメータとして設定する。
$ ic ks cluster get -c k8s-vpc-jp
<中略>
Ingress サブドメイン:     k8s-vpc-jp-dd3a245ee37e0f22836f16bc6000a054-0000.jp-tok.containers.appdomain.cloud
Ingress の秘密:          k8s-vpc-jp-dd3a245ee37e0f22836f16bc6000a054-0000
<中略>
イングレスの起動
イングレスタスクを実行することで、数分すると、イングレスを起動してインターネットからアクセスを受け付ける様になる。
$ kubectl apply -f taskrun-ingress.yaml

$ kubectl get ing
NAME               HOSTS                                                                            \
           ADDRESS   PORTS     AGE
el-cicd-listener   k8s-classic-tok04-dd3a245ee37e0f22836f16bc6000a054-0000.jp-tok.containers.appdoma\
in.cloud   128.168.66.131   80, 443   0s
GitHubのトークン設定
GitHubトークン生成方法を参考にトークンを取得する。ここで取得したトークンと、TektonとGitHubで共有する文字列を収めたシークレットを作成する。
$ kubectl apply -f secret-github.yaml
自身のGitHubのリポジトリで、Setting -> Webhooks で Add Webhook をクリックして、IngressのURLアドレスに、https://をつけてインプットする。そして、前述のシークレットに設定したシークレット文字列を設定する。
WebHookタスクの起動
GitHubから飛んでくるWebHookのアクセスに応対するタスクを起動して、準備完了
kubectl apply -f taskrun-webhook.yaml
これで GitHub からの Webhookを受け取りパイプラインを実行できる様になった。
テスト
パイプライン対象のリポジトリをクローンして、そのままコードの修正なしで、次のコマンドでプッシュしてWebhookを発動できる。
git clone https://github.com/takara9/web-nginx
cd web-nginx
git commit -a -m "build commit" --allow-empty && git push
結果の確認は、'kubectl get pod -w' でポッドの生成と終了を確認することで、タスクの進行を確認できる。
それから、以下をリストすることで、実行された pipelinerun の終了状態が確認できる。
$ kubectl get pipelinerun
NAME                        SUCCEEDED   REASON      STARTTIME   COMPLETIONTIME
webapl                      True        Succeeded   72m         68m
webapl-pipeline-run-qvpn8   True        Succeeded   7m14s       4m
パイプラインの実行ログを参照するには、`tkn pipelinerun logs ' を実行すると良い。
$ tkn pipelinerun logs webapl-pipeline-run-qvpn8 -L
[clone-repo : clone] + CHECKOUT_DIR=/workspace/output/.
[clone-repo : clone] + '[[' true '==' true ]]
[clone-repo : clone] + cleandir
[clone-repo : clone] + '[[' -d /workspace/output/. ]]
[clone-repo : clone] + rm -rf /workspace/output/./Dockerfile /workspace/output/./Jenkinsfile /workspace/output/./README.md /workspace/output/./html /workspace/output/./image-digest /workspace/output/./image-digested /workspace/output/./kubernetes /workspace/output/./nginx /workspace/output/./version
[clone-repo : clone] + rm -rf /workspace/output/./.git
[clone-repo : clone] + rm -rf '/workspace/output/./..?*'
[clone-repo : clone] + test -z
[clone-repo : clone] + test -z
[clone-repo : clone] + test -z
[clone-repo : clone] + /ko-app/git-init -url https://github.com/takara9/web-nginx -revision master -refspec  -path /workspace/output/. '-sslVerify=true' '-submodules=true' -depth 1
[clone-repo : clone] {"level":"info","ts":1594303030.1211662,"caller":"git/git.go:136","msg":"Successfully cloned https://github.com/takara9/web-nginx @ 81c95c5488548f3e1521e559a0322c79e48ca29d (grafted, HEAD, origin/master) in path /workspace/output/."}
[clone-repo : clone] {"level":"info","ts":1594303030.153868,"caller":"git/git.go:177","msg":"Successfully initialized and updated submodules in path /workspace/output/."}
[clone-repo : clone] + cd /workspace/output/.
[clone-repo : clone] + git rev-parse HEAD
[clone-repo : clone] + tr -d '\n'
[clone-repo : clone] + RESULT_SHA=81c95c5488548f3e1521e559a0322c79e48ca29d
[clone-repo : clone] + EXIT_CODE=0
[clone-repo : clone] + '[' 0 '!=' 0 ]
[clone-repo : clone] + echo -n 81c95c5488548f3e1521e559a0322c79e48ca29d

[source-to-image : build-and-push] E0709 13:58:12.071966      15 aws_credentials.go:77] while getting AWS credentials NoCredentialProviders: no valid providers in chain. Deprecated.
[source-to-image : build-and-push] 	For verbose messaging see aws.Config.CredentialsChainVerboseErrors
[source-to-image : build-and-push] INFO[0041] Resolved base name nginx:latest to build
[source-to-image : build-and-push] INFO[0041] Retrieving image manifest nginx:latest
[source-to-image : build-and-push] INFO[0043] Retrieving image manifest nginx:latest
[source-to-image : build-and-push] INFO[0047] Retrieving image manifest nginx:latest
[source-to-image : build-and-push] INFO[0049] Retrieving image manifest nginx:latest
[source-to-image : build-and-push] INFO[0052] Built cross stage deps: map[0:[/html /etc/nginx/conf.d/default.conf]]
[source-to-image : build-and-push] INFO[0052] Retrieving image manifest nginx:latest
[source-to-image : build-and-push] INFO[0054] Retrieving image manifest nginx:latest
[source-to-image : build-and-push] INFO[0057] Executing 0 build triggers
[source-to-image : build-and-push] INFO[0057] Unpacking rootfs as cmd COPY ./html /html requires it.
[source-to-image : build-and-push] INFO[0060] COPY ./html /html
[source-to-image : build-and-push] INFO[0060] Taking snapshot of files...
[source-to-image : build-and-push] INFO[0060] COPY ./nginx/default.conf /etc/nginx/conf.d/default.conf
[source-to-image : build-and-push] INFO[0060] Taking snapshot of files...
[source-to-image : build-and-push] INFO[0060] Saving file html for later use
[source-to-image : build-and-push] INFO[0060] Saving file etc/nginx/conf.d/default.conf for later use
[source-to-image : build-and-push] INFO[0060] Deleting filesystem...
[source-to-image : build-and-push] INFO[0060] Retrieving image manifest nginx:latest
[source-to-image : build-and-push] INFO[0063] Retrieving image manifest nginx:latest
[source-to-image : build-and-push] INFO[0065] Executing 0 build triggers
[source-to-image : build-and-push] INFO[0065] Unpacking rootfs as cmd COPY --from=build /html /usr/share/nginx/html requires it.
[source-to-image : build-and-push] INFO[0069] COPY --from=build /html /usr/share/nginx/html
[source-to-image : build-and-push] INFO[0069] Taking snapshot of files...
[source-to-image : build-and-push] INFO[0069] COPY --from=build /etc/nginx/conf.d/default.conf /etc/nginx/conf.d/default.conf
[source-to-image : build-and-push] INFO[0069] Taking snapshot of files...


[source-to-image : digest-to-results] + cat ./image-digested
[source-to-image : digest-to-results] + jq .[0].value -rj
[source-to-image : digest-to-results] + tee /tekton/results/IMAGE-DIGEST
[source-to-image : digest-to-results] sha256:05c633c93715016d1ecaafc337254801fa9b954bc711929d366b10215930bf87


[deploy-to-cluster : run-kubectl] deployment.apps/web-nginx configured
[deploy-to-cluster : run-kubectl] service/web-nginx unchanged
参考資料
[1] https://github.com/tektoncd/triggers
[2] https://developer.ibm.com/tutorials/tekton-triggers-101/
[3] OpenShift Pipelines (Tekton) を動かしてみた件 https://qiita.com/mamomamo/items/ba8e2476ca80e9f90b3d
[4] OpenShift Container Platform 4.4, OpenShift Pipeline, https://access.redhat.com/documentation/ja-jp/openshift_container_platform/4.4/html/pipelines/understanding-openshift-pipelines