本記事は、OpenShift Advent Calendar 2019 の3日目です。
はじめに
2019/6/20 に Developer Preview としてリリースされた Cloud Native な CI/CD パイプラインフレームワークである OpenShift Pipelines (Tekton) について紹介したいと思います。
Developer Preview とは、開発中の新機能を Developer 向けに公開して試用してもらうものであり、プロダクション環境での利用は想定しておらず、もちろんサポートも提供されておりません。また、開発中の新機能が成熟してくると、Technology Preview を経て GA (General Availablity) に昇格していきます。
OpenShift Pipelines (Tekton) は、本記事を書いている 2019/12 時点でも Developer Preview です。
OpenShift Pipelines (Tekton) とは
OpenShift Pipelines (Tekton) は、Kubernetes スタイルの CI/CD パイプラインフレームワークである Tekton をベースに開発されており、クラウドネイティブな CI/CD パイプラインを構築・管理することができます。
OpenShift ではこれまで Jenkins を用いた CI/CD パイプラインを提供してきました。Jenkins は CI ツールとして非常に人気がありますが、Kubernetes が登場する前から存在していることもあり、Kubernetes スタイルの CI/CD パイプラインフレームワークとして Tekton が開発されています。
ここで言っている Kubernetes スタイルとは、
・Kubernetes のマニフェストと非常に似たマニフェストでパイプラインを定義できること
・パイプライン内の各タスクがコンテナとして稼働すること
・サーバレスでパイプラインを実行できるため CI サーバを管理する必要がないこと
などの特徴を指しています。
また、OpenShift では Jenkins イメージの提供も引き続き予定しており、OpenShift Pipelines (Tekton) は Jenkins を置き換えるものではありません。OpenShift における CI/CD パイプラインの管理を簡素化し、OpenShift ユーザの利用体験を向上する目的で開発されています。
Tekton とは
Tekton とは、2019/3 に発足した Continuous Delivery Foundation がホストするプロジェクトの一つであり、サーバレスフレームワーク Knative のビルド機能 Knative Build から派生したプロジェクトです。Tekton の概要や各 Custom Resource の説明は、別記事で詳細に説明していますので以下のURLをご参照ください。
Kubernetes ネイティブな CI/CD パイプラインフレームワーク Tekton について調査してみた件
https://qiita.com/mamomamo/items/556857cbea785fcc9b17
また、Tekton を用いて CI/CD パイプラインを実行するためには、以下の複数の Custom Resource を定義する必要があります。
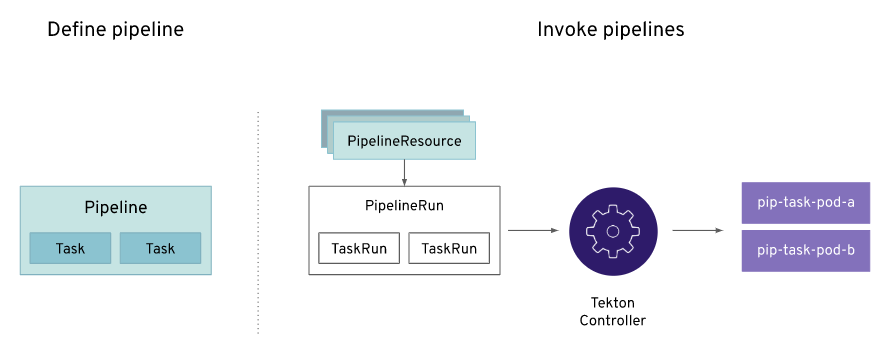
- Task: 最小の実行単位、複数の Step から構成された再利用可能なリソース
- Pipeline: 複数の Task から構成されたリソース
- PipelineResource: Task で利用するインプット/アウトプットを指定するリソース
- TaskRun: Task を実行するためのリソース
- PipelineRun: Pipeline を実行するためのリソース
OpenShift Pipelines (Tekton) を動かしてみた
ここからは実際に OpenShift Pipelines (Tekton) を動かしながら説明したいと考えています。
事前準備
OpenShift Pipelines (Tekton) を試すには、OpenShift 4 クラスタが必要です。また、GUI からパイプラインの構築・管理を行うこともできますが、Tekton CLI (tkn) ツールを以下のURLを参照してインストールします。
Tekton Pipelines cli
https://github.com/tektoncd/cli#getting-started
OpenShift Pipeline Operator インストール
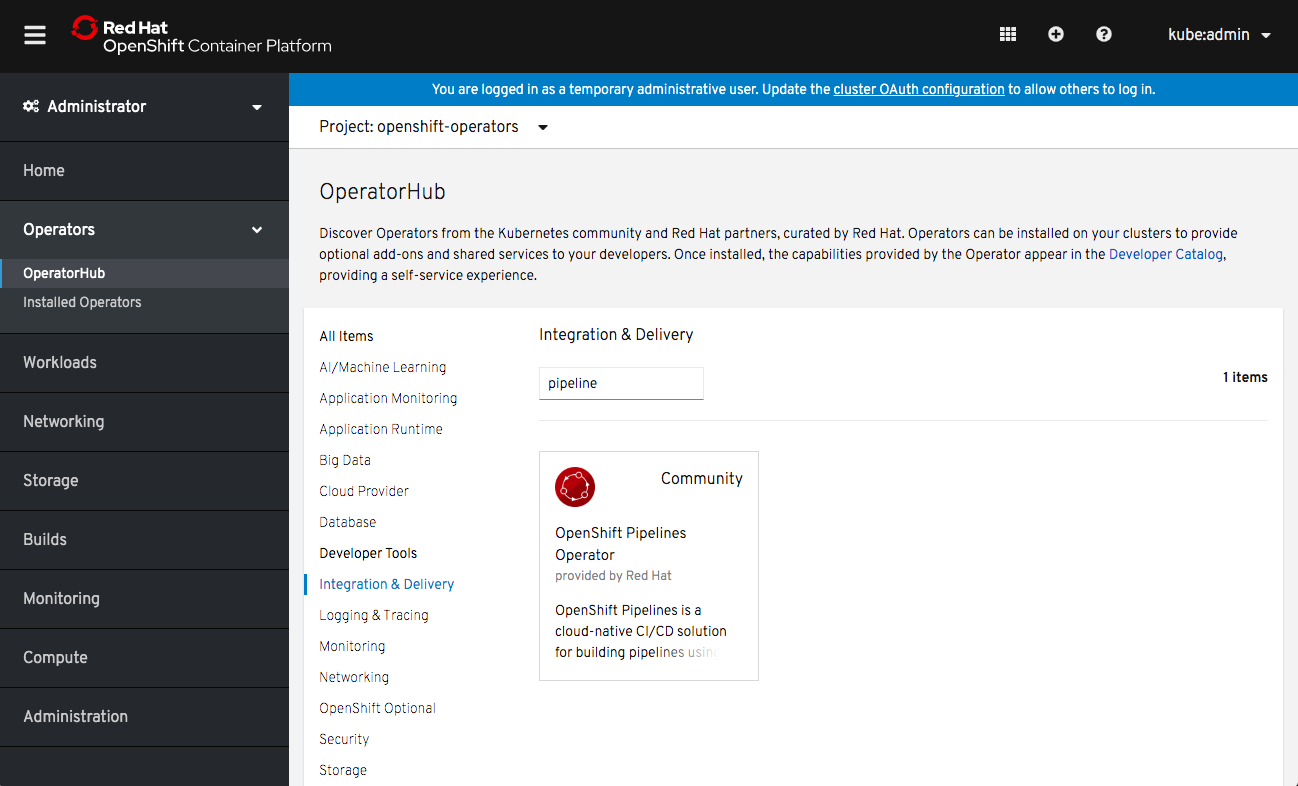
OpenShift Pipeline (Tekton) は、OpenShift OperatorHub から簡単にインストールすることができます。Web コンソールから Catalog > OperatorHub を選択し、"Integration & Delivery" カテゴリの中から "OpenShift Pipeline Operator" を選択します。
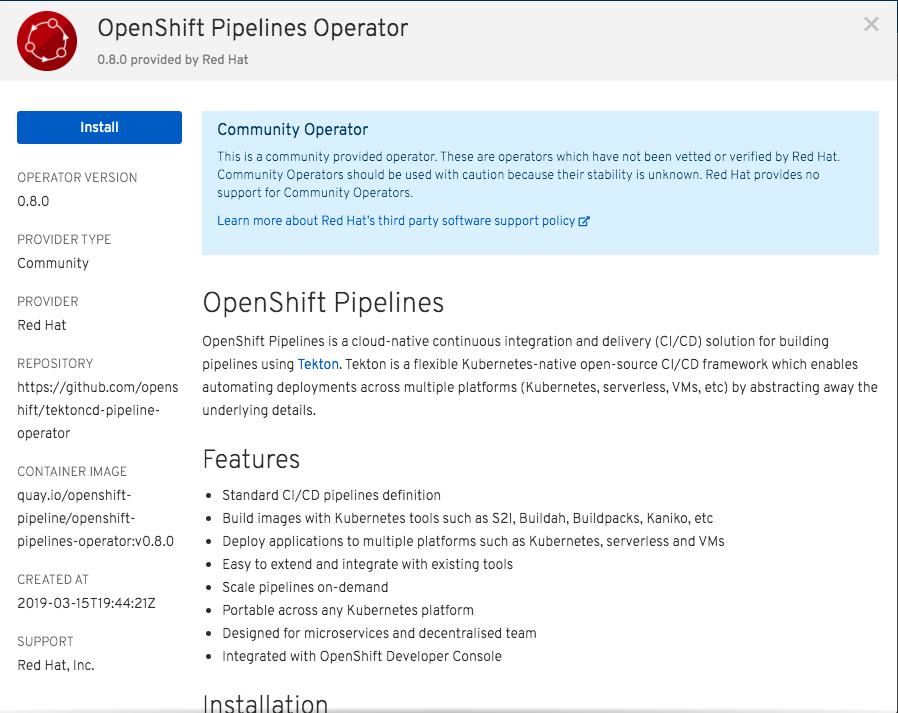
以下のような画面が表示されますので、"Install" ボタンを押下します。
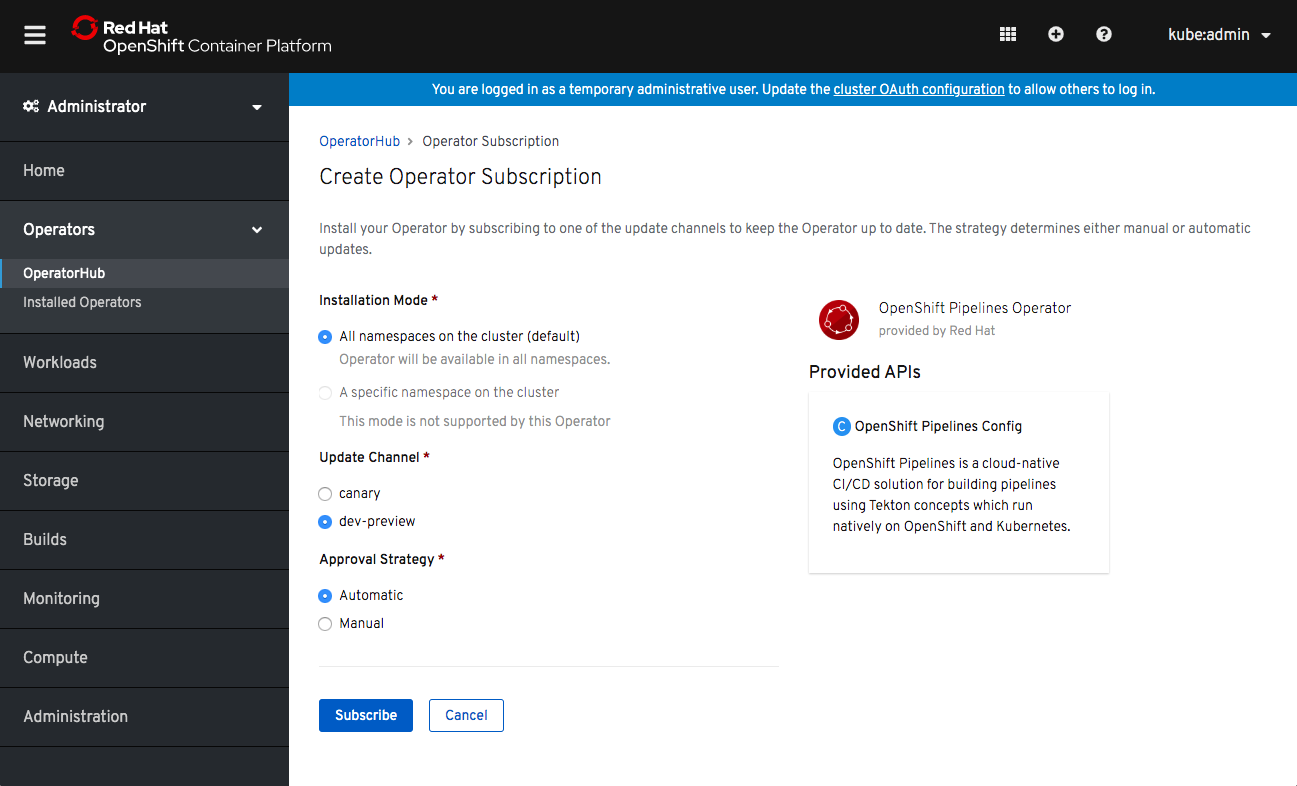
以下のような画面が表示されますので、"Subscribe" ボタンを押下します。
これだけで OpenShift Pipelines (Tekton) のインストールは完了です。
サンプルアプリケーションのデプロイ
OpenShift Pipelines (Tekton) を用いて、アプリケーションのビルド・デプロイができることを確認するため、Spring PetClinic のサンプルアプリケーションを利用します。
以下のコマンドを実行することで、Spring PetClinic サンプルアプリケーションを OpenShift 上にデプロイするのに必要なオブジェクト一式を作成します。
$ oc new-project pipelines-tutorial
$ oc create -f https://raw.githubusercontent.com/openshift/pipelines-tutorial/master/petclinic/manifests.yaml
imagestream.image.openshift.io/spring-petclinic created
deploymentconfig.apps.openshift.io/spring-petclinic created
service/spring-petclinic created
route.route.openshift.io/spring-petclinic created
ここでは、ImageStream・DeploymentConfig・Service・Route のオブジェクトを作成しています。
Task 作成
次に Task の Custome Resource のマニフェストを紹介します。
以下の2つの Custom Resource は、コンテナイメージを OpenShift クラスタにデプロイする Task と、S2I (Source-to-Image) を用いてソースコードからコンテナイメージを作成する Task です。
apiVersion: tekton.dev/v1alpha1
kind: Task
metadata:
  name: openshift-client
spec:
  inputs:
    params:
      - name: ARGS
        description: The OpenShift CLI arguments to run
        type: array
        default:
        - "help"
  steps:
    - name: oc
      image: quay.io/openshift/origin-cli:latest
      command: ["/usr/bin/oc"]
      args:
        - "$(inputs.params.ARGS)"
apiVersion: tekton.dev/v1alpha1
kind: Task
metadata:
  name: s2i-java-8
spec:
  inputs:
    resources:
      - name: source
        type: git
    params:
      - name: PATH_CONTEXT
        description: The location of the path to run s2i from
        default: .
        type: string
      - name: TLSVERIFY
        description: Verify the TLS on the registry endpoint (for push/pull to a non-TLS registry)
        default: "true"
        type: string
      - name: MAVEN_ARGS_APPEND
        description: Additional Maven arguments
        default: ""
        type: string
      - name: MAVEN_CLEAR_REPO
        description: Remove the Maven repository after the artifact is built
        default: "false"
        type: string
      - name: MAVEN_MIRROR_URL
        description: The base URL of a mirror used for retrieving artifacts
        default: ""
        type: string
  outputs:
    resources:
      - name: image
        type: image
  steps:
    - name: gen-env-file
      image: quay.io/openshift-pipeline/s2i
      workingdir: /env-params
      command:
        - '/bin/sh'
        - '-c'
      args:
        - |-
          echo "MAVEN_CLEAR_REPO=$(inputs.params.MAVEN_CLEAR_REPO)" > env-file

          [[ '$(inputs.params.MAVEN_ARGS_APPEND)' != "" ]] &&
            echo "MAVEN_ARGS_APPEND=$(inputs.params.MAVEN_ARGS_APPEND)" >> env-file

          [[ '$(inputs.params.MAVEN_MIRROR_URL)' != "" ]] &&
            echo "MAVEN_MIRROR_URL=$(inputs.params.MAVEN_MIRROR_URL)" >> env-file

          echo "Generated Env file"
          echo "------------------------------"
          cat env-file
          echo "------------------------------"
      volumeMounts:
        - name: envparams
          mountPath: /env-params
    - name: generate
      image: quay.io/openshift-pipeline/s2i
      workingdir: /workspace/source
      command:
        - 's2i'
        - 'build'
        - '$(inputs.params.PATH_CONTEXT)'
        - 'registry.access.redhat.com/redhat-openjdk-18/openjdk18-openshift'
        - '--image-scripts-url'
        - 'image:///usr/local/s2i'
        - '--as-dockerfile'
        - '/gen-source/Dockerfile.gen'
        - '--environment-file'
        - '/env-params/env-file'
      volumeMounts:
        - name: gen-source
          mountPath: /gen-source
        - name: envparams
          mountPath: /env-params
    - name: build
      image: quay.io/buildah/stable
      workingdir: /gen-source
      command: ['buildah', 'bud', '--tls-verify=$(inputs.params.TLSVERIFY)', '--layers', '-f', '/gen-source/Dockerfile.gen', '-t', '$(outputs.resources.image.url)', '.']
      volumeMounts:
        - name: varlibcontainers
          mountPath: /var/lib/containers
        - name: gen-source
          mountPath: /gen-source
      securityContext:
        privileged: true
    - name: push
      image: quay.io/buildah/stable
      command: ['buildah', 'push', '--tls-verify=$(inputs.params.TLSVERIFY)', '$(outputs.resources.image.url)', 'docker://$(outputs.resources.image.url)']
      volumeMounts:
        - name: varlibcontainers
          mountPath: /var/lib/containers
      securityContext:
        privileged: true
  volumes:
    - name: varlibcontainers
      emptyDir: {}
    - name: gen-source
      emptyDir: {}
    - name: envparams
      emptyDir: {}
以下のコマンドを実行することで、Task オブジェクトを作成します。
$ oc create -f https://raw.githubusercontent.com/openshift/tektoncd-catalog/release-v0.7/openshift-client/openshift-client-task.yaml
task.tekton.dev/openshift-client created
$ oc create -f https://raw.githubusercontent.com/openshift/pipelines-catalog/release-v0.7/s2i-java-8/s2i-java-8-task.yaml
task.tekton.dev/s2i-java-8 created
作成された Task オブジェクトは以下のコマンドで確認することができます。
$ tkn task ls
NAME               AGE
openshift-client   19 seconds ago
s2i-java-8         7 seconds ago
また、Task は複数の step から構成されており、step はシーケンシャルに実行されます。
1つの Task は1つの Pod として動作し、それぞれの step はコンテナとして実行されるため、Task の中ではローカルボリュームを介して複数の step 間でファイルを共有することができます。
Pipeline 作成
次にパイプラインを作成します。ここで作成するパイプラインは以下の図の通りであり、Git リポジトリに格納されたソースコードから "s2i-java-8" Task によりコンテナイメージをビルドし、"openshift-client" Task により OpenShift 上にアプリケーションをデプロイします。
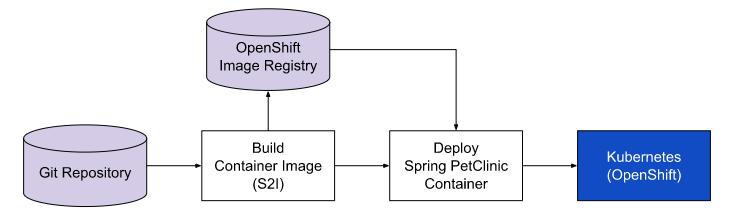
上記の図のパイプラインの Custom Resource は以下の通りです。
apiVersion: tekton.dev/v1alpha1
kind: Pipeline
metadata:
  name: petclinic-deploy-pipeline
spec:
  resources:
  - name: app-git
    type: git
  - name: app-image
    type: image
  tasks:
  - name: build
    taskRef:
      name: s2i-java-8
    params:
      - name: TLSVERIFY
        value: "false"
    resources:
      inputs:
      - name: source
        resource: app-git
      outputs:
      - name: image
        resource: app-image
  - name: deploy
    taskRef:
      name: openshift-client
    runAfter:
      - build
    params:
    - name: ARGS
      value:
        - rollout
        - latest
        - spring-petclinic
以下のコマンドを実行することで、Pipeline オブジェクトを作成します。
$ oc create -f https://raw.githubusercontent.com/openshift/pipelines-tutorial/master/pipeline/01-build-deploy.yaml
pipeline.tekton.dev/petclinic-deploy-pipeline created
作成された Pipeline オブジェクトは以下のコマンドで確認することができます。
$ tkn pipelines ls
NAME                        AGE              LAST RUN   STARTED   DURATION   STATUS
petclinic-deploy-pipeline   45 seconds ago   ---        ---       ---        ---
PipelineResource 作成
次にパイプラインを実行するのに必要なインプット/アウトプットを定義します。パイプラインのインプットとして Git リポジトリ、アウトプットとして OpenShift 上のコンテナレジストリの PipelineResource の Custom Resource を作成します。
---
apiVersion: tekton.dev/v1alpha1
kind: PipelineResource
metadata:
  name: petclinic-image
spec:
  type: image
  params:
  - name: url
    value: image-registry.openshift-image-registry.svc:5000/pipelines-tutorial/spring-petclinic
---
apiVersion: tekton.dev/v1alpha1
kind: PipelineResource
metadata:
  name: petclinic-git
spec:
  type: git
  params:
  - name: url
    value: https://github.com/spring-projects/spring-petclinic
以下のコマンドを実行することで、PipelineResource オブジェクトを作成します。
$ oc create -f https://raw.githubusercontent.com/openshift/pipelines-tutorial/master/pipeline/02-resources.yaml
pipelineresource.tekton.dev/petclinic-image created
pipelineresource.tekton.dev/petclinic-git created
作成された PipelineResource オブジェクトは以下のコマンドで確認することができます。
$ tkn resource ls
NAME              TYPE    DETAILS
petclinic-git     git     url: https://github.com/spring-projects/spring-petclinic
petclinic-image   image   url: image-registry.openshift-image-registry.svc:5000/pipelines-tutorial/spring-petclinic
Pipeline 実行
必要な Custom Resource が揃いましたので、パイプラインを実行します。将来的には Web コンソールからパイプラインを実行できるようになる予定ですが、OpenShift Pipelines (Tekton) は開発中であるため、本記事を書いている時点では以下のコマンドによりパイプラインを実行します。
$ tkn pipeline start petclinic-deploy-pipeline \
          -r app-git=petclinic-git \
          -r app-image=petclinic-image \
          -s pipeline
Pipelinerun started: petclinic-deploy-pipeline-run-5h9zb
上記のコマンドでは、"petclinic-deploy-pipeline" というパイプラインに、"app-git=petclinic-git" と "app-image=petclinic-image" をインプット/アウトプットに指定して、パイプラインを実行しています。"-s" オプションでは、パイプラインを実行するサービスアカウントを指定しています。
実行中のパイプラインは以下のコマンドにより、進捗状況を確認することができます。
$ tkn pipeline logs -f
? Select pipeline : petclinic-deploy-pipeline
[build : create-dir-image-h5tnd] {"level":"warn","ts":1573024585.0436273,"logger":"fallback-logger","caller":"logging/config.go:69","msg":"Fetch GitHub commit ID from kodata failed: \"KO_DATA_PATH\" does not exist or is empty"}
[build : create-dir-image-h5tnd] {"level":"info","ts":1573024585.046481,"logger":"fallback-logger","caller":"bash/main.go:64","msg":"Successfully executed command \"sh -c mkdir -p /workspace/output/image\"; output "}

[build : git-source-petclinic-git-dqztk] {"level":"warn","ts":1573024585.5599883,"logger":"fallback-logger","caller":"logging/config.go:69","msg":"Fetch GitHub commit ID from kodata failed: \"KO_DATA_PATH\" does not exist or is empty"}
[build : git-source-petclinic-git-dqztk] {"level":"info","ts":1573024588.3948753,"logger":"fallback-logger","caller":"git/git.go:102","msg":"Successfully cloned https://github.com/spring-projects/spring-petclinic @ master in path /workspace/source"}

[build : gen-env-file] Generated Env file
[build : gen-env-file] ------------------------------
[build : gen-env-file] MAVEN_CLEAR_REPO=false
[build : gen-env-file] ------------------------------

[build : generate] Application dockerfile generated in /gen-source/Dockerfile.gen

(中略)

[build : push] Getting image source signatures
[build : push] Copying blob sha256:db9fb96cb28d92b70f1a4c5195c7300660612b06a7d17e3af7203b91dea20d3c
[build : push] Copying blob sha256:a15113c4a1975a7a4895c5eb15d81656ad779957e4b9ce14cd3a2b1ada2e035a
[build : push] Copying blob sha256:506371554037d52b19e26f55cc0ef8c90a73a5e6e80c9bfc85151d33ff9b70fe
[build : push] Copying blob sha256:3a927d7db2c82c4372d68fe9f2d167bd58e325a80220de04bf4ffb921b0b93f6
[build : push] Copying blob sha256:8935905300780401a2c19a636ad769d57532eb7fc4413e80840d345511d4f841
[build : push] Copying blob sha256:2d0b39e0971047fc3ba6a28358abe6dc1d0dbd7d3f11444f1013944d05818e98
[build : push] Copying config sha256:71ab73216814eea1a68ec7ed05d5359b41d6e97dbef5bafe1999dfc3f10741e3
[build : push] Writing manifest to image destination
[build : push] Copying config sha256:71ab73216814eea1a68ec7ed05d5359b41d6e97dbef5bafe1999dfc3f10741e3
[build : push] Writing manifest to image destination
[build : push] Storing signatures

[build : image-digest-exporter-tb5qr] 2019/11/06 07:21:53 ImageResource petclinic-image doesn't have an index.json file: stat /builder/home/image-outputs/image/index.json: no such file or directory
[build : image-digest-exporter-tb5qr] 2019/11/06 07:21:53 Image digest exporter output: []

[deploy : oc] deploymentconfig.apps.openshift.io/spring-petclinic rolled out
また、パイプラインの実行状況は、以下のコマンドにより確認できます。
$ tkn pipeline ls
NAME                        AGE              LAST RUN                              STARTED         DURATION    STATUS
petclinic-deploy-pipeline   16 minutes ago   petclinic-deploy-pipeline-run-5h9zb   8 minutes ago   8 minutes   Succeeded
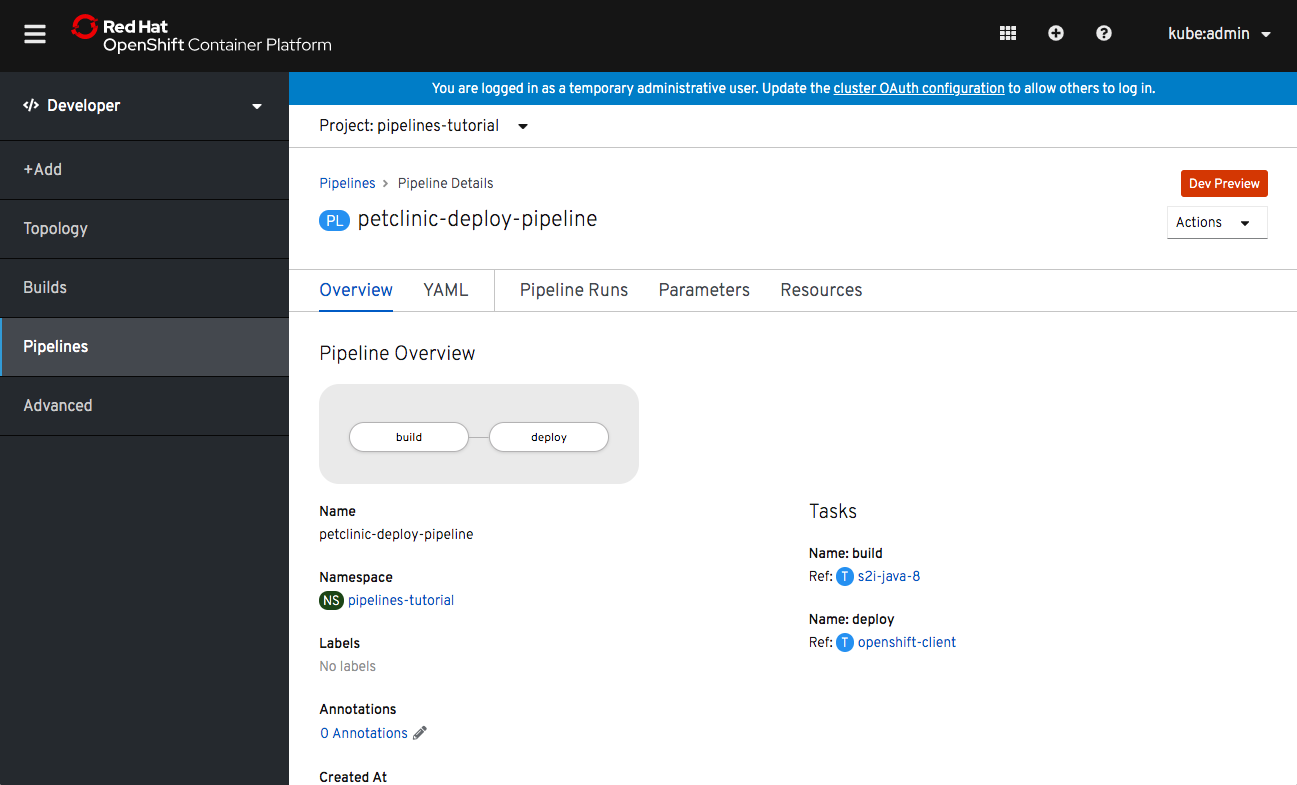
Developer Perspective からパイプラインの確認
これまでは CLI を使ってパイプラインの実行状況を確認してきましたが、Web コンソールの Deverloper Perspective からパイプラインの実行状況を確認することもできます。Developer Perspective の左ペインから "Pipelines" を選択し、実行状況を確認したいパイプラインを選択すると、以下のようにパイプラインの Overview を確認することが可能です。
さいごに
本記事では、OpenShift Pipelines (Tekton) について紹介しました。
普段から OpenShift (Kubernetes) のマニフェストに慣れ親しんでいる人にとっては、Task・Pipeline などの Custom Resource は非常に理解し易かったと思います。
また、2019/12 時点では Developer Preview ですが、非常に簡単にインストールすることができますので、少しでもお試しいただけると幸いです。