Tektonは歴史が浅いためか、Jenkinsと比較すると、機能的な熟成度は、これからという感じがする。しかし、クラウドネイティブを推進する上では、Kubernetesのために作られたCIツールでもあり、今後発展するであろう抑えておきたい重要ツールだ。そこで、Tektonを使って、GitHub https://github.com/takara9/web-nginx のリポジトリからクローンして、コンテナをビルドした後コンテナレジストリへ登録、Kubernetesへデプロイする一連のパイプラインを、参考資料を読みながらつくってみた。
今回実現するCICDパイプライン
今回、目指すTektonパイプラインは、次の図の様なシンプルなものとする。パイプラインの中には、3つのタスクがある。

環境準備作業
ここでは、Tektonパイプラインを使用するための準備として、専用名前空間の作成とデフォルト名前空間の変更、IBMレジストリサービスからコンテナイメージをプルするための設定を実施する。
K8sクラスタ準備とTektonのインストール
今回は 諸般の都合により、IBM Cloud Kubernetes Service (IKS)を利用したが、OpenShiftでも同じことができる。Kubernetesクラスタは、Terraformで書かれた マルチゾーン HCL と Kubernetes HCL を IBM Cloud Schematic でリソース管理する形で起動した。本題とは関係ないので、これは別の機会にQiitaの記事にしたい。
Tektonのデプロイのために、以下のマニフェストを実行する。
$ kubectl apply --filename https://storage.googleapis.com/tekton-releases/pipeline/previous/v0.11.1/release.yaml
専用のネームスペースを作成
tekon専用の名前空間cicdを作成して、デフォルトの名前空間にcicdを指定する。
$ kubectl create ns cicd
$ kubectl config get-contexts | grep `kubectl config current-context`
$ kubectl config set-context cicd --namespace=cicd --cluster=<CLUSTER> --user=<AUTHINFO>
$ kubectl config use-context cicd
IBM コンテナレジストリへの登録する権限を付与
名前空間cicdを作成することで、サービスアカウント default が作成される。このサービスアカウントに設定が無ければ、IBM コンテナレジストリにアクセスができない。そのため、設定値を追加する作業を実施する。
$ kubectl get serviceaccount
NAME               SECRETS   AGE
default            1         23h
pipeline-account   2         19h
下記のサービスアカウントdefaultの設定で、「Image pull secrets」の値が「none」となっているため、IBMレジストリサービスからコンテナ・イメージをプルすることができない。この値には、コンテナレジストリにアクセスするためのキーが入ったシークレットの名前が設定されている必要がある。
$ kubectl describe serviceaccount default
Name:                default
Namespace:           cicd
Labels:              <none>
Annotations:         <none>
Image pull secrets:  <none>
Mountable secrets:   default-token-5j8cp
Tokens:              default-token-5j8cp
Events:              <none>
IBM Cloud の Kubernetesサービスでは、名前空間 default に プライベートのコンテナレジストリサービスから、イメージをプルするためのシークレットが設定される。
その内容は、以下の様にして確認することができる。 この中で、icr-ioと表示されたものが、各地域のIBMクラウドデータセンターに配置されたレジストリサービスである。
$ kubectl get secret -n default
NAME                                               TYPE                                  DATA   AGE
all-icr-io                                         kubernetes.io/dockerconfigjson        1      2d10h
default-au-icr-io                                  kubernetes.io/dockerconfigjson        1      2d10h
default-de-icr-io                                  kubernetes.io/dockerconfigjson        1      2d10h
default-icr-io                                     kubernetes.io/dockerconfigjson        1      2d10h
default-jp-icr-io                                  kubernetes.io/dockerconfigjson        1      2d10h
default-token-7g4x7                                kubernetes.io/service-account-token   3      2d10h
default-uk-icr-io                                  kubernetes.io/dockerconfigjson        1      2d10h
default-us-icr-io                                  kubernetes.io/dockerconfigjson        1      2d10h
<以下省略>
上記の中で、all-icr-io のシークレットが、Tektonパイプラインを実行したい名前空間にあれば良いので、次のコマンドでコピーする。それに加えて、YAMLに埋め込まれた名前空間名をsedでdefaultをcicdに書き換える。
$ kubectl get secret all-icr-io -n default -o yaml | sed 's/default/cicd/g' | kubectl create -n cicd -f -
次に名前空間cicdのサービスアカウントdefaultにパッチを当てて、コピーしたシークレットの名前をセットする。
$ kubectl patch -n cicd serviceaccount/default -p '{"imagePullSecrets":[{"name": "all-jp-icr-io"}]}'
$ kubectl describe serviceaccount default
Name:                default
Namespace:           cicd
Labels:              <none>
Annotations:         <none>
Image pull secrets:  cicd-jp-icr-io      <----  default名前空間からコピーしたシークレット名
Mountable secrets:   default-token-5j8cp
Tokens:              default-token-5j8cp
Events:              <none>
以上で専用名前空間と関連する設定が完了した。
テクトン・パイプラインの構築
Gitからマニフェストをクローンする
ここで利用するマニフェストは次のURL https://github.com/takara9/tekton-pipeline-1 からクローンできる。これらは、Tekton Catalog や Tutolial から収集したファイルなので、出処はファイルのヘッダー部分にメモしてある。
$ git clone https://github.com/takara9/tekton-pipeline-1 tp1
$ cd tp1
タスクの作成
次にTektonパイプラインを構成するタスクを設定する。このタスクに対するパラメーターは、パイプラインとパイプライン・ランから与えるので、タスクについて変更する必要はない。タスクの雛形は、tektonカタログ https://github.com/tektoncd/catalog に様々なタスクが準備されている。とりあえずパイプラインを構成する場合、このタスク・カタログから選んでくれば良い。
$ kubectl apply -f task-git-clone.yaml
$ kubectl apply -f task-kaniko.yaml
$ kubectl apply -f task-deploy-using-kubectl.yaml
タスクを作成した結果は、以下のコマンドで確認できる。
$ kubectl get task
NAME                   AGE
deploy-using-kubectl   22h
git-clone              22h
kaniko                 22h
パイプラインの作成
タスクの登録ができたので、各タスクを繋ぐためのパイプラインを設定する。
今回、目的とするパイプラインは、次の3ステップである。
(1) コンテナをビルドするための材料となるコードをGitHubレジストリから取得
(2) コンテナ・イメージをビルドとコンテナ・レジストリへ登録
(3) Kubenetesの名前空間cicdへデプロイして実行
各ステップに相当するタスクの作成は上記で完了している。次に、パイプラインをYAMLを作成する。
このパイプラインは、パラメータを与えてタスクを順次実行するためのもので、このパイプラインに加え「kind: PipelineRun」からパラメータを与えて実行となる。
apiVersion: tekton.dev/v1beta1
kind: Pipeline
metadata:
  name: build-and-deploy-pipeline
spec:
  workspaces:
    - name: git-source
      description: The git repo
  # パラメータセクション  実行時に Kind: PipelineRun から変数を与える。
  params:
    - name: gitUrl
      description: Git repository url
    - name: gitRevision
      description: Git revision to check out
      default: master
    - name: pathToContext
      description: The path to the build context, used by Kaniko - within the workspace
      default: src
    - name: pathToYamlFile
      description: The path to the yaml file to deploy within the git source
    - name: imageUrl
      description: Image name including repository
    - name: imageTag
      description: Image tag
      default: "latest"
  tasks:

    # ステップ #1
    # GitHubからソースコードをワークスペースにクローン(取得)する
    - name: clone-repo
      taskRef:
        name: git-clone
      workspaces:
        - name: output
          workspace: git-source
      params:
        - name: url
          value: "$(params.gitUrl)"
        - name: revision
          value: "$(params.gitRevision)"
        - name: subdirectory
          value: "."
        - name: deleteExisting
          value: "true"

    # ステップ #2
    # コンテナのビルドとレジストリへ登録  Kanikoタスクにパラメータを渡してビルド実行、イメージをレジストリへ登録
    - name: source-to-image
      taskRef:
        name: kaniko
      runAfter:
        - clone-repo
      workspaces:
        - name: source
          workspace: git-source
      params:
        - name: CONTEXT
          value: $(params.pathToContext)
        - name: IMAGE
          value: $(params.imageUrl):$(params.imageTag)

    # ステップ #3
    # レジストリサービスに登録された コンテナ・イメージを K8sへデプロイする
    - name: deploy-to-cluster
      taskRef:
        name: deploy-using-kubectl
      workspaces:
        - name: git-source
          workspace: git-source
      params:
        - name: pathToYamlFile
          value: $(params.pathToYamlFile)
        - name: imageUrl
          value: $(params.imageUrl)
        - name: imageTag
          value: $(params.imageTag)
        - name: imageDigest
          value: $(tasks.source-to-image.results.IMAGE-DIGEST)
次にパイプラインを登録する。
$ kubectl apply -f pipeline-build-and-deploy.yaml
次のコマンドでパイプラインの登録を確認できる。 これで、このパイプラインに「kind: PipelineRun」からパラメータを与えて、何度でも実行することができる。
$ kubectl get pipeline
NAME                        AGE
build-and-deploy-pipeline   22h
レジストリへのアクセス用シークレット作成
Kanikoタスクから、プライベートなコンテナレジストリにイメージを登録するために、シークレットを登録する。 シークレットのの取得には、IBM クラウドのウェブコンソール画面の「管理」->「アクセス(IAM)」->「APIキー」と進んで、「IBM Cloud APIキーの作成」をクリックしてキーを取得する。そして、シークレットに与えるアノテーション には、東京リージョンのレジストリを利用する場合「jp.icr.io」を設定する。
$ kubectl create secret generic ibm-registry-secret --type="kubernetes.io/basic-auth" --from-literal=username=iamapikey --from-literal=password=<API-KEY>
$ kubectl annotate secret ibm-registry-secret tekton.dev/docker-0=<REGISTRY>
ワークスペース用の永続ボリューム作成
パイプライン実行のために必要なアプリケーションのソースコード、生成オブジェクトを一時保存するための領域となるワークスペース用のボリュームを作成する。
$ kubectl apply -f pipeline-ws-pvc.yaml
サービスアカウントの作成と権限付与
Tektonパイプラインの実行に必要な権限を与えるために、サービスアカウントの作成と、役割ベースの権限をサービスアカウントへ付与する。
$ kubectl apply -f pipeline-sa-and-rbac.yaml
パイプライン実行
これであとは、パイプラインを実行して、ソースコードからデプロイまでの実行するだけとなった。このPipelineRunでは、既に登録済みのパイプライン名とパラメータを設定する。このファイルを apply することで、パイプラインのタスクが順次実行される。
apiVersion: tekton.dev/v1beta1
kind: PipelineRun
metadata:
  name: webapl
spec:
  # 利用するパイプラインを指定
  pipelineRef:
    name: build-and-deploy-pipeline
  params:
    # パラメータ
    # この値が最終的にタスクに渡されて、各タスクが実行する
    #
    # ソースコードやDockerfileの GitHubリポジトリ
    - name: gitUrl
      value: https://github.com/takara9/web-nginx
    # ビルドコンテキストを設定 GitHubのディレクトリ構造に合わせて値を変更
    - name: pathToContext
      value: .
    # K8sへデプロイする時のマニフェスト この中にも変数を渡すのでTekton用の作成したマニフェストが必要
    # 前述のGitからクローンする中に、値のファイルが入っている必要がある
    - name: pathToYamlFile
      value: "kubernetes/web-nginx.yaml"
    # コンテナ・レジストリのURL、名前空間、リポジトリ名を設定
    - name: imageUrl
      value: jp.icr.io/takara/web-nginx
    # リポジトリに登録する時のタグを設定
    - name: imageTag
      value: "1.0"
  # パイプライン実行用のサービスアカウント、RBACで権限付与済み
  serviceAccountName: pipeline-account
  # ワークスペースとなるPVCの指定
  workspaces:
    - name: git-source
      persistentVolumeClaim:
        claimName: workspace-source-pvc
次のコマンドで実行を開始する。このパイプラインでおよそ10分くらいで、アプリケーションがデプロイされる。
$ kubectl apply -f pipelinerun-apl.yaml
実行経過確認
以下の実行ログは、パイプライン実行開始から終了までの経過である。ポッドの記録から、Tektonの各ステップはポッドであるという説明がよく解る。ここでは、各タスクを担う3つのポッドが実行されていることが解る。
$ kubectl apply -f pipelinerun-apl.yaml
pipelinerun.tekton.dev/webapl created

$ kubectl get pipelinerun
NAME     SUCCEEDED   REASON    STARTTIME   COMPLETIONTIME
webapl   Unknown     Running   8s

$ kubectl get pod -w
NAME                                READY   STATUS     RESTARTS   AGE
affinity-assistant-7abf84d7a3-0     1/1     Running    0          11s
webapl-clone-repo-n5pt9-pod-77t5w   0/1     Init:0/3   0          11s
webapl-clone-repo-n5pt9-pod-77t5w   0/1     Init:1/3   0          66s
webapl-clone-repo-n5pt9-pod-77t5w   0/1     Init:2/3   0          67s
webapl-clone-repo-n5pt9-pod-77t5w   0/1     PodInitializing   0          68s
webapl-clone-repo-n5pt9-pod-77t5w   1/1     Running           0          69s
webapl-clone-repo-n5pt9-pod-77t5w   1/1     Running           0          69s
webapl-clone-repo-n5pt9-pod-77t5w   0/1     Completed         0          74s
webapl-source-to-image-5wkzr-pod-88kfn   0/3     Pending           0          0s
webapl-source-to-image-5wkzr-pod-88kfn   0/3     Pending           0          0s
webapl-source-to-image-5wkzr-pod-88kfn   0/3     Init:0/4          0          0s
webapl-source-to-image-5wkzr-pod-88kfn   0/3     Init:1/4          0          18s
webapl-source-to-image-5wkzr-pod-88kfn   0/3     Init:2/4          0          19s
webapl-source-to-image-5wkzr-pod-88kfn   0/3     Init:3/4          0          20s
webapl-source-to-image-5wkzr-pod-88kfn   0/3     PodInitializing   0          21s
webapl-source-to-image-5wkzr-pod-88kfn   3/3     Running           0          27s
webapl-source-to-image-5wkzr-pod-88kfn   3/3     Running           0          27s
webapl-source-to-image-5wkzr-pod-88kfn   2/3     Running           0          103s
webapl-source-to-image-5wkzr-pod-88kfn   0/3     Completed         0          104s
webapl-deploy-to-cluster-xpmj7-pod-8wtfn   0/2     Pending           0          0s
webapl-deploy-to-cluster-xpmj7-pod-8wtfn   0/2     Pending           0          0s
webapl-deploy-to-cluster-xpmj7-pod-8wtfn   0/2     Init:0/2          0          0s
webapl-deploy-to-cluster-xpmj7-pod-8wtfn   0/2     Init:1/2          0          1s
webapl-deploy-to-cluster-xpmj7-pod-8wtfn   0/2     PodInitializing   0          2s
webapl-deploy-to-cluster-xpmj7-pod-8wtfn   2/2     Running           0          6s
webapl-deploy-to-cluster-xpmj7-pod-8wtfn   2/2     Running           0          6s
webapl-deploy-to-cluster-xpmj7-pod-8wtfn   1/2     Running           0          8s
web-nginx-58dbcb78c6-9cl6s                 0/1     Pending           0          0s
web-nginx-58dbcb78c6-9cl6s                 0/1     Pending           0          1s
web-nginx-58dbcb78c6-9cl6s                 0/1     ContainerCreating   0          1s
webapl-deploy-to-cluster-xpmj7-pod-8wtfn   0/2     Completed           0          10s
affinity-assistant-7abf84d7a3-0            1/1     Terminating         0          3m10s
affinity-assistant-7abf84d7a3-0            0/1     Terminating         0          3m10s
web-nginx-58dbcb78c6-9cl6s                 1/1     Running             0          2s
affinity-assistant-7abf84d7a3-0            0/1     Terminating         0          3m18s
affinity-assistant-7abf84d7a3-0            0/1     Terminating         0          3m18s

$ kubectl get pipelinerun
NAME     SUCCEEDED   REASON      STARTTIME   COMPLETIONTIME
webapl   True        Succeeded   9m29s       6m20s
Tekton CLIの利用
Tektonの専用CLIが提供されている。まだまだ発展途上な感じだが、ログの表示は、デバックに役立つと感じた。
インストール方法は https://github.com/tektoncd/cli#installing-tkn にある。
次は、Tektonの管理用コマンドの実行結果である。kubectlコマンドが実行できる環境があれば tkn は実行できる。
$ tkn pipelinerun describe webapl
Name:              webapl
Namespace:         cicd
Pipeline Ref:      build-and-deploy-pipeline
Service Account:   pipeline-account
Timeout:           1h0m0s
Labels:
 tekton.dev/pipeline=build-and-deploy-pipeline

🌡️  Status

STARTED         DURATION    STATUS
7 minutes ago   3 minutes   Succeeded

📦 Resources

 No resources

⚓ Params

 NAME               VALUE
 ∙ gitUrl           https://github.com/takara9/web-nginx
 ∙ pathToContext    .
 ∙ pathToYamlFile   kubernetes/web-nginx.yaml
 ∙ imageUrl         jp.icr.io/takara/web-nginx
 ∙ imageTag         1.0

🗂  Taskruns

 NAME                               TASK NAME           STARTED         DURATION     STATUS
 ∙ webapl-deploy-to-cluster-xpmj7   deploy-to-cluster   4 minutes ago   11 seconds   Succeeded
 ∙ webapl-source-to-image-5wkzr     source-to-image     5 minutes ago   1 minute     Succeeded
 ∙ webapl-clone-repo-n5pt9          clone-repo          7 minutes ago   1 minute     Succeeded
次の同じ tkn コマンドのログの表示結果である。
tkn pipeline logs は、タスクの途中で、異常終了となった場合、メッセージが親切なので、デバッグに有用と感じた。
$ tkn pipeline logs build-and-deploy-pipeline -L
[clone-repo : clone] + CHECKOUT_DIR=/workspace/output/.
[clone-repo : clone] + '[[' true '==' true ]]
[clone-repo : clone] + cleandir
[clone-repo : clone] + '[[' -d /workspace/output/. ]]
[clone-repo : clone] + rm -rf /workspace/output/./Dockerfile /workspace/output/./Jenkinsfile /workspace/output/./README.md /workspace/output/./html /workspace/output/./image-digest /workspace/output/./image-digested /workspace/output/./kubernetes /workspace/output/./nginx /workspace/output/./version
[clone-repo : clone] + rm -rf /workspace/output/./.git
[clone-repo : clone] + rm -rf '/workspace/output/./..?*'
[clone-repo : clone] + test -z
[clone-repo : clone] + test -z
[clone-repo : clone] + test -z
[clone-repo : clone] + /ko-app/git-init -url https://github.com/takara9/web-nginx -revision master -refspec  -path /workspace/output/. '-sslVerify=true' '-submodules=true' -depth 1
[clone-repo : clone] {"level":"info","ts":1594038970.0260096,"caller":"git/git.go:136","msg":"Successfully cloned https://github.com/takara9/web-nginx @ a2c3c44412611c2fad66964270639f28d25a33bc (grafted, HEAD, origin/master) in path /workspace/output/."}
[clone-repo : clone] {"level":"info","ts":1594038970.0757568,"caller":"git/git.go:177","msg":"Successfully initialized and updated submodules in path /workspace/output/."}
[clone-repo : clone] + cd /workspace/output/.
[clone-repo : clone] + git rev-parse HEAD
[clone-repo : clone] + tr -d '\n'
[clone-repo : clone] + RESULT_SHA=a2c3c44412611c2fad66964270639f28d25a33bc
[clone-repo : clone] + EXIT_CODE=0
[clone-repo : clone] + '[' 0 '!=' 0 ]
[clone-repo : clone] + echo -n a2c3c44412611c2fad66964270639f28d25a33bc

[source-to-image : build-and-push] E0706 12:37:20.190084      14 aws_credentials.go:77] while getting AWS credentials NoCredentialProviders: no valid providers in chain. Deprecated.
[source-to-image : build-and-push] 	For verbose messaging see aws.Config.CredentialsChainVerboseErrors
[source-to-image : build-and-push] INFO[0040] Resolved base name nginx:latest to build
[source-to-image : build-and-push] INFO[0040] Retrieving image manifest nginx:latest
[source-to-image : build-and-push] INFO[0043] Retrieving image manifest nginx:latest
[source-to-image : build-and-push] INFO[0046] Retrieving image manifest nginx:latest
[source-to-image : build-and-push] INFO[0049] Retrieving image manifest nginx:latest
[source-to-image : build-and-push] INFO[0052] Built cross stage deps: map[0:[/html /etc/nginx/conf.d/default.conf]]
[source-to-image : build-and-push] INFO[0052] Retrieving image manifest nginx:latest
[source-to-image : build-and-push] INFO[0054] Retrieving image manifest nginx:latest
[source-to-image : build-and-push] INFO[0057] Executing 0 build triggers
[source-to-image : build-and-push] INFO[0057] Unpacking rootfs as cmd COPY ./html /html requires it.
[source-to-image : build-and-push] INFO[0061] COPY ./html /html
[source-to-image : build-and-push] INFO[0061] Taking snapshot of files...
[source-to-image : build-and-push] INFO[0061] COPY ./nginx/default.conf /etc/nginx/conf.d/default.conf
[source-to-image : build-and-push] INFO[0061] Taking snapshot of files...
[source-to-image : build-and-push] INFO[0061] Saving file html for later use
[source-to-image : build-and-push] INFO[0061] Saving file etc/nginx/conf.d/default.conf for later use
[source-to-image : build-and-push] INFO[0061] Deleting filesystem...
[source-to-image : build-and-push] INFO[0061] Retrieving image manifest nginx:latest
[source-to-image : build-and-push] INFO[0063] Retrieving image manifest nginx:latest
[source-to-image : build-and-push] INFO[0067] Executing 0 build triggers
[source-to-image : build-and-push] INFO[0067] Unpacking rootfs as cmd COPY --from=build /html /usr/share/nginx/html requires it.
[source-to-image : build-and-push] INFO[0070] COPY --from=build /html /usr/share/nginx/html
[source-to-image : build-and-push] INFO[0070] Taking snapshot of files...
[source-to-image : build-and-push] INFO[0070] COPY --from=build /etc/nginx/conf.d/default.conf /etc/nginx/conf.d/default.conf
[source-to-image : build-and-push] INFO[0070] Taking snapshot of files...


[source-to-image : digest-to-results] + cat ./image-digested
[source-to-image : digest-to-results] + tee /tekton/results/IMAGE-DIGEST
[source-to-image : digest-to-results] + jq .[0].value -rj
[source-to-image : digest-to-results] sha256:226a53d7b56e605a6378e410a541af8f83696236ad22de2c3d13ff65bbfe2f09


[deploy-to-cluster : run-kubectl] deployment.apps/web-nginx created
[deploy-to-cluster : run-kubectl] service/web-nginx unchanged
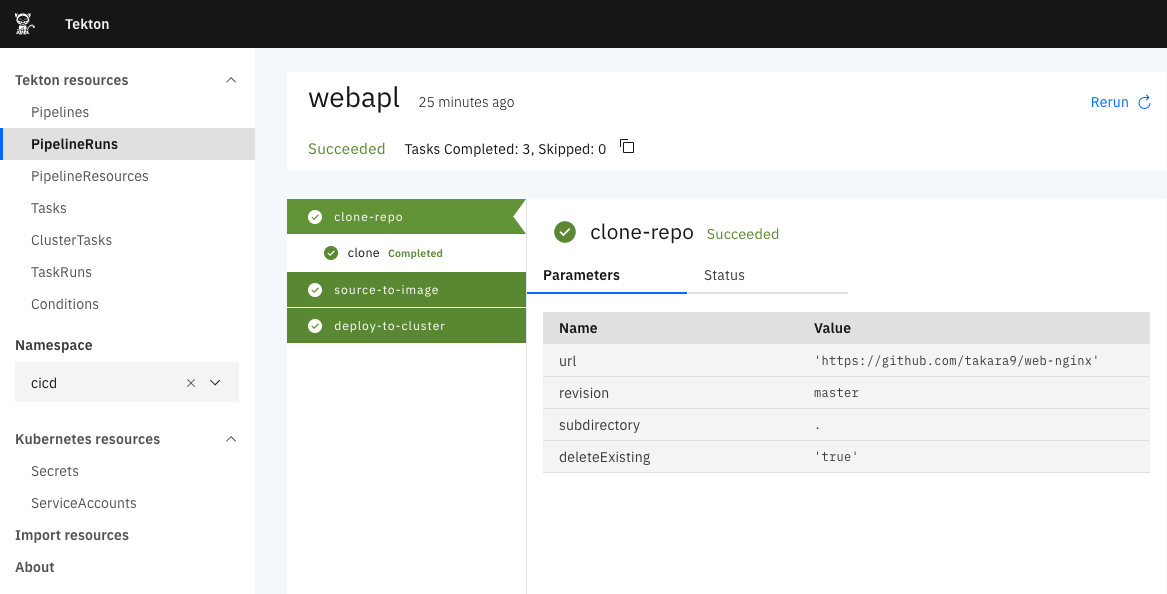
Tekton ダッシュボード
まだ表示くらいの機能しかないが、Tekton ダッシュボード https://tekton.dev/docs/dashboard/ が提供される。マニフェストを適用するだけでダッシュボードが利用できる。 Tektonのリソース構造から、参照していけるので、これを利用すると、Tektonの構造把握が早くなる。
kubectl apply --filename https://github.com/tektoncd/dashboard/releases/latest/download/tekton-dashboard-release.yaml
ユーザー管理や認証の機能が無いので、Ingressの下で動かすか、それとも、port-foward で利用する。
$ kubectl --namespace tekton-pipelines port-forward svc/tekton-dashboard 9097:9097
感想
CICDツールと言えば、重厚長大で歴史がある Jenkins と比較してしまう。 そうすと Tektonは コンパクトで軽くセットアップも用意な感じがした。もちろん、パイプラインを構築する手間は、どちらも変わらないが、CIツールとしての機能と便利さは、まだまだ Jenkins の方が上だと感じる。しかし、最初からコンテナ用として設計されているので、今後の発展に期待したい。