はじめに
そういえば・・・と、AWS Cognitoをあまり使ったことが無かったなぁと思ったので、AWS Cognitoを使って認証画面を作ってみることにしました。
AWS Amplifyを使えば楽に作ることができますが、今回はスクラッチで作ろうと思います。
スクラッチで作る理由は以下2つ。
- 1人で作るならAWS Amplifyで良いのですが、フロントエンド、バックエンドで分業するとAWS Cognito単体を使うことになりそう。
- スクラッチで作ると、どうやって認証の仕組みを作れば良いか個人的な学びになりそう。
というわけで、作成してきます。
AWS 構成図
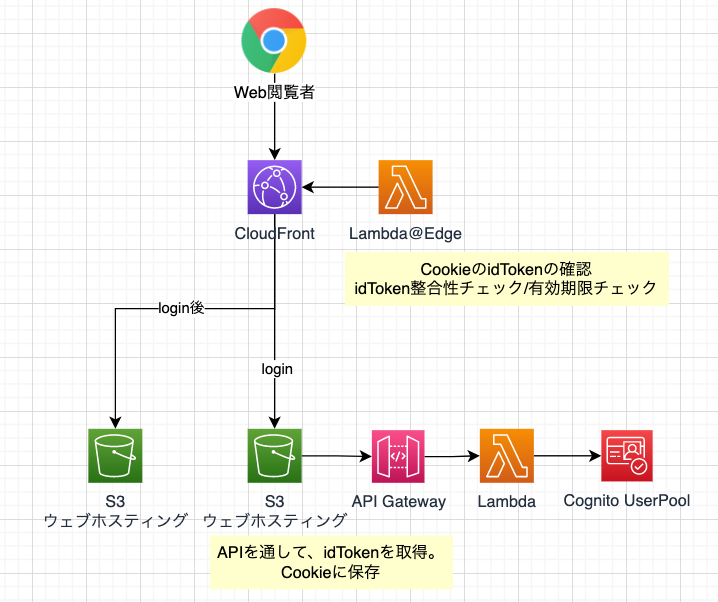
AWSの構成図を書くと認証の仕組みは、大体このようなイメージ。

Lambda@Edgeを使って、Cookieに保存してあるidTokenを参照してプライベートページの閲覧許可を出しています。
idTokenの取得は、APIで行います。
実装
API Lambdaの処理
認証だけであれば、AWS Cognitoのユーザープールだけで問題なさそう。(フェデレーティッドアイデンティティ(IDプール)は使わない)
amazon-cognito-identity-jsを使って、ユーザープールからidToken, accessToken, refreshTokenを取得します。
export const handler: APIGatewayProxyHandlerV2 = async event => {
  try {
   return await new SignIn().handler(event)
  } catch (error: unknown) {
   return {
      isBase64Encoded: false,
      500,
      body: 'Internal Server Error',
      headers: {
        'content-type': 'application/json',
      },
    }
  }
}

export default class SignIn {
  public async handler(event: APIGatewayProxyEventV2): Promise<ApiResponse> {
    if (!event.body) throw new Error('event.body is empty')
    const data: {
      Username: string
      Password: string
    } = JSON.parse(event.body)

    const authenticationDetails = new AmazonCognitoIdentity.AuthenticationDetails({
      Username: data.Username,
      Password: data.Password,
    })

    const userPool = new AmazonCognitoIdentity.CognitoUserPool({
      UserPoolId: process.env.USER_POOL_ID ?? '',
      ClientId: process.env.CLIENT_ID ?? '',
    })

    const cognitoUser = new AmazonCognitoIdentity.CognitoUser({
      Username: data.Username,
      Pool: userPool,
    })

    const cognitoUserAuth: AmazonCognitoIdentity.CognitoUserSession = await new Promise((resolve, reject) =>
      cognitoUser.authenticateUser(authenticationDetails, {
        // 認証成功
        onSuccess: result => {
          resolve(result)
        },

        // 認証失敗
        onFailure: (error: unknown) => {
          if (error instanceof Error) {
            reject(new Error(error.message))
          }
        },

        // 仮パスワードでユーザがログインした場合
        newPasswordRequired: (userAttributes, requiredAttributes) => {
          cognitoUser.completeNewPasswordChallenge(data.Password, userAttributes, {
            // 認証成功
            onSuccess: result => {
              resolve(result)
            },

            // 認証失敗
            onFailure: error => {
              if (error instanceof Error) {
                reject(new Error(error.message))
              }
            },
          })
        },
      }),
    )

    const idToken = cognitoUserAuth.getIdToken().getJwtToken() // IDトークン
    const accessToken = cognitoUserAuth.getAccessToken().getJwtToken() // アクセストークン
    const refreshToken = cognitoUserAuth.getRefreshToken().getToken() // 更新トークン

    Log.debug(`{ "idToken": "${idToken}", "accessToken":" ${accessToken}", "refreshToken": "${refreshToken}" }`)

    return {
      isBase64Encoded: false,
      200,
      body: `{ "idToken": "${idToken}", "accessToken":" ${accessToken}", "refreshToken": "${refreshToken}" }`,
      headers: {
        'content-type': 'application/json',
      },
    }
  }
}
idToken, accessToken, refreshTokenの違いですが、最初この違いがわかりませんでした。
ざっくり言えば以下の通りらしい。
- idToken(IDトークン):認証したユーザー情報の参照・認証に使用する。
- accessToken(アクセストークン):ユーザー情報の更新に使用する。
- refreshToken(リフレッシュトークン):新しいIDトークン、アクセストークンを取得のに使用する。
今回は認証だけしたいので、idTokenだけ使うことにしました。
Lambda@Edgeの処理
トークンの検証ですが、以下に記載してある通りのことをやります。
aws-jwt-verifyを使うと楽です。
JWTのベストプラクティスにそって検証してくれるので、検証はライブラリを使うのが良さそう。
export const handler: CloudFrontRequestHandler = async (event, context, callback) => {
  const userPoolId = process.env.USER_POOL_ID ?? ''
  const tokenUse = 'id'
  const clientId = process.env.CLIENT_ID ?? ''

  const verifier = CognitoJwtVerifier.create({
    userPoolId,
    tokenUse,
    clientId,
  })

  const request = event.Records[0].cf.request

  Log.info('headers', request)
  try {
    for (const cookie of request.headers['cookie']) {
      const values = cookie.value.split(';')
      for (const value of values) {
        if (value.split('idToken=')[1]) {
          const payload = await verifier.verify(value.split('idToken=')[1])
          // 認証成功
          callback(null, request)
          return undefined
        }
      }
    }
    throw new Error('Token not valid!')
  } catch (error: unknown) {
    // 認証失敗
    const response = {
      status: '302',
      statusDescription: 'Found',
      headers: {
        location: [
          {
            key: 'Location',
            value: `https://${request.headers.host[0].value}`,
          },
        ],
      },
    }
    callback(null, response)
    return undefined
  }
}
なお、認証に失敗した場合は、リダイレクトさせます。
余談:自力でトークン(JWT)を検証する
ちなみに、トークン(JWT)の検証は以下サイトを使って自力で確認することもできます。
Algorithmは「RS256」にします。
JWTを検証するドキュメントのステップ2に書いてあるような簡易プログラムを作成します。
import * as Axios from 'axios'
const jwkToPem = require('jwk-to-pem')

interface PublicKey {
  alg: string
  e: string
  kid: string
  kty: string
  n: string
  use: string
}
interface PublicKeys {
  keys: PublicKey[]
}
interface PublicKeyMeta {
  instance: PublicKey
  pem: string
}
interface MapOfKidToPublicKey {
  [key: string]: PublicKeyMeta
}

(async () => {
  const url = 'https://cognito-idp.ap-northeast-1.amazonaws.com/${プールID}/.well-known/jwks.json'
  const publicKeys = await Axios.default.get<PublicKeys>(url)
  const key = publicKeys.data.keys.reduce((agg, current) => {
    const pem = jwkToPem(current)
    console.log(pem)
    agg[current.kid] = { instance: current, pem }
    return agg
  }, {} as MapOfKidToPublicKey)
  console.log(key)
})()
ここで欲しいのは、Cognito側で作成したJSON形式の公開鍵をPEM形式に変換したPublic Keyです。
それをconsole.logに出力しています。
あとは上記サイトで、idTokenとPEM形式にした公開鍵(Public Key)を入力すればトークン(JWT)の検証ができます。(Private Keyの箇所は空欄で大丈夫です)
こうやって各トークンのPayloadに何が格納されているかが見えるので、これはこれで面白いですね。
さいごに
AWS Amplifyを使えばササッとできるところを、APIを作り、Lambda@Edgeを作り、S3&CloudFrontを作り...etc...
結構、大変でした。
タイトルに「ふらっと」って書いてますが、「ふらっと」 やることじゃないですね。![]()
しかし、これはこれで自分なりに学びになったし、良かったと思います。
Cognitoを使った認証方法の1例として、参考にしいただければ幸いです。(もっと色々な方法で認証できるし、他の方法もあるはず!)
では![]()