目的
Unity chan をつかってARでアプリケーションを作ってみよう!
続きはこちらです
ARPlaneの代わりに通常のPlaneを使ってアプリをつくろう!
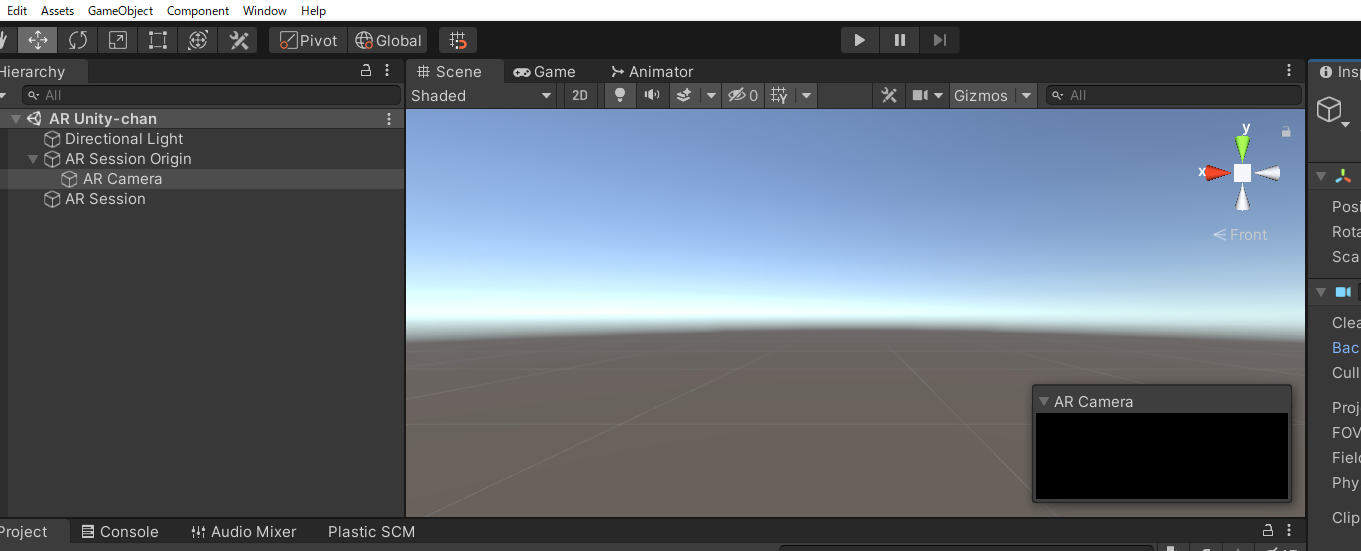
AR FoundationではARのカメラが以下の写真のようになってしまいます。
でも、ARで使うのって ARPlane と ARRaycastなので、3D ObjectのplaneとPhysicsのRaycastで代用が可能!
なので、まずはAR Foundationを使わずにアプリケーションを作って、それをARに移植します。
流れ
- オブジェクトを設定する
- ちびキャラのユニティちゃんをクリックしたところに増殖させて表示する
- ちびキャラのユニティちゃんをみんなまとめて移動させる
- コライダーをつけて重ならないようにする
- ちびキャラのユニティちゃんのアニメーションをつける
- 音や物理マテリアルをつける
1. オブジェクトを設定する。
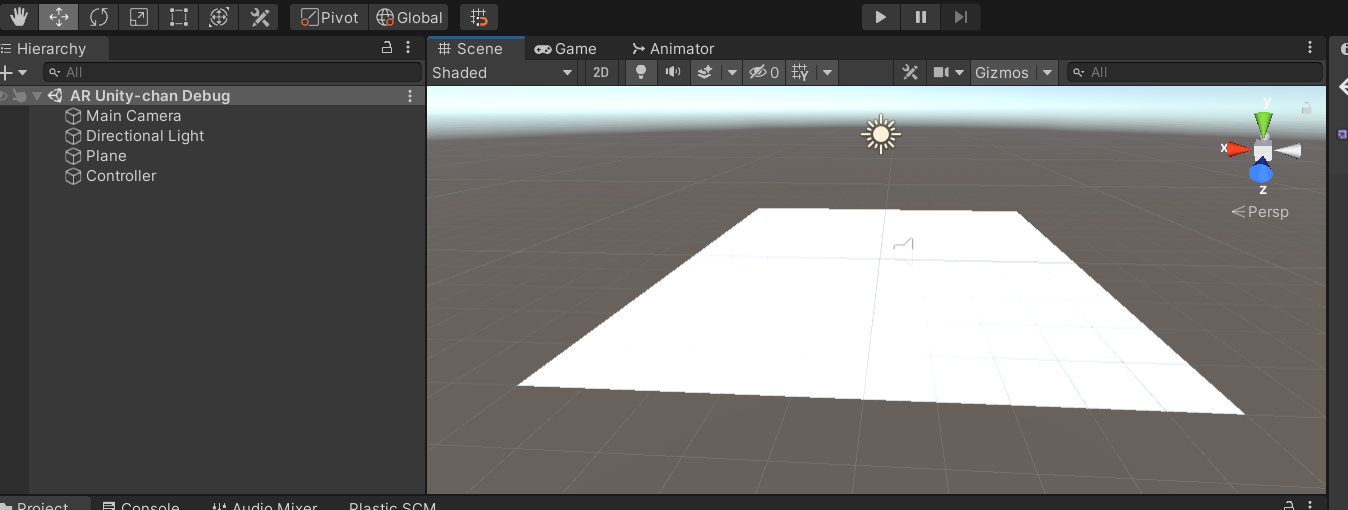
まずはダミーのシーンを作って、Planeを写真のように設定します。
次に、Hierachyから空のオブジェクトを作成し, Controllerと名前を変更します。
2. ちびキャラのユニティちゃんをクリックしたところに増殖させて表示する
まず、ちびキャラのユニティちゃんについてはSDユニティちゃんのものを使用させていただきました。ありがとうございます!
つぎにクリックしたところにユニティちゃんを置きます
using System.Collections;
using System.Collections.Generic;
using UnityEngine;


public class SetUnitychanDebug : MonoBehaviour
{
    [SerializeField] GameObject UnityChan;

    public bool isUnitychan;

    public List<GameObject> UnityChanReals;

    public Vector3 hitPosition;

    // Start is called before the first frame update

    void Start(){
        UnityChanReals = new List<GameObject>();
    }

    // Update is called once per frame
    void Update()
    {
        if (Input.GetMouseButtonDown(0)) {
            Ray ray = Camera.main.ScreenPointToRay (Input.mousePosition);
            RaycastHit hit_info = new RaycastHit ();

            bool is_hit = Physics.Raycast(ray, out hit_info);

            if (is_hit)
            {
                Debug.Log("Point : " + hit_info.point);
                Debug.Log("Create Unitychan!");
                isUnitychan = true;
                var unitychan = Instantiate(UnityChan, hit_info.point, hit_info.transform.rotation);
                UnityChanReals.Add(unitychan);
                hitPosition = hit_info.point;
            }
        }
    }
}
どうせ、あとで増殖させるのでユニティちゃんをUnityChanRealsというリストに保存しています。
ポイントとしては,
-
Physics.Raycast(ray, out hit_info); でRayが当たったところの情報を保存していること。
ARRaycastでは、ピンチ動作とかで複数の指を考える場合があるので、hit_infoのところがListになっていますが、どうせ1つのデータしか今回のアプリケーションでは使わないです。 -
Instantiateにおいて、hit_info.pointの場所でUnitychanを生成していること。hit_info.pointはUnity上でのworld座標でのColliderをもつオブジェクトとの交差点が返ってきます。
-
hitPositionに交差点の情報を保存しています。これにより、あとでUnityちゃんの移動とかにつかいます。
これをControllerにアタッチして、InspectorのUnitychanのところにSD ユニティちゃんをアタッチします。
3. ちびキャラのユニティちゃんをみんな移動させる
つぎに、ユニティちゃんをみんなまとめて移動させます。
using System.Collections;
using System.Collections.Generic;
using UnityEngine;

public class UnitychanControllerDebug : MonoBehaviour
{

    [SerializeField] float gain = 100.0f;
    private SetUnitychanDebug setUnitychan;
    // Start is called before the first frame update

    private Vector3 preHitPosition;

    void Start(){
        setUnitychan = GetComponent<SetUnitychanDebug>();
    }

    // Update is called once per frame
    void Update()
    {
        if (setUnitychan.isUnitychan){
            if (Vector3.Distance(preHitPosition, setUnitychan.hitPosition) > 0.01f){
                Debug.Log("Destination Change!");
                for(var i = 0 ; i < setUnitychan.UnityChanReals.Count; i++){
                    setUnitychan.UnityChanReals[i].transform.LookAt(setUnitychan.hitPosition);
                }
                preHitPosition = setUnitychan.hitPosition;
            }
            for(var i = 0 ; i < setUnitychan.UnityChanReals.Count; i++){
                setUnitychan.UnityChanReals[i].transform.position = Vector3.MoveTowards(setUnitychan.UnityChanReals[i].transform.position, preHitPosition, Time.deltaTime * gain);
            }
        }
    }
}
画面をクリックすると、クリック前のhitPositionとクリック後のhitPositionの値が変化するので、それを利用してif文で分岐しています。
クリック時にはクリックした方向に全員のユニティちゃんが向くようになっています。
また、Vector3.MoveTowardsをつかって、クリックした点に向かっていくようにしています。
ちなみに、Vector3.SmoothDampを使うと面白い挙動をするので、よかったらやってみてください。
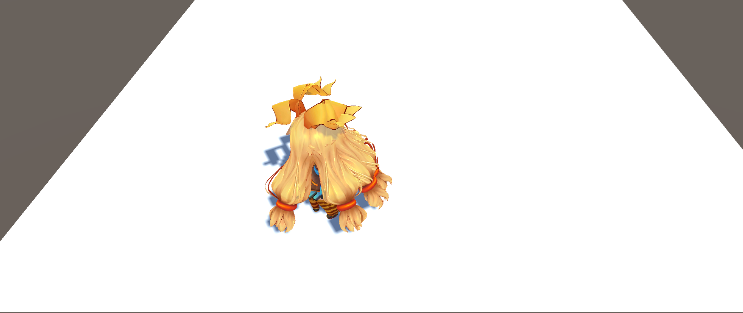
ただし、今のままでは写真のように重なってしまうので改良していきます。
4. コライダーをつけて重ならないようにする
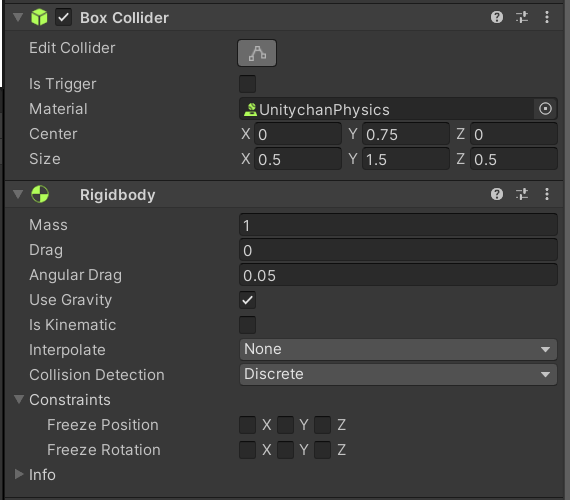
いかのようにユニティちゃんにコライダーとRigidBodyを設置してください
これで重ならないようになります。
ちなみに、ユニティちゃんのルートに設置しないとコライダーだけが吹っ飛んで行ってしまいます...。
これにちょっと引っかかりました...。
5. ちびキャラのユニティちゃんのアニメーションをつける
次にちびキャラのアニメーションを編集します。
-
Projectから「SD_unitychan_motion_humanoid」と「SD_unitychan_motion_humanoid Import Settings」を検索して、Ctrl + Dで複製し、Sceneフォルダーに移動させてください。
-
複製したSD_unitychan_motion_humanoid Import Settingsについて、Standing, Running, Walking以外のモーションをすべて削除します
-
複製したSD_unitychan_motion_humanoid Import SettingsのWalkingモーションについて、ダブルクリックをして選択をした後で、Inspectorのしたの方へ行くと、Eventという項目があります。ここのEventに関して、すべて消去します
-
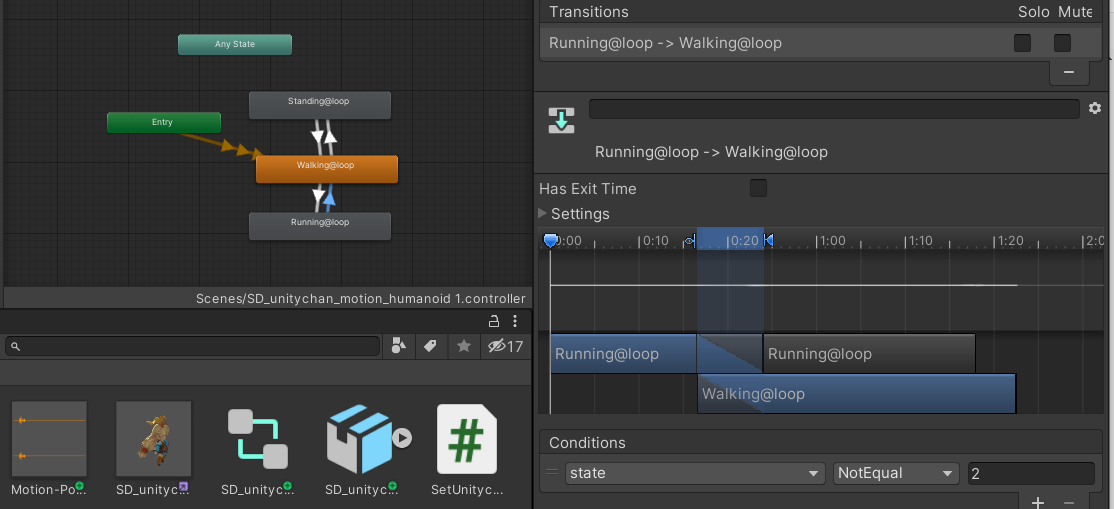
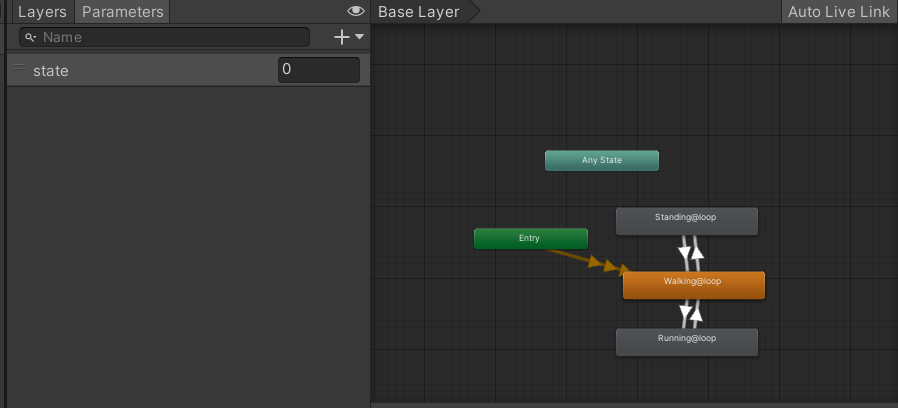
複製したSD_unitychan_motion_humanoidについて、編集していきます。写真のようにStanding, Running, Walking以外をすべて消してください。また、parameterについてはNest, Backを消去しInt形で新たに stateという parameterを追加してください
-
SD_unitychan_motion_humanoid中の各ステートマシーンの中にあるAnimation ClipをSD_unitychan_motion_humanoid Import Settingsのものに変えてください
-
SD ユニティちゃんのPrefab中のアニメーターを複製したSD_unitychan_motion_humanoidに変えます。
-
最後にSDユニティちゃんについて、Animator, IKLookAt, BoxCollider, RigidBody以外のコンポーネントをすべて削除すれば完了です。
あと、Scriptで増殖したユニティちゃんのAnimatorを管理するので、SetUnityChanDebug.csとUnityChanControllerDebug.csを以下のように書き換えます
using System.Collections;
using System.Collections.Generic;
using UnityEngine;


public class SetUnitychanDebug : MonoBehaviour
{
    [SerializeField] GameObject UnityChan;

    public bool isUnitychan;

    public List<GameObject> UnityChanReals;

    public List<Animator> UnityChanAnimators;

    public Vector3 hitPosition;

    // Start is called before the first frame update

    void Start(){
        UnityChanReals = new List<GameObject>();
        UnityChanAnimators = new List<Animator>();
    }

    // Update is called once per frame
    void Update()
    {
        if (Input.GetMouseButtonDown(0)) {
            Ray ray = Camera.main.ScreenPointToRay (Input.mousePosition);
            RaycastHit hit_info = new RaycastHit ();

            bool is_hit = Physics.Raycast(ray, out hit_info);

            if (is_hit)
            {
                Debug.Log("Point : " + hit_info.point);
                Debug.Log("Create Unitychan!");
                isUnitychan = true;
                var unitychan = Instantiate(UnityChan, hit_info.point, hit_info.transform.rotation);
                UnityChanReals.Add(unitychan);
                UnityChanAnimators.Add(unitychan.GetComponent<Animator>());
                hitPosition = hit_info.point;
            }
        }
    }
}
using System.Collections;
using System.Collections.Generic;
using UnityEngine;

public class UnitychanControllerDebug : MonoBehaviour
{

    [SerializeField] float gain = 100.0f;
    private SetUnitychanDebug setUnitychan;
    // Start is called before the first frame update

    private Vector3 preHitPosition;

    private List<Animator> UnitychanAnimators;

    void Start(){
        setUnitychan = GetComponent<SetUnitychanDebug>();
    }

    // Update is called once per frame
    void Update()
    {
        if (setUnitychan.isUnitychan){
            if (Vector3.Distance(preHitPosition, setUnitychan.hitPosition) > 0.01f){
                Debug.Log("Destination Change!");
                for(var i = 0 ; i < setUnitychan.UnityChanReals.Count; i++){
                    setUnitychan.UnityChanReals[i].transform.LookAt(setUnitychan.hitPosition);
                }
                preHitPosition = setUnitychan.hitPosition;
            }
            for(var i = 0 ; i < setUnitychan.UnityChanReals.Count; i++){
                setUnitychan.UnityChanReals[i].transform.position = Vector3.MoveTowards(setUnitychan.UnityChanReals[i].transform.position, preHitPosition, Time.deltaTime * gain);
                var distance = Vector3.Distance(setUnitychan.UnityChanReals[i].transform.position, preHitPosition);
                var state = 0;
                if (distance > 1.0f){
                    state = 2;
                }else if (distance > 0.1f){
                    state = 1;
                }else{
                    state = 0;
                }
                Debug.Log("state : " + state + " distance : " + distance);
                setUnitychan.UnityChanAnimators[i].SetInteger("state", state);
            }
        }
    }
}
6. 音や物理マテリアルをつける
音の設定
次にユニティちゃん同士が接触したとに音が鳴るようにします。この記事を参考にさせていただきました。
- CollisionSoundMotion.csを作成し、SDユニティちゃんにアタッチします
using System.Collections;
using System.Collections.Generic;
using UnityEngine;

public class CollistionSoundMotion : MonoBehaviour
{
    // ぶつかった時の音
    [SerializeField] AudioClip se;

    // ぶつかった時に音を鳴らす
    void OnCollisionEnter(Collision col)
    {
        AudioSource.PlayClipAtPoint(se, transform.position);
    }

}
2.Inspector中のCollistionSoundMotion.csのSEを設定します。
ちなみにSEにはhttps://otologic.jp/free/se/motion-pop05.htmlのポップモーション42を、BGMにはhttps://otologic.jp/free/bgm/pop-music01.htmlの不思議ちゃんオーラを使用しています。
3.ControllerにAudioSourceを設定し、BGNのAudioClipをアタッチし、Loopを設定します。
PhysicsMaterialの設定
最後はまあ、なくてもいいのですがPhysicsMaterialを設定します。値を以下に設定して、SDユニティちゃんのコライダーに設置します。
