増殖するUnity-chan in ARの続きです。
完成デモはこちら
- 超重たいですが、これは2018年生の最安のスマートフォンを使っているためです。皆さま方のいいスマートフォンなら、普通に動くと思います。
repositoryはこれ
目的
増殖するユニティちゃんをARで味わいたい! + ついでに増殖したユニティちゃんのスクリーンショットで遊んでみよう
目次
- UnityでのARのプロジェクト設定
- 前回の記事で作成したスクリプトの改変
- ユニティちゃんとかの設置
- スクショをとって、画像をネガポジ変換してplaneのテクスチャに載せる
1. UnityでのARのプロジェクト設定
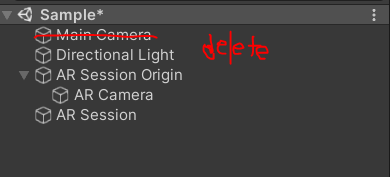
1.Hierachyから右クリックで XR > AR Session Origin, XR > AR Sessionの二つを追加します。
-
Main Cameraを削除します
-
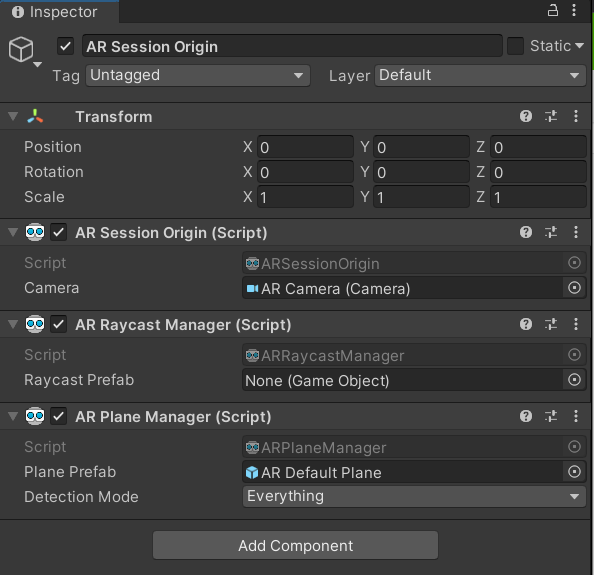
AR Session Origin には AR Session Origin のスクリプトしかないため、AR Raycast Manager と AR Plane Managerを追加します
AR Raycast Manager が Unity EditorでのRaycastの代わりをやってくれるもので、AR PlaneがARゲームとかでよく出てくる黄色い地面を管理するものです。
- AR Plane Manager に AR Default Planeを追加します。
- 注意点 : 必ずUnityのPackage ManagerからAR Kitがインストールされていることを確認してください。
一旦、ここでビルドしてみてください。カメラが平面を認識すると自動的に黄色い地面が出てくるようになります。
2. 前回の記事で作成したスクリプトの改変
以前作成したスクリプトを基にして、ARでもつかえるようにしていきます。
using System.Collections;
using System.Collections.Generic;
using UnityEngine;
using UnityEngine.XR.ARFoundation;
using UnityEngine.XR.ARSubsystems;
using UnityEngine.UI;


public class SetUnitychan : MonoBehaviour
{
    [SerializeField] GameObject UnityChan;

    public bool isUnitychan;

    public List<GameObject> UnityChanReals;

    public List<Animator> UnityChanAnimators;

    private ARRaycastManager aRRaycastManager;

    private List<ARRaycastHit> aRRaycastHits = new List<ARRaycastHit>();

    public Vector2 hitPosition;

    public Quaternion hitRotation;

    public bool isHit;

    // Start is called before the first frame update
    void Start()
    {
        aRRaycastManager = GetComponent<ARRaycastManager>();
        UnityChanReals = new List<GameObject>();
        UnityChanAnimators = new List<Animator>();
    }

    // Update is called once per frame
    void Update()
    {
    if(Input.touchCount > 0 && !isHit)
        {
            Touch touch = Input.GetTouch(0);
            if(touch.phase == TouchPhase.Began)  //画面に指が触れた時に処理する
            {
                if (aRRaycastManager.Raycast(touch.position, aRRaycastHits, TrackableType.PlaneWithinPolygon))
                {
                    Pose hitPose = aRRaycastHits[0].pose;  //RayとARPlaneが衝突しところのPose
                    // Debug.Log("Point : " + hitPose.position);
                    // Debug.Log("Create Unitychan!");
                    isUnitychan = true;
                    var unitychan = Instantiate(UnityChan, hitPose.position, Quaternion.Euler(Vector3.zero));
                    UnityChanReals.Add(unitychan);
                    UnityChanAnimators.Add(unitychan.GetComponent<Animator>());
                    hitPosition = hitPose.position;
                    isHit = true;
                }
            }
        }
    }


}
以前のところとは異なるところについて、解説していきます。
まず、 Input.GetTouch(0)によって、スマホの画面をタッチしたところの最初の場所をとっています。
その触った場所を開始地点として、 AR Raycast Manager による、画面に垂直な光線の発射とPlaneなどコライダーを持つオブジェクトとの衝突個所の判定が行われます。
それを AR Raycast Hitsでとらえて、最初にコライダーが衝突した位置を取得し、前回と同様にその場所にUnity chanを配置しています。
また、Instanceを生成した後は衝突したことを示すisHitフラグをオンにしています。
using System.Collections;
using System.Collections.Generic;
using UnityEngine;
using UnityEngine.UI;

public class UnitychanController : MonoBehaviour
{

    [SerializeField] float gain = 0.01f;
    private SetUnitychan setUnitychan;
    // Start is called before the first frame update

    private Vector3 preHitPosition;

    private List<Animator> UnitychanAnimators;

    void Start(){
        setUnitychan = GetComponent<SetUnitychan>();
    }

    // Update is called once per frame
    void Update()
    {
        if(Input.touchCount > 0)
        {
            Touch touch = Input.GetTouch(0);
            if(touch.phase == TouchPhase.Began)//画面に指が触れた時に処理する
            {
            if (setUnitychan.isUnitychan){
                if (Vector3.Distance(preHitPosition, setUnitychan.hitPosition) > 0.01f){ //別の場所にタッチ
                    for(var i = 0 ; i < setUnitychan.UnityChanReals.Count; i++){
                        setUnitychan.UnityChanReals[i].transform.LookAt(setUnitychan.hitPosition);
                    }
                preHitPosition = setUnitychan.hitPosition;
                }
            }
        }
            if(setUnitychan.isUnitychan){
                for(var i = 0 ; i < setUnitychan.UnityChanReals.Count; i++){
                    setUnitychan.UnityChanReals[i].transform.position = Vector3.MoveTowards(setUnitychan.UnityChanReals[i].transform.position, preHitPosition, Time.deltaTime * gain);
                    var distance = Vector3.Distance(setUnitychan.UnityChanReals[i].transform.position, preHitPosition);
                    var state = 0;
                    if (distance > 0.01f){
                        state = 2;
                    }else if (distance > 0.001f){
                        state = 1;
                    }else{
                        state = 0;
                    }
                    // Debug.Log("state : " + state + " distance : " + distance);
                    setUnitychan.UnityChanAnimators[i].SetInteger("state", state);
                }
            }
        }
    }
}
Unitychan Controller に関してはほぼ同じですが、別の場所にタッチした判定を緩くしているのと、Vector3.MoveTowardsによる移動速度を遅くしています。
なぜかというと、AR環境ではUnity Editor 環境とことなり、Sesssion ORigin が起点となり、相対位置で距離が決まります。なので、planeを近くに配置すると、それだけユニティちゃんどうしの距離が短くなるため、このようなことをしています。
3. ユニティちゃんとかの設置
次にユニティちゃんとかを配置していきます。
AR Session Origin の配下に Unitychan Controller, Set Unitychan, Audio Souceをアタッチします。
Set Unitychan の Unitychanには以前作成したユニティちゃんを入れて、Audio Sourceにも以前使用したBGMを入れてループ再生します。
一旦、これでビルドして遊んでみてください。
4.スクショをとって、画像をネガポジ変換してplaneのテクスチャに載せる
最後にあたらしいユニティちゃんが出てくるたびに自動でスクショをとり、planeのテクスチャがそのスクショになるようにします。
-
まず、新しいマテリアル PlaneMaterialを作成し、Shader を Legacy Shaders/Diffuseにします。このPlaneマテリアルにキャプチャ画面をTextureとしてアタッチしていきます。
-
以下のようなPlaneTextureChange.csというスクリプトを作成します
using System.Collections;
using System.Collections.Generic;
using UnityEngine;
using System.IO;
using UnityEngine.XR.ARFoundation;
using UnityEngine.XR.ARSubsystems;
using System;


public class PlaneTextureChange : MonoBehaviour
{
    private SetUnitychan setUnitychan;

    private string imgPath;

    private Texture2D captureTexture;

    private Texture2D revertTexture;

    private Vector3 preHitPosition;

    // Start is called before the first frame update
    private ARPlaneManager planeManager;

    [SerializeField] Material captureMaterial;
    void Start(){
        setUnitychan = GetComponent<SetUnitychan>();
        planeManager = GetComponent<ARPlaneManager>();
        imgPath = "unityChan.png";
    }

    // Update is called once per frame
    void Update()
    {
        if (setUnitychan.isUnitychan){
            if (setUnitychan.isHit){
                // CaptureScreenShot(imgPath);
                StartCoroutine ("AndroidCapture");
                setUnitychan.isHit = false;
            }
        }
    }

    private void TextureChange(){
        if(captureTexture == null){
            Debug.Log("Capture Texture not Found...");
            return;
        }

        revertTexture = new Texture2D(captureTexture.width, captureTexture.height, captureTexture.format, captureTexture.mipmapCount == -1);

        for (var x = 0; x < captureTexture.width; x++)
        {
            for (var y = 0; y < captureTexture.height; y++)
            {
                var color = captureTexture.GetPixel(x, y);
                for (var i = 0; i < 3; i++)
                    color[i] = 1 - color[i];

                revertTexture.SetPixel(x, y, color);
            }
        }

        revertTexture.Apply();
    }

    IEnumerator AndroidCapture()
    {
        var dataPath = UnityEngine.Application.persistentDataPath + "/" + imgPath;
        Debug.Log("data path " + dataPath);
        if (File.Exists(dataPath) == true)
		{
			// ファイル削除
			File.Delete(dataPath);
			while (File.Exists(dataPath) == true)
			{
				yield return null;
			}
		}
	    // スクリーンショットを撮る
	    ScreenCapture.CaptureScreenshot(imgPath);
		while (File.Exists(dataPath) == false)
		{
			yield return null;
		}
        Debug.Log("Capture Success!");
        byte[] bytes = File.ReadAllBytes(UnityEngine.Application.persistentDataPath + "/" + imgPath);
        captureTexture = new Texture2D(2, 2);
        captureTexture.LoadImage(bytes);

        TextureChange();
        captureMaterial.SetTexture("_MainTex", revertTexture);

        foreach (var plane in planeManager.trackables)
        {
            var unityChanPlane = plane.gameObject;
            Debug.Log("Plane : " + unityChanPlane);
            var material = unityChanPlane.GetComponent<MeshRenderer>();
            material.material = captureMaterial;
        }
    }
}
SetUnitychan.csで衝突の判定が出たときに実行するようにしています。
ただ、キャプチャの動作が重いので、Corutineをつかって、ゲームがストップするのを回避しています。
TextureChange関数が今回画像変換としてネガポジによる反転を行ったところで、0-1までの各RGB値について、1から引いた結果を代入し、色相の逆の配置かつ逆の明るさの画像に変換しています。
ちなみにですが、ScreenCapture.CaptureScreenshotはデフォルトで UnityEngine.Application.persistentDataPathが追加されるようになっています。そのため、File系と異なりわざわざパスの追加をする必要がないのですが、知らずにパスを追加しデバックが大変でした。
- 最後に写真のようにAR Session Origin に PlaneTextureChangeをアタッチし、CaptureMaterialにPlaneMaterialを設定すれば完成です。


